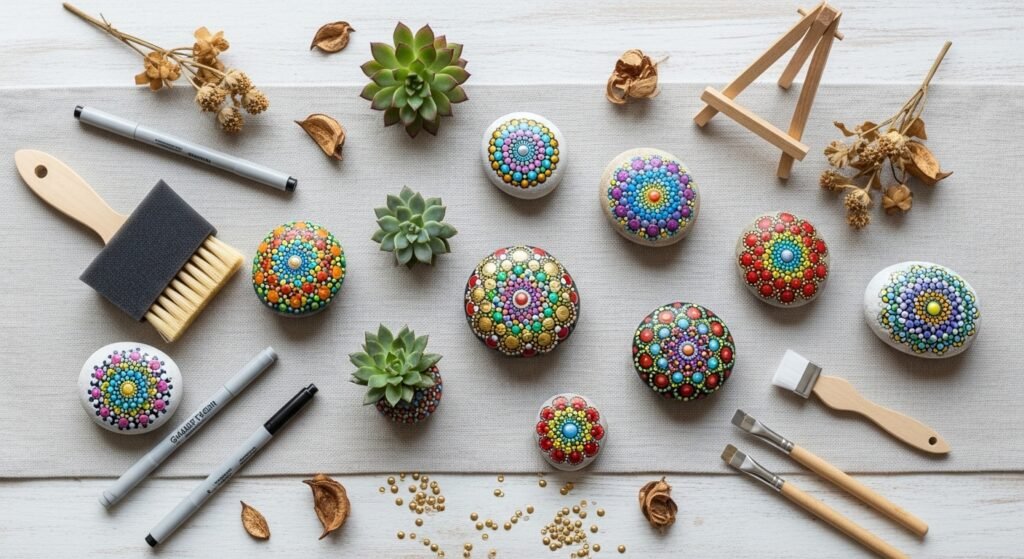
Finding a quiet craft that gives you beautiful results and a calm, meditative rhythm? Mandala stone painting ideas are exactly that: small, portable, and endlessly rewarding. Whether you love dot mandalas, fine-line floral designs, or bold boho patterns, these projects let you slow down and make pieces that feel gallery-ready.
You’ll find 20 complete stone-painting projects below — each with a full materials list, step-by-step instructions, drying times, troubleshooting tips, and display or gifting ideas. I mention tools I actually use, like a set of Posca paint pens for crisp lines and a dotting tool set for consistent dots. If you prefer cutting stencils, try my small cutting machine, the Cricut Joy cutting machine — it speeds up pattern prep on complex pieces.
These mandala stone painting ideas are arranged from simplest to more advanced, so you can pick one that fits your time and skill level. Keep a jar of warm water for rinsing brushes and a stackable craft organizer close by to keep your stones and supplies tidy. Ready? Let’s dot, swirl, and paint our way to calm.
- River Rock Dot Mandala — Beginner Friendly
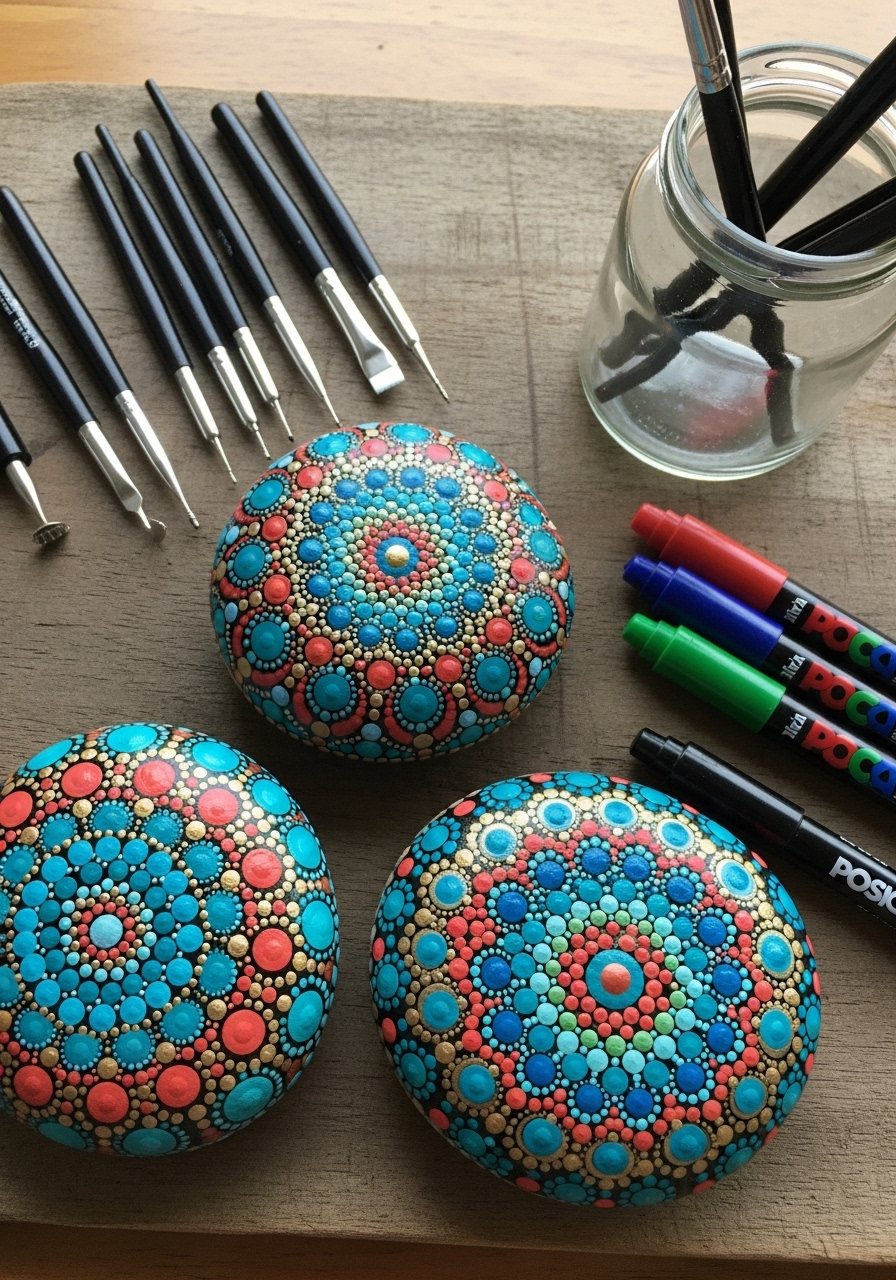
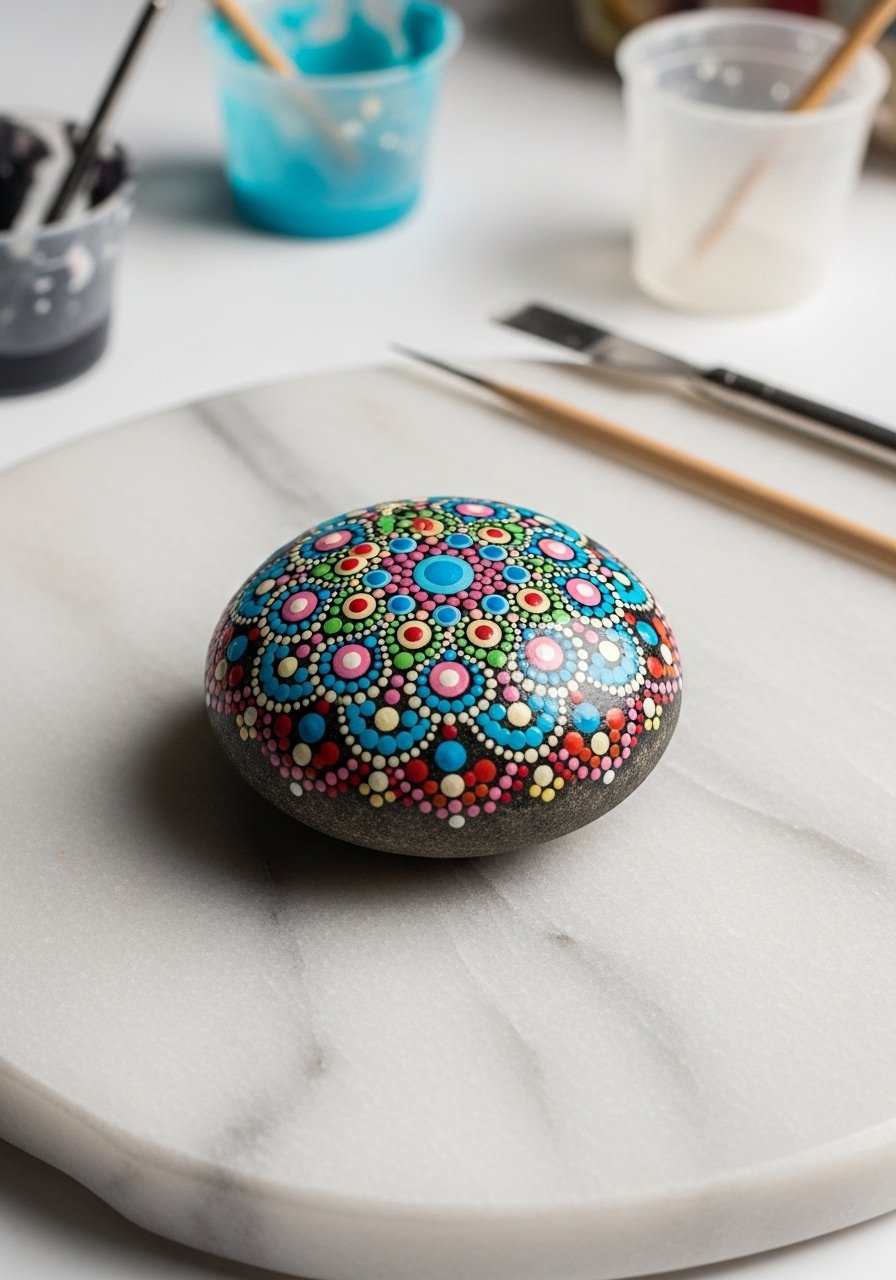
This classic dot mandala on a river rock is perfect if you’re new to stone painting. The look is tidy, rhythmic, and very forgiving—you can correct dots or add layers as you go. The finished stones have a tactile, glossy feel if sealed and look lovely grouped in a bowl or on a windowsill.
Materials
- 3 smooth river rocks, about 2–3 in (5–7.5 cm) each, washed and dried
- White gesso or acrylic primer, one thin coat
- Acrylic craft paints, 2–4 colors (e.g., teal, coral, white)
- Gold metallic acrylic paint, 1 small tube
- Posca paint pens (fine and medium tips) for tiny dots and outlines
- Dotting tool set (various sizes)
- Foam brush, 1
- Krylon UV-resistant clear spray or similar sealer
- Paper towels, jar of water
Instructions
- Wash stones with warm soapy water, rinse, and let dry fully (30–60 minutes).
- Apply one thin coat of white gesso with a foam brush to give paint adhesion. Dry 15–20 minutes.
- Plan your center point visually and mark lightly with a pencil.
- Start with your largest dot in the center using the largest dotting tool dipped in paint. Press gently for an even circle. Wait 5–10 minutes for it to set.
- Work outward with smaller dotting tools and contrasting colors, letting each ring dry 5–10 minutes before adding the next to avoid smudging.
- Use a fine-tip Posca paint pen for tiny dots and delicate outlines.
- Touch up with metallic gold accents once paint is dry to the touch (about 30 minutes).
- Let stones cure 24 hours. Spray two light coats of clear sealer, 15 minutes apart. Full cure 24 hours.
How to Display or Gift It
- Cluster three stones in a ceramic bowl on a coffee table for a calm vignette.
- Attach a small felt pad under each stone to protect furniture.
- Wrap in kraft paper with a dried sprig and tuck into a small gift box for a handmade present.
- Store finished stones flat in a stackable craft organizer while waiting for the sealer to cure.
- Midnight Gold Mandala on Slate — Moody Metallics
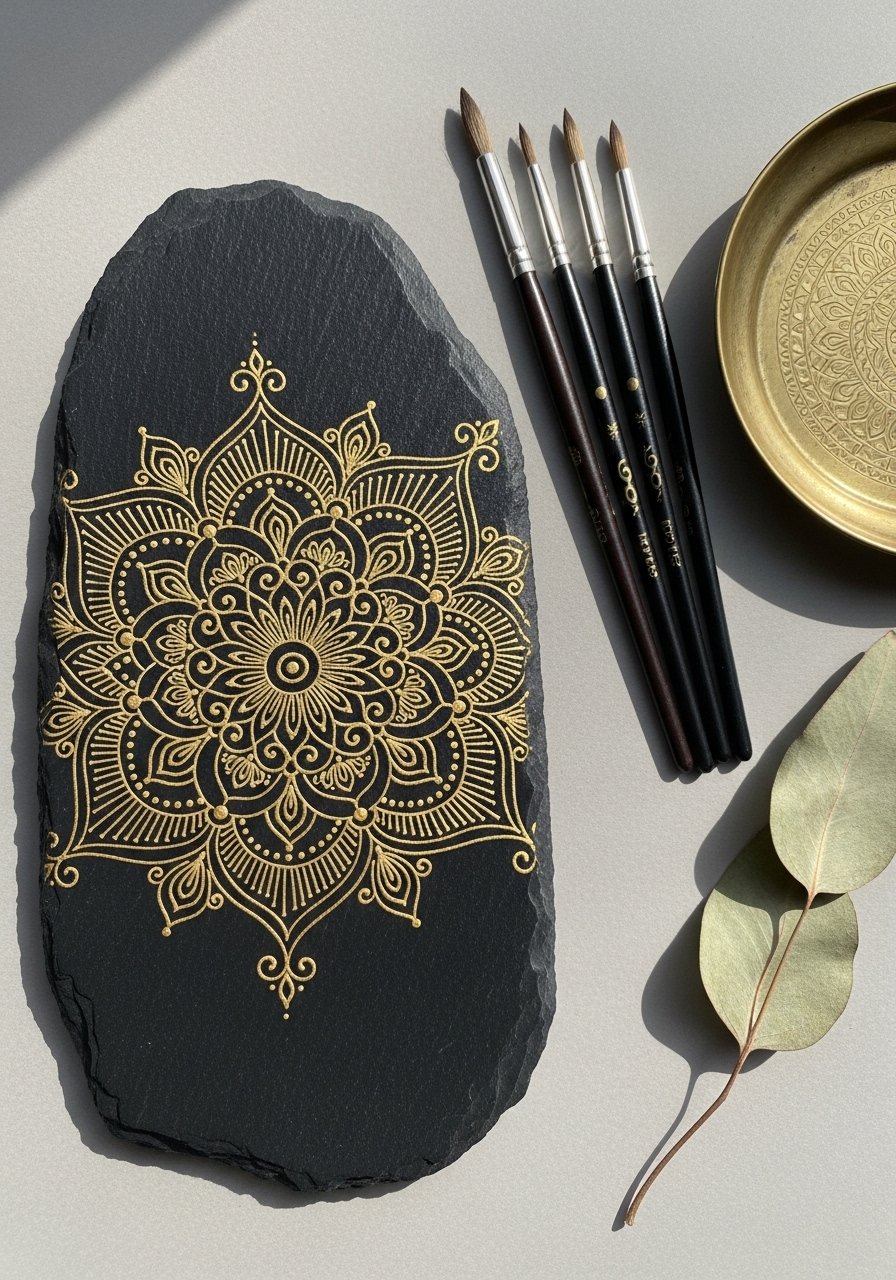
Black slate is a dramatic base for metallic mandalas. The high-contrast gold feels luxe and modern, and the flat slate surface makes fine-line work easier. This is a satisfying project for someone who likes precise lines and minimal color palettes.
Materials
- 1 flat slate stone, approx 3–4 in (7.5–10 cm)
- Matte black acrylic paint (or black gesso)
- Gold metallic acrylic paint (liquid or pen)
- Fine line paint pens, metallic gold and white
- Detail round brushes (sizes 0 and 2)
- Self-healing cutting mat for a clean work surface
- Fine sandpaper (220 grit) to smooth any rough edges
- Krylon clear spray sealer, matte or satin
- Ruler and pencil
Instructions
- Sand slate lightly and dust off.
- Paint two thin coats of matte black acrylic. Allow each coat to dry 20–30 minutes.
- Lightly pencil the mandala grid: center dot, concentric circles using a small cup as guide.
- Trace the design with a size 0 detail brush and gold paint thinned slightly (10% water). Work in short strokes.
- For ultra-crisp lines, use a metallic gold paint pen to refine edges. Let metallic layers dry 30 minutes.
- Add tiny white highlight dots for depth using a fine paint pen.
- Let cure 24 hours. Spray two light coats of clear sealer, 20 minutes apart. Full cure 24 hours.
How to Display or Gift It
- Prop the slate on a small wooden easel for shelf display.
- Pair with warm candlelight or concrete planters for a Japandi or modern farmhouse shelf.
- Wrap in soft tissue and tie with jute for gifting.
- Pebble Mandala Charm Magnets — mandala stone painting ideas for quick gifts
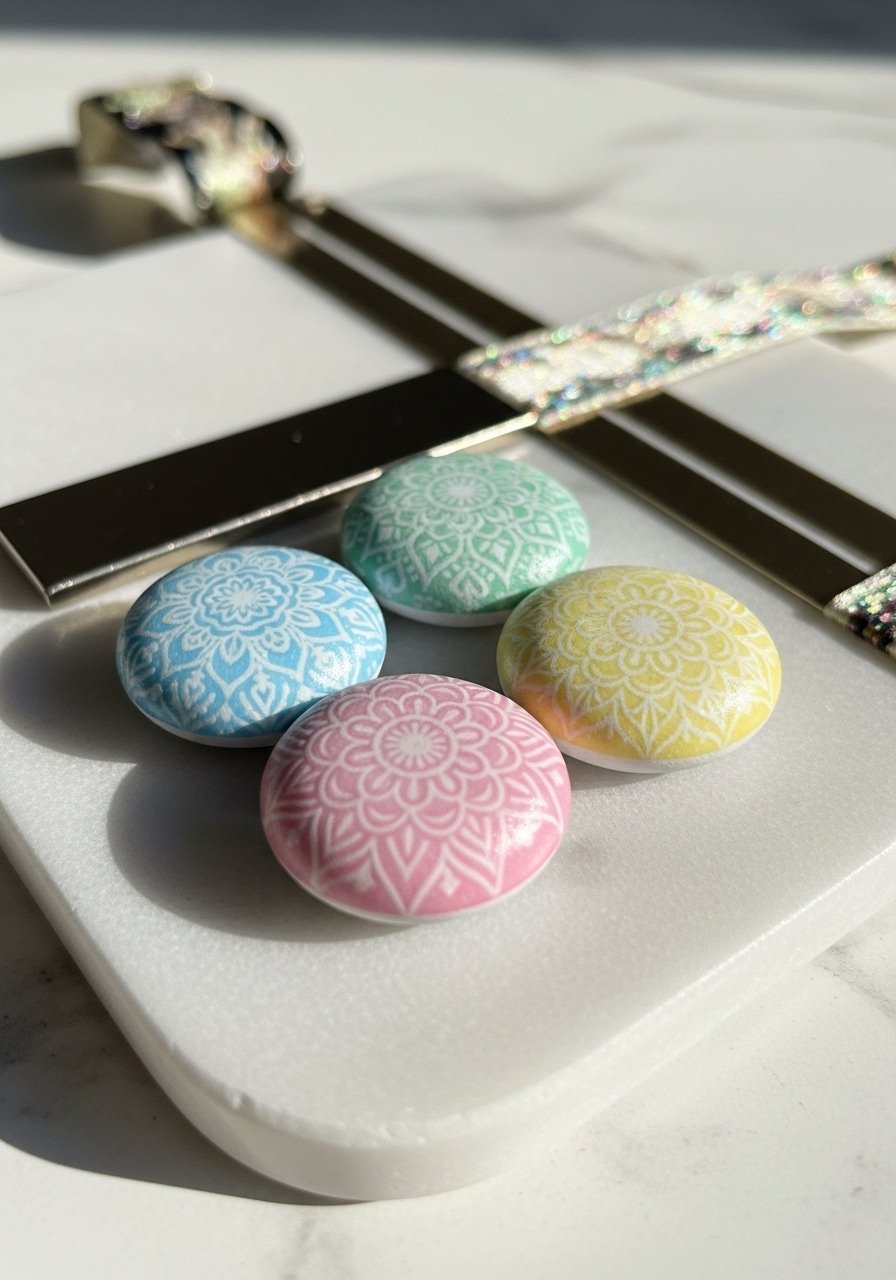
Tiny pebble mandalas make adorable fridge magnets or party favors. These are fast, portable projects — great for group craft nights or for making a batch for gifts. Use strong magnets glued underneath for a secure hold.
Materials
- 12 small flat pebbles, approx 1–1.5 in (2.5–4 cm)
- Acrylic craft paints, pastel set
- Very fine paint pens (0.7 mm tips) or Posca micro pens
- Small round dotting tool or toothpicks
- Strong disc magnets, 12 pieces (8 mm)
- Hot glue gun plus glue sticks
- Mod Podge Matte, thin coat to seal
- Paper towels, jar of water
Instructions
- Clean pebbles and dry thoroughly.
- Paint a base coat (white or pale pastel) with a foam brush. Dry 15–20 minutes.
- Sketch center points and use a toothpick or small dotting tool for concentric rings.
- Add fine details with micro paint pens. Allow 10–15 minutes drying between layers.
- Apply one thin coat of Mod Podge Matte; dry 20 minutes.
- Hot-glue a disc magnet to the back. Let adhesive set 10 minutes.
- Cure all magnets 24 hours before use to ensure sealant and glue reach max strength.
How to Display or Gift It
- Tie a set of three with baker’s twine and tuck into kraft gift bags.
- Use as place card weights by writing guest initials on the back with a paint pen.
- Keep extra magnets in a craft organizer drawer to prevent loss.
- Boho Rainbow Mandala Stone — Cottagecore Color Palette
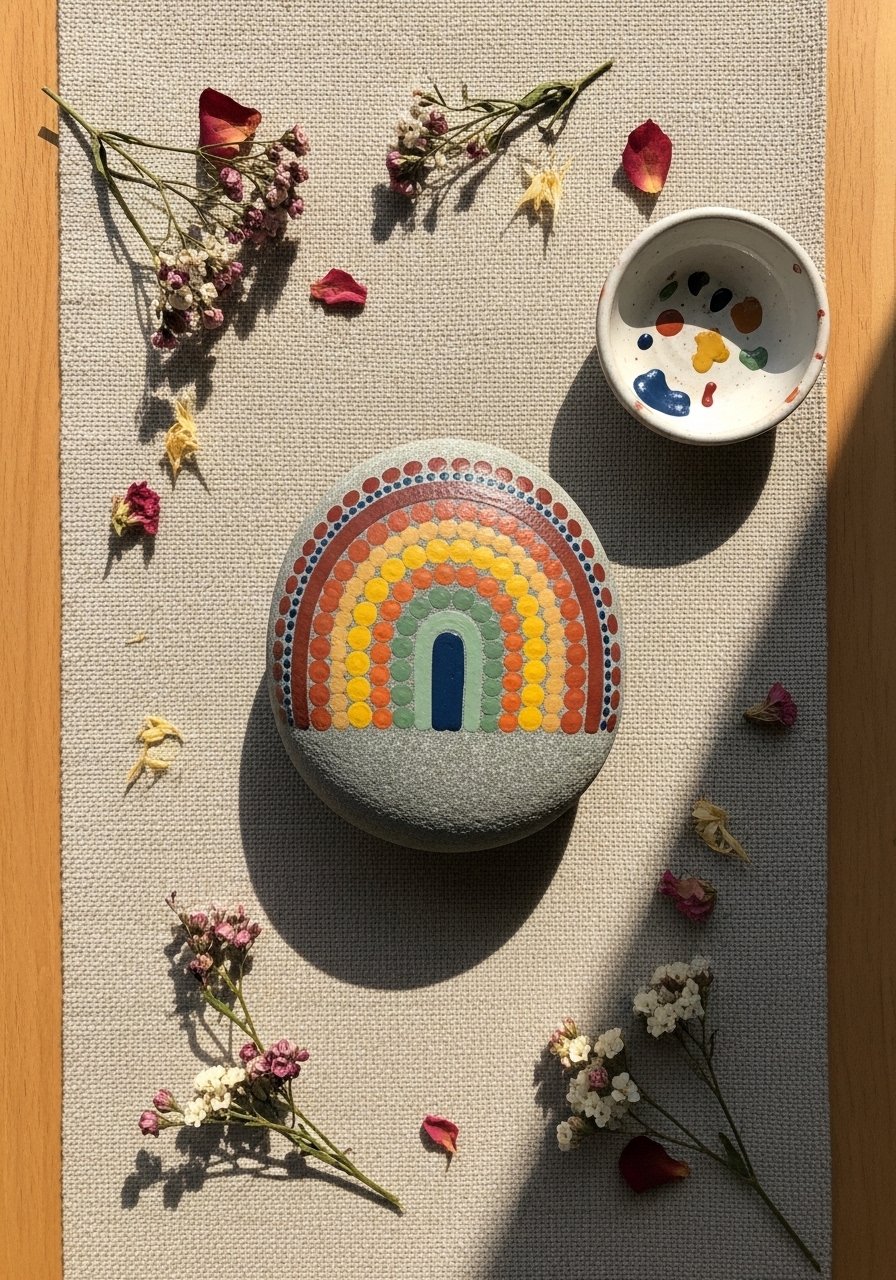
This boho-inspired mandala uses warm, earthy colors for a cottagecore or bohemian look. The layered rings bring a joyful, folk-art feel and work well as garden accents or shelf art.
Materials
- 1 oval beach stone, 3–4 in (7.5–10 cm)
- Acrylic craft paint set with terracotta, mustard, sage, navy
- Dotting tool set (multiple sizes)
- Small round sponge or brush for base coat
- Fine liner paint pens
- Matte spray sealer
- Paper palette for mixing
Instructions
- Clean stone; apply two thin coats of a warm neutral base (off-white or light terracotta). Dry 20 minutes between coats.
- Mark center. Apply center dot and build concentric rings with dotting tools using alternating colors. Let each ring dry 5–10 minutes.
- Use a fine liner pen to add little arches or scallops between rings.
- Add tiny white highlight dots for contrast.
- Let cure 24 hours. Spray two light coats of matte sealer, 15 minutes apart.
How to Display or Gift It
- Tuck into a potted plant saucer for a sweet accent.
- Place in a drawer as a paperweight or on a bedside table.
- Wrap individually in tissue and place in a set of small kraft gift boxes.
- Ombre Dot Mandala Coaster Set — Functional Art
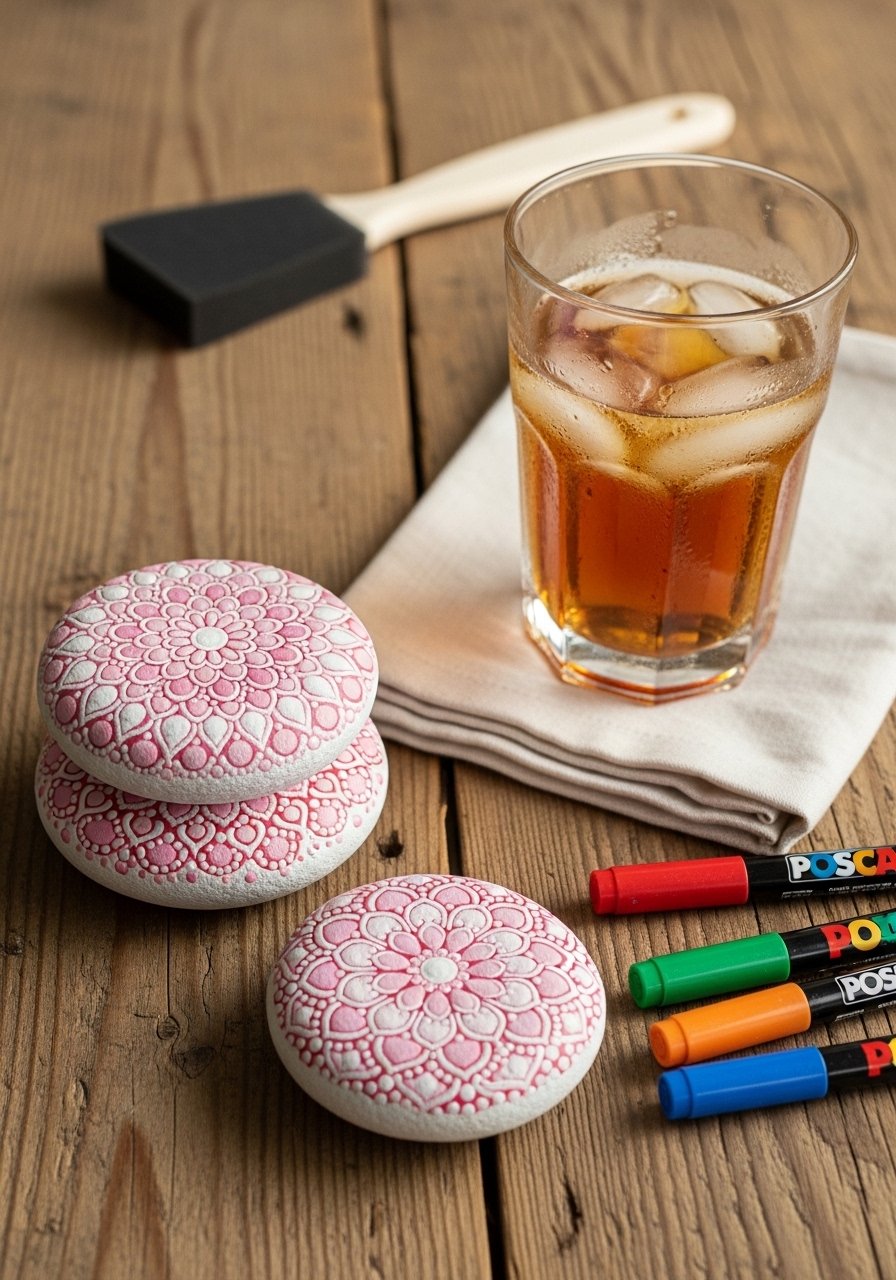
Turn larger flat stones into coasters with mandala ombre patterns. Use thicker paint layers and a durable sealer so they stand up to cups and condensation.
Materials
- 4 flat river stones, each 3.5–4 in (9–10 cm) diameter
- Acrylic paints in a gradient (light pink to deep pink)
- Foam brush for base coats
- Dotting tools for rings
- Posca paint pens for details
- Clear epoxy resin kit for waterproofing (follow manufacturer instructions)
- Sandpaper (220 grit) to smooth under-sides
Instructions
- Sand stone undersides lightly to level if needed.
- Apply a white base coat; dry 20 minutes.
- Paint an ombre background from center outward or top-to-bottom in 3 blended bands. Dry 30 minutes.
- Add dot mandala pattern on top using dotting tools. Let dry 1–2 hours.
- Mix epoxy resin per kit instructions in a well-ventilated area. Pour a thin even coat over each stone to seal and waterproof. Epoxy self-levels; remove bubbles with a heat gun if available.
- Cure resin 24–72 hours depending on kit. Avoid moving until fully cured.
How to Display or Gift It
- Use as coasters or bedside trays for jewelry.
- Nest the set in a lined wooden box for a gift.
- Store coasters flat until resin cures fully in a dust-free area like a craft organizer.
- Floral Linework Mandala on River Stone — Fine-Line Painting

If you enjoy fine ink-like lines, this floral mandala emphasizes thin petals and filigree. A steady hand and a fine round brush or paint pen will yield crisp botanical details.
Materials
- 1 smooth river stone, 3 in (7.5 cm) diameter
- Acrylic gesso base
- Fine detail round brushes (sizes 0 and 1)
- Acrylic paints in blush, sage, cream
- Fine-tip acrylic pens for white highlights
- Pencil and eraser
- Matte spray sealer
Instructions
- Prime the stone with gesso; dry 20 minutes.
- Lightly sketch the floral mandala layout with a pencil.
- Paint base color and let dry 30 minutes.
- Using size 0 brush, paint thin petals and filigree lines, working outward from the center. Pause frequently to steady your hand.
- Add white highlight dots with a fine-tip pen for dimension.
- Let cure 24 hours. Spray one thin coat of matte sealer; dry 20 minutes.
How to Display or Gift It
- Place on a small easel in a bathroom or vanity.
- Pair with dried lavender and wrap with twine for a spa-themed gift.
- Keep extras in a craft organizer tray to prevent nicks.
- Mandala Story Stones — For Kids and Mindful Play
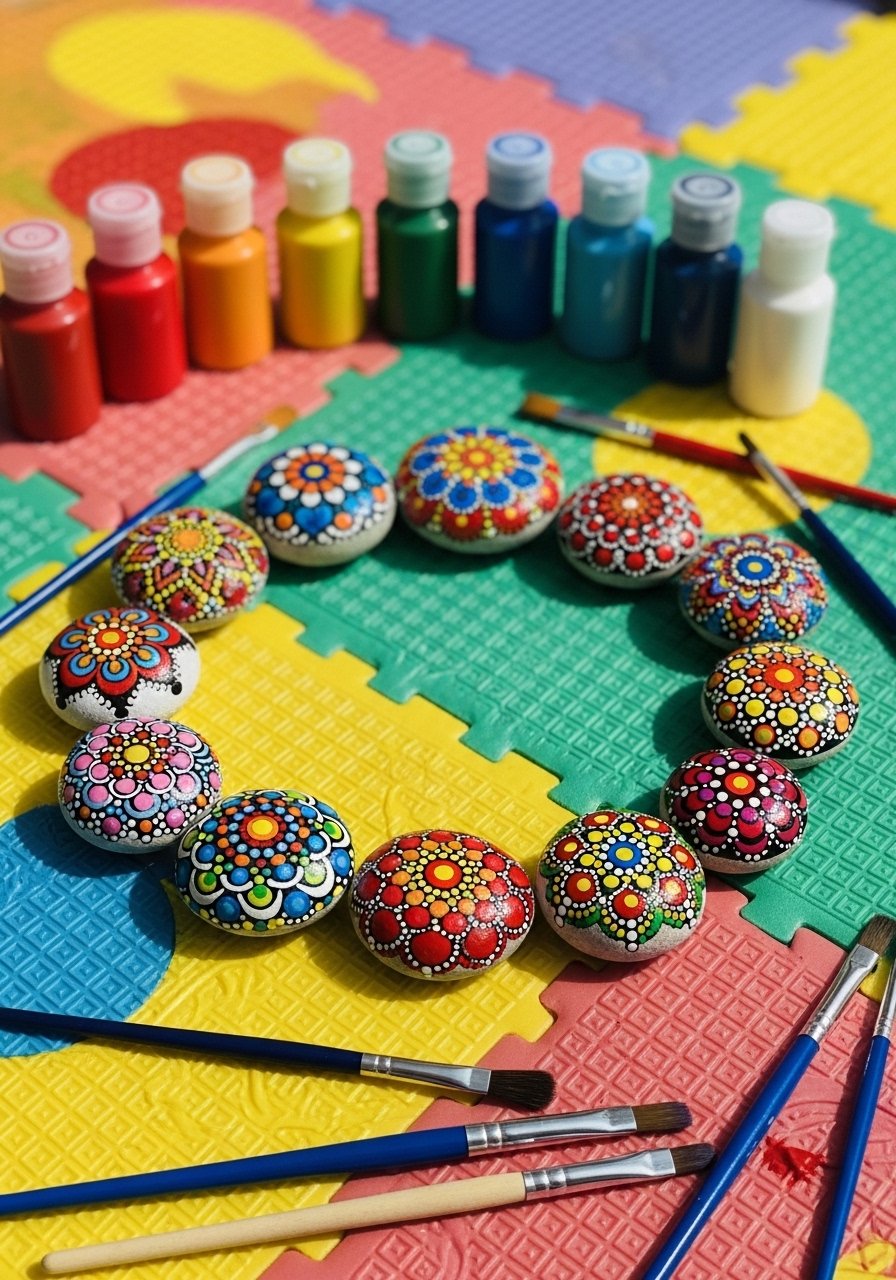
Story stones combine mandala motifs with simple symbols—great for kids’ mindfulness or storytelling. This project keeps designs simple and bold so little hands can play with them.
Materials
- 6 small stones, 1–2 in (2.5–5 cm)
- Non-toxic acrylic paints, primary colors
- Wide craft brush for base coats
- Dotting tools and thick paint pens
- Mod Podge for sealing
- Small storage pouch for the set
Instructions
- Wash stones and paint a solid base color. Dry 20 minutes.
- Use large dotting tools and paint pens to create simple mandala rings and add a symbol (sun, leaf, heart) in the center.
- Let dry 1 hour.
- Seal with one light coat of Mod Podge. Dry 30 minutes.
- Store in a soft pouch for play.
How to Display or Gift It
- Use as a tactile quiet-time kit for kids.
- Store in a labeled fabric pouch for travel.
- Make multiple sets in different color palettes for party favors.
- Garden Marker Mandalas — Weather-Resistant Outdoor Stones
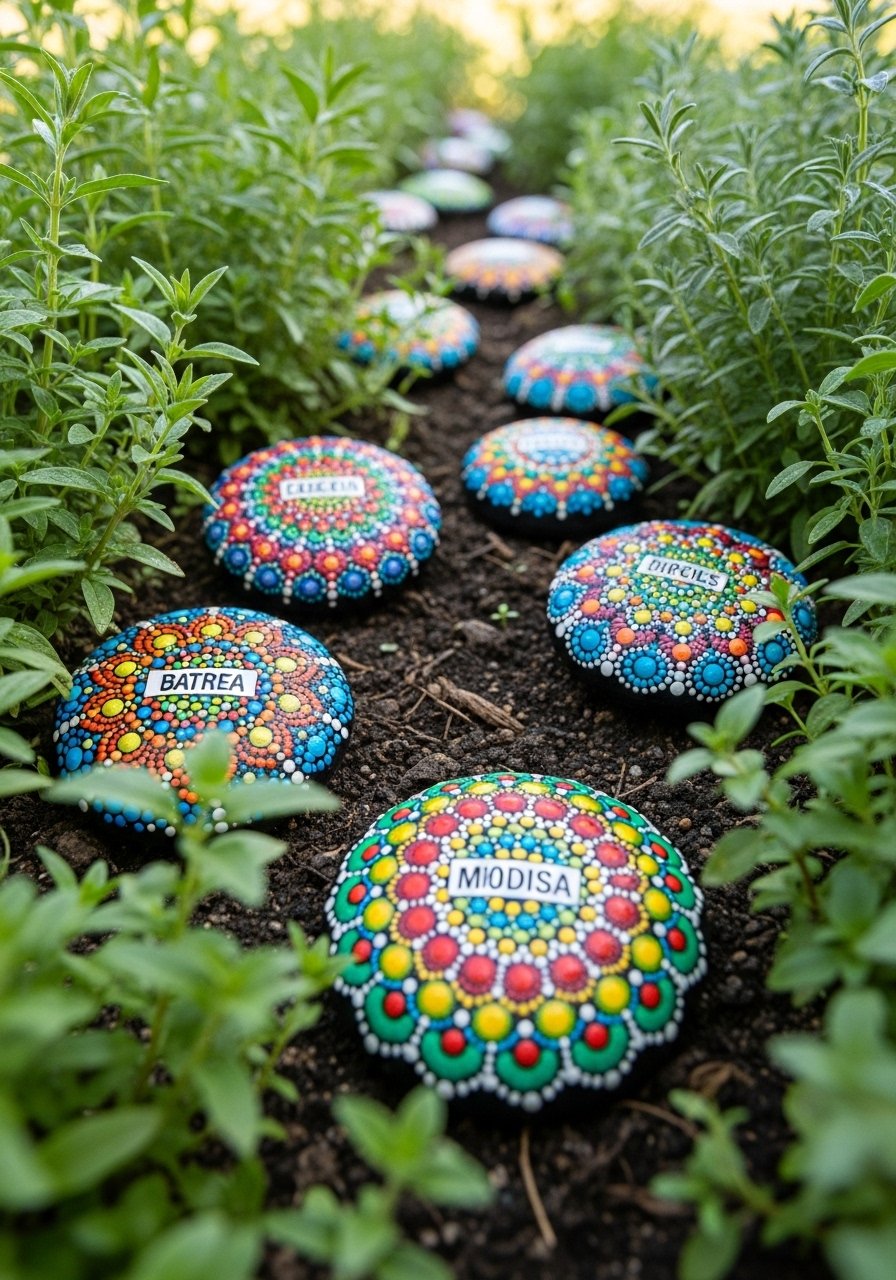
Create cheerful, weather-resistant mandala garden markers for herbs and potted plants. Use outdoor paints or sealers so they hold up to sun and rain.
Materials
- 12 medium flat stones, 2–3 in (5–7.5 cm)
- Outdoor acrylic paint or weatherproof paint set
- Paint pens suitable for outdoor use
- Clear outdoor sealer (UV-resistant)
- Stencils or small letter stickers for plant names
- Small foam brush
Instructions
- Clean stones and paint a base color. Dry 30 minutes.
- Add a simple dot mandala border with contrasting colors.
- Use weatherproof paint pens to write the plant name in the center.
- Let full cure 24 hours.
- Apply two coats of outdoor sealer, allowing 30 minutes between coats.
How to Display or Gift It
- Place at the front of herb pots or in raised beds.
- Tie a set together and give as a housewarming gift with small potted herbs.
- Store extra markers in a waterproof bin until planting season.
- Pebble Mandala Necklace — mandala stone painting ideas for wearable art
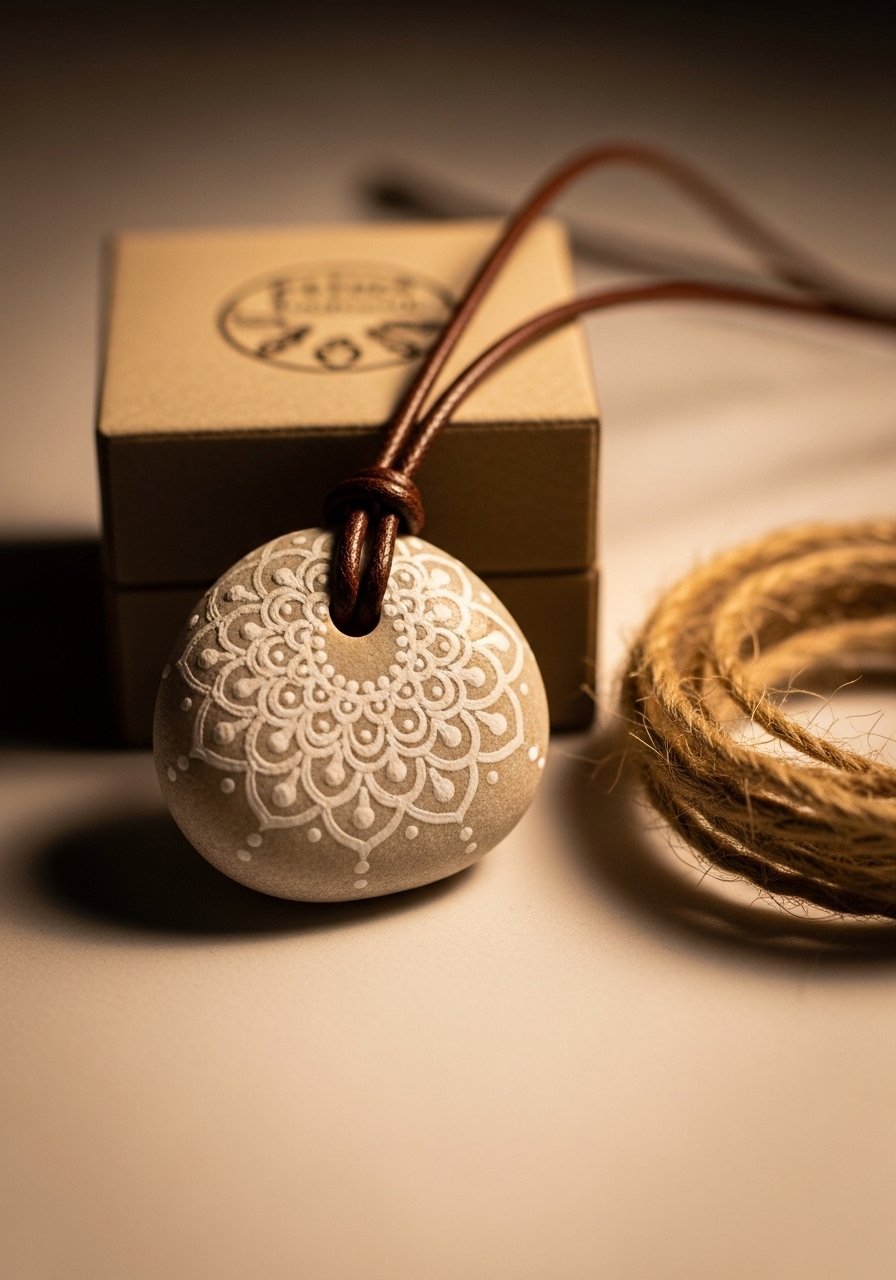
Turn a carefully painted pebble into a pendant for a thoughtful wearable piece. Drill a small hole, seal well, and thread onto leather or ribbon for a boho statement.
Materials
- 1 small flat pebble, 1–1.5 in (2.5–4 cm)
- Drill with small masonry bit (or local hardware drill service)
- Acrylic paint and fine liner pens
- Clear epoxy or jewelry resin for top coat
- Leather cord or waxed cotton cord, 20 in (50 cm)
- Small pliers and jump ring (if using wire loop)
- Dotting tools
Instructions
- Paint a tiny mandala on the pebble. Dry 1 hour.
- Let the paint cure 24 hours for best adhesion.
- Carefully drill a small hole through the top using a masonry bit. Wear safety glasses and clamp the pebble if possible.
- Thread leather cord through the hole. Optionally, apply a thin coat of jewelry resin over the painted face; cure per resin kit (24–72 hours).
- Knot cord and trim ends.
How to Display or Gift It
- Present in a small jewelry box with a label describing the color story.
- For longer-term storage, keep in a padded compartment of a jewelry organizer.
- Metallic Mandala Pebbles for Table Settings — Farmhouse to Boho
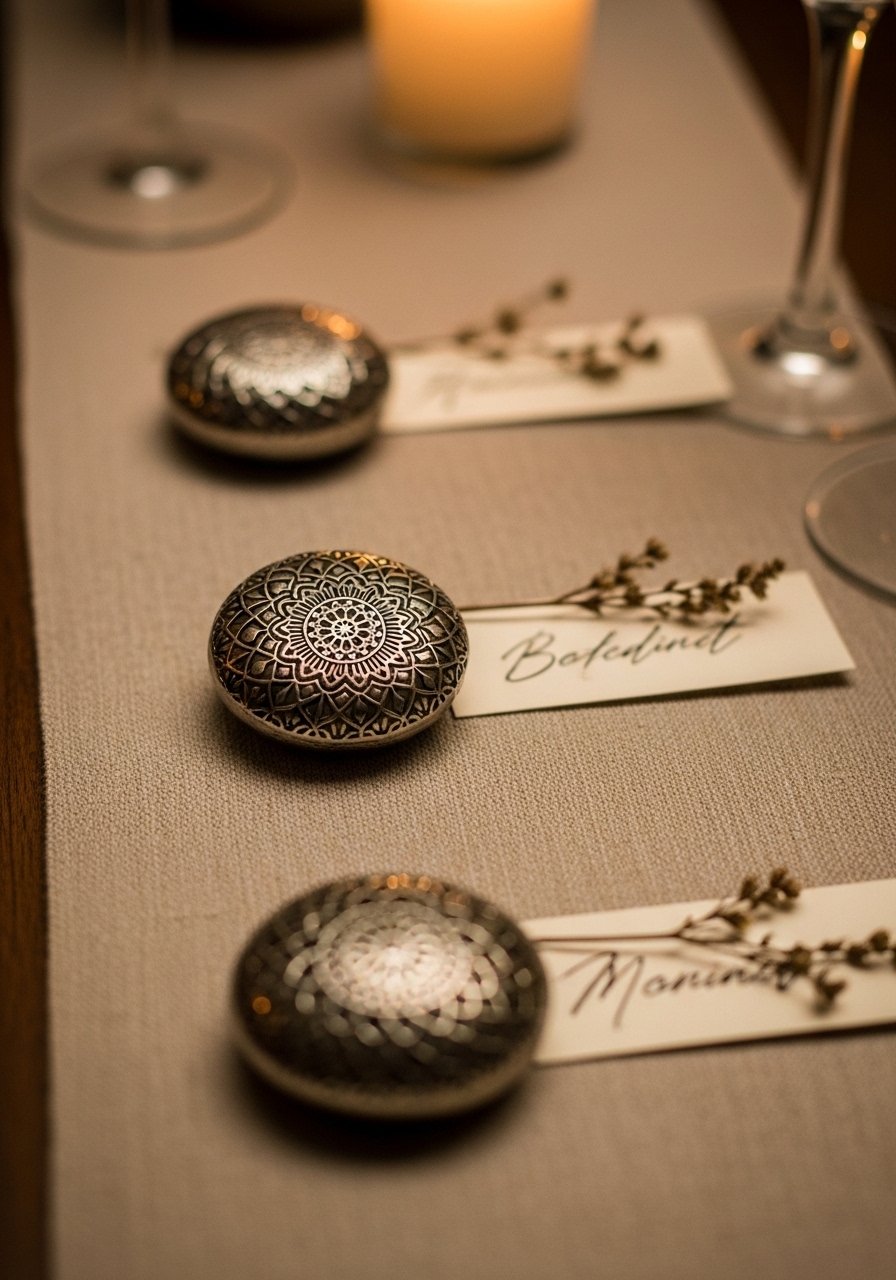
These metallic-accented mandala stones double as place card weights or wedding favors. Their neutral base and gold/silver highlights fit farmhouse, boho, and modern aesthetics.
Materials
- 8 flat pebbles, 2–3 in (5–7.5 cm)
- Chalky paint in neutral tones (linen, taupe)
- Metallic paint pens, gold and silver
- Fine-tip paint pens for names
- Clear satin spray sealer
- Small clothespins (optional for attaching name tags)
Instructions
- Paint a chalky base and dry 20 minutes.
- Add dot mandala rings with metallic pens.
- Write guest names on a small tag and attach with clothespin or write directly with a fine pen.
- Seal with a satin spray; cure 24 hours.
How to Display or Gift It
- Arrange on table runners with sprigs of greenery for weddings or dinner parties.
- Store extras in a labeled craft bin.
- Pet Memorial Mandala Stone — Soothing Keepsake
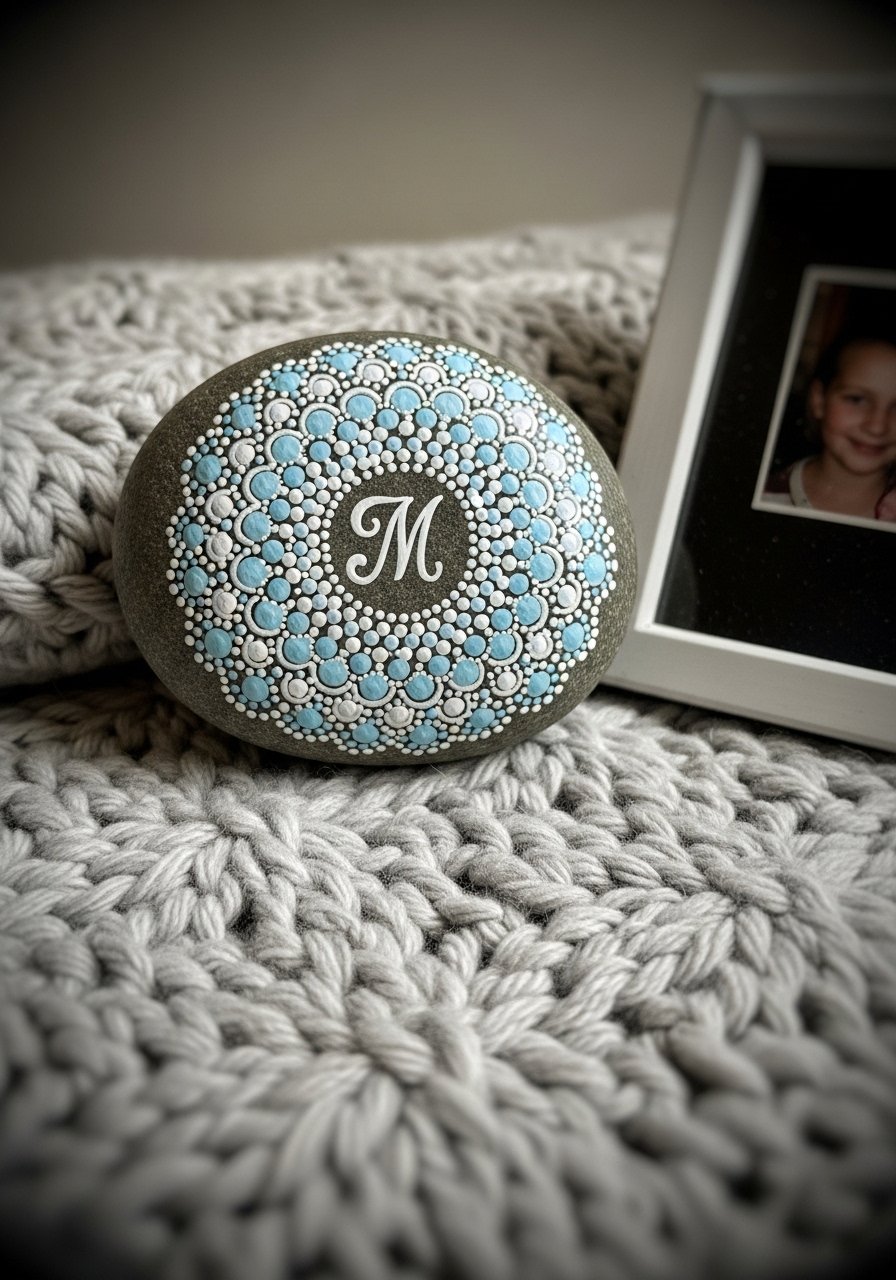
A personalized mandala stone can be a gentle keepsake for remembering a beloved pet. Choose calm colors and simple shapes for a soothing look.
Materials
- 1 small smooth stone, 2–3 in (5–7.5 cm)
- Acrylic paints in soft neutrals
- Fine-tip paint pen for initials
- Fine round brush
- Mod Podge Gloss or matte depending on preference
- Soft cloth
Instructions
- Paint a neutral base and dry 20 minutes.
- Add a soft mandala using muted colors and thin dotting tools.
- Place the pet’s initial in the center with a fine-tip pen.
- Let dry 24 hours. Seal with a thin coat of Mod Podge and allow to cure 24 hours.
How to Display or Gift It
- Sit beside a framed photo or on a memorial shelf.
- Wrap in tissue and include a small card for a friend.
- Galaxy Mandala Rocks — Glow-in-the-Dark Accent Stones
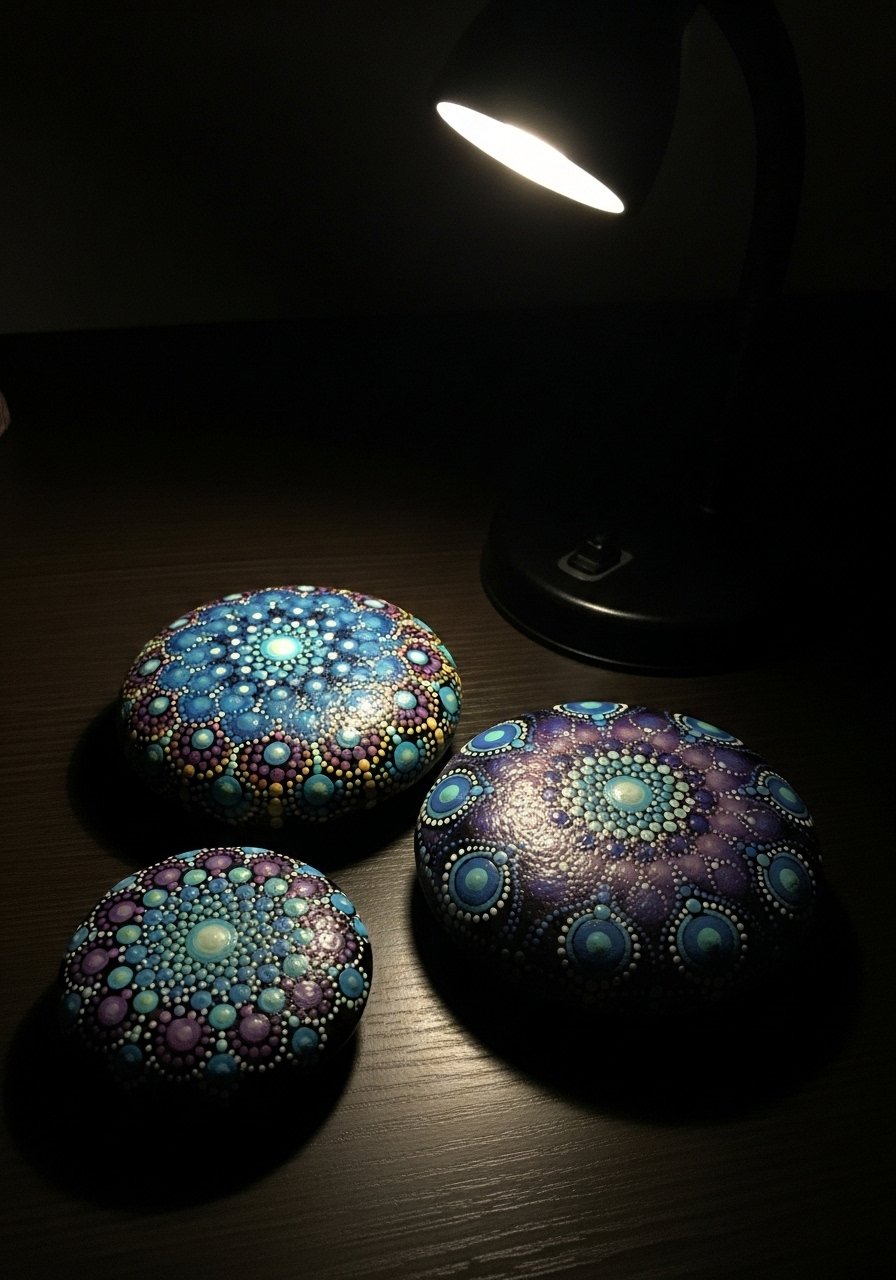
Use metallics and glow-in-the-dark paint for stones that read celestial by day and softly glow at night. Perfect for fairy gardens or bedroom accents.
Materials
- 3 flat stones, 2–3 in (5–7.5 cm)
- Dark blue and black acrylic paints
- Metallic silver acrylic
- Glow-in-the-dark paint (fine pen or paint)
- Small sponge for sponging stars
- Clear spray sealer
Instructions
- Paint a dark base (black to navy gradient). Dry 20–30 minutes.
- Sponge light nebula textures with diluted white and purple, then dry.
- Dot with metallic silver and add a mandala ring in a contrasting color.
- Add tiny dots of glow-in-the-dark paint within the mandala. Let cure 24 hours.
- Seal with two light coats of clear spray. Full cure 24 hours.
How to Display or Gift It
- Scatter in a backyard fairy garden or children's room.
- Bundle as a nightlight set in a small box.
- Minimal Japandi Mandala Stones — Neutral Aesthetic
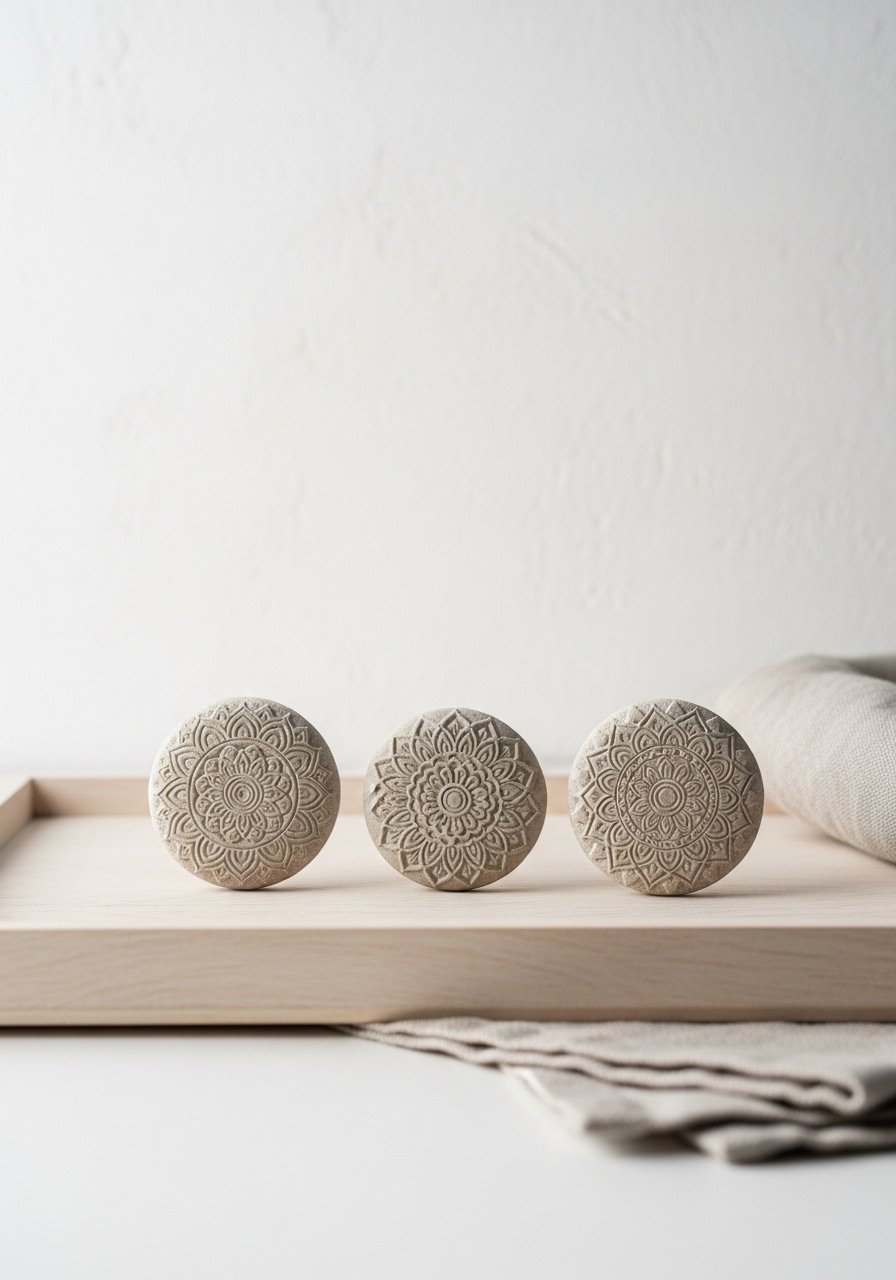
Japandi favors minimal compositions and neutral palettes. These mandala stones use restrained color and negative space for a serene, modern look.
Materials
- 3 oval stones, 3–4 in (7.5–10 cm)
- Chalk paint in warm whites and greys
- Very fine detail brush
- Matte spray sealer
- Sandpaper for smoothing
Instructions
- Apply a chalk-like base coat. Dry 20 minutes.
- Sketch a simple concentric dot layout with pencil.
- Use a tiny brush to paint thin rings and sparse dots.
- Keep design airy—less is more. Let dry 1 hour.
- Seal with matte sealer; cure 24 hours.
How to Display or Gift It
- Arrange on a shallow tray with a single small vase.
- Gift as a calming desk accessory.
- Resin-Embedded Mandala Pebbles — Depth and Shine
Embedding a mandala under a resin dome adds depth and professional shine. This technique works best when paint is fully cured and you use a thin resin layer to avoid running.
Materials
- 1 painted pebble, fully cured (see earlier projects for method)
- Clear epoxy resin kit (small amount)
- Disposable mixing cups and stir sticks
- Small leveling tool (cardboard)
- Gloves and respirator mask
- Small cardboard box for dust protection during curing
Instructions
- Ensure paint is cured 48 hours.
- Mix epoxy resin per kit directions in a well-ventilated space.
- Place pebble on a level surface inside a small box to reduce dust.
- Pour a thin layer over the pebble just enough to cover; remove bubbles with a heat gun quickly (5 seconds).
- Cure per resin kit (24–72 hours). Avoid touching until fully cured.
How to Display or Gift It
- Use as a keychain insert (drill a small hole before resin step).
- Place on a desk or in a jewelry box.
- Mandala Stone Painting Ideas: Layered Lace Motif
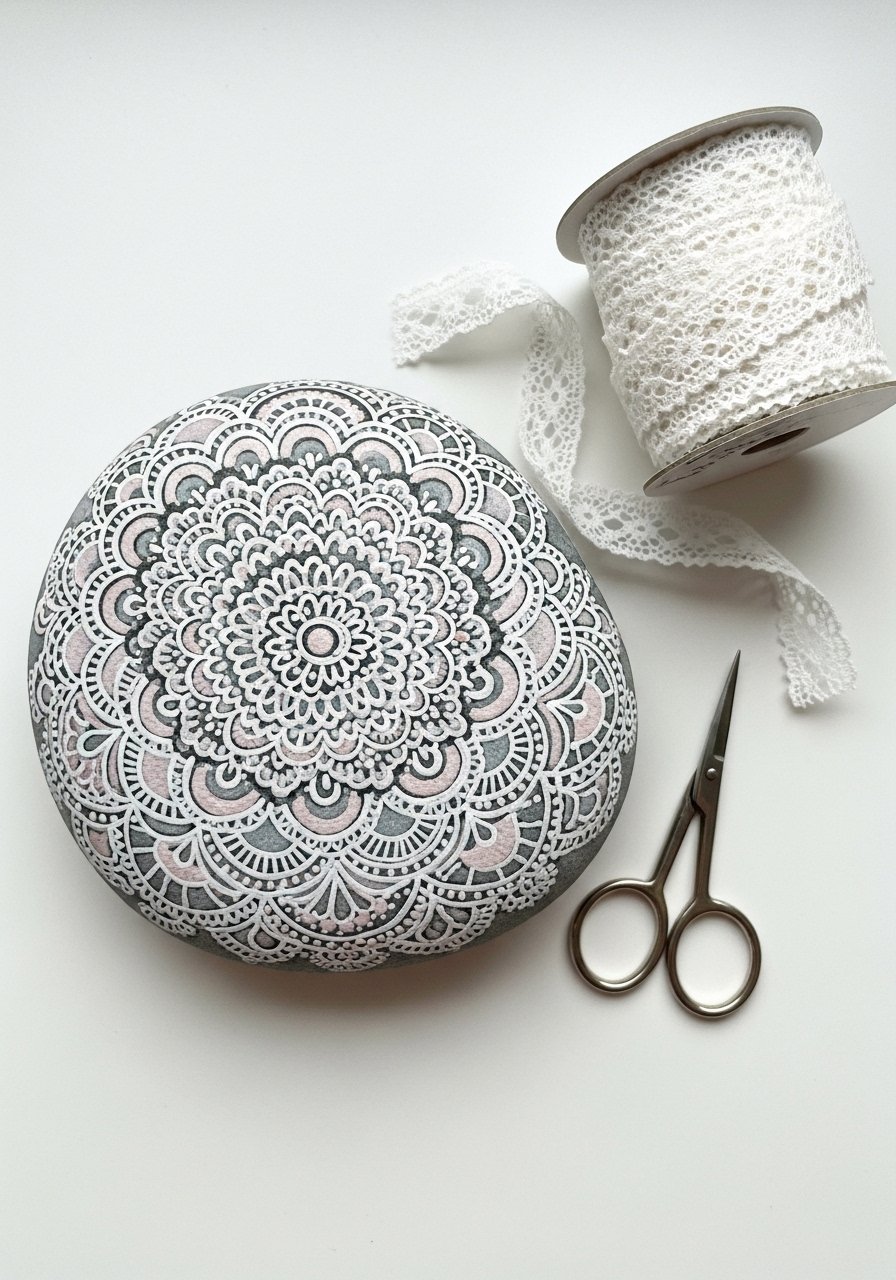
This layered lace motif mimics textile lace through fine rings and scallops. It’s a great match for vintage or shabby-chic decor.
Materials
- 1 smooth oval stone, 3 in (7.5 cm)
- Acrylic paints in blush and grey
- Fine-tip pens and size 0 brush
- Stencil (optional) for scallops
- Matte sealer
Instructions
- Prime stone and paint a pale blush base. Dry 20 minutes.
- Lightly sketch lace rings with a pencil.
- Paint lace layers starting with the largest elements in grey, working inward with finer details in white.
- Add tiny scalloped dots with a fine-tip pen.
- Seal with matte sealer and cure 24 hours.
How to Display or Gift It
- Tie with a small lace ribbon and include with a sachet for a bridal shower gift.
- Store wrapped in tissue to protect the fine paintwork.
- Mosaic Bead Mandala Stone — Texture and Shine
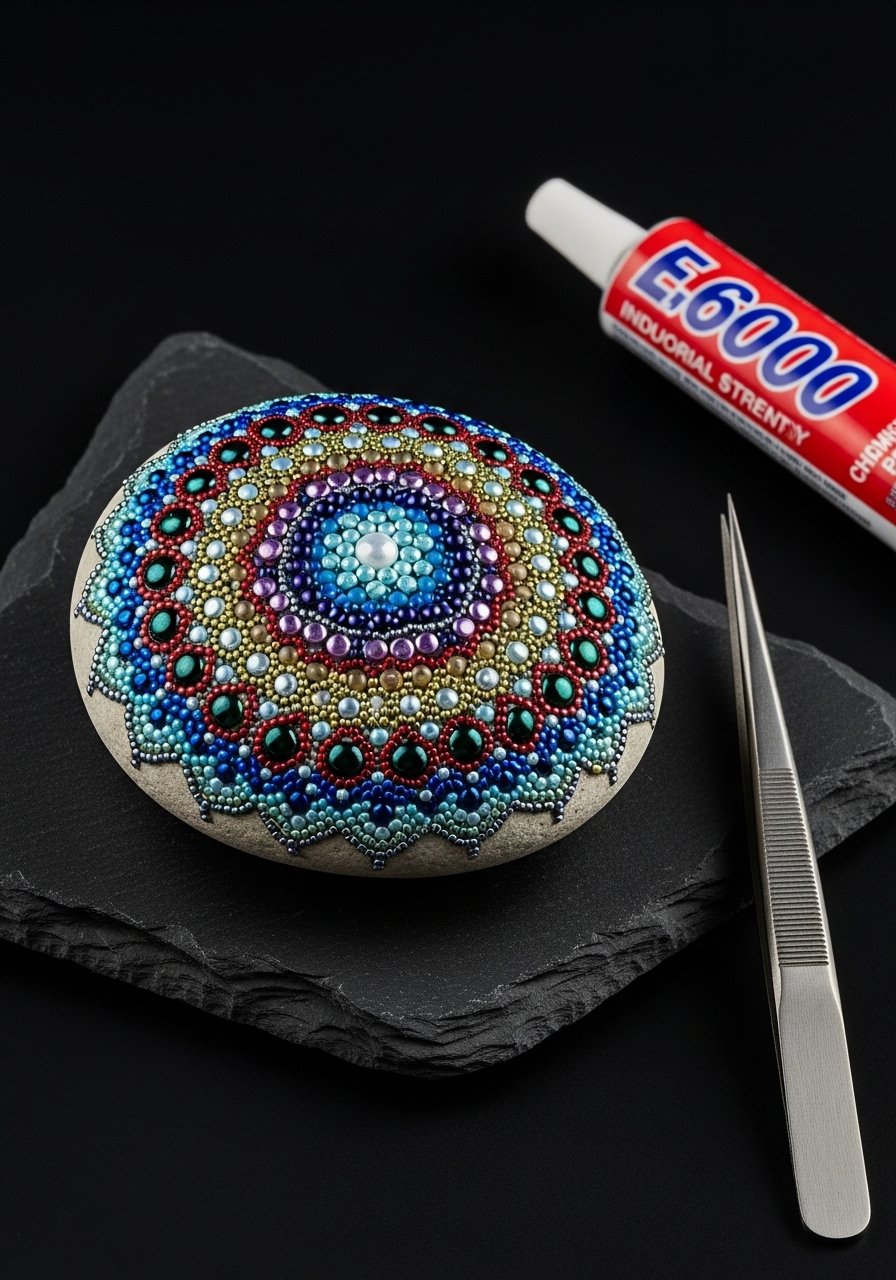
Instead of painting, use tiny glass beads to build a mosaic mandala. This is a slightly more advanced technique that results in a jewel-like, textured piece.
Materials
- 1 flat stone, 3–4 in (7.5–10 cm)
- Tiny glass seed beads in assorted colors
- E6000 adhesive or strong craft glue
- Tweezers
- Circular paper template to guide layout
- Clear grout (optional) for filling gaps
Instructions
- Clean stone and position a paper template centered on it.
- Working in small sections, add a bead line with E6000 using tweezers. Press gently.
- Build concentric circles and alternate colors.
- Let adhesive cure fully 24–48 hours.
- Optional: brush clear grout over beads to lock and then wipe excess. Cure as per grout instructions.
How to Display or Gift It
- Display on a shelf where light catches the beads.
- Wrap in soft tissue and include care instructions (hand dust only).
- Pressed Floral Mandala with Clear Seal — Nature-Infused
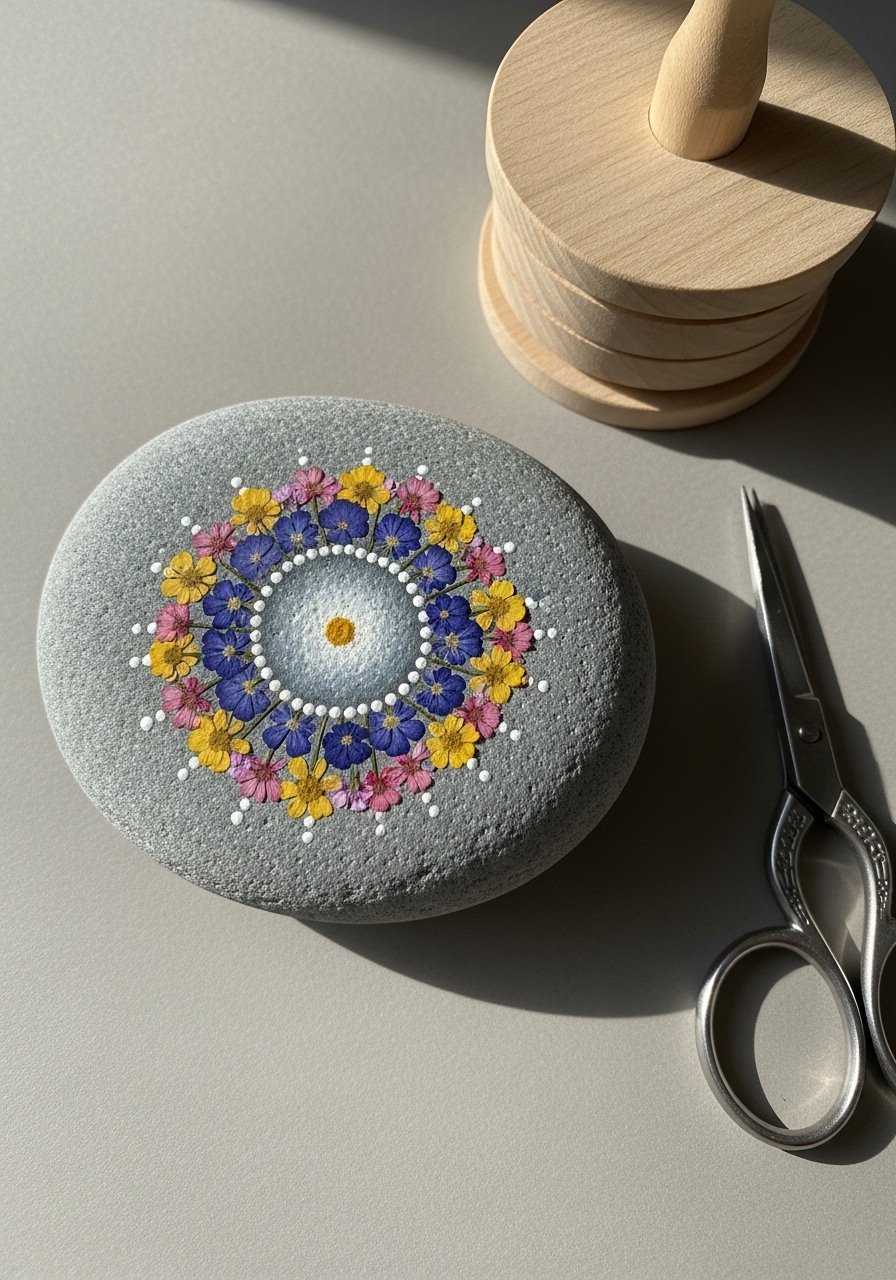
Combine tiny pressed flowers with mandala dots for a soft, organic piece. Keep flowers small (baby’s breath, tiny statice) and seal carefully.
Materials
- 1 flat stone, 3 in (7.5 cm)
- Tiny pressed flowers, pre-pressed and dry
- Thin craft glue or decoupage medium
- Acrylic paints for center and dots
- Clear waterproof sealer (epoxy recommended for outdoors)
- Tweezers
Instructions
- Apply a thin ring of decoupage medium where flowers will sit.
- Arrange pressed florals in concentric rings using tweezers.
- Seal with a thin decoupage coat and let dry 1 hour.
- Add painted mandala center and dots. Let dry 24 hours.
- Apply an epoxy topcoat if outdoors; cure per product instructions.
How to Display or Gift It
- Nestle in a shadow box with other pressed botanical items.
- Wrap with kraft tissue and tie with twine.
- Stacked Totem Mandala Stones — Sculptural Accent
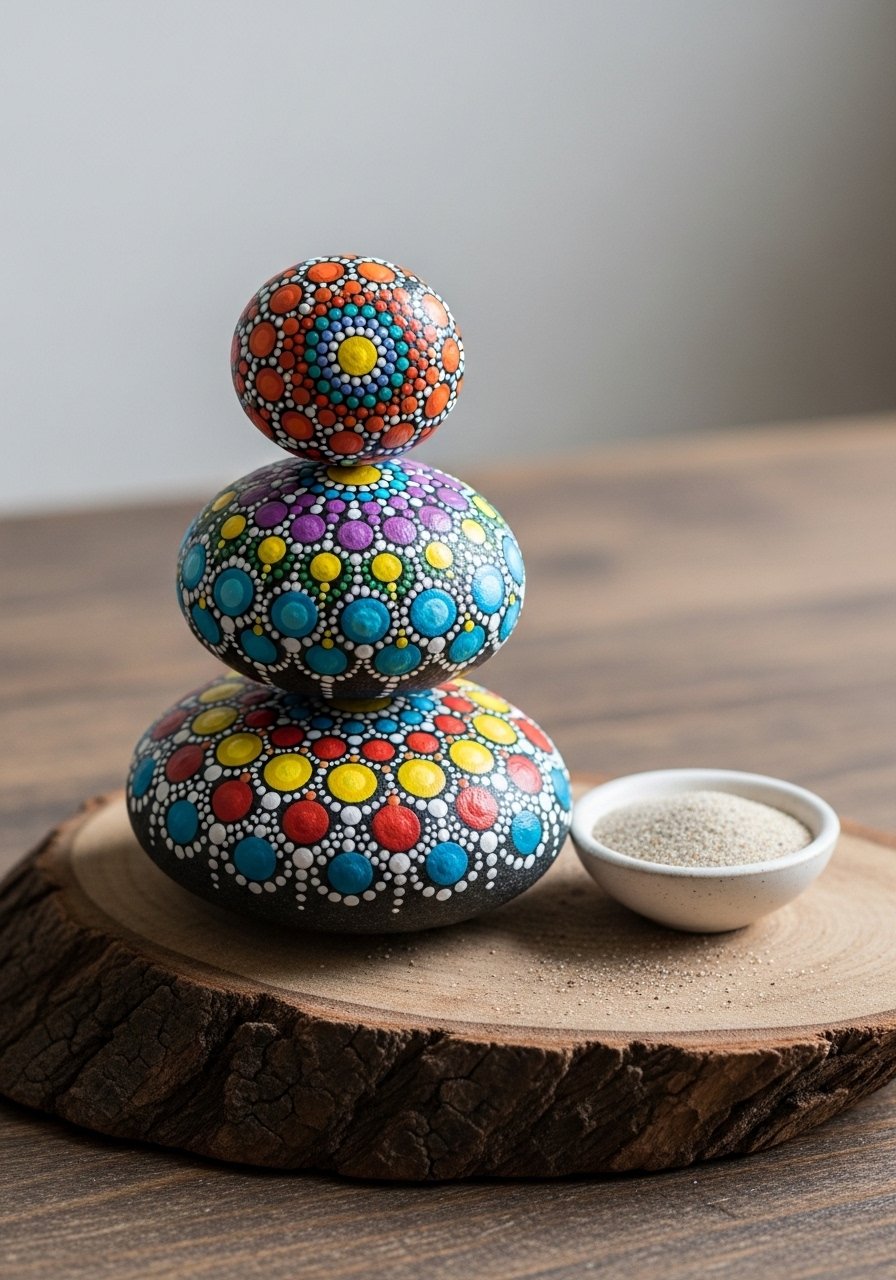
Stack painted stones into a small totem for tabletop sculptural impact. Balance and weight are key—use heavier stones at the base and a bit of adhesive if you want permanence.
Materials
- 3 stones of graduated sizes
- Acrylic paints
- Strong clear adhesive (E6000) if making permanent
- Sand or small dish for base display
- Fine brushes and dotting tools
Instructions
- Paint each stone with complementary mandala designs and let cure 24 hours.
- Dry-fit stack to balance. If permanent, add a small dab of adhesive between layers. Let set 24–48 hours.
- For removable stacks, display in a shallow bowl of sand or fine gravel to stabilize.
How to Display or Gift It
- Use as a bedside focal piece or mantel accent.
- Wrap as a “Zen gift set” with a mini candle and tea sachet.
- Holiday Wreath Mini Stones — Seasonal Mandalas
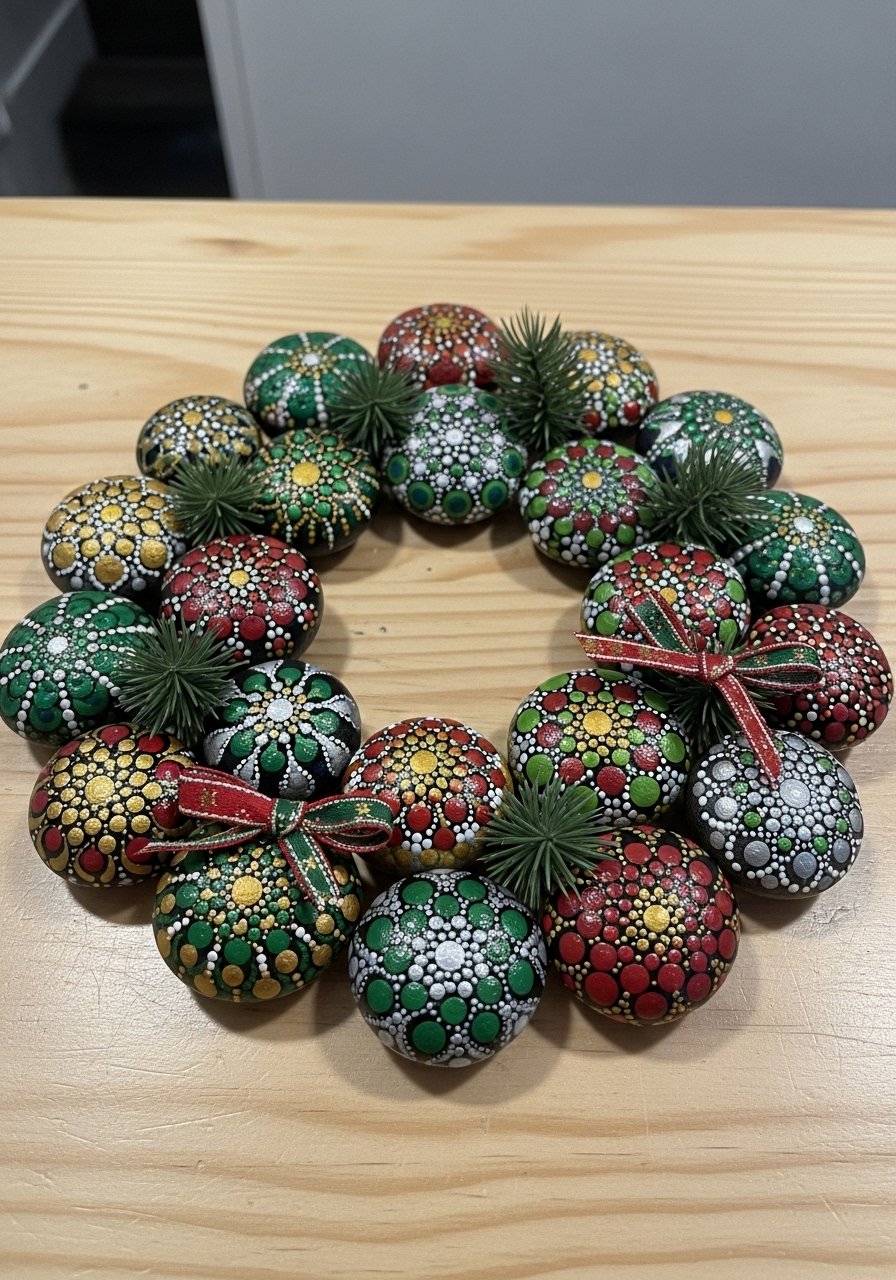
Make a small wreath by arranging mini mandala stones with seasonal colors. These are great as ornaments or tabletop décor.
Materials
- 8–10 small stones
- Acrylic paints in seasonal colors (reds, greens, metallics)
- Hot glue gun
- Faux evergreen sprigs
- Small ribbon for hanging
- Cardboard round base (optional)
Instructions
- Paint stones in holiday palette and let dry 24 hours.
- Glue stones onto a cardboard base or directly form a ring with hot glue, spacing evenly.
- Fill gaps with tiny faux sprigs and add a ribbon loop for hanging.
- Allow glue to set fully (30 minutes).
How to Display or Gift It
- Hang on a small door, place on a table as a centerpiece, or include with hostess gifts.
- Store flat in a box with tissue between layers.
- Abstract Watercolor Mandala Stones — Soft Wash Effects
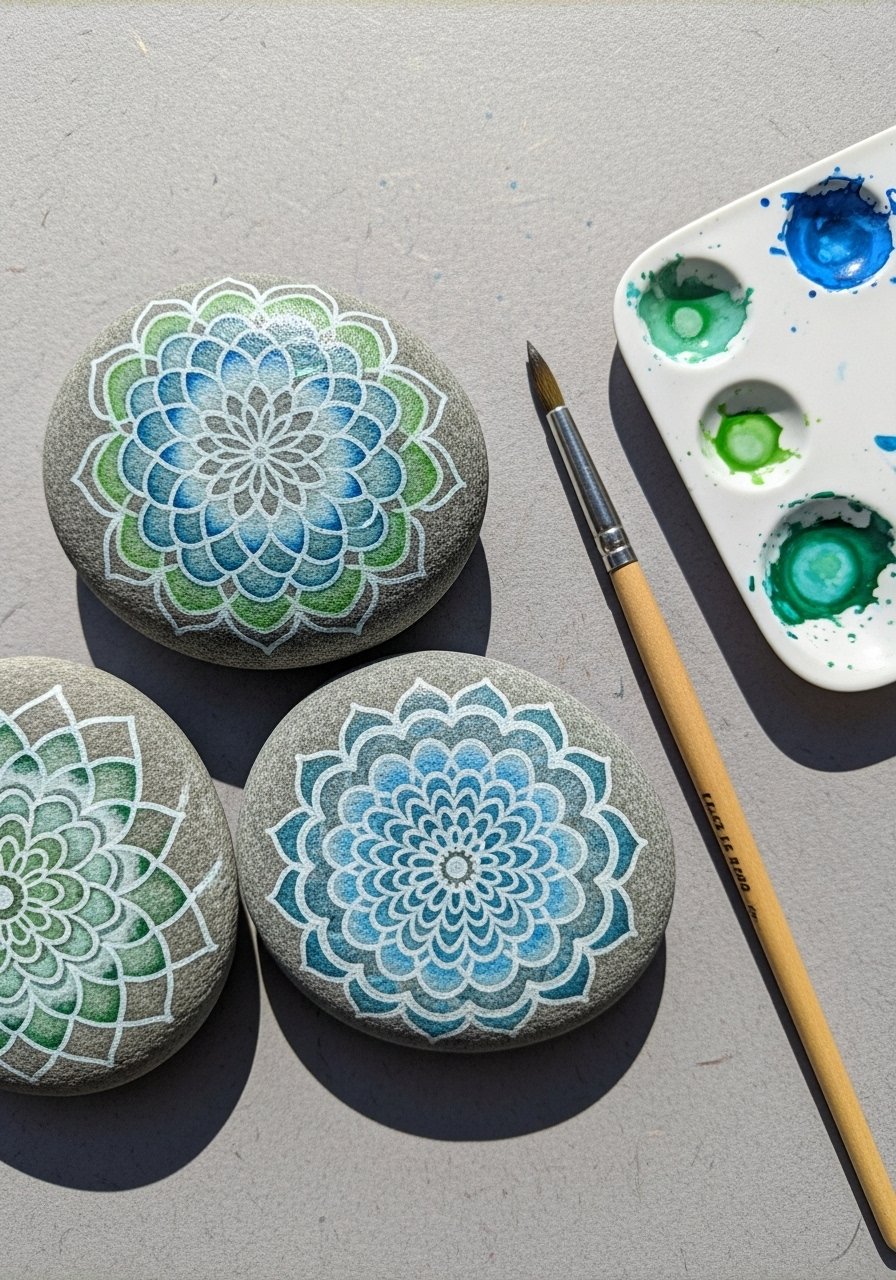
Create a loose, watercolor effect using heavily thinned acrylics for a softer mandala look. This works beautifully with seagrass or coastal decor.
Materials
- 3 smooth stones, 2.5–3.5 in (6–9 cm)
- Acrylic paints thinned with water or acrylic glazing medium
- Soft round watercolor-style brush
- Fine liner for final dots
- Matte sealer
Instructions
- Apply a light wash base by thinning paint and brushing lightly. Let dry 20 minutes.
- Build soft rings with more concentrated washes, letting edges bleed slightly.
- After base is dry, add crisp dots and micro details with a fine liner.
- Seal with matte sealer; cure 24 hours.
How to Display or Gift It
- Cluster in a shallow bowl with driftwood for coastal styling.
- Gift as a trio in a lined box.
I hope these 20 mandala stone painting ideas gave you a range of palettes, techniques, and finishes to try—from beginner dotting to resin domes and bead mosaics. Pick one that fits the time you have and the look you love, and enjoy the calming rhythm of dot-by-dot work. Save or pin this article for later, share it with a friend who loves crafty evenings, and tell me: which design will you try first?
Trust me, picking up a quality hot glue gun with temperature control changed how every single one of these projects turned out — no more stringy mess, no more burns.


