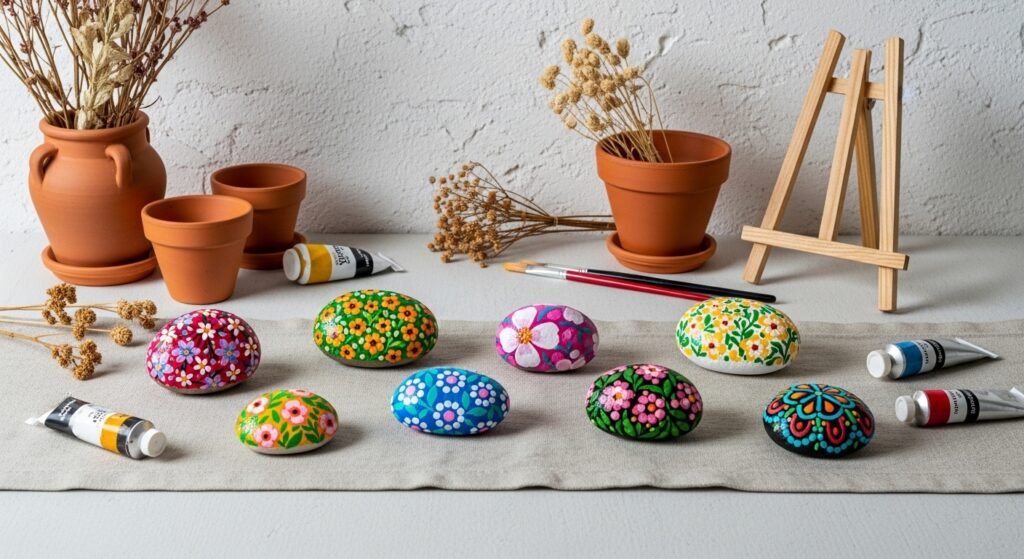
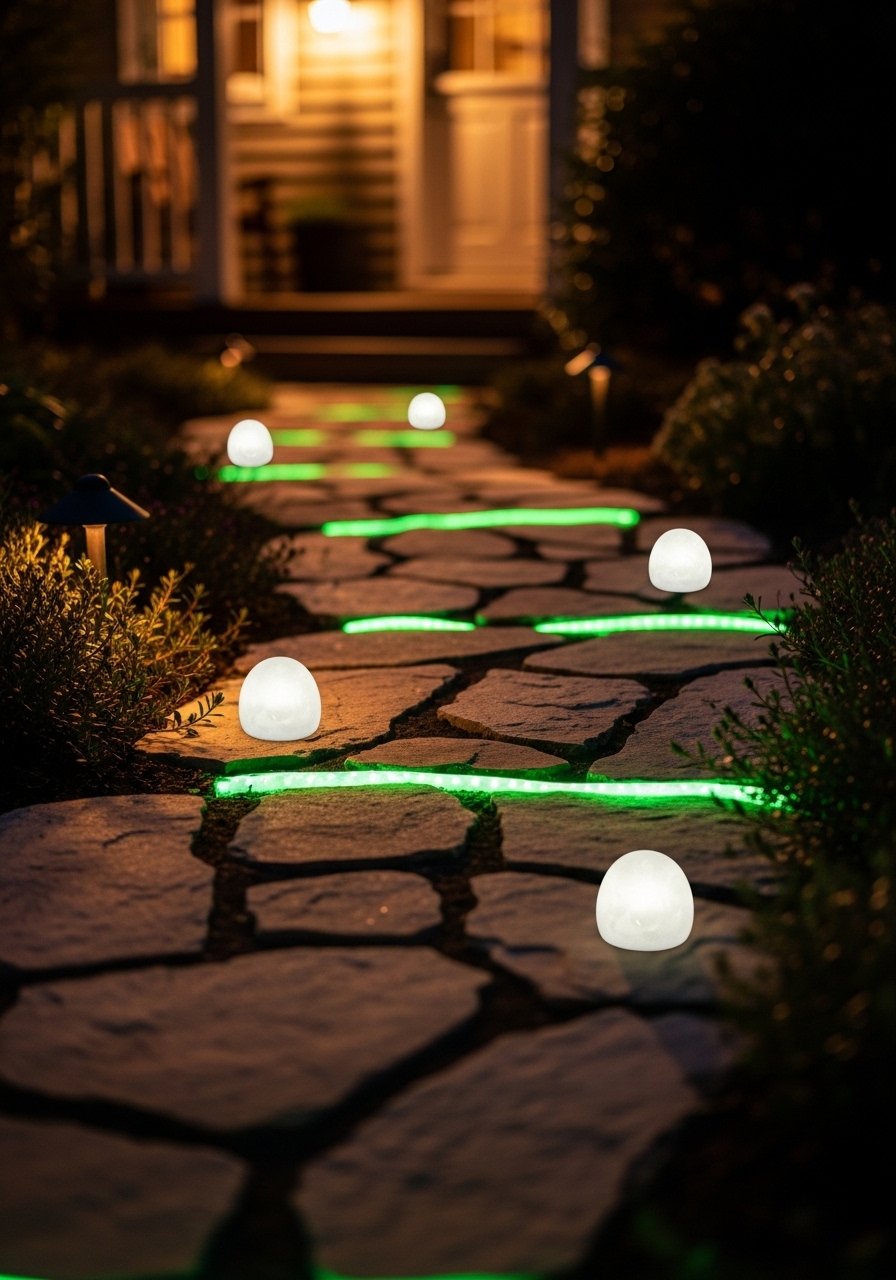
You know that little patch by your mailbox or the blank border beside your fence that could use personality? These stone painting ideas for garden are exactly the kind of small, joyful project that makes outdoor spaces feel lived-in and loved. Whether you want vibrant marker-drawn succulents, durable resin-coated messages, or natural-toned pebble mosaics, this list covers 24 weatherproof ways to paint, seal, and display stones that stand up to rain, sun, and muddy kids.
I’ll show step-by-step materials, exact paint counts, drying times, and sensible troubleshooting so your work lasts through seasons. Grab an outdoor Mod Podge for protective topcoats and a good acrylic paint set to start — I often reach for a reliable Mod Podge Outdoor sealer and a basic FolkArt acrylic paint set for color. Keep a foam brush and a fine liner paint pen nearby and you’re ready to make some weather-resistant garden art. Let’s paint some stones!
- Sunburst Marker Rocks
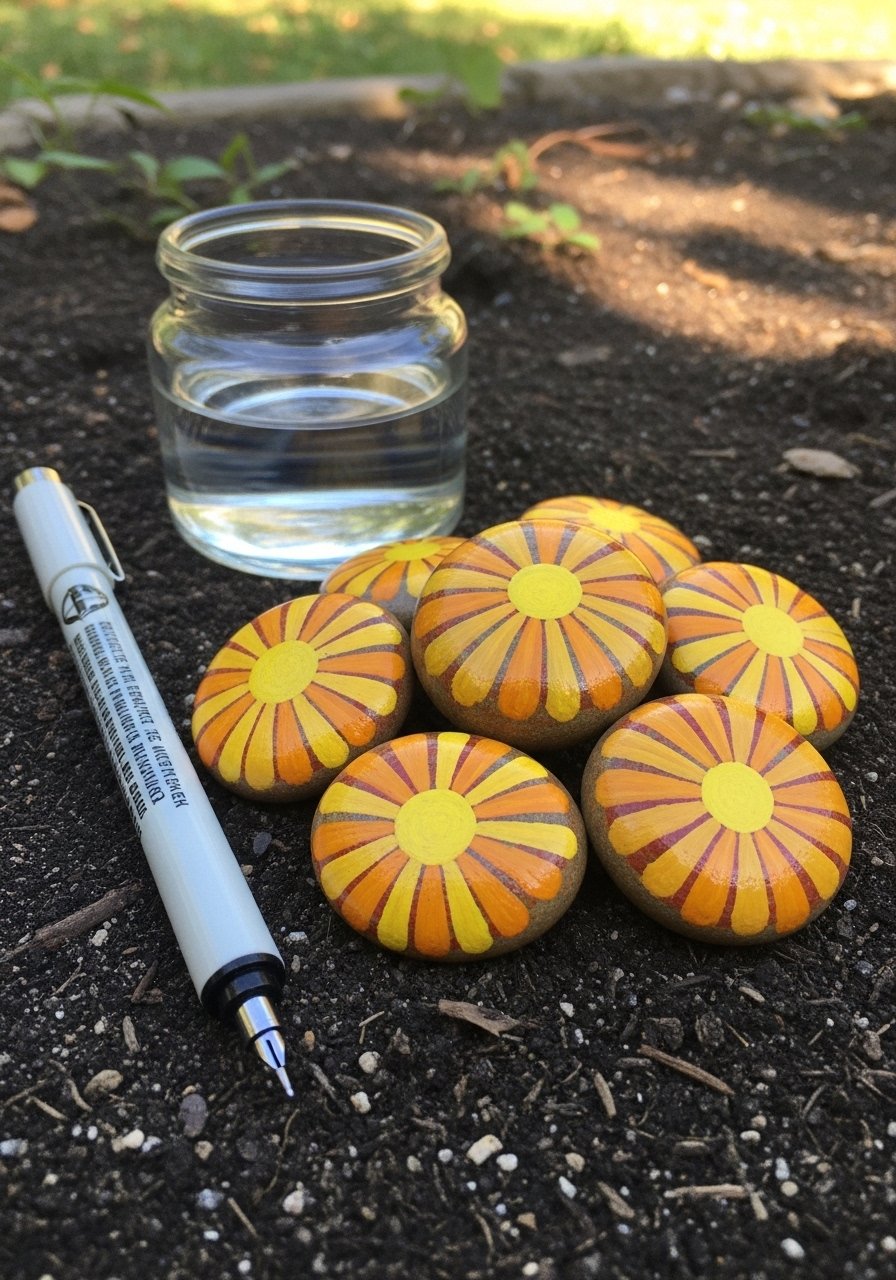
These cheerful sunburst rocks pop among green foliage and need minimal brushwork, so they’re perfect for kids or quick weekend projects. The look is bold, glossy, and sunproof when sealed. I use a fine-tip paint marker for crisp rays and a foam brush for sealing.
Materials
- 6 smooth river rocks, medium (approx 3–4 in / 7–10 cm each)
- 1 white acrylic base coat (approx 30 ml)
- Yellow, orange, and red acrylic paints (5–10 ml each)
- Black fine-tip paint pen (0.7 mm)
- Primer spray for stone (one light coat)
- Foam brush (1")
- Mod Podge Outdoor sealer (gloss)
- Sandpaper (120 grit)
- Rags and rubbing alcohol for cleaning
Instructions
- Wash stones with soap, rinse, and dry fully (30–60 minutes). Sand any rough spots.
- Wipe with rubbing alcohol and let air-dry 5 minutes.
- Spray a light primer coat; dry 15 minutes. This helps paint adhere.
- Paint a solid white base coat with 1 thin layer; let dry 20–30 minutes. Apply a second coat for full opacity; dry 30 minutes.
- Use a pencil to lightly mark center points for sunbursts.
- Draw short rays with the yellow marker or brush, layer orange then red toward tips for gradient. Let each color set 10 minutes.
- Outline center and rays with black fine-tip pen. Let ink dry 15 minutes.
- Apply 2 thin coats of Mod Podge Outdoor with a foam brush. Dry 30 minutes between coats; final cure 24 hours.
How to Display or Gift It
- Nestle a trio of sunburst rocks in a terracotta pot for instant porch cheer.
- Tie a small tag and place in a gift box lined with kraft tissue for neighbor gifts.
- Store extra sealed pieces in a stackable craft organizer until ready to place.
- Show on a small wooden easel beside entries; I use a mini wooden easel for display.
- Mini Chalkboard Garden Pebbles
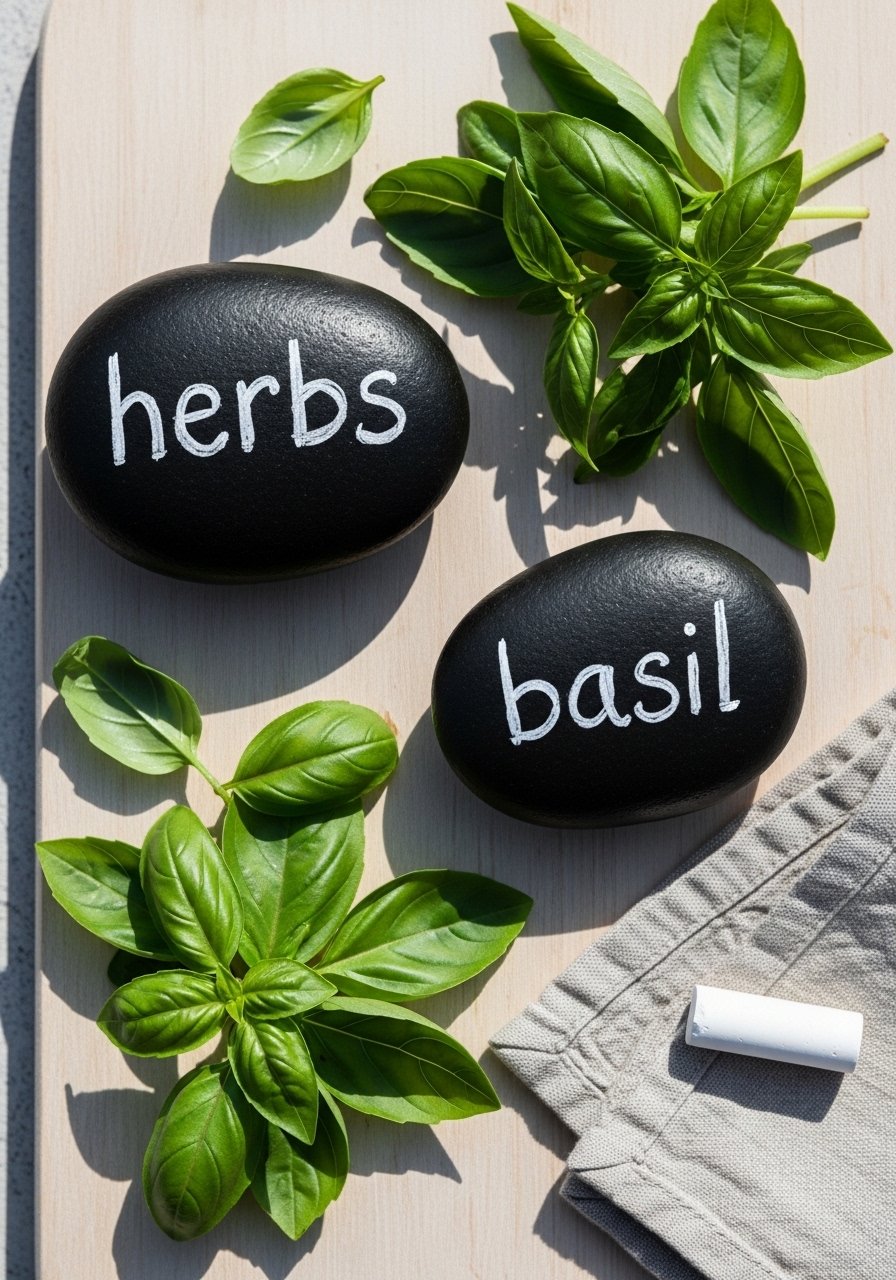
These tiny black pebble signs are practical and chic for labeling herbs or plant rows. The matte surface feels like a little slate and wipes clean. I use a chalk marker for crisp labels and a Krylon matte spray sealer to protect written names.
Materials
- 12 small flat stones (2–3 in / 5–7 cm)
- Black chalkboard paint (30–50 ml)
- White chalk marker (fine tip)
- Foam brush (½" or 1")
- Sandpaper (220 grit)
- Paper towels
- Krylon matte spray sealer (1 can)
- Painter’s tape (for clean edges)
Instructions
- Wash and dry stones 30 minutes; sand smooth tops lightly.
- Tape edges if you want a trimmed border.
- Apply 2 coats of chalkboard paint with foam brush, each coat 20 minutes apart, full cure 24 hours.
- Season the chalkboard surface by rubbing full-length of chalk and wiping off.
- Write plant names with a chalk marker; let ink set 5 minutes.
- Seal edges with one light mist of matte spray sealer (hold can 8–10 in away). Dry 15 minutes.
How to Display or Gift It
- Insert into herb pots as cute markers.
- Wrap sets in kraft paper and tie with twine for gardener gifts.
- Store unused labeled pebbles in a shallow craft container; they stack flat.
- Cottagecore Floral Story Stones
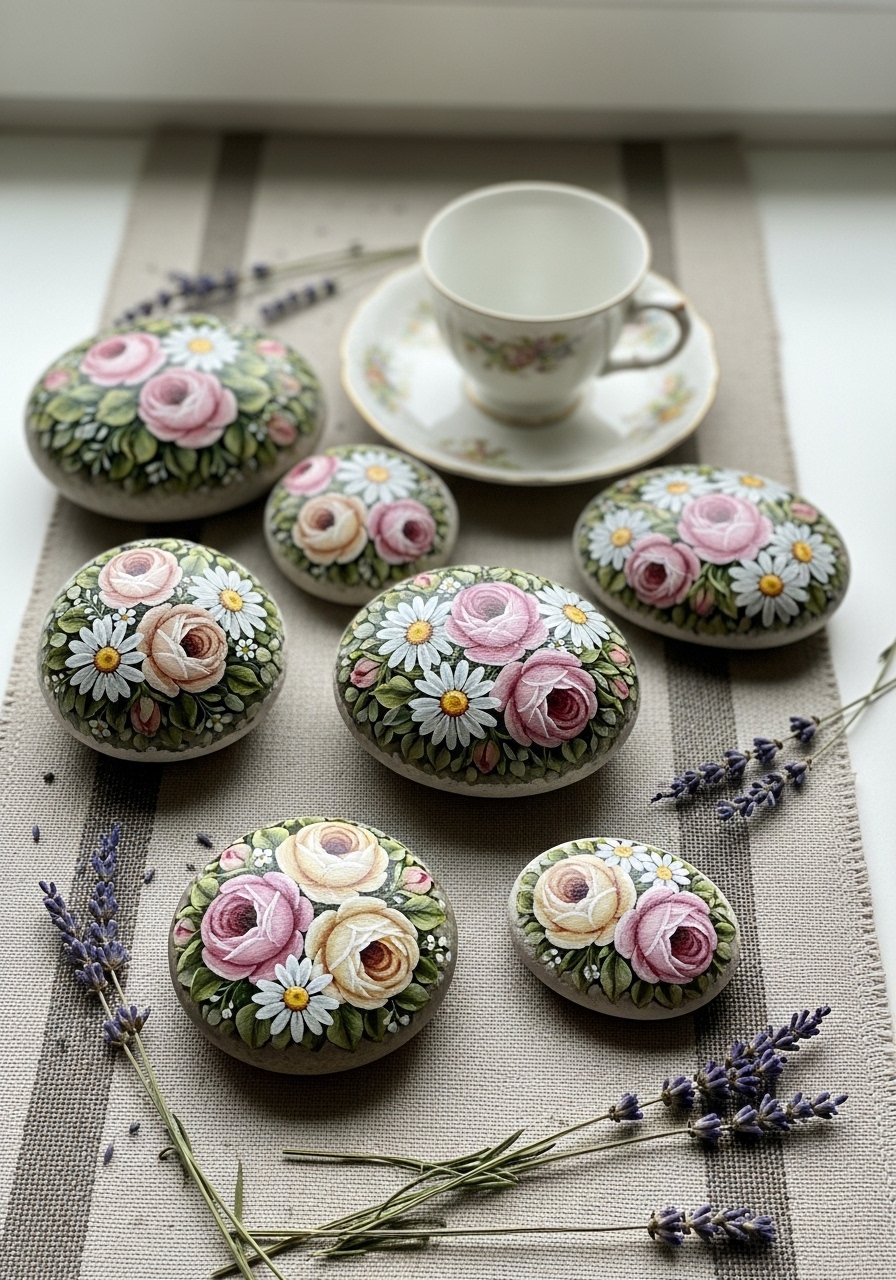
Feature soft, layered blooms reminiscent of cottage gardens. These story stones work as whimsical table accents or simple pathway markers. I reach for a detail round brush set and a reliable FolkArt acrylic paint set for those muted tones.
Materials
- 8 flat stones (4–5 in / 10–12 cm)
- Acrylic paints: cream, blush pink, olive green, muted yellow (5–10 ml each)
- Detail brush set (sizes 0, 2, 4)
- Primer (optional; one light coat)
- Palette or disposable plate
- Toothpicks for tiny dots
- Outdoor gloss sealer (2 coats)
- Paper towels and water jar
Instructions
- Clean stones, dry 30 minutes, and prime if needed.
- Apply a thin base coat in cream; dry 20–30 minutes.
- Sketch floral layout lightly in pencil.
- Paint foliage with olive green, let dry 10 minutes.
- Layer petals with blush pink, building 2–3 thin coats for depth; dry 10 minutes between layers.
- Add centers with muted yellow using a toothpick for dot texture.
- Touch up outlines with a tiny round brush if desired.
- Apply 2 coats of outdoor gloss sealer; dry 30 minutes between coats, cure 24 hours.
How to Display or Gift It
- Cluster on a garden shelf with dried lavender.
- Glue a magnet to the back for refrigerator story stones — use a strong craft glue.
- Wrap in tissue and tuck a dried sprig for a sweet hostess gift.
- Japandi Minimalist Zen Stones
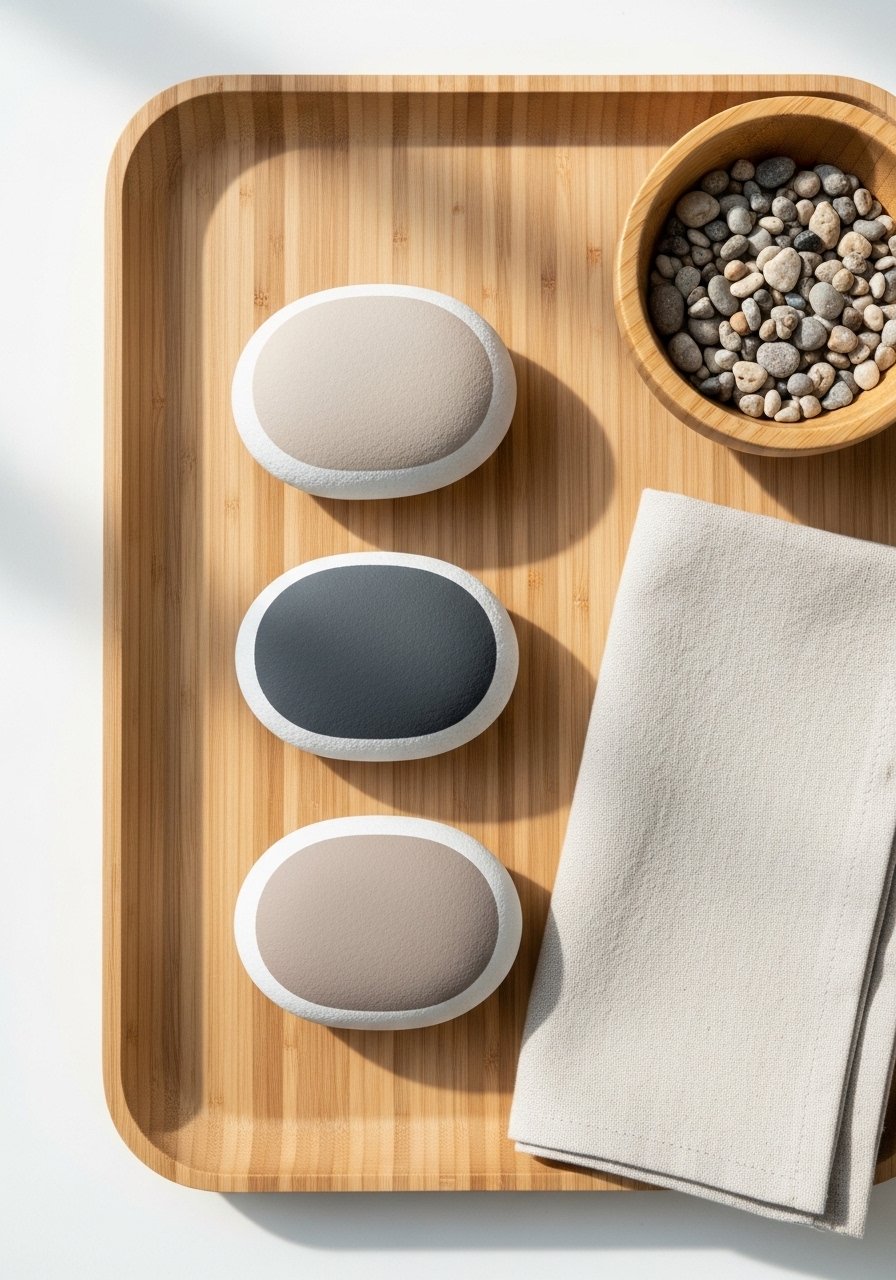
This clean, Japandi-inspired set uses neutral blocks and negative space for a calm look. Works well as stepping-stone accents or shelf décor. I recommend a small foam roller for seamless color blocks and a sanding block for prep.
Materials
- 3 oval flat stones (3–4 in)
- Acrylic paints: beige, charcoal, terracotta (10 ml each)
- Small foam roller (1.5" wide)
- Painter’s tape
- Sanding block (120–220 grit)
- Matte outdoor sealer (1 can)
- Disposable gloves
Instructions
- Clean and sand stone surfaces; dry 30 minutes.
- Tape crisp lines for color blocking.
- Roll first color thinly; dry 15 minutes. Apply a second thin coat if needed; dry 20 minutes.
- Remove tape slowly. Touch up edges with a detail brush.
- Repeat for other colors.
- Cure fully 24 hours, then apply one light mist of matte sealer. Dry 15 minutes.
How to Display or Gift It
- Place on a wooden tray for a zen vignette.
- Pair with a small succulent in a neutral pot.
- Pack in a kraft box with a linen ribbon for a thoughtful gift.
- Thermochromic Mood Stones

Thermochromic paint changes with temperature for a playful garden surprise. Use it on a sign or hide in shady areas for interactive charm. Thermochromic requires a clear epoxy topcoat for weatherproofing; a small epoxy resin kit works well.
Materials
- 4 smooth stones (3–4 in)
- White acrylic primer (30 ml)
- Thermochromic paint (color-change powder mixed into clear medium) — follow product packet for amounts (typically 1–2 g pigment per 30 ml medium)
- Clear epoxy resin kit (small, enough for 4 stones)
- Disposable mixing cups and stir sticks
- Nitrile gloves
- Torch or heat gun for bubble removal
- Sandpaper (220 grit)
Instructions
- Clean and prime stones; dry 30 minutes.
- Apply thin white base coat; dry 20 minutes.
- Mix thermochromic pigment into clear medium per manufacturer; test on scrap.
- Paint stone surfaces with thermochromic layer; dry 20–30 minutes.
- Mix epoxy resin per kit instructions (10–15 minutes mixing). Pour thin layer over stone; use torch/heat gun for 2–3 seconds to pop bubbles.
- Let cure 24–48 hours (depends on resin; follow kit).
- Check for tackiness; fully cured stones are firm and non-tacky.
How to Display or Gift It
- Tuck among shade-loving plants to surprise visitors.
- Include a care note: avoid prolonged sun exposure to maintain pigment life.
- Store extras flat in a closed craft box until cured fully.
- Mosaic Pebble Stepping Markers
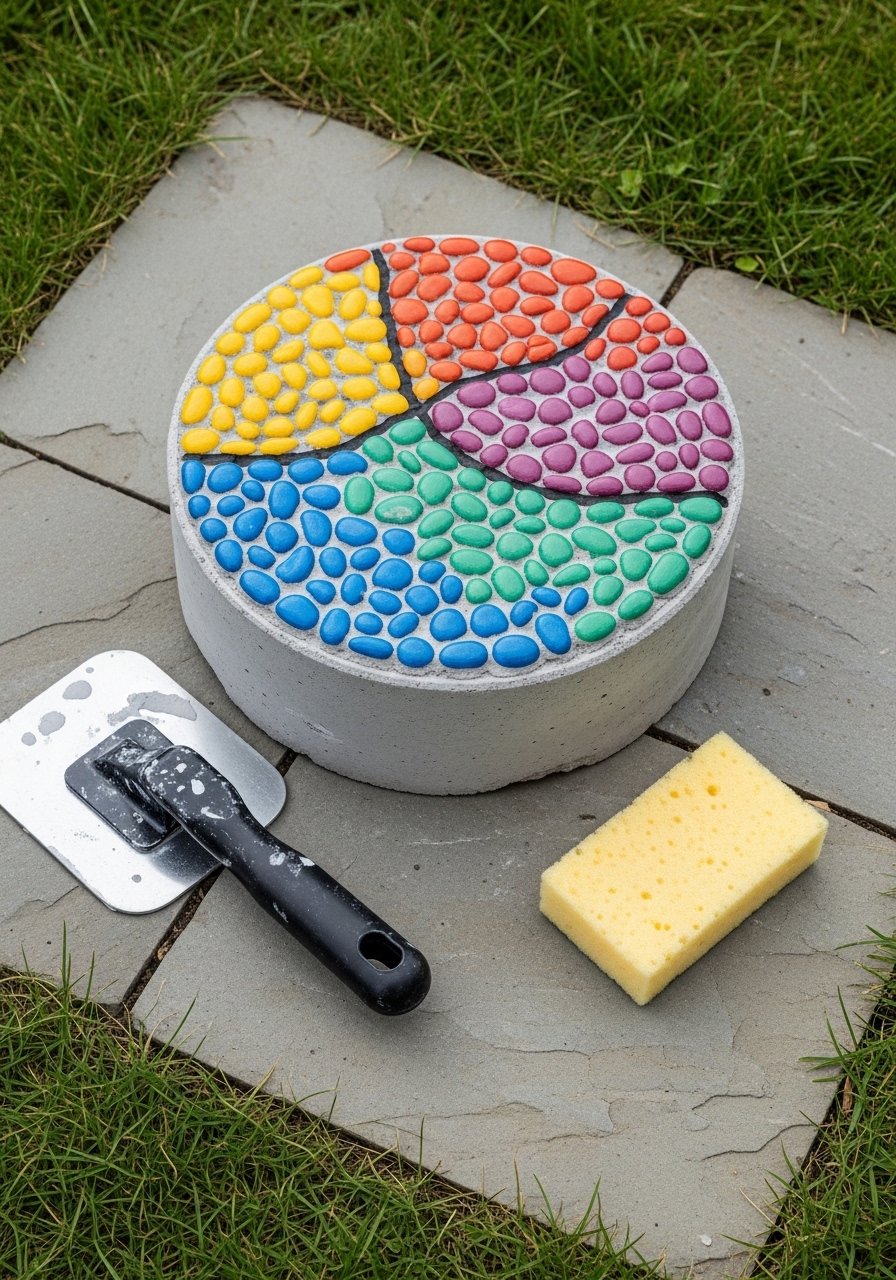
Make tiny mosaic stepping markers by glueing painted pebbles onto a concrete paver and grouting the gaps. The textured, colorful result is eye-catching and durable. A grout float and outdoor adhesive are musts.
Materials
- One 8 in concrete stepping paver
- 40–60 small painted pebbles (various colors)
- Outdoor tile adhesive or E6000 (50 ml)
- Grout (sandless, exterior use) (one small packet)
- Grout float and sponge
- Sealant for grout (1 bottle)
- Rubber gloves and mixing bucket
Instructions
- Paint pebbles and seal with acrylic sealer; let cure 24 hours.
- Arrange pebbles on paver until you like the pattern.
- Glue pebbles with outdoor adhesive in small sections; press firmly. Dry 2 hours.
- Mix grout per package and spread over pebbles with a float, pushing into gaps.
- Wipe excess with a damp sponge; finish edges clean.
- Cure grout 24–48 hours, then apply grout sealer. Dry 2 hours.
How to Display or Gift It
- Use as a small stepping stone or decorative paver beside a path.
- Wrap in kraft paper and tie with twine for a heavy, thoughtful gift.
- Store in a dry shed until installation.
- Fairy Door Story Stones

Paint miniature doors and faces for fairy gardens or potted plants. Tiny details bring charm—use tiny round brushes and a detail brush set.
Materials
- 10 small stones (2–3 in)
- Acrylic paints: brown, cream, moss green, gold (small amounts)
- Detail brush sizes 0 and 2
- Toothpicks for tiny dots
- Outdoor gloss sealer (2 coats)
- Super glue or tacky glue for attaching tiny accessories (mini buttons, beads)
Instructions
- Clean stones and paint a base color; dry 20 minutes.
- Sketch doors and windows lightly.
- Paint door shapes and accents using fine brushes; add tiny doorknob with gold paint using a toothpick.
- Add mossy details with stippled green.
- Seal with 2 coats of gloss sealer; dry 30 minutes between coats.
How to Display or Gift It
- Nestle into fairy gardens or mini planters.
- Glue onto a small slice of wood as a whimsical shelf piece.
- Package in a small kraft box with shredded paper.
- Nautical Anchor Stones
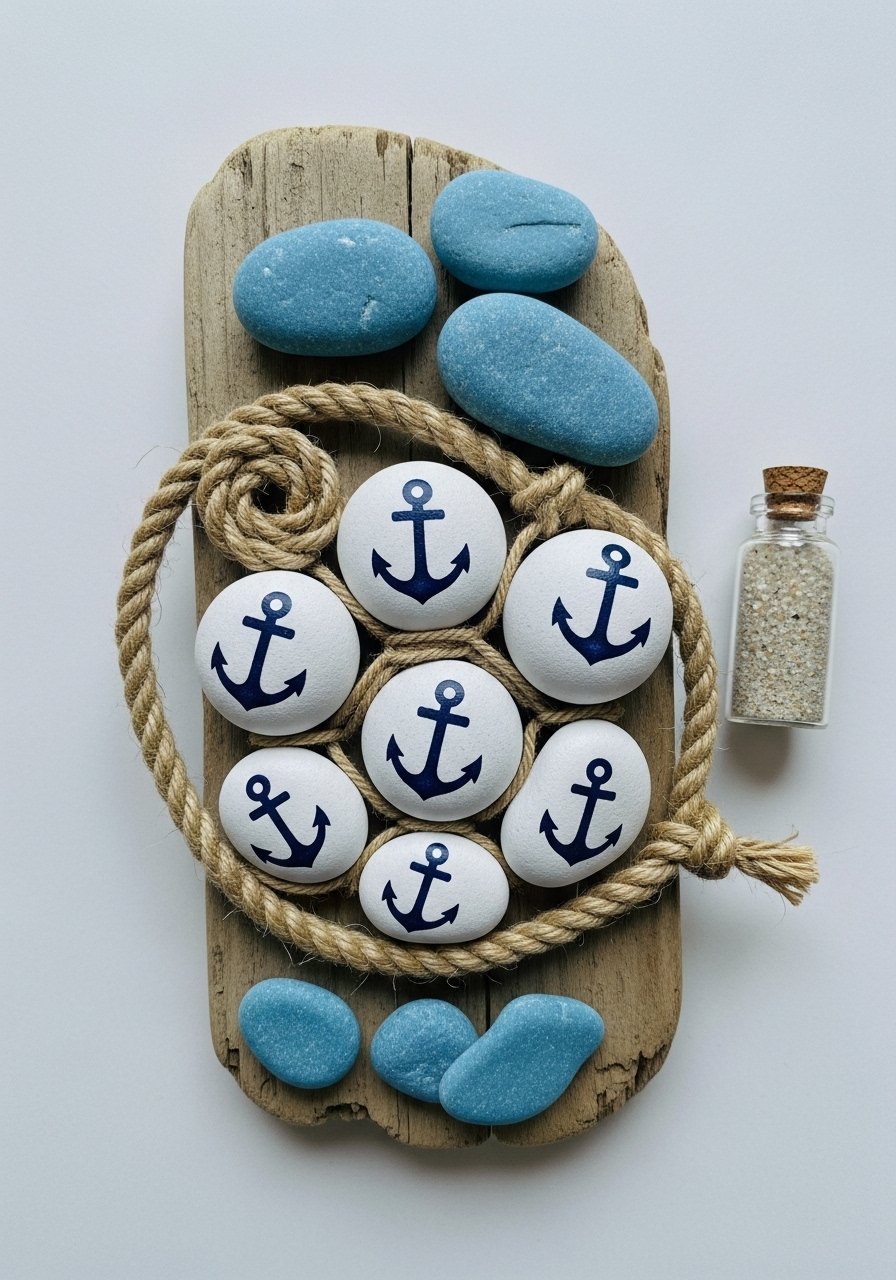
Perfect for coastal gardens or beach-themed containers. The high-contrast navy on white pops and fares well when sealed. I use a stencil sheet for repeatable anchors.
Materials
- 6 smooth stones (3–4 in)
- White acrylic paint (base coat)
- Navy blue acrylic (5–10 ml)
- Reusable small stencil (anchor)
- Foam dabbers
- Fine liner paint pen (navy or black)
- Outdoor gloss sealer
- Thin jute twine for accents
Instructions
- Clean, prime, and apply 2 coats white base; dry 20 minutes between coats.
- Place stencil and hold firmly. Dab navy paint with foam dabber; remove stencil carefully after 1–2 minutes.
- Touch up edges with fine liner pen if needed. Let dry 15 minutes.
- Wrap a small length of jute twine around the stone as an accent and tuck ends under a dab of glue.
- Seal with two coats of gloss sealer; dry 30 minutes between coats.
How to Display or Gift It
- Scatter in a coastal potted arrangement or use as paperweights.
- Gift paired with a packet of beachy seeds wrapped in jute.
- Store in a breathable craft bin until ready for placement.
- Succulent Painted Rocks (Real-Looking)
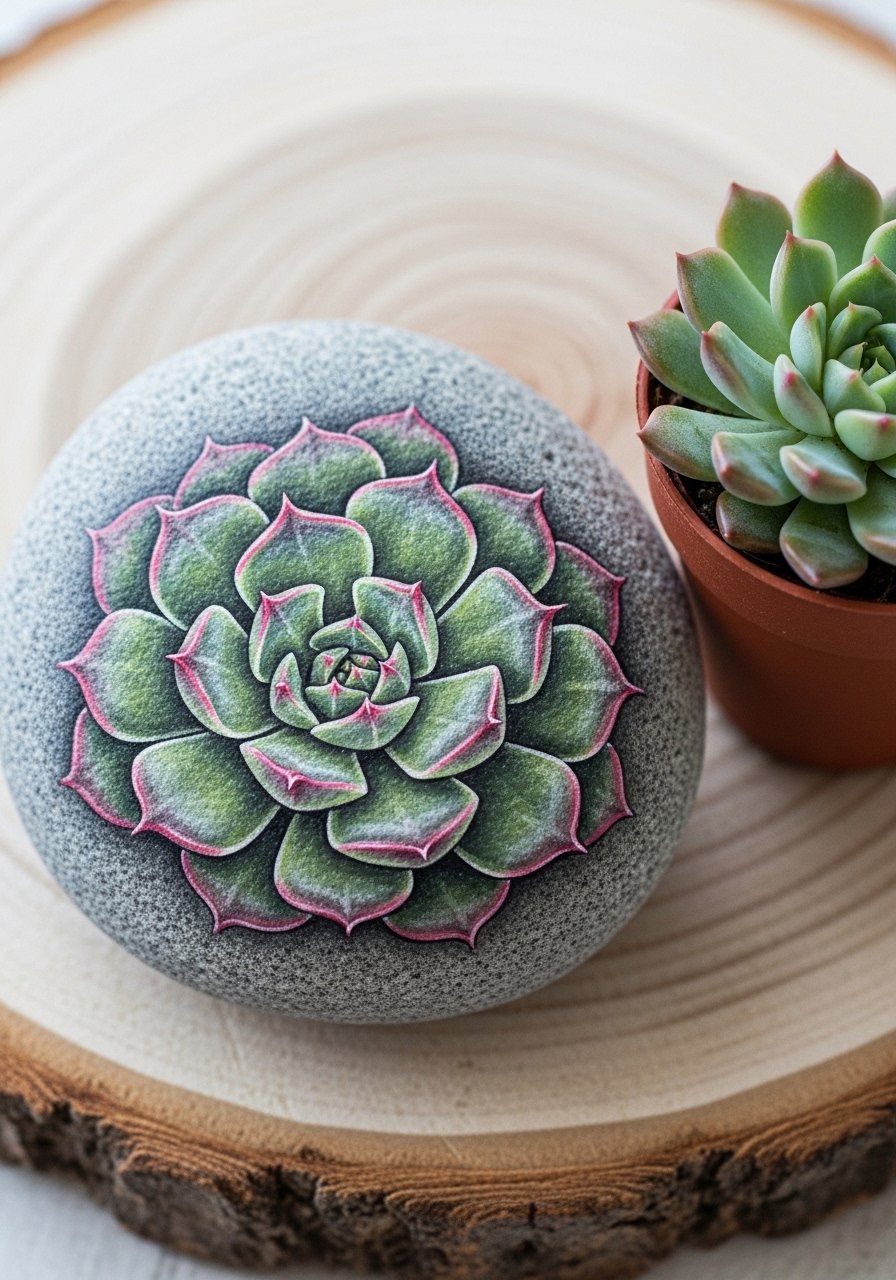
These painted succulents mimic real plants—no watering required. Layered greens and precise highlights make them convincing. Use a set of small round brushes and a palette knife for texture.
Materials
- 6 flat stones (4–5 in)
- Acrylic paints: sage, forest green, lime, white (small tubes)
- Detail brushes (sizes 0, 2)
- Palette knife for texture
- Outdoor matte sealer (2 coats)
- Small sanding sponge
Instructions
- Prep stones by sanding and cleaning.
- Paint a soft green base; dry 20 minutes.
- Sketch succulent rosette lightly.
- Layer greens from dark to light, building petal edges with a tiny round brush. Let layers dry 10 minutes between.
- Add white highlights along petal edges for realism.
- Seal with 2 thin coats matte sealer; dry 20 minutes between coats.
How to Display or Gift It
- Mix with real succulents in a low planter for texture contrast.
- Use as no-fuss hostess gifts with a note saying “no watering required.”
- Store flat in a shallow tray until sealed fully.
- Story Pebbles — Garden Prompts

Paint single-word prompts to scatter through the garden for inspiration. Script work looks best with paint pens and a steady hand.
Materials
- 12 flat stones (2–3 in)
- White or light base paint (if needed)
- Black or colored paint pens (fine and medium tips)
- Clear outdoor sealer (matte)
- Pencil for sketching
- Sandpaper (220 grit)
Instructions
- Clean and apply base coat where needed; dry 20 minutes.
- Sketch words with pencil.
- Write with paint pen in one confident stroke; let dry 5–10 minutes.
- Erase any remaining pencil carefully.
- Seal with one coat of matte sealer; dry 20 minutes.
How to Display or Gift It
- Tuck words along a path or in cozy reading nooks.
- Bundle a set with a note card in a small gift box.
- Keep extras in a labeled craft drawer.
- Glow-in-the-Dark Pathstones
Add safety and whimsy with glow-in-the-dark paint. Use a high-quality phosphorescent paint on top of your design, then seal with an epoxy or outdoor sealer.
Materials
- 10 path stones (4–6 in)
- Base acrylics for design
- Phosphorescent glow paint (powder or bottled) — follow product amounts (usually 1–2 coats)
- Outdoor sealer or thin epoxy topcoat
- Foam brushes and mixing cups
Instructions
- Paint base designs and seal first coat; dry 30 minutes.
- Apply 1–2 coats of glow paint over chosen areas; allow 30 minutes between coats.
- For long-lasting glow, top with a thin epoxy resin layer; cure 24–48 hours.
- Charge under sunlight for best glow performance.
How to Display or Gift It
- Line a pathway or edge a vegetable bed.
- Pair with a small solar stake light for extra visibility.
- Pack in a protective box if gifting; label with charging tips.
- Whimsical Animal Pebbles
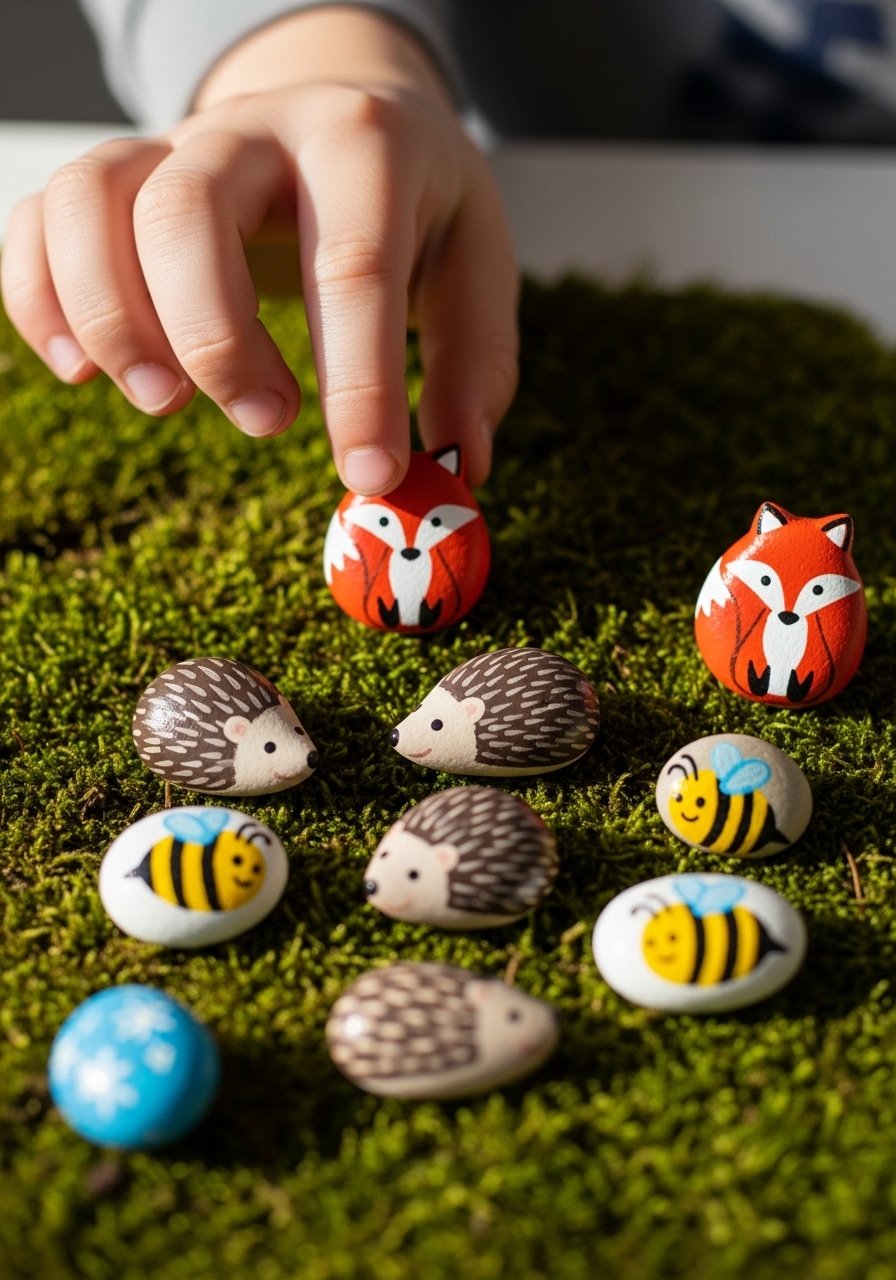
Tiny animal faces are great for kids’ gardens or classroom projects. Use acrylics and a round detail brush for small features.
Materials
- 20 small pebbles (1–2 in)
- Acrylic paints: brown, orange, black, white (small amounts)
- Detail brushes (size 0)
- Toothpicks for pupils and noses
- Matte sealer
- Small storage jar for finished pieces
Instructions
- Clean and paint base colors; dry 15–20 minutes.
- Add ears and body marks with a small brush.
- Dot eyes and noses with toothpicks; let dry 10 minutes.
- Seal with a light coat matte sealer; dry 20 minutes.
How to Display or Gift It
- Scatter among low groundcover or inside play gardens.
- Gift in a clear glass jar with a ribbon and label.
- Store excess in a craft organizer drawer.
- Mandala Dot Stones
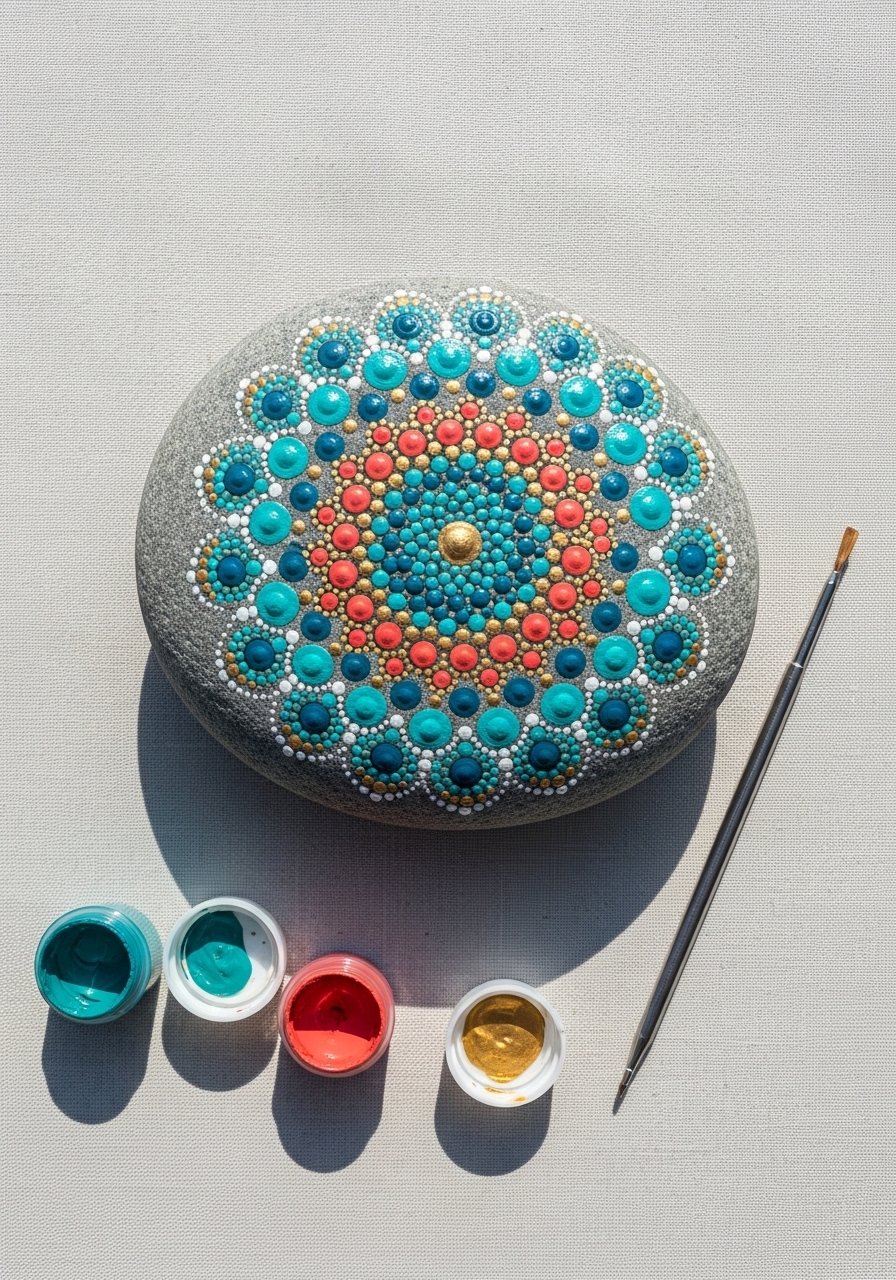
Mandala stones make meditative garden accents. Use dotting tools or the back of brushes for consistent dots. I use a small dotting tool set.
Materials
- 4 large flat stones (4–6 in)
- Acrylic paints in 4–6 colors
- Dotting tool set (various sizes)
- Pencil for center marking
- Outdoor gloss sealer
- Palette and disposable cups
Instructions
- Clean stones and paint a base if desired; dry 20 minutes.
- Mark the center and guidelines lightly with pencil.
- Use dotting tools to apply concentric dots from center outward.
- Let layers dry 10 minutes between major color shifts.
- Seal with 2 coats gloss sealer; dry 30 minutes between coats.
How to Display or Gift It
- Place in a meditation corner or rock garden.
- Wrap in tissue and include a small card explaining dot patterns.
- Store flat to protect dots until sealed completely.
- Stone Plant Labels with Vinyl Decals
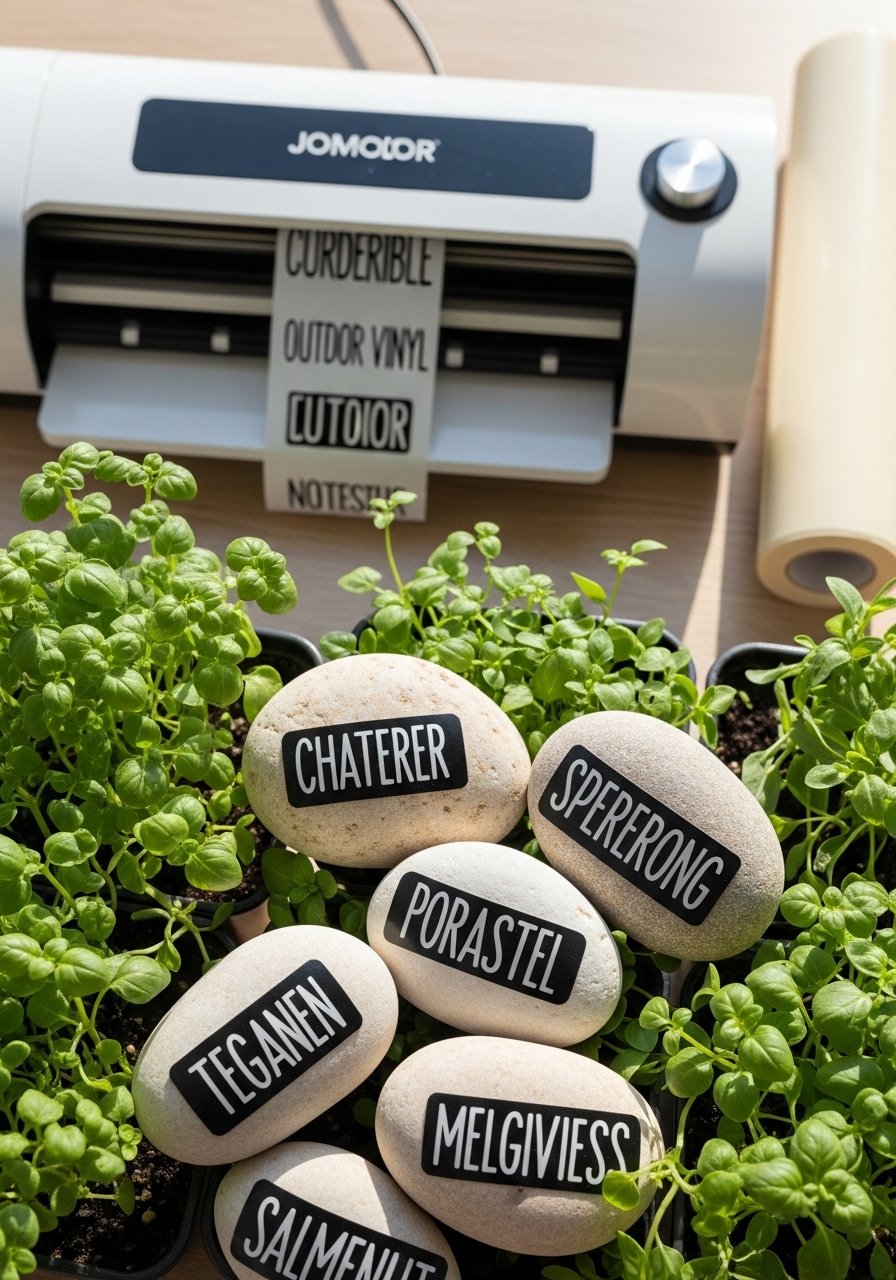
Use a cutting machine for precise, weatherproof labels. Vinyl is cleaner-looking than hand-lettering and holds up when sealed.
Materials
- 12 smooth flat stones
- Outdoor adhesive vinyl (small roll)
- Transfer tape
- Cricut or Silhouette cutting machine OR printable waterproof label paper
- Weeding tool
- Outdoor sealer (matte)
- Scissors and ruler
Instructions
- Clean stones and let dry.
- Cut plant names from vinyl using your machine. Weed excess vinyl.
- Use transfer tape to apply vinyl to stones; press firmly.
- Seal lightly with matte sealer to protect edges.
- Let cure 24 hours before placing in soil.
How to Display or Gift It
- Use in garden beds or window boxes.
- Gift a labeled set with a packet of seeds.
- Keep spare vinyl and transfer tape in your craft organizer.
- Pebble Birdbath Mosaic
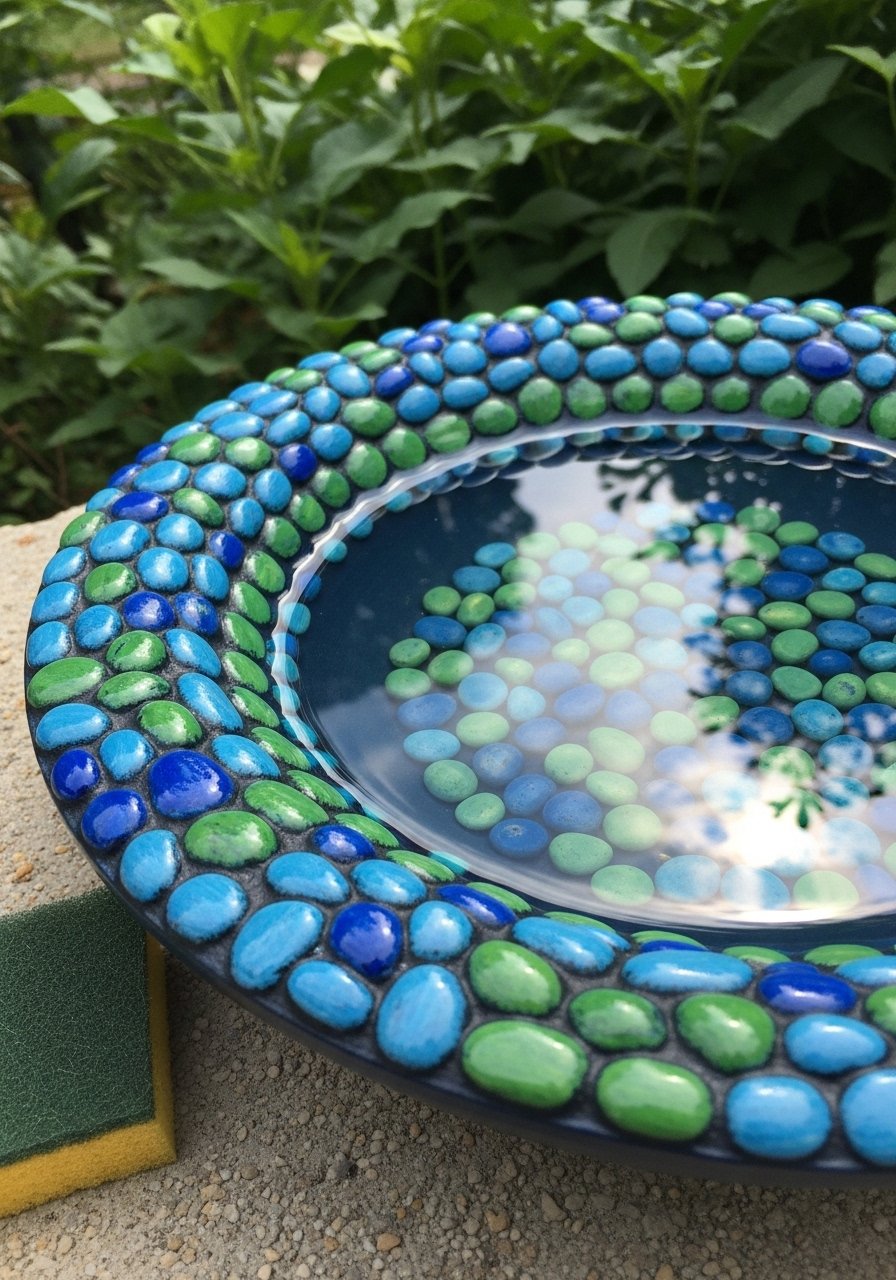
A pebble mosaic on a birdbath rim adds texture and color that birds ignore but people love. Use outdoor adhesives and grout rated for exterior use.
Materials
- One shallow ceramic birdbath (rim wide enough for pebbles)
- Painted pebbles (60–80 small stones)
- Outdoor tile adhesive (300 ml)
- Grout (exterior)
- Grout float, sponge, bucket
- Clear outdoor sealant for grout
Instructions
- Paint and pre-seal pebbles; dry 24 hours.
- Arrange pattern and glue pebbles down with outdoor adhesive; let set 2–4 hours.
- Grout as with stepping marker instructions; clean excess grout.
- Cure grout 24–48 hours and seal grout lines.
How to Display or Gift It
- Place near a shrub for birds and viewing pleasure.
- Gift to a neighbor with a bag of birdseed.
- Store extra pebbles in a labeled container for repairs.
- Boho Feather Stones
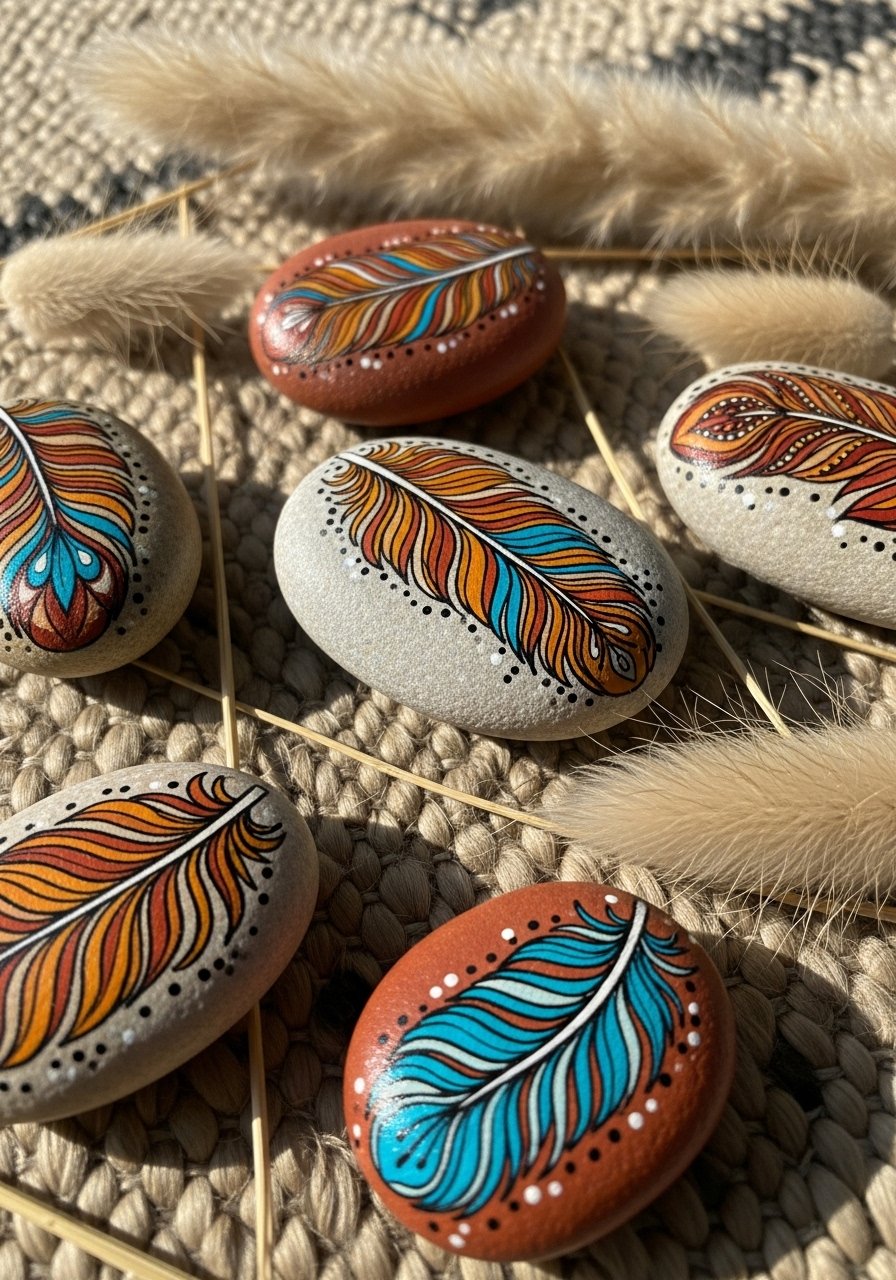
Boho feathers add soft, earthy vibes to planters or borders. Brush strokes and layered colors lend texture.
Materials
- 8 medium stones (3–4 in)
- Acrylic paints: terracotta, ochre, teal, white
- Flat and detail brushes
- Sandpaper and primer
- Matte sealer
- Small paint palette
Instructions
- Clean and prime stones; apply base coat if desired.
- Sketch feather outlines and block in main colors.
- Use a flat brush to add feather strokes; layer highlights.
- Seal with matte sealer; dry 20 minutes.
How to Display or Gift It
- Tuck into potted plants for boho charm.
- Bundle a trio in tissue with dried pampas for gifting.
- Keep in a shallow craft box until sealed.
- Weatherproof School Rocks (Educational)

Use durable paints and sealers to create tactile learning stones for children. High-contrast colors help visibility outdoors.
Materials
- 26 small stones for letters + 10 for numbers
- Acrylics in primary colors
- Stencils for letters (optional)
- Foam brushes and detail brushes
- Outdoor gloss sealer
- Storage crate for portability
Instructions
- Clean stones and paint base colors; dry 20 minutes.
- Add letters/numbers with stencils or freehand; dry 10 minutes.
- Apply 2 coats outdoor gloss sealer; dry 30 minutes between coats.
- Store in a labeled crate for outdoor play; rotate inside during storms.
How to Display or Gift It
- Use in preschool outdoor learning centers.
- Gift a set to a teacher in a small wooden crate.
- Keep extras in a stackable craft organizer.
- Abstract Weather-Resistant Swirls
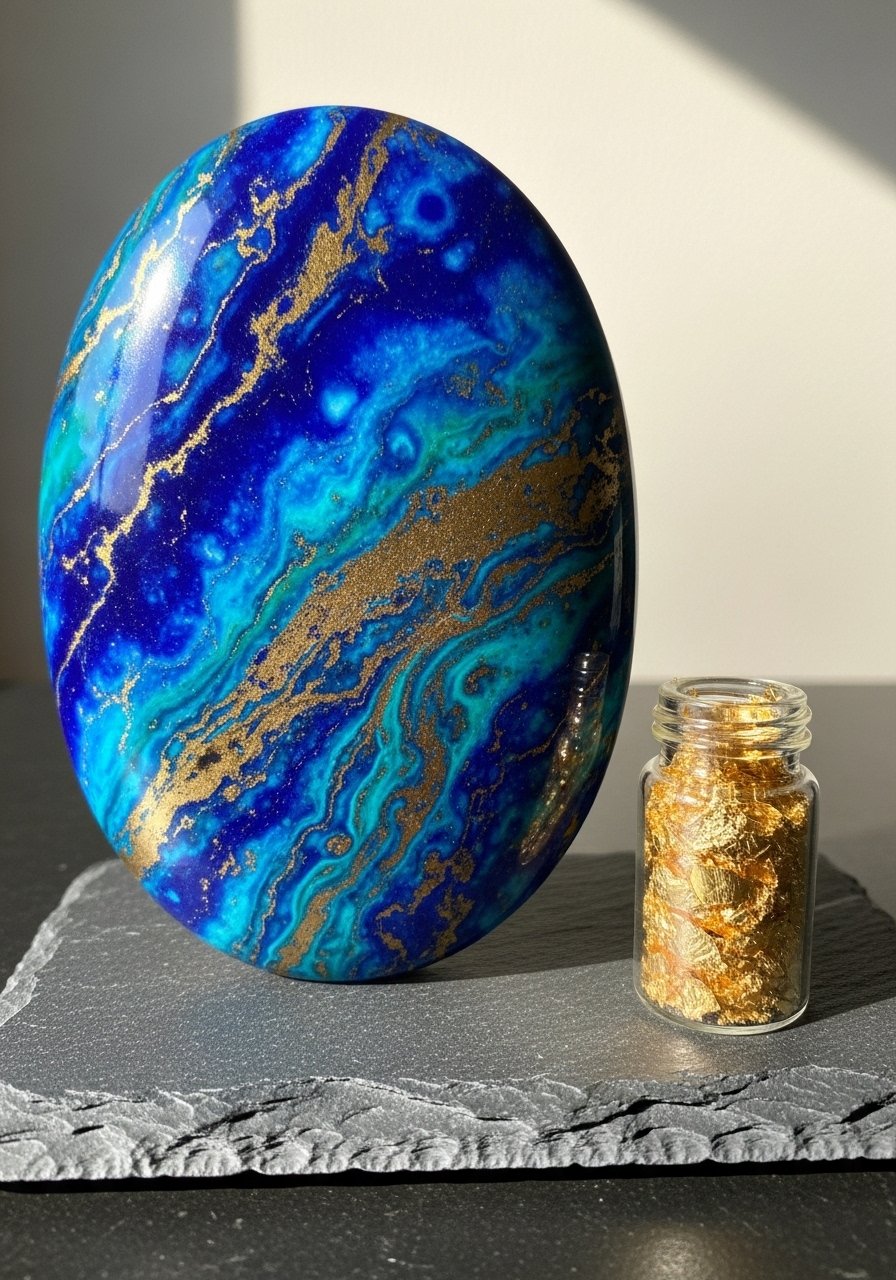
Marbled or abstract swirls are modern and forgiving—no precision needed. Use alcohol inks for marbling then seal with epoxy for permanence.
Materials
- 3 large oval stones (5–6 in)
- Alcohol inks (3 colors) OR acrylic pour paints
- Isopropyl alcohol and pipettes
- Epoxy resin kit (small)
- Gloves and mixing supplies
- Heat gun for resin bubbles
Instructions
- Clean stones; apply a thin white base for color pop.
- Drop alcohol inks and blend with isopropyl alcohol until you like the marbling.
- Let inks dry 30–60 minutes.
- Pour a thin epoxy layer; smooth and remove bubbles with a heat gun.
- Cure 24–48 hours.
How to Display or Gift It
- Use as statement pieces on tables or in rock gardens.
- Wrap with protective padding if gifting.
- Store upright on a small easel for display.
- Painted Rock Nameplates

Turn a stone into a nameplate for garden gates or porch steps. Use vinyl for very crisp fonts or a steady hand with a paint pen.
Materials
- 1 large flat oval stone (6–8 in)
- Slate gray acrylic base (50 ml)
- White paint pen or vinyl cut letters
- Matte sealer
- Transfer tape if using vinyl
Instructions
- Clean and paint base with 2 thin coats; dry 30 minutes between.
- Apply name with vinyl or paint pen. If painting, sketch then fill carefully.
- Seal with 2 coats matte sealer; dry 20 minutes between coats.
- Place by the front step or attach to gate with outdoor adhesive.
How to Display or Gift It
- Present as a housewarming gift with matching plant.
- Store flat in a padded box until installed.
- Seasonal Holiday Stones (Pumpkin & Snowflake)
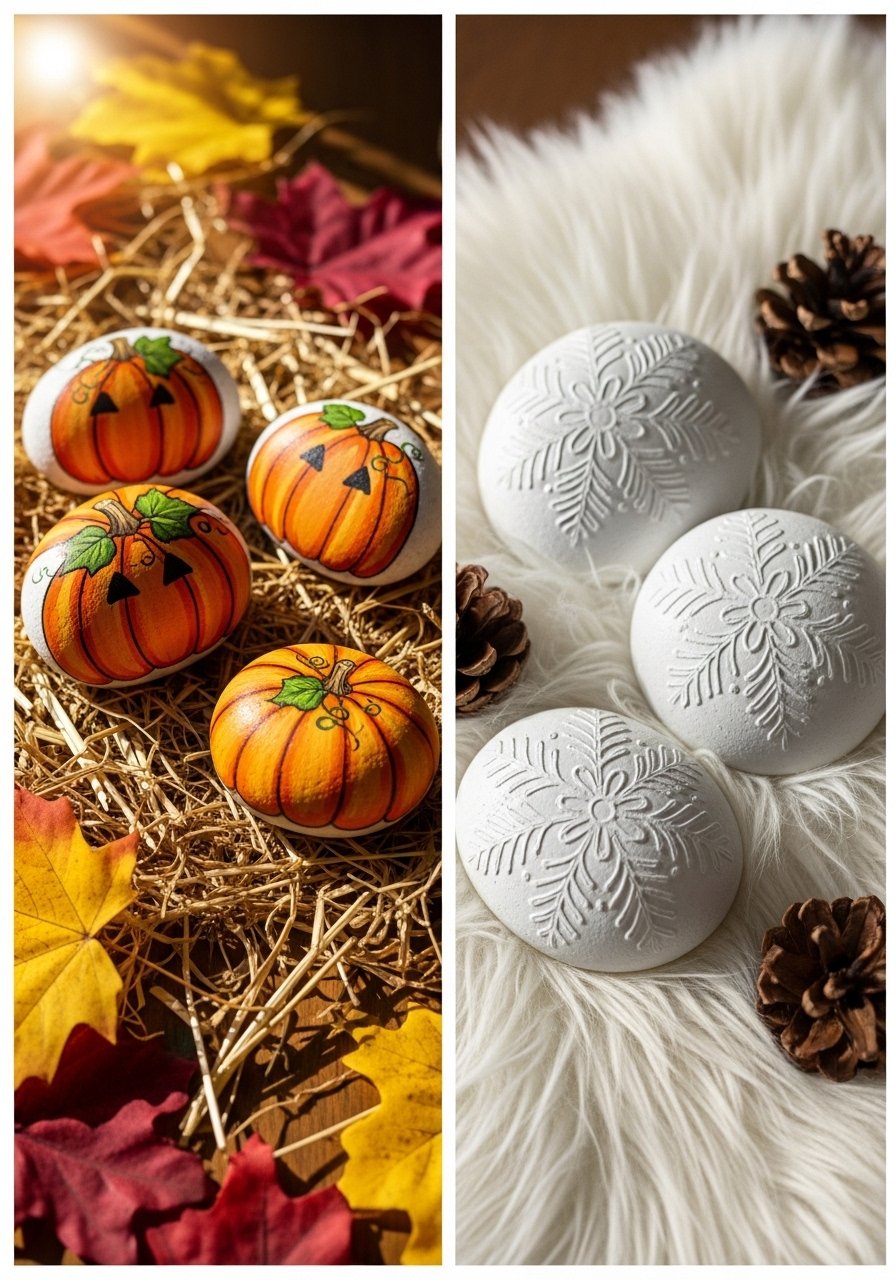
Create seasonal groups—easy to swap out for fall and winter. Use stencils for snowflakes and freehand for pumpkins.
Materials
- 10 stones per season
- Acrylic paints for each theme (orange/white/metallic)
- Snowflake stencil set
- Detail brushes and sponge dabbers
- Outdoor sealer (gloss for pumpkin shine, matte for snow)
Instructions
- Clean stones and paint base colors; dry 20 minutes.
- Stencil snowflakes or paint pumpkins in layers; dry 10 minutes between layers.
- Seal with appropriate sealer; cure 24 hours before outdoor display.
- Store seasonal stones in labeled bins to reuse annually.
How to Display or Gift It
- Scatter along mantels or porch steps seasonally.
- Gift a seasonal set with a small care card.
- Keep in stackable craft bins until needed.
- Inspirational Quote Garden Stones
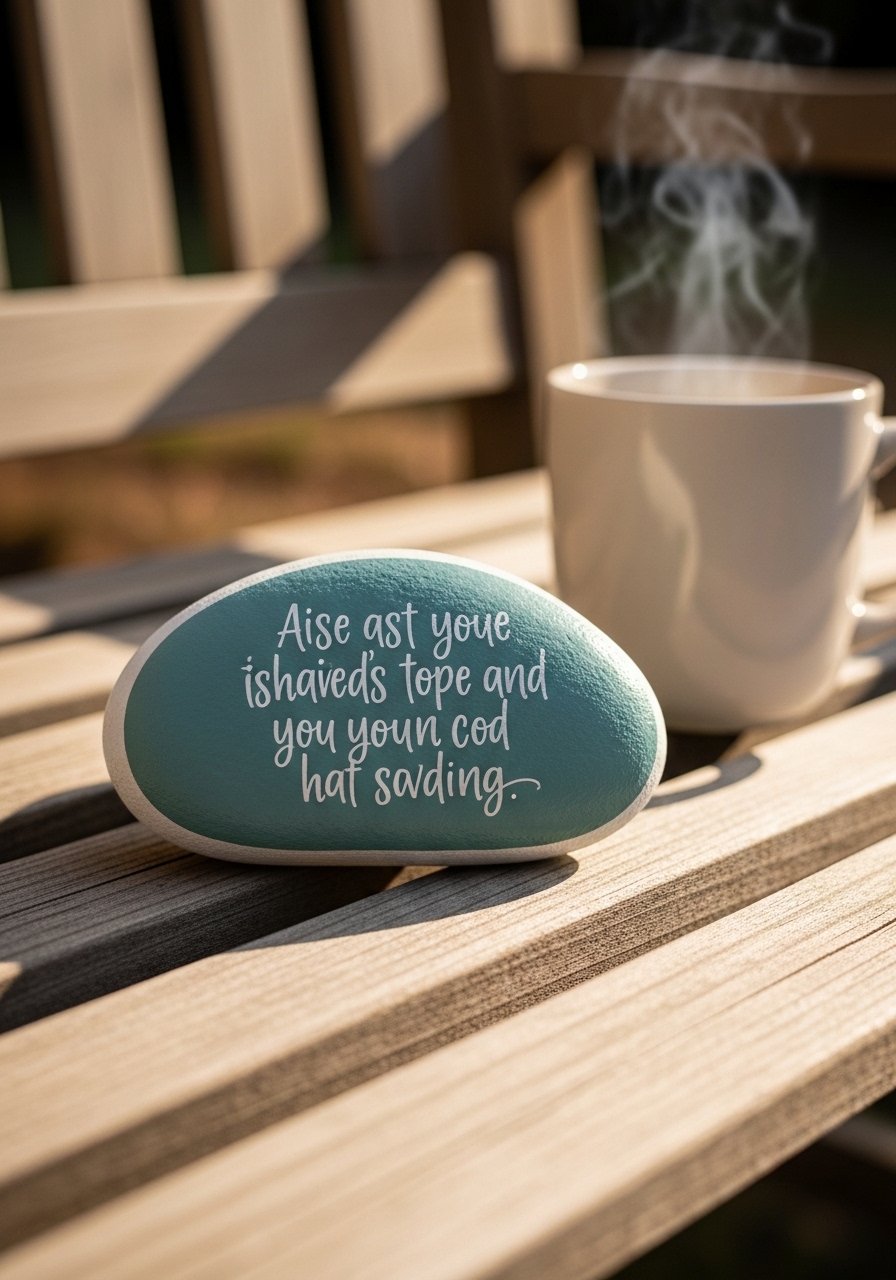
Short quotes feel uplifting outdoors. Use a white paint pen for clean lettering and seal well for durability.
Materials
- 6 medium flat stones
- Base acrylic color (teal, mint)
- White paint pen (medium tip)
- Pencil for sketching
- Matte outdoor sealer
- Small wooden easel for display
Instructions
- Prime and paint base color; dry 25 minutes.
- Lightly pencil quote spacing.
- Letter with paint pen in one confident stroke; dry 10 minutes.
- Seal with two matte coats; dry 20 minutes between.
How to Display or Gift It
- Place near seating areas or walking paths.
- Gift as a set for encouragement notes.
- Display on a small wooden easel; consider a mini wooden easel.
- Rainforest Leaf Rubbing Stones
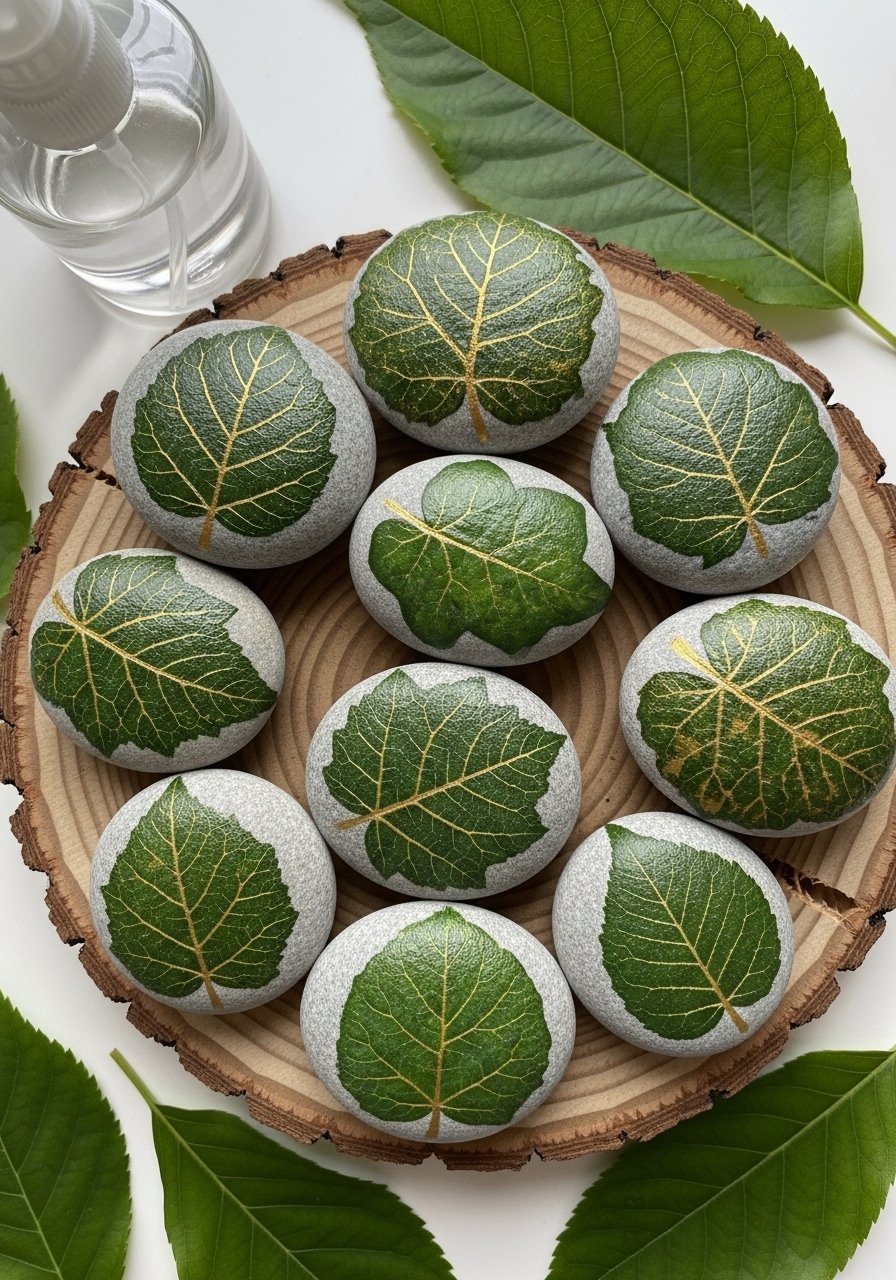
Use real leaves to press texture into paint for botanical impressions. The technique creates subtle, weatherproof impressions.
Materials
- 8 stones (flat)
- Fresh leaves (various sizes)
- Acrylic paint in greens
- Brayer roller (small)
- Foam brush and dish for water
- Outdoor sealer
- Craft glue (for fixing delicate leaves if you want kept originals)
Instructions
- Lay leaf on stone, dab paint over with foam brush.
- Press firmly or roll with brayer to transfer texture.
- Remove leaf; let paint dry 20 minutes.
- Touch up highlights with tiny brush.
- Seal with 2 coats outdoor sealer; dry 30 minutes between coats.
How to Display or Gift It
- Use as tray accents with potted ferns.
- Press a sample leaf into a gift tag and pair with stone gift sets.
- Stenciled Geometric Garden Markers

Geometric stencils make modern markers that handle weather well. Use painter’s tape for sharp lines and a brayer for even paint application.
Materials
- 8 medium stones
- Stencil set (triangles, stripes)
- Acrylics in 3–4 colors
- Brayer roller
- Painter’s tape
- Matte outdoor sealer
Instructions
- Clean stones and paint base color; dry 20 minutes.
- Secure stencil and use brayer to apply color evenly; remove stencil carefully.
- Repeat with additional shapes for layered geometric look.
- Seal with matte sealer; dry 20 minutes.
How to Display or Gift It
- Line modern planters with geometric markers.
- Gift in a slim box with a stencil included for DIY fun.
- Store unused stencils in a flat file to prevent warping.
- Resin-Sealed Botanical Pressed Flowers on Stone
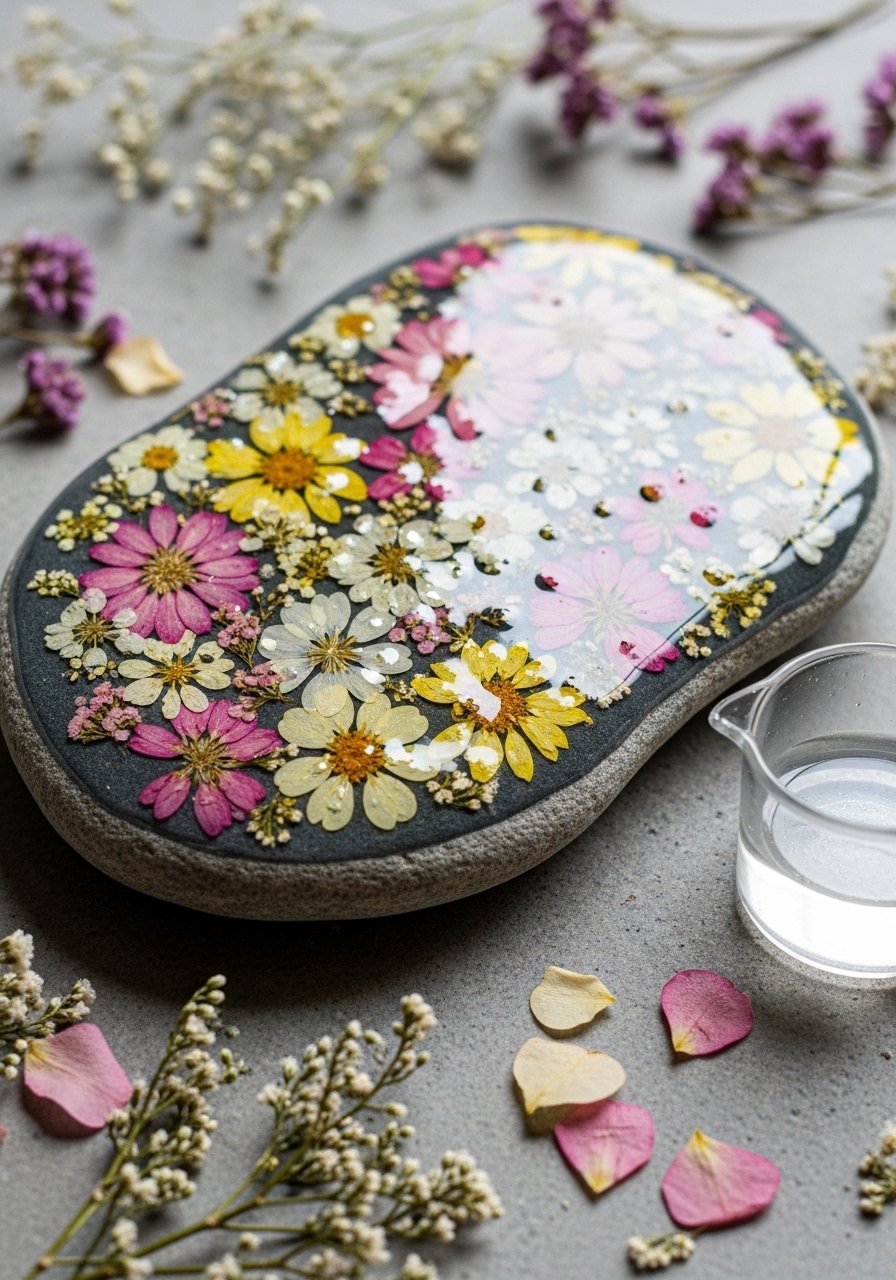
Embed pressed flowers under resin for a delicate, long-lasting effect. Press flowers for 1–2 weeks before use and use a clear resin for a glassy finish.
Materials
- 3 large smooth stones
- Pressed flowers (pressed 1–2 weeks prior)
- Clear epoxy resin kit (small)
- Disposable mixing cups and stir sticks
- Nitrile gloves and protective surface
- Heat gun for bubbles
Instructions
- Arrange pressed flowers on cleaned stone.
- Mix resin per kit instructions; pour a thin layer, position flowers, then pour a second layer to fully embed.
- Remove bubbles with heat gun briefly.
- Cure 24–48 hours depending on resin. Final piece should be hard and glossy, not tacky.
How to Display or Gift It
- Use as delicate décor on a garden table.
- Gift in a padded box with a note about press time and care.
- Keep extras stored upright until fully cured.
You made it through 24 colorful, charming, weather-resistant stone painting ideas for garden that range from playful to elegant. There’s a project here whether you’re painting with kids, building a meditative rock garden, or creating giftable keepsakes. Pin this list and save your favorite three to try next weekend — then tell a friend and trade techniques.
If one tool will help across many projects, a reliable clear epoxy resin kit and a weatherproof Mod Podge Outdoor sealer will take you far. Which stone project are you trying first — a sunburst rock or a resin-pressed flower? Share a picture when you do; I’d love to see your garden come alive.


