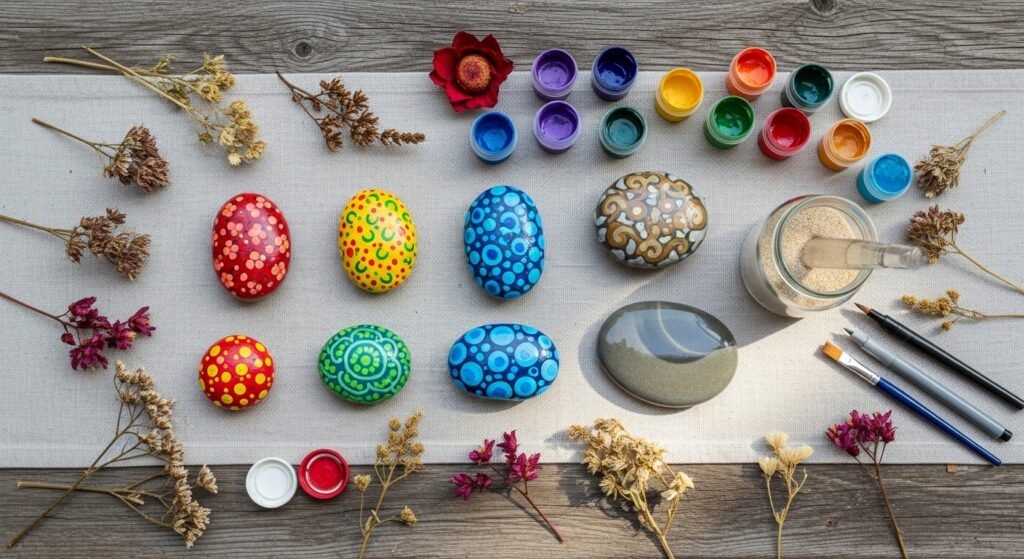
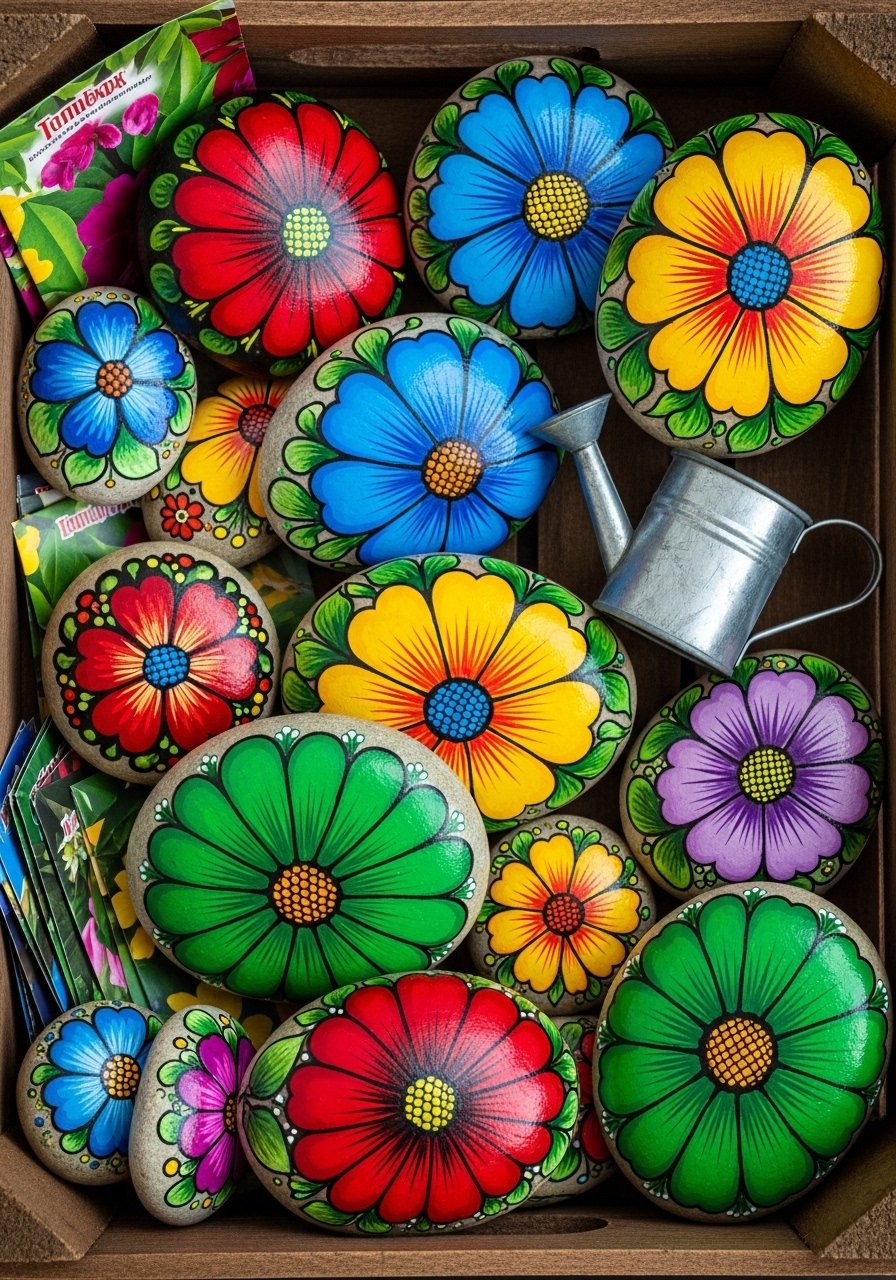
You know that moment when a bare garden bed or plain patio needs a little personality? These 29 playful and weather-ready stone painting ideas for outdoors give your paths, pots, and planters instant color and charm. Whether you want whimsical ladybug markers, durable pet memorial stones, or boho mandalas that stand up to rain, these projects are designed to last and look beautiful.
I’ll walk you through easy prep, paints that resist fading, accurate drying and curing times, and sealing tricks that prevent chipping. You'll see a mix of cottagecore, farmhouse, boho, and Japandi-friendly looks so there's a style for every garden. Grab a set of outdoor acrylics and a pack of paint pens—my go-to FolkArt outdoor acrylic paint set works well—and let’s make your stones weatherproof and cheerful.
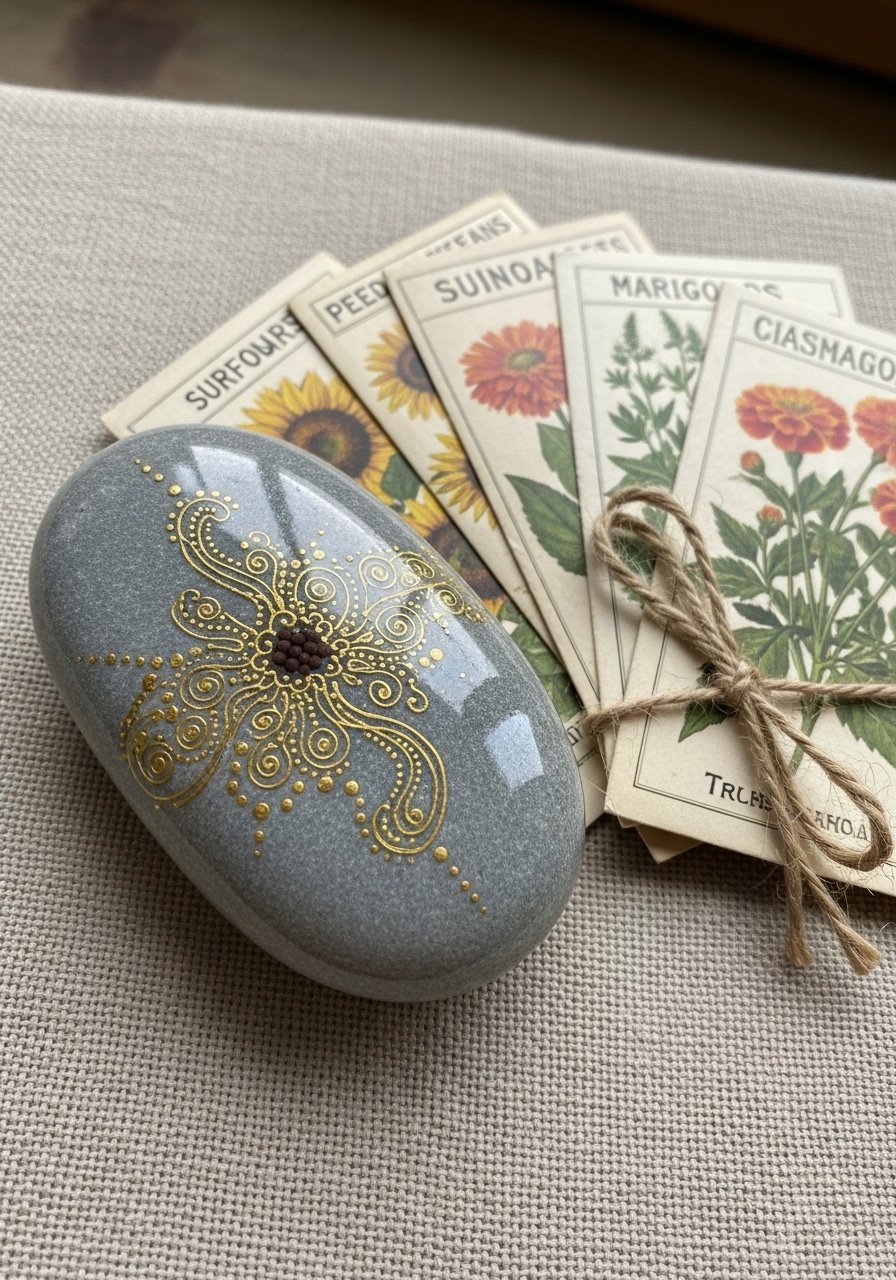
- Sunburst Rock Path Markers
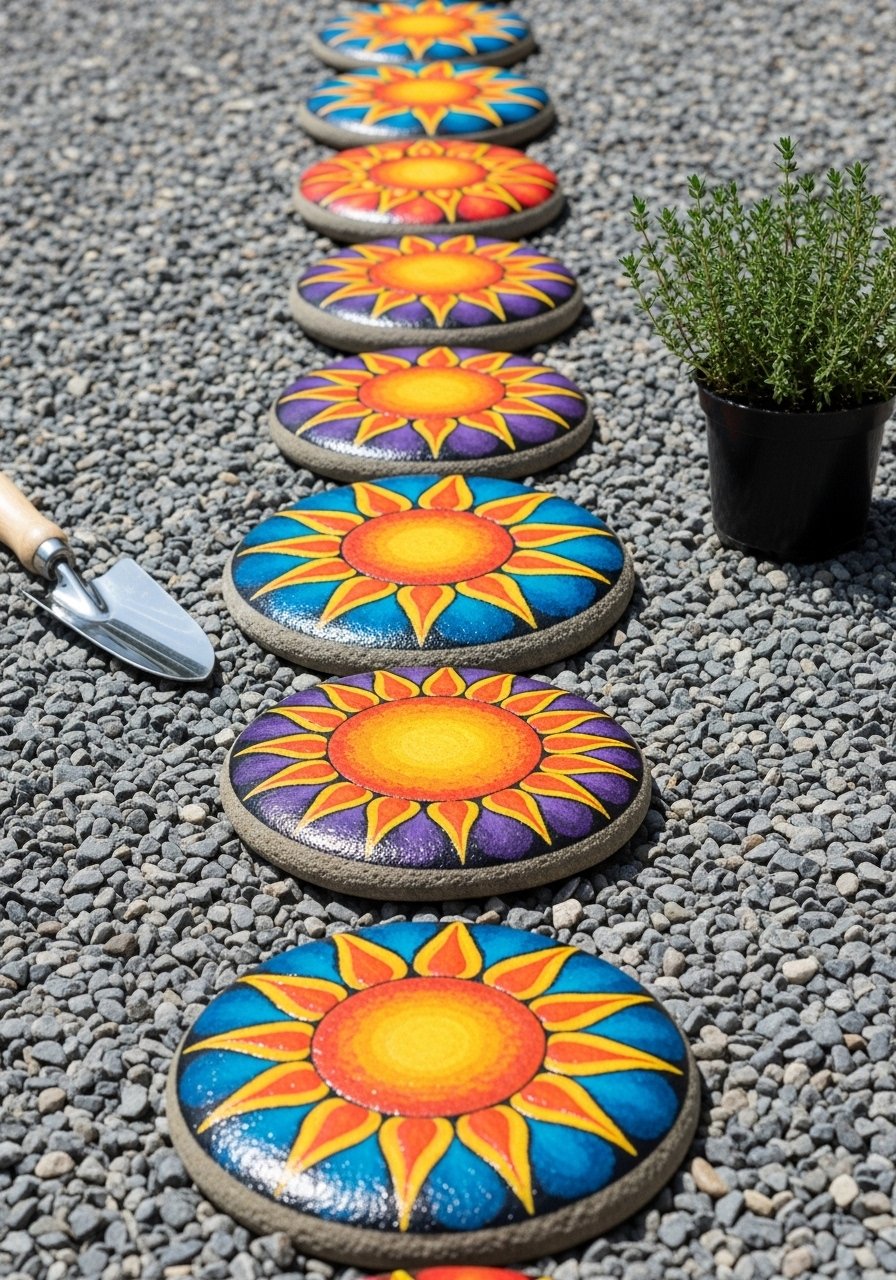
Bright, graphic sunbursts make a cheerful path. The bold rays are simple but impactful, and sealed properly they'll shrug off rain and foot traffic. This is perfect if you love clean lines and a cottagecore color palette. The finished stones feel smooth and glossy to the touch.
Materials
- Flat river stones, 6–8 pieces (approx 3–4" diameter)
- FolkArt outdoor acrylic paints, assorted colors, 2 oz tubes
- 1/2" foam brush
- Fine-tipped acrylic paint pen, black (0.7 mm)
- Low-tack painter's tape, 1/2" roll
- Mod Podge Outdoor gloss, 2 coats
- Sandpaper, 120 grit for light scuffing
- Nitrile gloves and paper towel
Instructions
- Wash stones with soapy water, rinse, and let dry fully (2 hours).
- Lightly sand each stone to give paint tooth. Dust off.
- Tape the center circle with painter's tape if you want a crisp center. Paint a base color with a foam brush; allow 30 minutes between coats. Apply 2 coats for opaque coverage.
- Use a pencil to mark sunray guides radiating from the center.
- Paint alternating rays with contrasting colors using a small round brush. Let dry 20–30 minutes.
- Outline rays with a fine-tipped paint pen for contrast.
- When fully dry (overnight recommended), apply 2 thin coats of Mod Podge Outdoor gloss. Allow 24 hours curing between coats.
- Cure fully for 72 hours before placing in a high-traffic area.
How to Display or Gift It
- Line these along a walkway or around a small vegetable bed for bright accents.
- Tie a tag and nestle a pair in a gift box for plant-loving friends.
- Store extras flat in a shallow craft organizer until sealed; I like a small stackable craft tray.
- Painted Succulent Pebble Trio
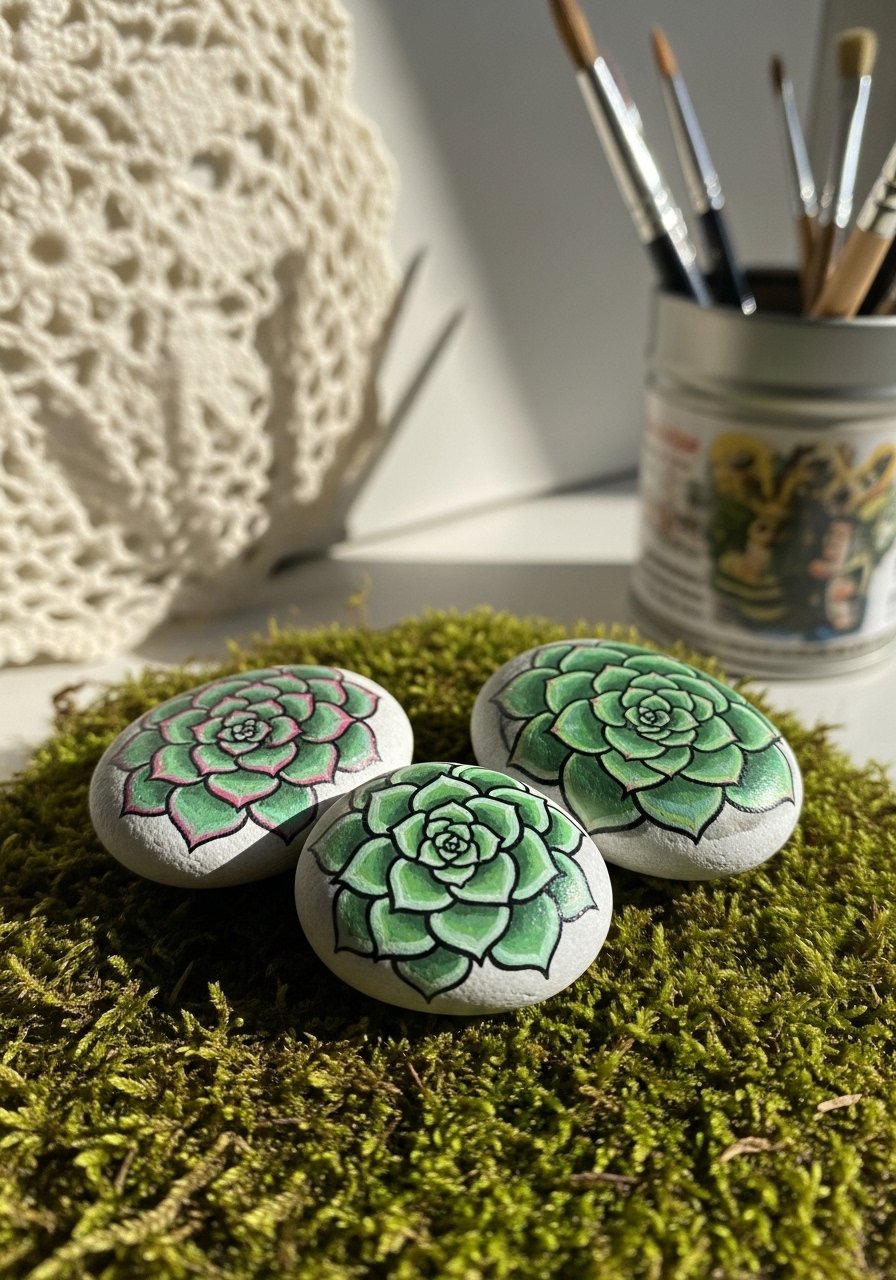
Mini succulent paintings on pebbles add micro-garden interest—great tucked into potting soil or terrariums. The textured matte finish mimics living succulents and the smooth stone keeps paint crisp. Beginners and kids will love how fast each pebble comes together.
Materials
- Small flat pebbles, 3 per set (approx 1–1.5")
- Acrylic craft paint set, greens and browns, 1 oz tubes
- Tiny round brushes (sizes 0 and 2)
- White paint pen for highlights
- Matte outdoor sealer spray (UV-resistant)
- Paper plate palette
- Q-tips for small corrections
Instructions
- Clean pebbles and let dry (1 hour).
- Apply a light base coat in a pale green; let dry 15–20 minutes.
- Use a tiny round brush to layer darker greens and shape rosettes with short strokes.
- Add highlights with a white paint pen—tiny dots or short strokes.
- Let paint fully dry (overnight).
- Spray with 2 light coats of UV-resistant matte sealer, 15-minute intervals. Cure 24 hours.
How to Display or Gift It
- Nestle among real succulents in a shallow dish for a mixed-texture vignette.
- Attach a small felt backing and use as fridge magnets.
- Pack sets in kraft boxes with tissue for a sweet, portable gift.
- Ladybug Garden Labels
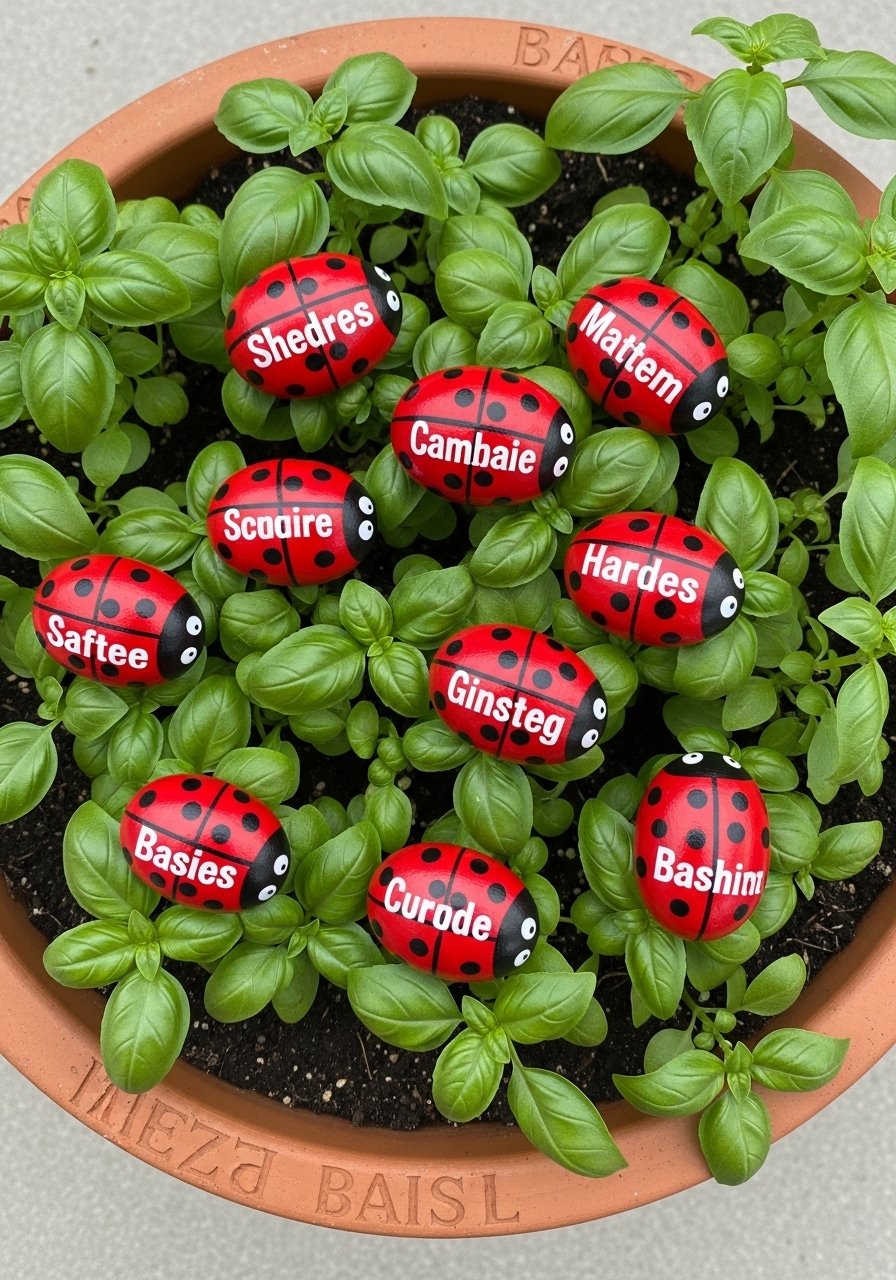
Cute, functional, and weather-ready—ladybug markers identify herbs while brightening pots. Use paint pens for names so labels stay readable. Gardeners of any skill level will appreciate the charm.
Materials
- Oval planting stones, 6 pieces (approx 2–3")
- Red and black acrylics, 2 oz each
- White paint pen for labels (fine tip)
- Black paint pen for dots and head
- Mod Podge Outdoor matte, 2 coats
- Small round brush and flat brush
Instructions
- Clean stones and dry 1 hour.
- Paint base red—2 thin coats, 30 minutes between coats.
- Once dry, block off a center line for the wing split. Paint head black and dots.
- Use the white pen to write plant names—press firmly but avoid dragging.
- Allow overnight drying.
- Seal with 2 coats of Mod Podge Outdoor matte; cure 24–48 hours.
How to Display or Gift It
- Place in pots, labeling basil, mint, and thyme.
- Wrap trios in cellophane with twine for a hostess gift.
- Store extra labels flat in a shallow craft box.
- Boho Mandala Garden Stone

Mandala stones bring calming boho vibes. The concentric dots and lines pop with paint pens and last when sealed. Great for a meditative painting session or gift for a friend who loves boho or Japandi styles.
Materials
- Large flat garden stone, 1 (approx 5–6")
- Acrylic paint set, earth tones and white
- Dotting tools set (various sizes) or round stylus
- Fine-tipped paint pens (white and black)
- Mod Podge Outdoor gloss, 2 coats
- Pencil for center guideline
Instructions
- Clean and prime the stone with a neutral base coat; dry 30–45 minutes.
- Lightly mark center and concentric circles with a pencil.
- Use dotting tools to apply mandala dots, working from center outward.
- Add fine lines and details with paint pens.
- Let dry overnight for full pigment set.
- Seal with 2 thin coats of outdoor gloss; allow 24 hours between coats and 72 hours cure.
How to Display or Gift It
- Place as a focal point in a rock garden or meditation nook.
- Display on a small wooden easel for table décor—try a mini wooden easel.
- Wrap in kraft paper and tie with jute for gifting.
- Chalkboard Pebbles for Labels
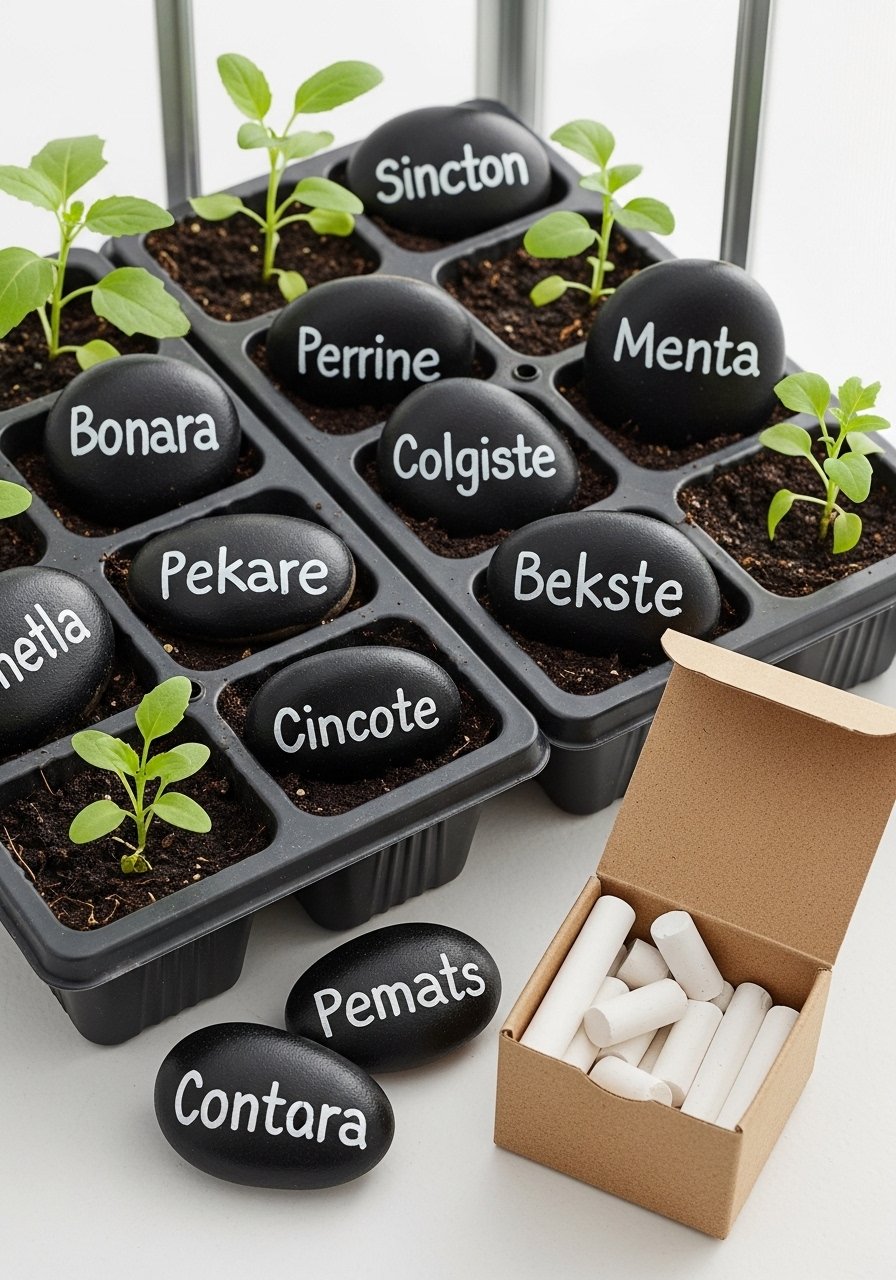
Reusable chalkboard stones are clever plant tags that you can erase and relabel each season. Chalkboard paint clings well to stone and the matte surface is easy to write on.
Materials
- Small flat stones, 8–12 (approx 1–2")
- Chalkboard paint, 1–2 oz sample
- Foam brush, 1/2"
- Fine-grit sandpaper (180)
- Box of white chalk or chalk markers
- Clear outdoor matte sealer optional
Instructions
- Sand lightly, clean, and dry stones.
- Apply 2 thin coats of chalkboard paint, 20 minutes between coats.
- Let cure 24 hours.
- Prime gently by rubbing chalk over the surface and wiping off.
- Write labels with chalk. If you want longevity, add a light coat of matte sealer but avoid sealing the chalked surface fully.
How to Display or Gift It
- Stick in herb trays, seedling flats, or gift seedling kits with a set of these.
- Store unused stones in a mason jar labeled for future reuse.
- Painted Pebble Mosaic Stepping Stone
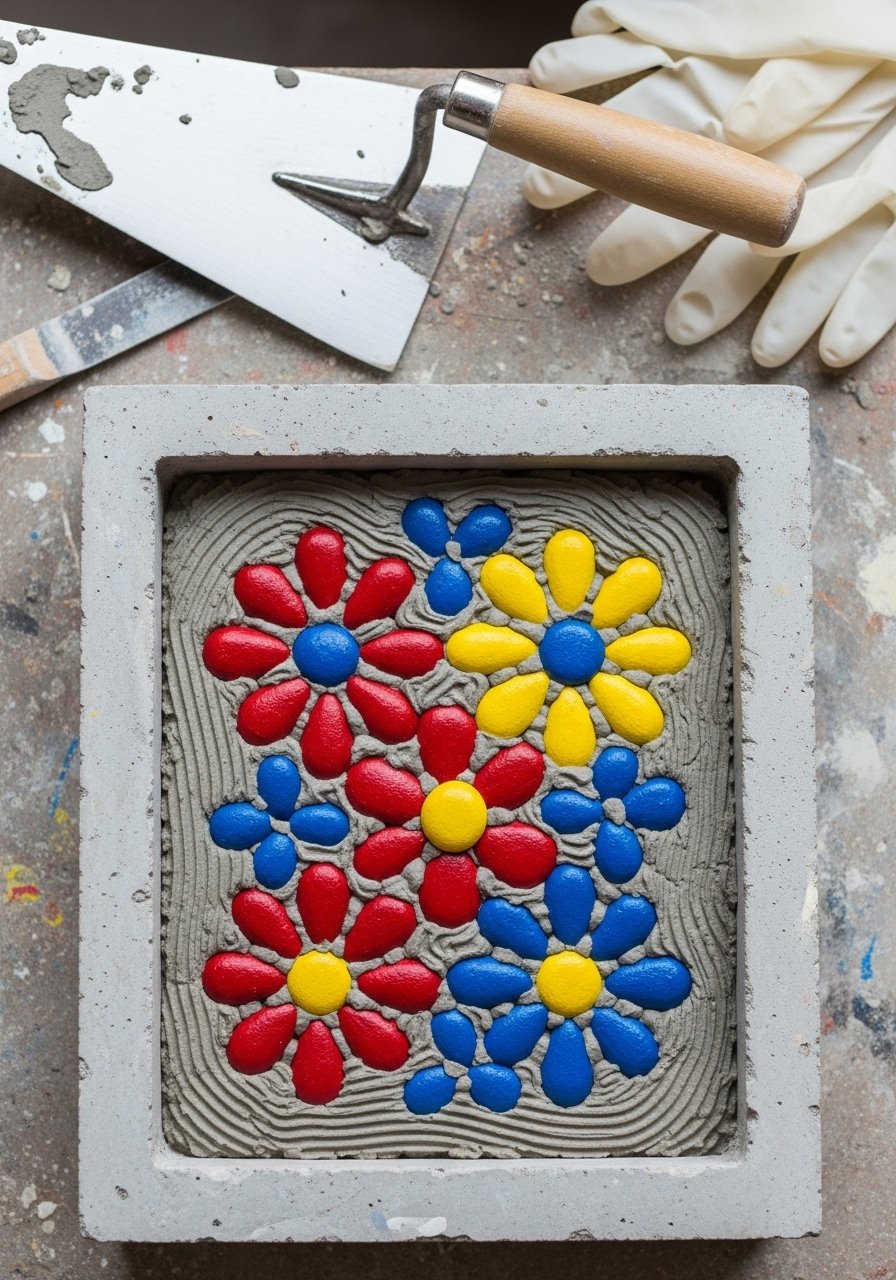
Combine painted pebbles with a mortar base for a DIY stepping stone. The painted pieces are set into concrete then sealed for a durable garden feature. This is a project for crafters comfortable with small amounts of cement.
Materials
- Round mold (12" diameter)
- Quick-set mortar, small 10 lb bag
- Painted pebbles (20–30), pre-sealed
- Mixing bucket and trowel
- Rubber gloves
- Concrete sealer (water-based), 1 can
Instructions
- Paint pebbles and pre-seal them with 2 coats of outdoor sealer; cure 48 hours.
- Mix mortar per package instructions.
- Pour mortar into mold to 1" depth, smooth surface.
- Press painted pebbles into mortar in desired pattern.
- Let set 24–48 hours before demolding.
- Apply concrete sealer over the stone and pebble joints; cure 72 hours.
How to Display or Gift It
- Place at garden entrances or by a porch.
- Wrap with kraft paper and a ribbon if gifting a ready-made stone.
- Store mold and leftover mortar in labeled buckets for easy repeats.
- Fairy Door Pebbles for Planters
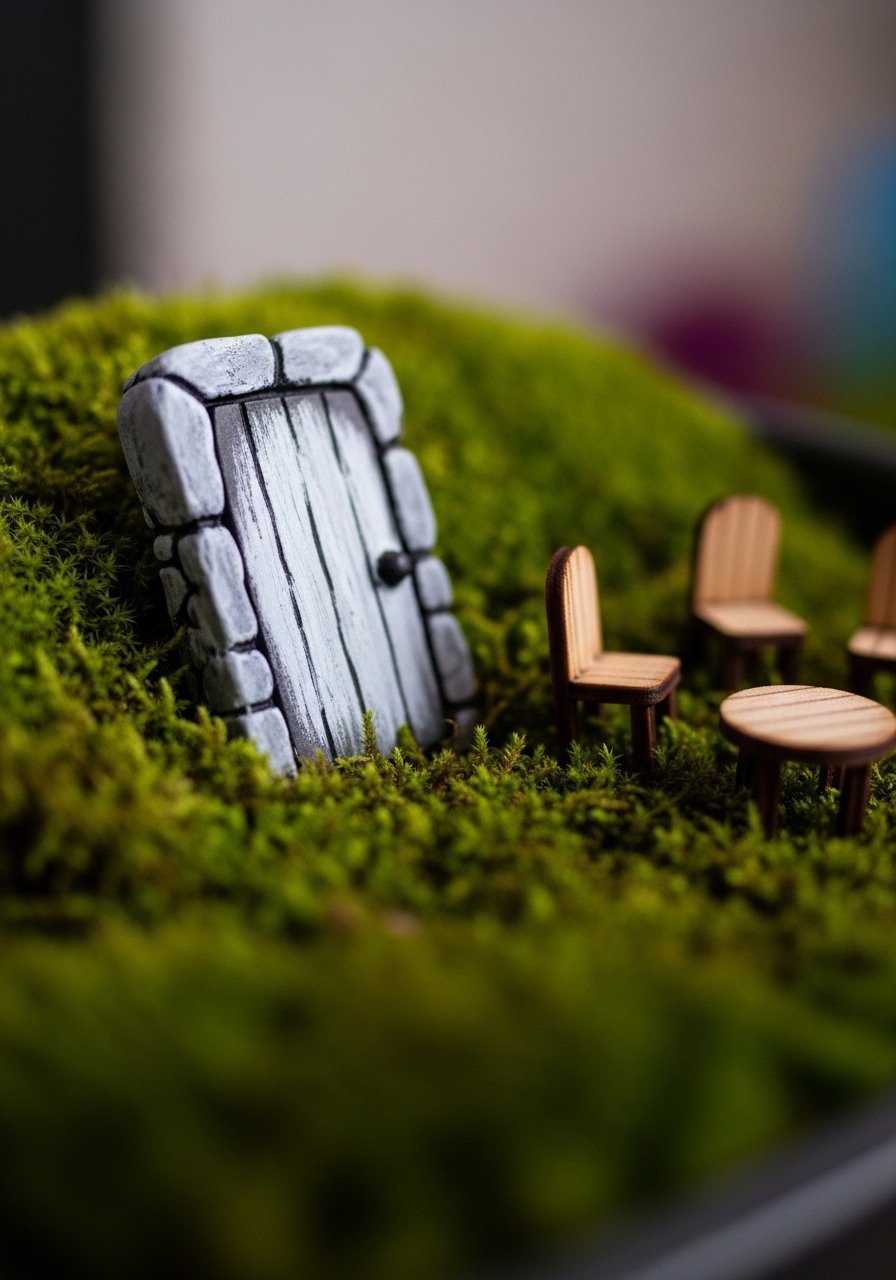
Tiny painted doors on stones create instant fairy gardens. Use fine brushes and a steady hand for windows and knobs. Sealed doors survive outdoor misting and morning dew.
Materials
- Small flat stones, 1–2" each
- Acrylic craft paints, assorted
- Ultra-fine round brush (size 0)
- Gloss outdoor sealer, 2 coats
- Tiny embellishments (ribbon, miniature knobs)
- Tacky glue for embellishments
Instructions
- Clean stones and paint a base color; dry 30 minutes.
- Sketch door outline with pencil; paint door and trim with fine brush.
- Add hardware details and windows with a white or metallic pen.
- Glue tiny knobs or ribbon accents; allow glue to set 24 hours.
- Seal with 2 gloss coats; cure 24–48 hours.
How to Display or Gift It
- Tuck into potted plants or terrariums for whimsy.
- Gift as a tiny "starter kit" with moss and a mini pot.
- Keep extras in a small compartment organizer.
- Farmhouse Numbered House Stones — stone painting ideas for outdoors
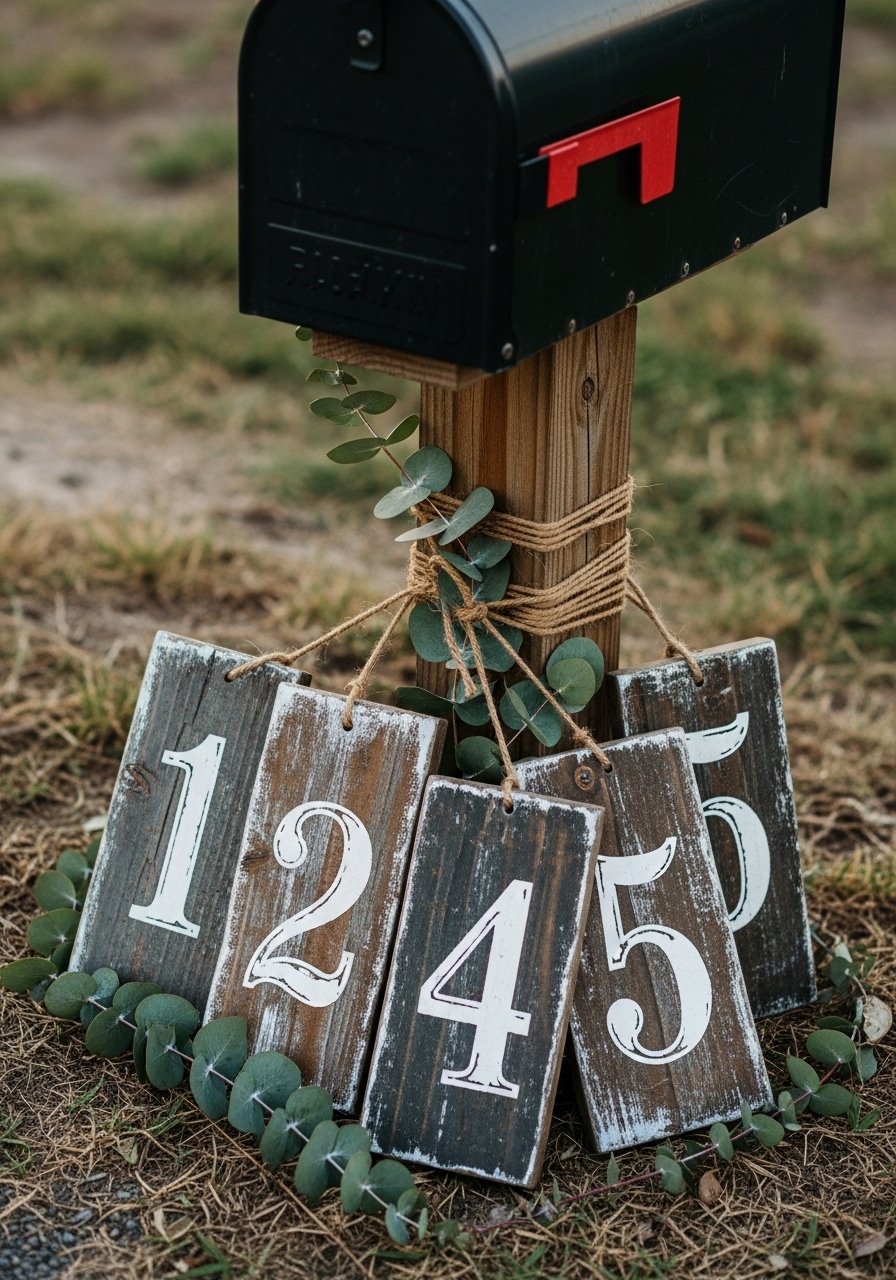
Numbered house stones bring farmhouse charm to an entryway. Use stencils and distressing techniques to match farmhouse or Japandi styles, and seal for weather resistance.
Materials
- Rectangular stones, 1–3 (5–6" long)
- Outdoor-grade white acrylic paint
- Number stencils
- Foam dabber and flat brush
- Light brown glaze or watered-down paint for distress
- Krylon UV-resistant clear spray
- Sandpaper for distressing
Instructions
- Clean and paint a solid background; 2 coats, 30 minutes apart.
- Center stencil and dab number using a foam dabber for crisp edges.
- Lightly sand edges and corners for a worn look.
- Apply a very thin glaze of brown to age; wipe off quickly.
- Let dry overnight.
- Spray 2 coats of UV-resistant clear spray, 15 minutes apart; cure 24–48 hours.
How to Display or Gift It
- Place by mailbox or front steps to mark your home.
- Pair with a slate slate sign or wooden planter for a coordinated look.
- Store spares in a shallow craft chest.
- Pet Paw Print Memorial Stones

Create commemorative pet stones with hand-painted paw prints and engraving-style lettering. Use a durable sealer to keep memories intact outdoors.
Materials
- Heart-shaped stones, 1–2 (approx 4")
- Acrylic paints, neutral tones
- Fine paint pen for dates and names
- Clear outdoor epoxy (thin pour) for glossy finish
- Alcohol wipes to prep surface
- Foam brush
Instructions
- Clean and prime stone; dry 30 minutes.
- Paint background color; 2 coats as needed.
- Carefully paint a paw print or press a pet's paw into an ink pad and stamp (practice first).
- Add dates with a fine paint pen.
- Let dry overnight.
- Apply a thin coat of outdoor epoxy or 2 coats of clear sealer; allow epoxy to cure 72 hours.
How to Display or Gift It
- Place next to a favorite garden spot or pet memorial area.
- Wrap in soft tissue within a small box for a sympathetic gift.
- Keep out of direct weather while epoxy cures for full resilience.
- Weatherproof Story Stones (Seasonal Icons)
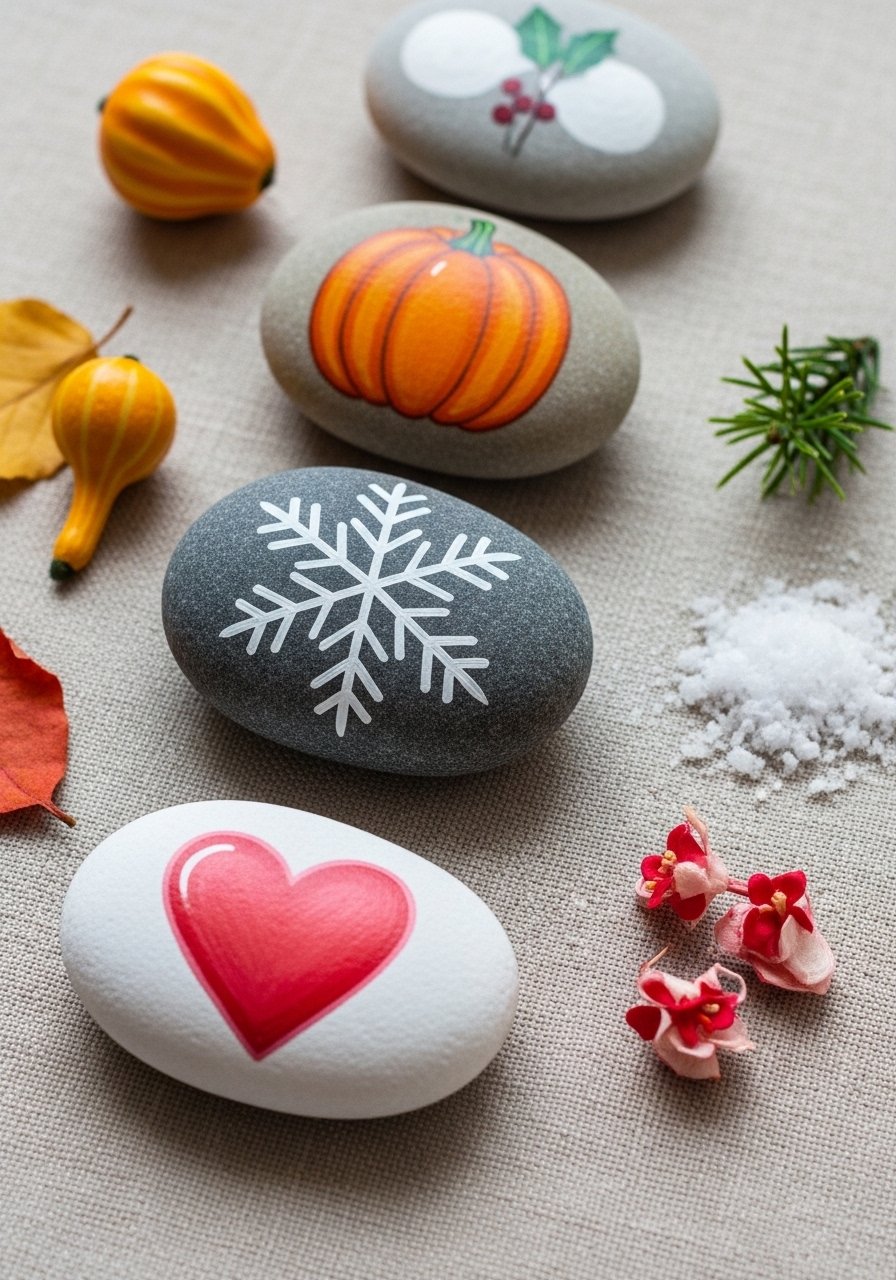
Create a set of story stones for seasonal displays: swap icons in planters or along a mantel. Durable paint and sealer mean they live outdoors through spring and fall.
Materials
- Small stones, 12 (1–2")
- Acrylic paint set, seasonal palette
- Detail brushes
- Outdoor matte sealer
- Storage pouch for off-season storage
Instructions
- Clean and sort stones by size.
- Paint simple icons—pumpkin, snowflake, leaf—one per stone.
- Add small details with a fine brush.
- Let dry overnight.
- Seal with 2 coats of matte sealer, 15 minutes apart.
- Store in a labeled pouch when not in use.
How to Display or Gift It
- Rotate stones in planters by season.
- Package as a set with a linen pouch for gifting.
- Use a small wooden crate for storage between seasons.
- Nautical Anchor Rocks

Nautical anchors are timeless for beachy patios and pots. Use a steady hand or stencil for clean anchors and a glossy sealer to mimic a polished boat finish.
Materials
- Round stones, 6 (3–4")
- Navy blue and white acrylics
- Anchor stencil
- Flat brush and small liner brush
- Gloss sealer spray
- Fine sandpaper
Instructions
- Sand and clean stones.
- Paint navy base—2 coats.
- Position stencil and paint anchors white.
- Add rope accents with a liner brush.
- Let dry overnight.
- Seal with 2 gloss coats and cure 24–48 hours.
How to Display or Gift It
- Scatter among potted palms or coastal planters.
- Pair with driftwood for a mantel vignette.
- Gift in a nautical-themed box with twine.
- Glow-in-the-Dark Path Accents

Add glow-in-the-dark paint for subtle nighttime magic. These stones charge in daylight and give a soft light at night—perfect for marking paths.
Materials
- Flat stones, 10–15 (2–3")
- Glow-in-the-dark acrylic paint
- White primer
- Foam brush
- Outdoor matte sealer
- UV topcoat optional for longer glow
Instructions
- Prime stones white to maximize glow pigment.
- Apply 2 coats of glow paint; let dry 30 minutes between coats.
- Charge in bright sunlight for 2 hours before testing glow.
- Seal with 1 coat of matte sealer to protect surface.
- Cure 24 hours.
How to Display or Gift It
- Place at the edge of a path or near steps for nighttime visibility.
- Include in an outdoor lantern bowl for soft evening ambiance.
- Store inside in the sun to recharge before events.
- Geode Slice Painted Stones

Painted geode stones bring a touch of glamour to the garden. Layer metallics and transparent glazes to mimic crystalline depth; seal thoroughly to keep sparkle intact.
Materials
- Flat stones, 1–3 (4–5")
- Metallic acrylic paints (gold, silver, copper)
- Translucent glaze medium
- Fine glitter (outdoor-rated)
- Small round brushes
- Resin or outdoor epoxy for a glassy finish
Instructions
- Paint base color and let dry 30 minutes.
- Sketch geode rings and fill with metallics and glaze for depth.
- Sprinkle fine glitter into wet glaze for sparkle.
- Let dry overnight.
- Pour a thin layer of outdoor epoxy; let cure 72 hours.
How to Display or Gift It
- Use as a statement in a succulent dish or rock garden.
- Wrap in soft tissue and a gift box for a fancy present.
- Keep in a cool, shaded spot if epoxy will be in direct sun.
- Painted Animal Portrait Stone (Cat or Dog)
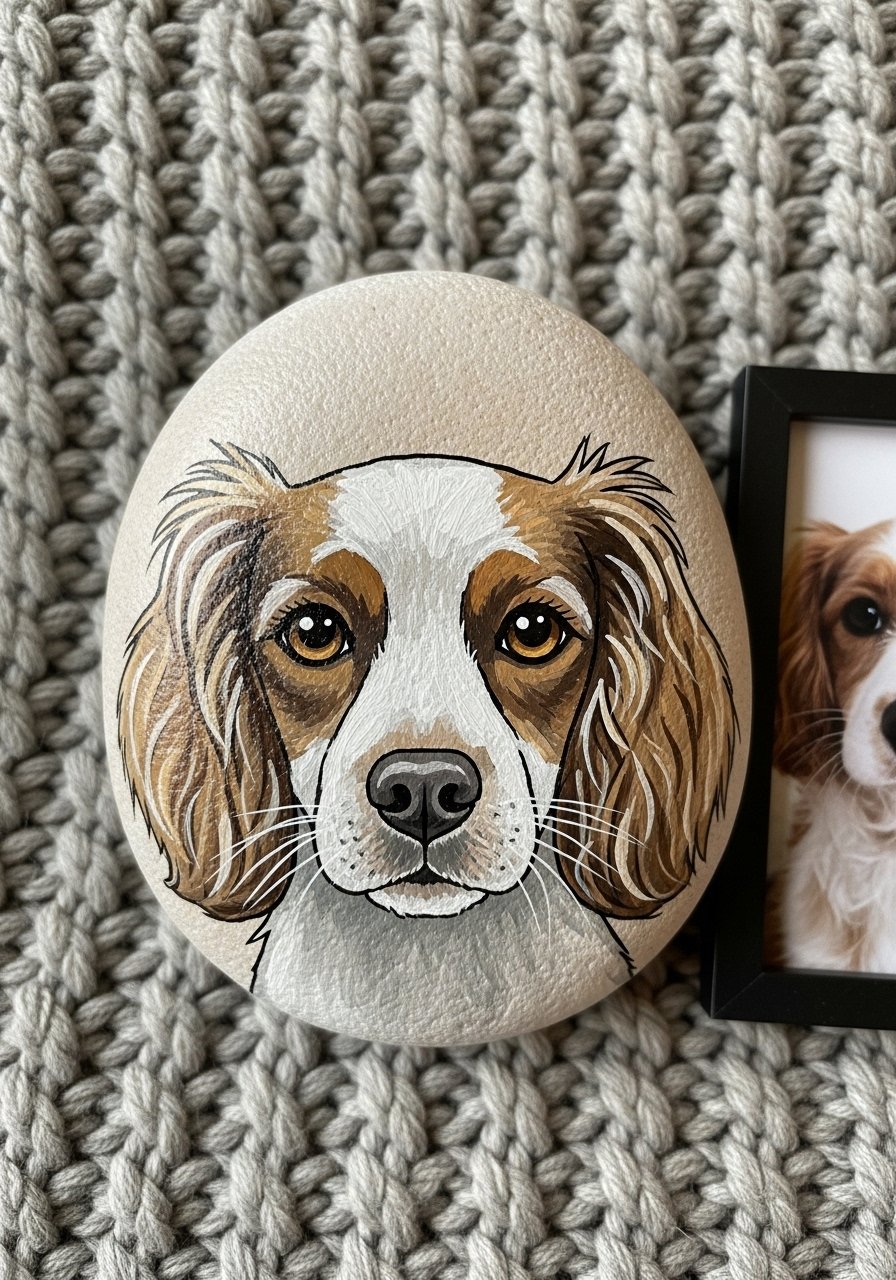
Capture a pet's likeness on stone for keepsakes or memorials. Use reference photos and fine liners for eyes and whiskers. Seal for outdoor durability.
Materials
- Medium flat stone, 1 (approx 4")
- Acrylic paints (skin/coat tones)
- Fine detail round brushes
- White and black paint pens for highlights
- Epoxy or outdoor gloss sealer
- Reference photo
Instructions
- Prime and paint a mid-tone background.
- Sketch pet features lightly with pencil.
- Block in major color areas and build up fur texture with small strokes.
- Add eyes and whiskers with fine brushes and paint pens.
- Let dry overnight.
- Seal with epoxy or gloss sealer; cure 72 hours.
How to Display or Gift It
- Place at a pet's favorite outdoor spot or bury at a memorial.
- Gift to a friend as a heartfelt keepsake in a small box.
- Store protected until epoxy fully cures.
- Polka Dot Garden Stones
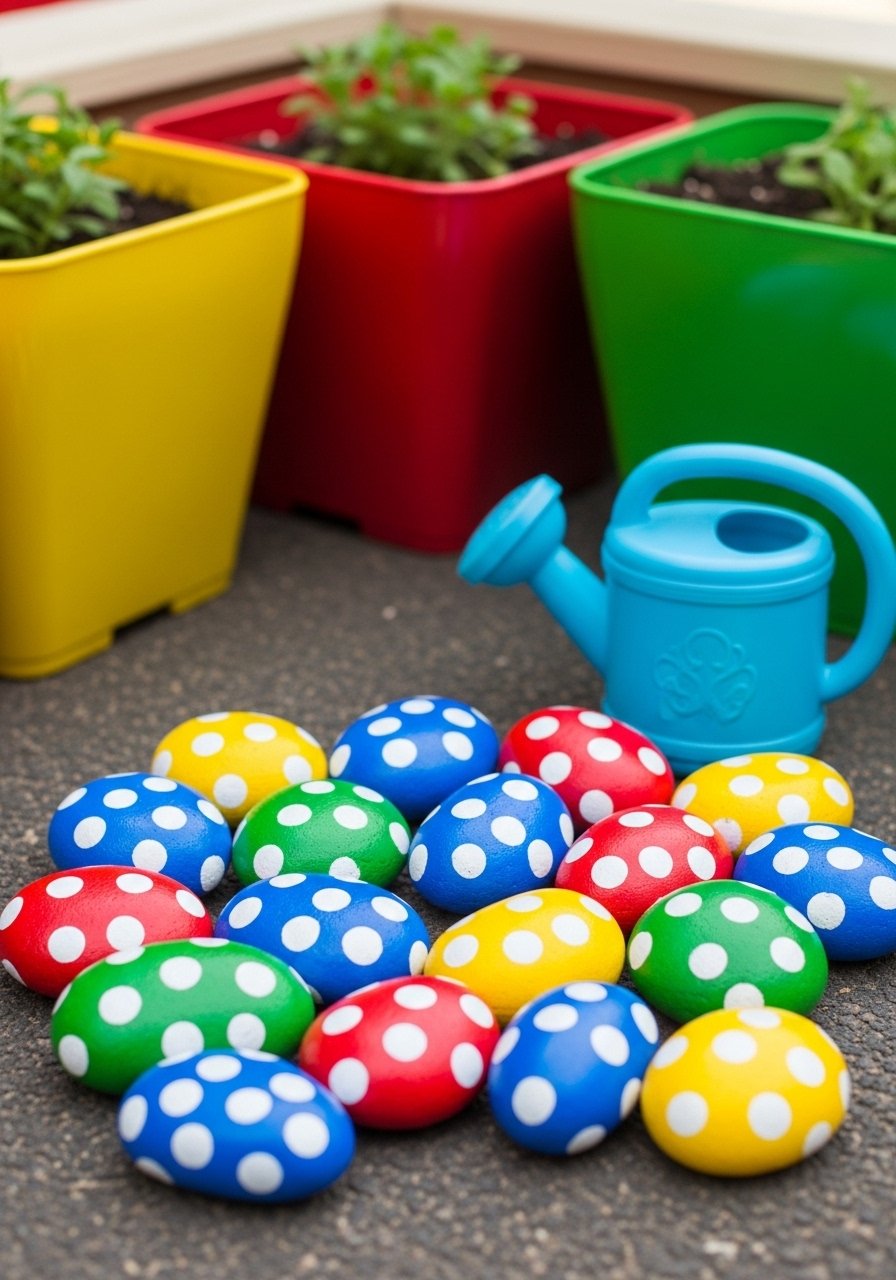
Polka dots are playful and quick. They add pops of color and are kid-friendly projects that stand up to weather when sealed properly.
Materials
- Small to medium stones, 10
- Acrylic paint set bright colors
- Round sponge dauber or dotting tool
- White paint for dots
- Outdoor matte sealer
- Paper towels
Instructions
- Paint base color on stones; 2 coats, drying 30 minutes between.
- Use dauber to place uniform white polka dots.
- Allow overnight drying.
- Seal with 2 coats of matte sealer; cure 24 hours.
How to Display or Gift It
- Scatter in a children's garden or use as playful markers.
- Package in a clear bag with a small tag for a simple gift.
- Store extras in a kids’ craft box.
- Stenciled Leaf Pattern Stones — stone painting ideas for outdoors
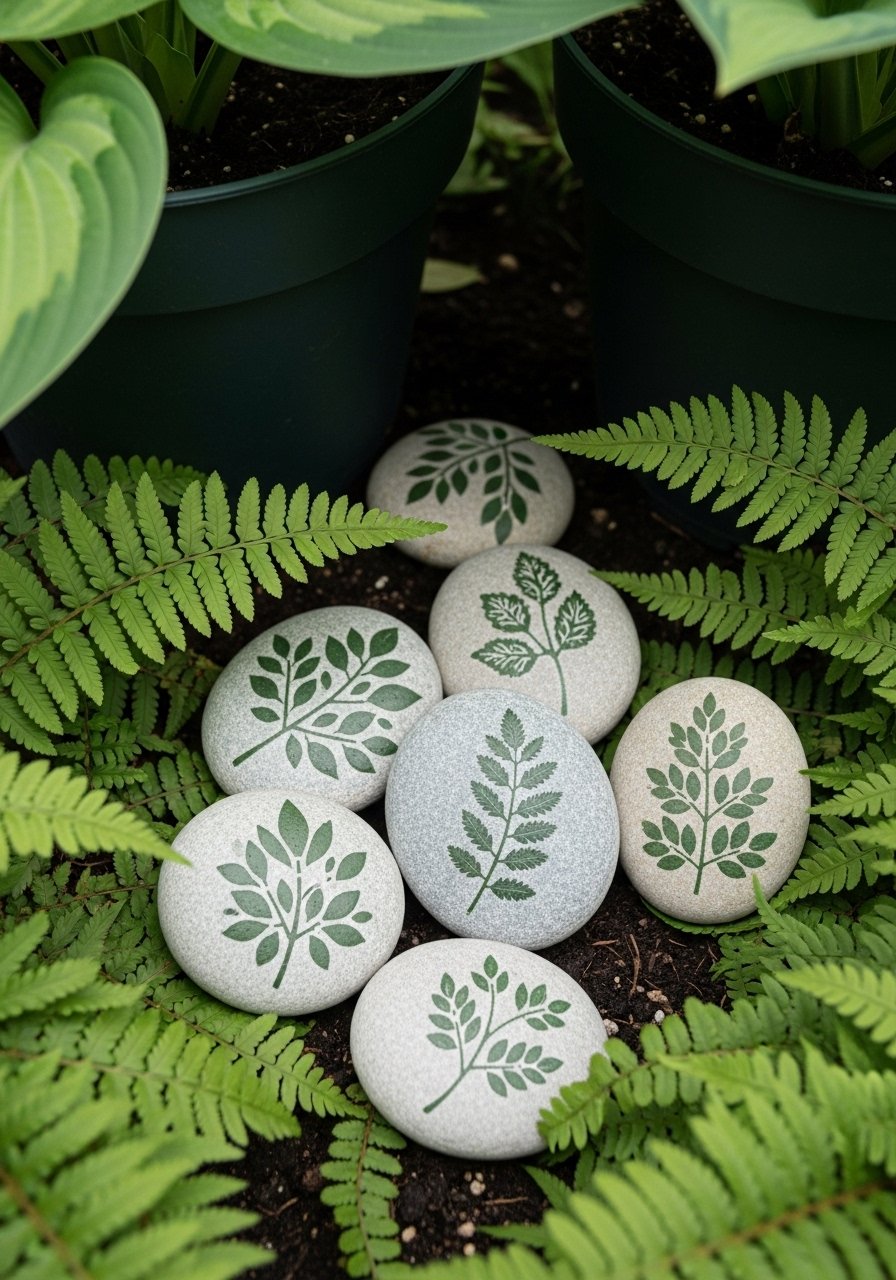
Leaf stenciling is great for botanical gardens and shaded corners. Use flexible stencils for curved surfaces and press down firmly to avoid bleed.
Materials
- Flat stones, 6–8
- Leaf stencil set
- Small foam pouncer
- Acrylic paints in green tones
- Matte outdoor sealer
- Tweezers to hold stencil
Instructions
- Paint base color and let dry 30 minutes.
- Position stencil and pounce paint lightly; avoid overloading.
- Repeat for layered leaf patterns.
- Let dry overnight.
- Seal with 2 coats of matte sealer; cure 24–48 hours.
How to Display or Gift It
- Tuck into shaded borders or near hostas for a coordinated look.
- Bundle several with a ribbon for a nature lover's gift.
- Store stencils flat in a craft drawer.
- Japanese-Inspired Koi Stones
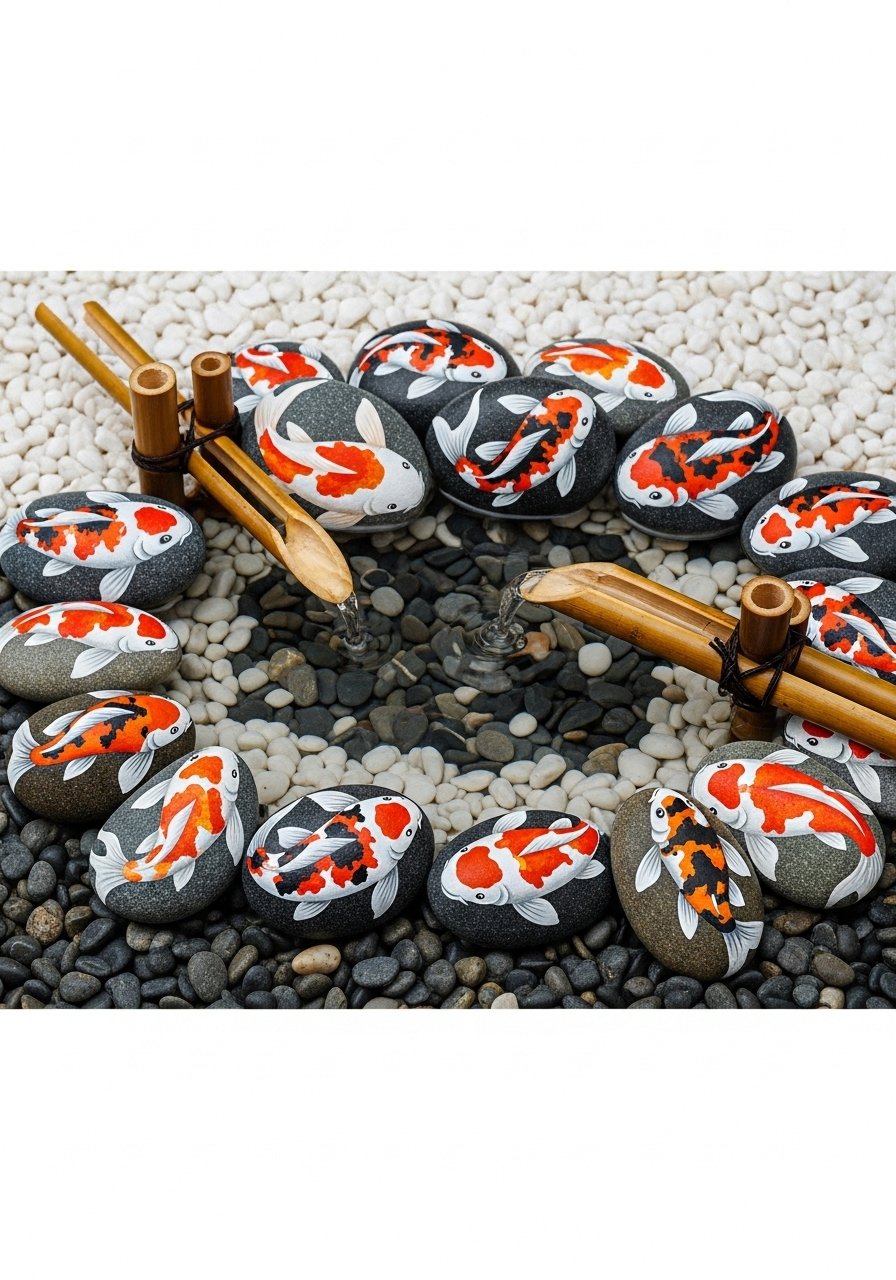
Koi stones add an elegant Asiatic motif. Smooth strokes and thin liners create flowing fish shapes; a satin sealer keeps colors vivid without harsh shine.
Materials
- Medium stones, 4–6
- Acrylic paints, orange, white, black
- Liner brush
- Satin outdoor sealer
- Pencil for sketching lines
- Small cup of water for cleaning brushes
Instructions
- Paint a neutral base; dry 30–45 minutes.
- Sketch koi shapes and fill with color.
- Define scales and fins with a liner brush.
- Allow overnight drying.
- Seal with satin sealer, 2 coats; cure 24–48 hours.
How to Display or Gift It
- Place near water features or in coastal planters.
- Gift as part of a zen garden kit with sand and a mini rake.
- Keep extras in a protective box.
- Rustic Whitewashed Stones
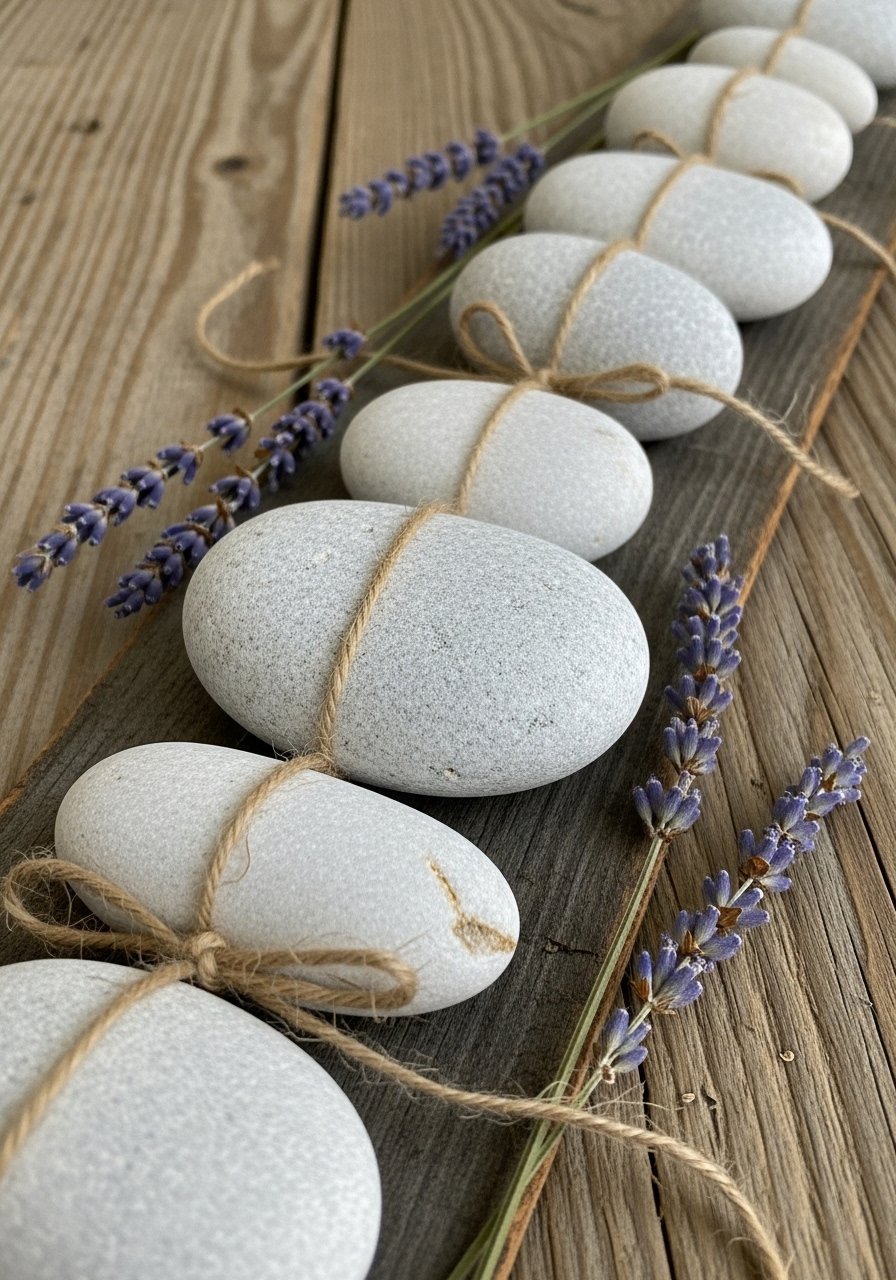
Whitewashing stones gives a rustic, farmhouse feel. The technique keeps natural texture while softening color—perfect for Japandi or farmhouse gardens.
Materials
- Assorted stones, 8–10
- White chalk paint (diluted)
- Flat brush
- Water to thin paint (approx 1 part paint:1 part water)
- Light sandpaper to distress
- Matte sealer
Instructions
- Mix chalk paint with water.
- Brush on lightly and wipe off with a rag to reveal texture.
- Sand edges for worn look.
- Let dry 30–60 minutes.
- Seal with matte sealer; cure 24 hours.
How to Display or Gift It
- Cluster at the base of potted olive trees for a Mediterranean look.
- Wrap as a small hostess gift with lavender sprigs.
- Stack in a wooden tray for storage.
- Stamped Botanical Impressions
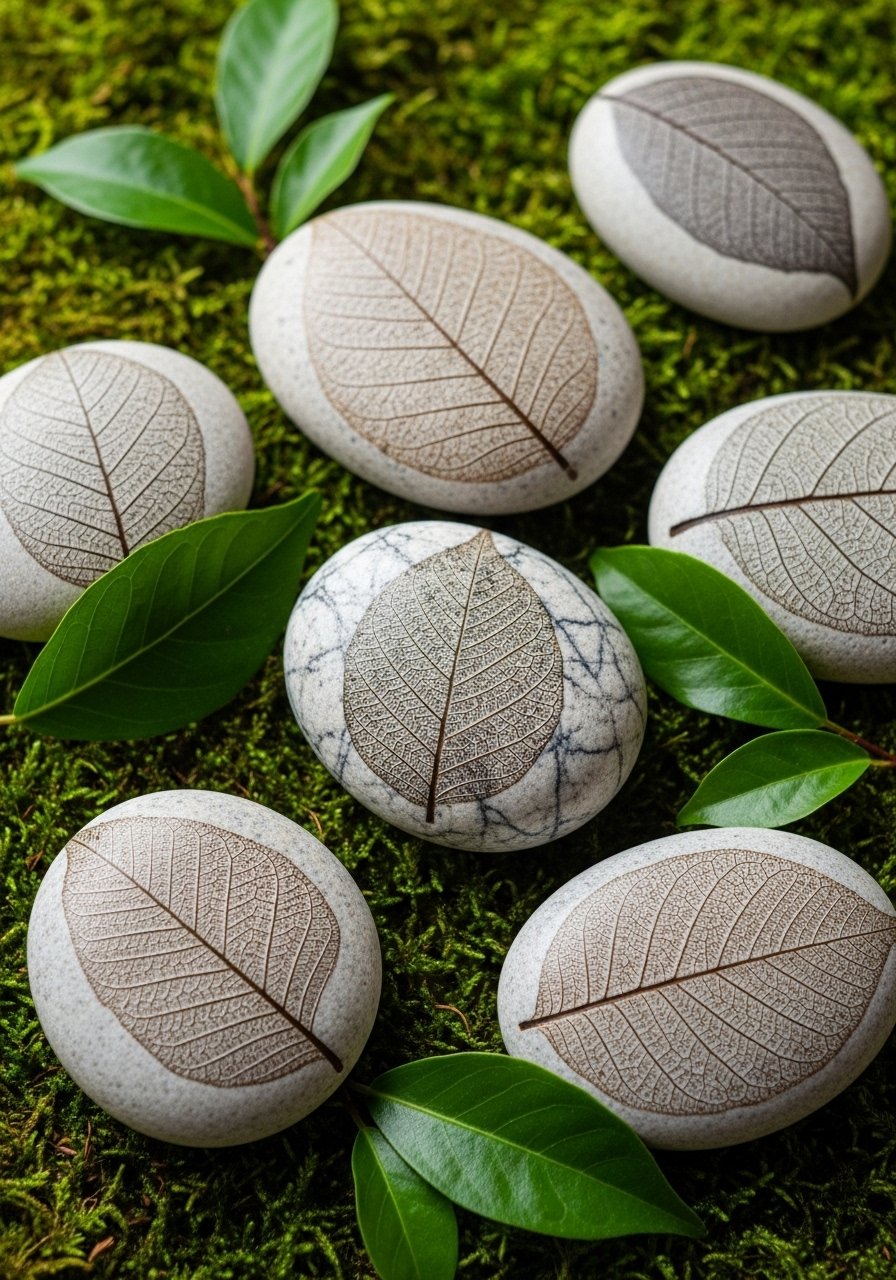
Use real leaves as stencils to create botanical impressions. The natural vein patterns make each stone unique; a protective sealer preserves the detail.
Materials
- Flat stones, 6
- Fresh leaves (various)
- Acrylic paints in earth tones
- Foam brush
- Clear outdoor sealer
- Paper towels
Instructions
- Paint base coat and let dry 30 minutes.
- Press leaf onto stone, paint over leaf edges, then lift leaf to reveal negative space.
- Touch up veins with a fine brush.
- Dry overnight.
- Seal with 2 coats of outdoor sealer; cure 24–48 hours.
How to Display or Gift It
- Scatter in woodland-themed planters.
- Gift with a packet of native seed.
- Keep spare leaves and stones in a craft kit.
- Travel Map Rock (Mini Map)
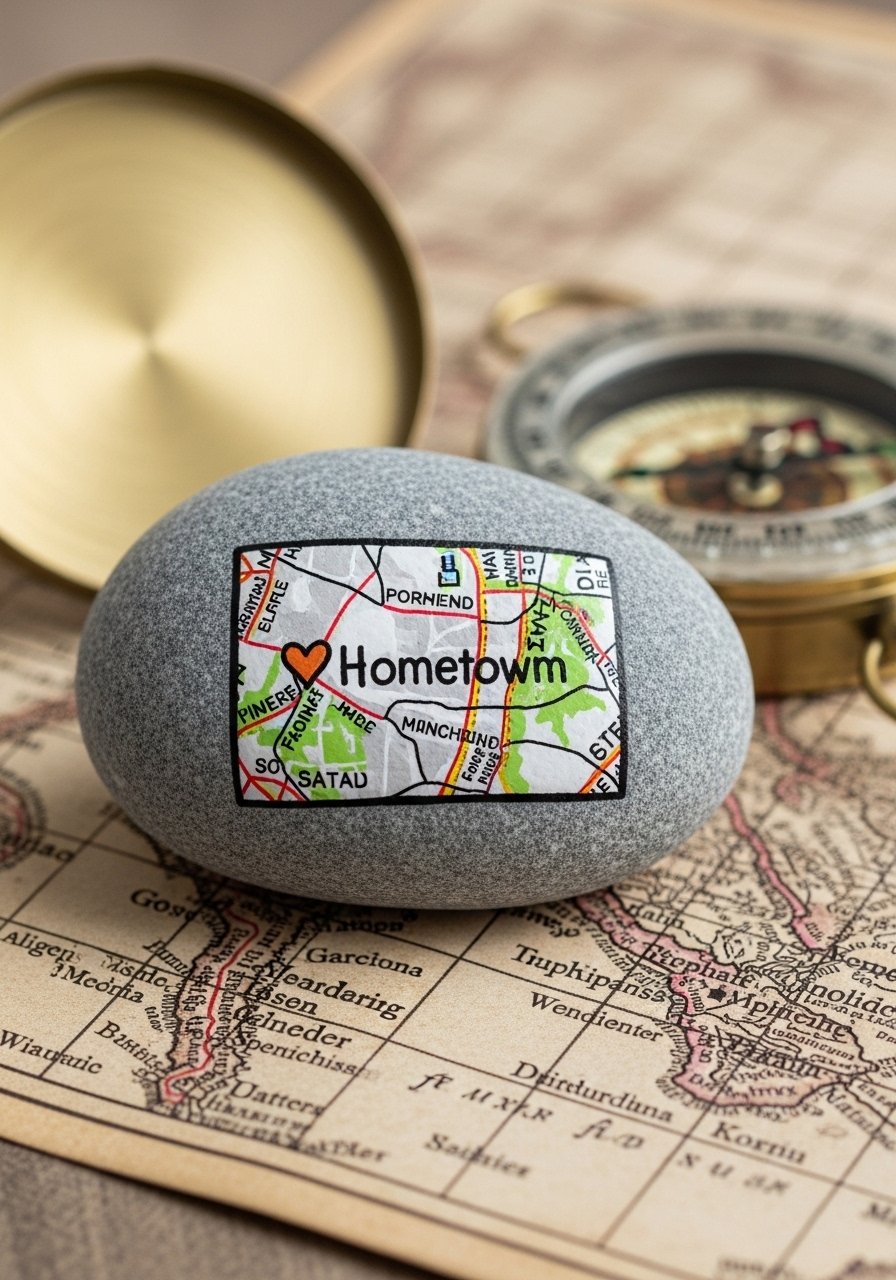
Capture a favorite place on a rock—great as personalized garden markers or moving-away gifts. Keep scale simple and seal for outdoor display.
Materials
- Medium flat stone, 1–2
- Fine-tip paint pens (black, white)
- Acrylic paints for background
- Clear gloss sealer
- Reference map or photo
Instructions
- Paint background color and let dry 30 minutes.
- Sketch rough map lines and paint with fine pens.
- Mark a heart or pin in red.
- Allow overnight drying.
- Seal with 2 gloss coats; cure 24–48 hours.
How to Display or Gift It
- Place near a porch or in a memory garden.
- Pair with a small compass or travel token.
- Store in a soft box until gifting.
- Folk Art Flower Stones — stone painting ideas for outdoors
Folk art florals are timeless and joyful. Big, graphic shapes make these readable from afar and kid-friendly. Use a matte sealer for a hand-painted look.
Materials
- Large stones, 6
- Bright acrylic paints
- Round and flat brushes
- Matte outdoor sealer
- Pencil for sketching
Instructions
- Paint a bold background; 2 coats.
- Sketch flower shapes and fill with solid colors.
- Add dot and line details with a fine brush.
- Dry overnight.
- Seal with 2 coats of matte sealer; cure 24–48 hours.
How to Display or Gift It
- Create a small floral cluster near perennials.
- Bundle three with twine for a cheerful gift.
- Keep extras in a shallow organizer.
- Metallic Edge Garden Markers
A gilded edge gives stones a polished look that contrasts well with matte centers for labeling. Use metallic paints sparingly for durability.
Materials
- Long flat stones, 4–6
- Matte black acrylic
- Metallic leaf paint (gold/copper)
- Fine liner brush
- Clear satin sealer
Instructions
- Paint center matte black; 2 coats.
- Carefully paint thin metallic rims with a liner brush.
- Let dry overnight.
- Seal with satin sealer; cure 24 hours.
How to Display or Gift It
- Use at the edge of raised beds for a chic look.
- Package with small brass plant labels for gifting.
- Store flat in an organizer.
- Mosaic Painted Heart Stones
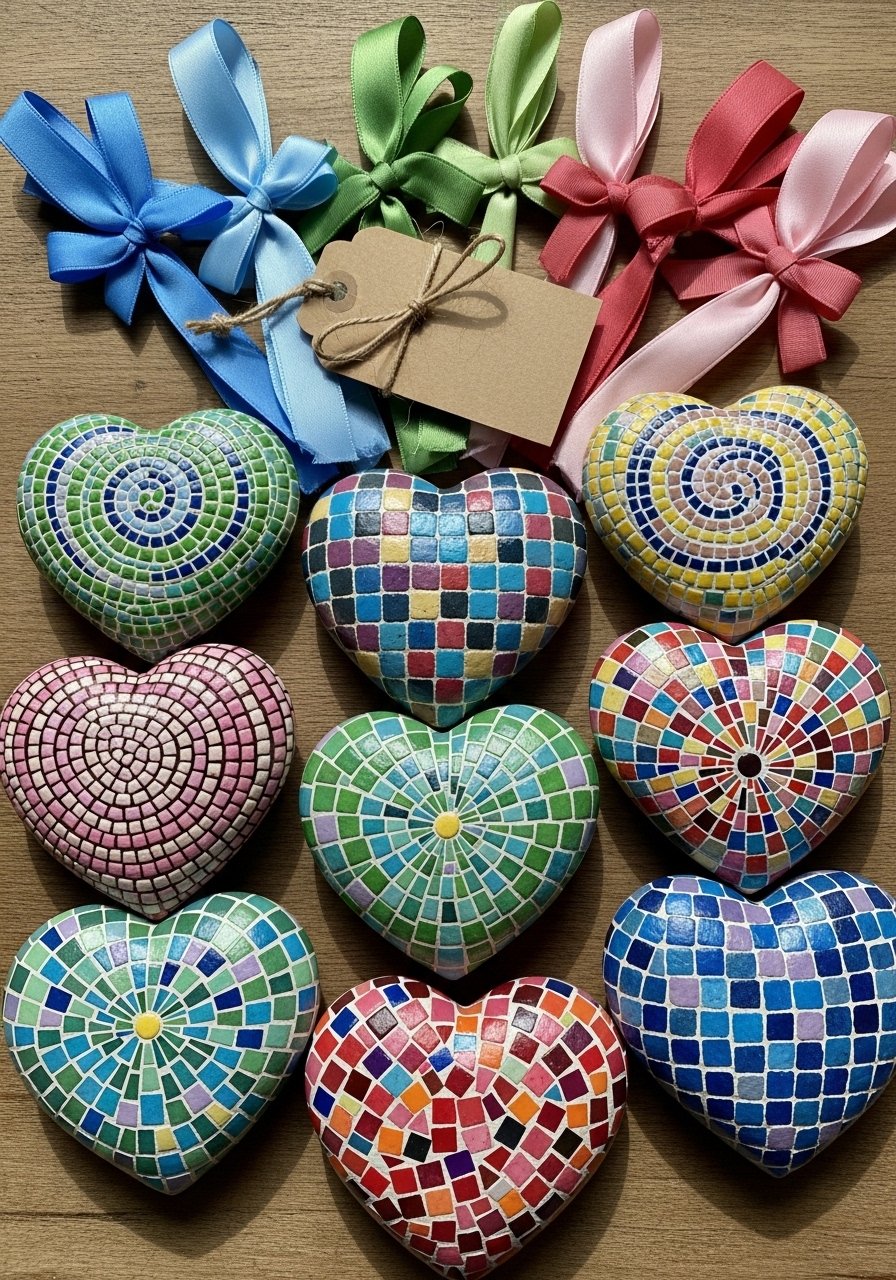
Painted mosaic hearts mimic tilework without grout. Use fine brushwork to create tile edges and a grout-like outline for a cozy vibe.
Materials
- Heart stones, 3–4
- Acrylic paints, multiple colors
- Fine liner brush
- Matte outdoor sealer
- Small sponge for texture
Instructions
- Paint base and let dry.
- Paint tile shapes in varied colors.
- Outline tiles with a thin gray line to emulate grout.
- Dry overnight.
- Seal with matte sealer; cure 24–48 hours.
How to Display or Gift It
- Nestle in planters or give as a set in a small box.
- Tie with ribbon and a tag for Valentine or friendship gifts.
- Store in a craft drawer.
- Inspirational Quote Stones
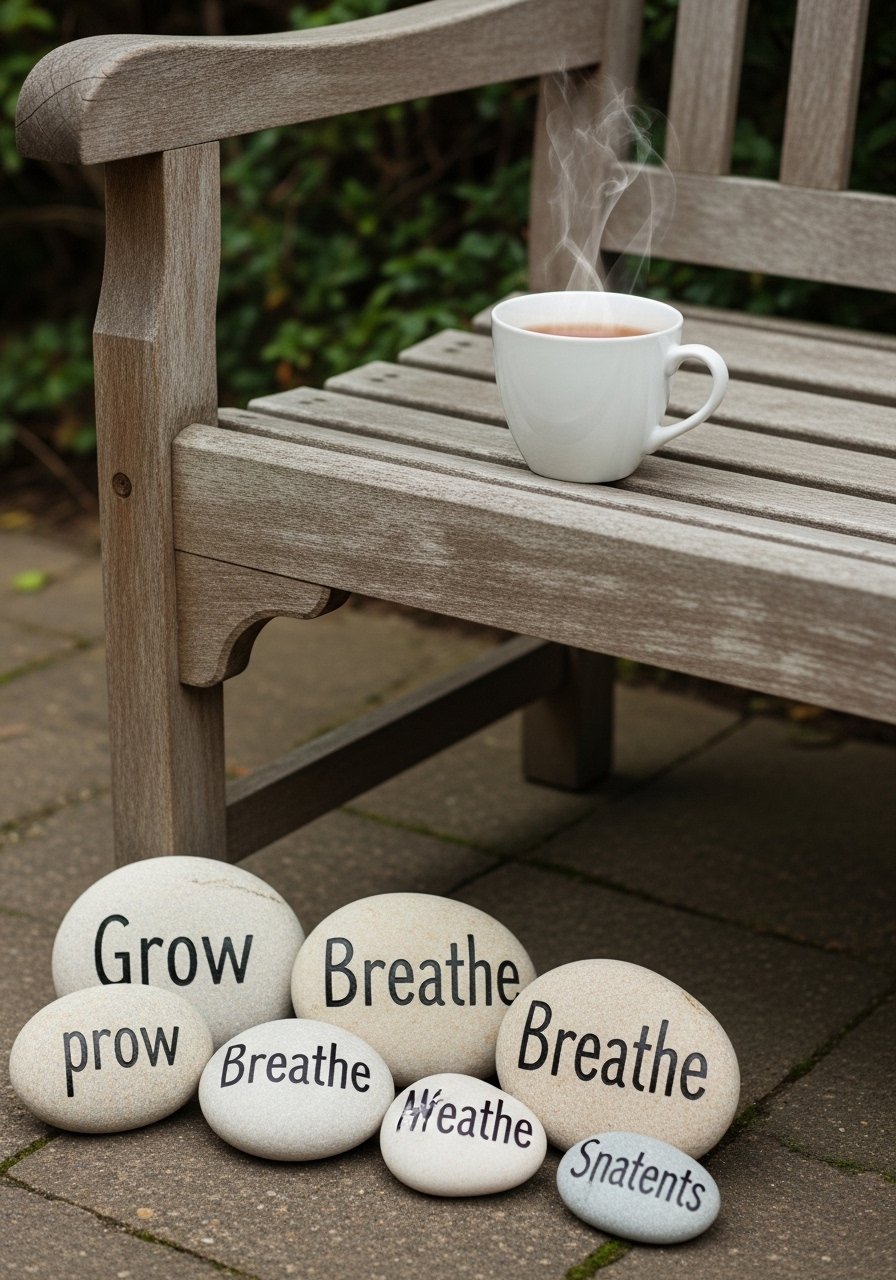
Short quotes on stones make thoughtful markers. Use paint pens for crisp lettering that lasts when sealed and protected.
Materials
- Smooth stones, 6–8
- Black paint pen (fine)
- White paint pen for contrast
- Matte sealer
- Pencil for layout
Instructions
- Paint neutral background if desired; dry 30 minutes.
- Sketch words lightly and trace with paint pen.
- Allow overnight drying.
- Seal with 2 coats of matte sealer; cure 24 hours.
How to Display or Gift It
- Place near a meditation spot or bench.
- Gift a set in a small fabric bag for encouragement.
- Store extras in a labeled box.
- Painted Butterfly Garden Stones
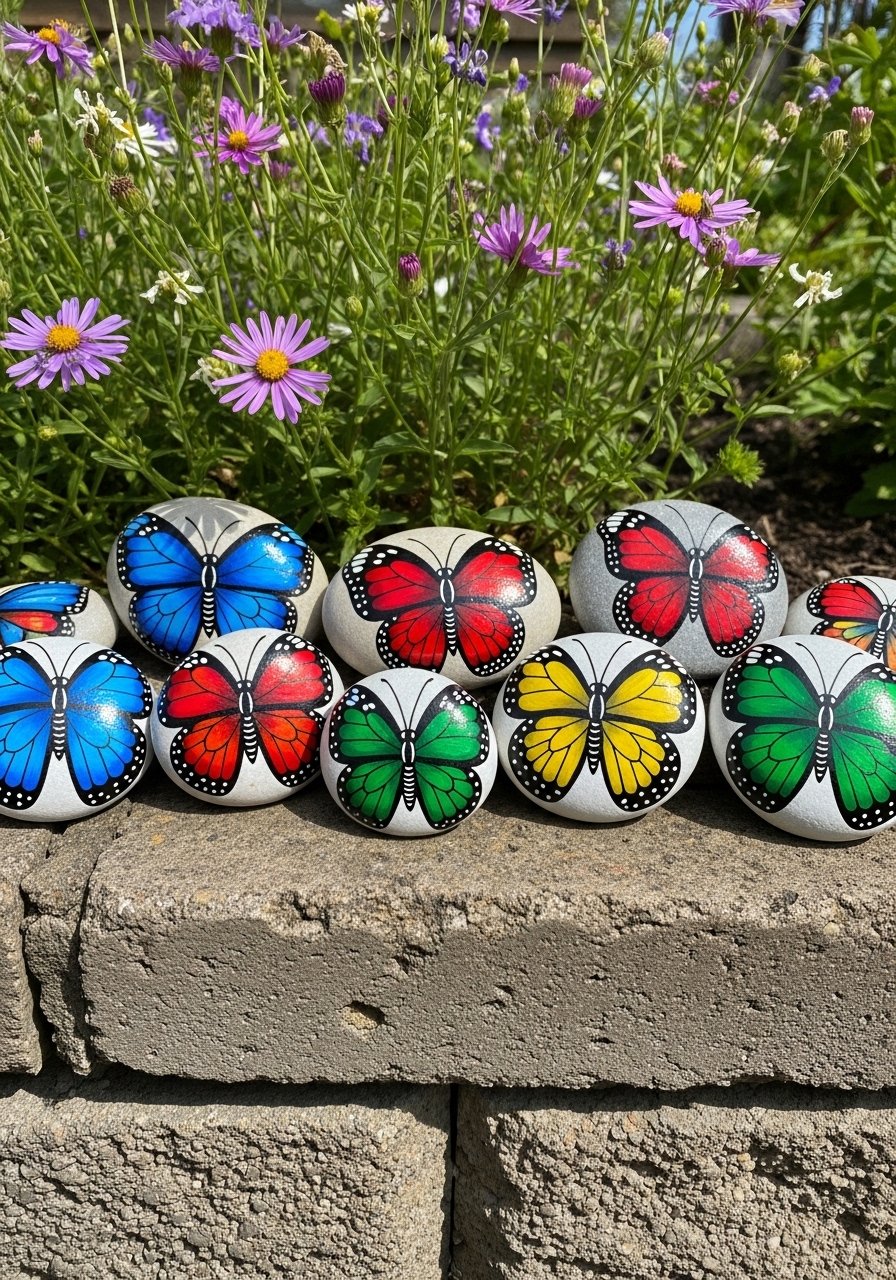
Butterfly stones flutter color into garden beds. Symmetrical wings look great with a mirror technique: paint one side, fold a paper to transfer and finish details.
Materials
- Medium stones, 6
- Acrylic paints, bright palette
- Round brushes
- Fine-tipped pen for antennae
- Gloss sealer
Instructions
- Paint a light base; dry 30 minutes.
- Sketch half-wing and fold paper pressed to transfer pattern to other side.
- Paint wings and add detail.
- Dry overnight.
- Seal with gloss sealer; cure 24–48 hours.
How to Display or Gift It
- Place among flowering borders to mimic real butterflies.
- Gift in seed packets for butterfly gardens.
- Keep in a safe box to prevent chipping.
- Weather-Resistant Word Stones for Path
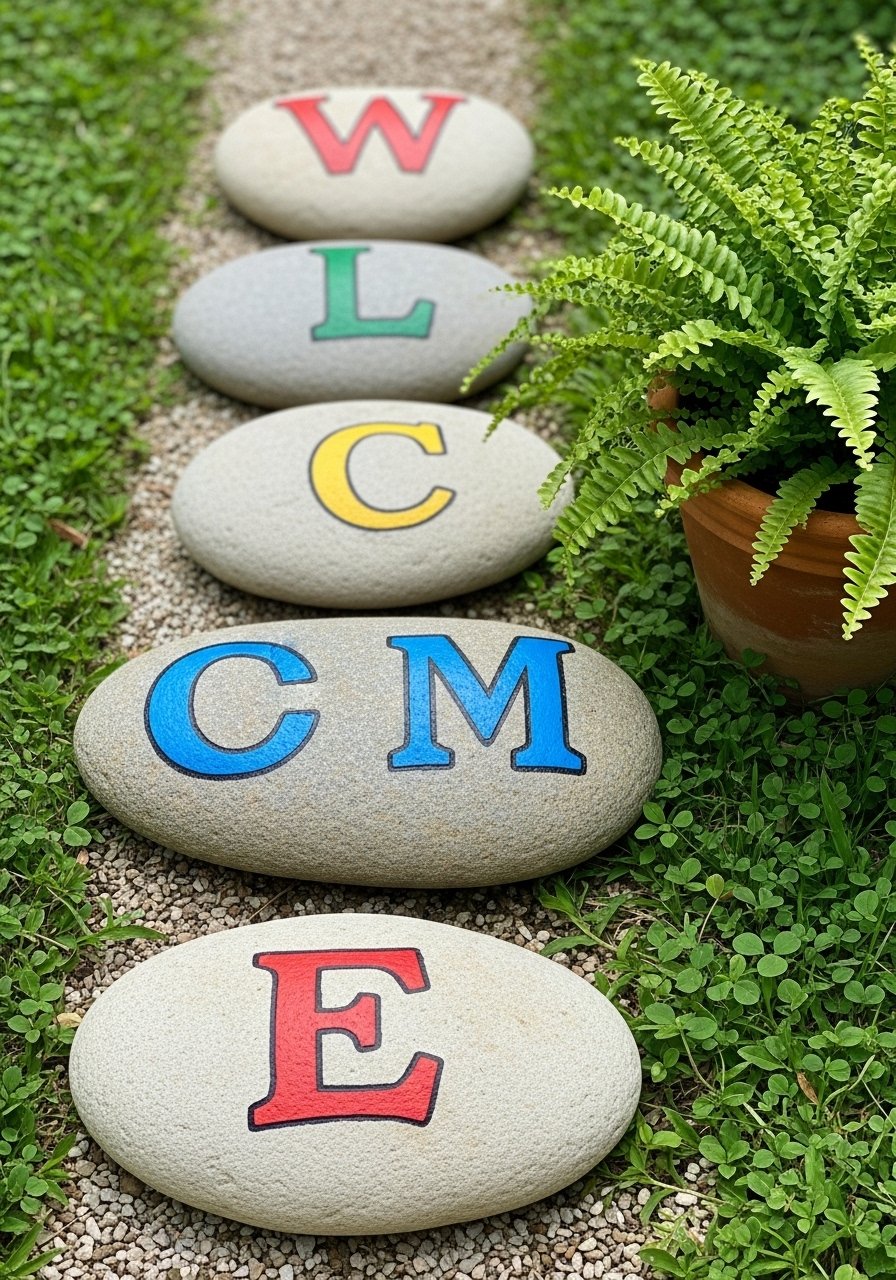
Word stones create an inviting path message. Large letters require crisp stenciling and a protective topcoat for frequent handling.
Materials
- Large flat stones, 7 (for letters)
- Letter stencils
- Acrylic paints
- Foam dabber
- Clear outdoor sealer
Instructions
- Paint background color; dry 30 minutes.
- Place stencil and dab paint for letters.
- Remove stencil and touch up edges.
- Dry overnight.
- Seal with 2 coats of sealer; cure 24–48 hours.
How to Display or Gift It
- Line the path to your front door or mailbox.
- Gift as a "welcome" set for new homeowners.
- Store in a crate until ready to use.
- Ombre Pebble Cluster
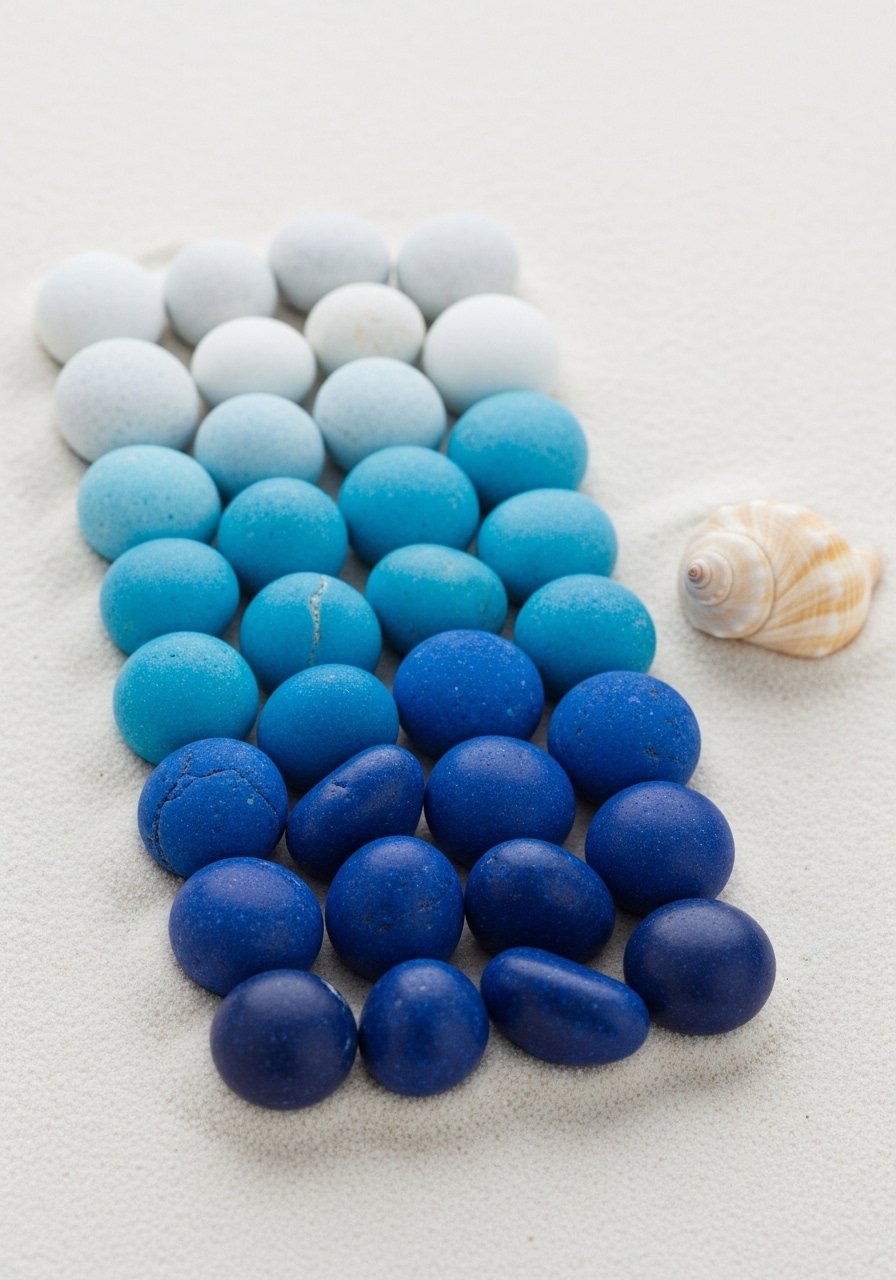
An ombre cluster offers a sophisticated gradient display. Paint pebbles in graded hues and arrange by tone for visual flow.
Materials
- Small pebbles, 12–20
- Acrylic paints in graduated shades
- Small flat brush
- Matte sealer
- Tray for display
Instructions
- Sort pebbles by size.
- Paint in gradient shades—2 coats if needed.
- Let dry overnight.
- Seal with matte sealer; cure 24 hours.
- Arrange by tone in a shallow planter or tray.
How to Display or Gift It
- Create a tabletop centerpiece in a shallow dish.
- Gift as a calming desktop set in a small box.
- Store in a shallow compartment organizer.
- Pet-Safe Painted Dog Toy Stone (Outdoor Décor)
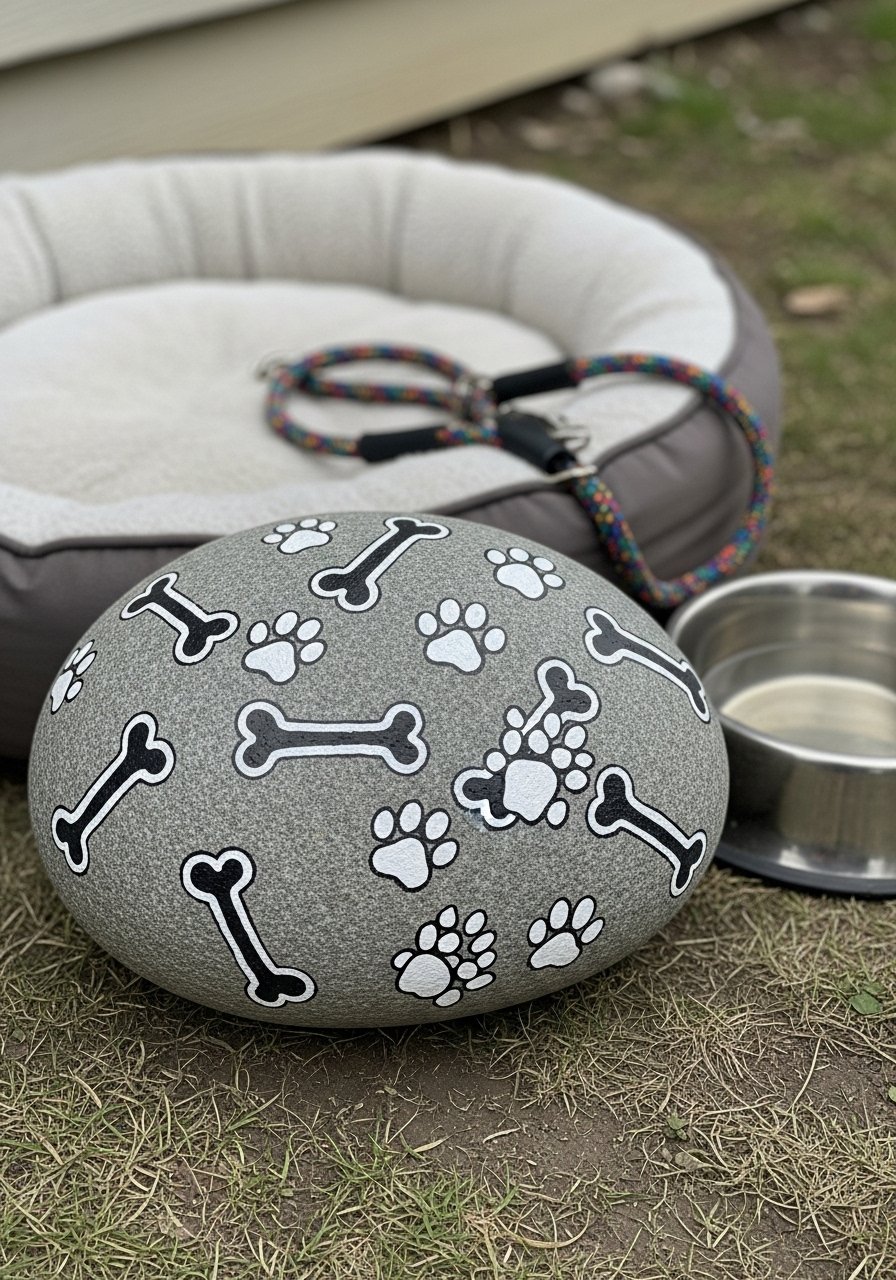
Create colorful decorative stones that coordinate with outdoor pet areas. Use non-toxic paints and sealers if pets interact with them.
Materials
- Large stone, 1 (5–6")
- Non-toxic acrylic paints
- Foam brush
- Matte sealer labeled pet-safe
- Stencils for paw and bone shapes
Instructions
- Paint background and let dry 30 minutes.
- Use stencils to add paw prints/bones.
- Dry overnight.
- Seal with pet-safe sealer; cure 24–48 hours.
How to Display or Gift It
- Place near a dog bed or water station.
- Include in a pet-care gift basket.
- Store separately from pet toys.
- Resin-Encapsulated Seed Stone (Keepsake)
Encapsulate a pressed seed or small keepsake in resin on top of a painted stone for a memorial or time-capsule feel. Use small resin pours and outdoor-rated epoxy for sealing.
Materials
- Flat stone, 1 (4–5")
- Pressed seed or tiny keepsake
- Two-part outdoor epoxy resin
- Mixing cup and stir stick
- Fine glitter or metallic paint for accents
- Gloves and respirator mask
Instructions
- Paint base and let dry overnight.
- Position pressed seed and secure with a tiny dot of glue.
- Mix epoxy per instructions and pour a thin coating (1/8").
- Remove bubbles with a heat gun burst for 2–3 seconds.
- Let resin cure 72 hours in a dust-free area.
- Add a second pour if you want more depth; cure 72 hours.
How to Display or Gift It
- Use as a garden keepsake or desk memento.
- Gift as a thoughtful, tactile present in a cushioned box.
- Store until fully cured, then keep in a shaded spot outdoors.
You made it—29 weather-ready, colorful stone painting ideas for outdoors to brighten planters, paths, and gifts. There’s a mix of quick weekend projects and slightly more involved techniques like epoxy pouring and mortar mosaics, so pick what suits your time and tools. Save this pin for later and try one project a weekend—it's an easy way to refresh your outdoor space and make meaningful, handmade pieces for friends.
Which style are you trying first—a whimsical ladybug, a boho mandala, or glow-in-the-dark path stones? If you're building a go-to kit, a temperature-controlled hot glue gun and a set of outdoor acrylics will make many of these projects smoother. Share your finished stones with a friend or pin this for rainy-day crafting plans.


