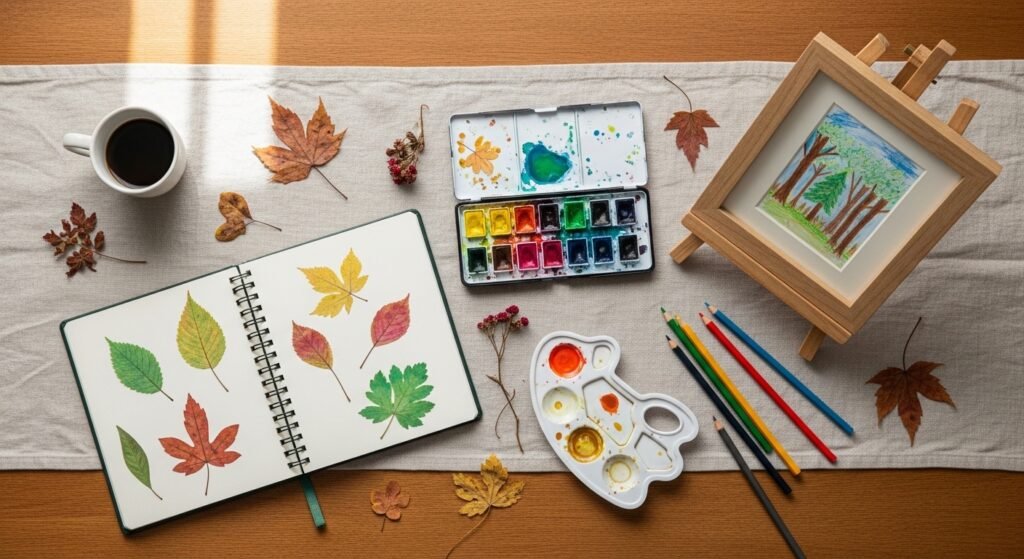
There’s something quietly powerful about watching a child trace the curve of a leaf and turn it into a drawing. These nature drawing ideas for kids are made to spark curiosity, build confidence, and get little hands outside and sketching. You’ll find projects that use pencils, watercolor, printing, rubbing, and simple collage — each idea tuned to short attention spans and big imaginations.
You’ll also find tips that stop common kid-craft glitches: how to keep watercolors from bleeding, which paper stands up to wet media, and when to let paint dry before adding details. I start most sessions with a trusty spiral sketchbook and a compact watercolor set like the Princeton 12-color watercolor pan set to keep things portable and mess-light. For cutting or tiny shapes, I reach for my self-healing cutting mat and craft knife, but a good pair of kids’ scissors works fine for beginners.
Below are 26 complete projects — each with a quick intro, a photo prompt for a Pinterest-ready image, exact materials, step-by-step instructions with sensible drying times, and display or gift ideas. Pin favorites, try one today, and watch your kid’s love for the outdoors grow through drawing.
- Leaf Outline Watercolor Resist
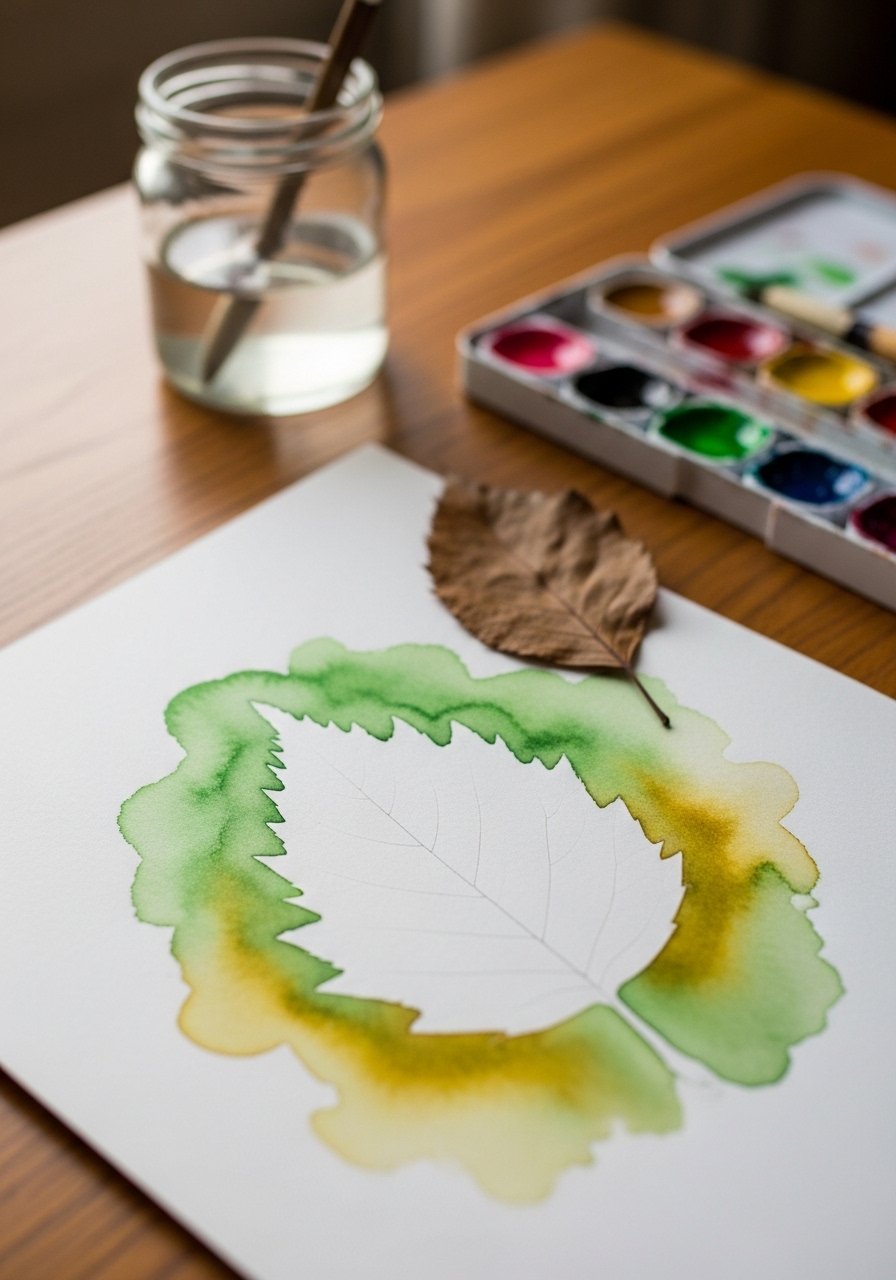
This classic gets beginner artists sketching natural edges and seeing positive and negative space. It looks like a soft watercolor wash with crisp white leaf shapes. Younger kids love the magic of the leaf silhouette appearing. The surface feels smooth and slightly buckled after paint — that’s normal. Use a white crayon or watercolor crayon to draw the leaf outline first.
Materials
- 1 sheet 140 lb cold-press watercolor paper, 9 x 12 inches
- 1 white wax crayon or watercolor resist crayon
- 12-pan watercolor set
- 1 flat 1/2 inch foam brush or medium round watercolor brush
- Small jar of water
- Paper towels
- Pencil and eraser
Instructions
- Tape the 9 x 12 paper to a board with painter’s tape to reduce buckling.
- Lightly sketch a leaf or two with pencil. Press firmly with the white crayon over the pencil lines so wax covers the paper.
- Mix green and yellow on your palette for a fresh spring green.
- Apply a wet wash with the flat foam brush across the sheet. The wax will resist the pigment.
- Rinse and add deeper green accents while the wash is still damp. Watercolor dries in 5–10 minutes.
- Once dry, gently erase any visible pencil marks and remove tape slowly.
How to Display or Gift It
Frame the artwork in an 8 x 10 frame and hang in a playroom. For a simple gift, mat it on kraft paper and tie with twine. Store flat in a portfolio sleeve until you’re ready to frame. A small wooden easel makes a sweet tabletop display.
- Leaf Rubbing Nature Collage
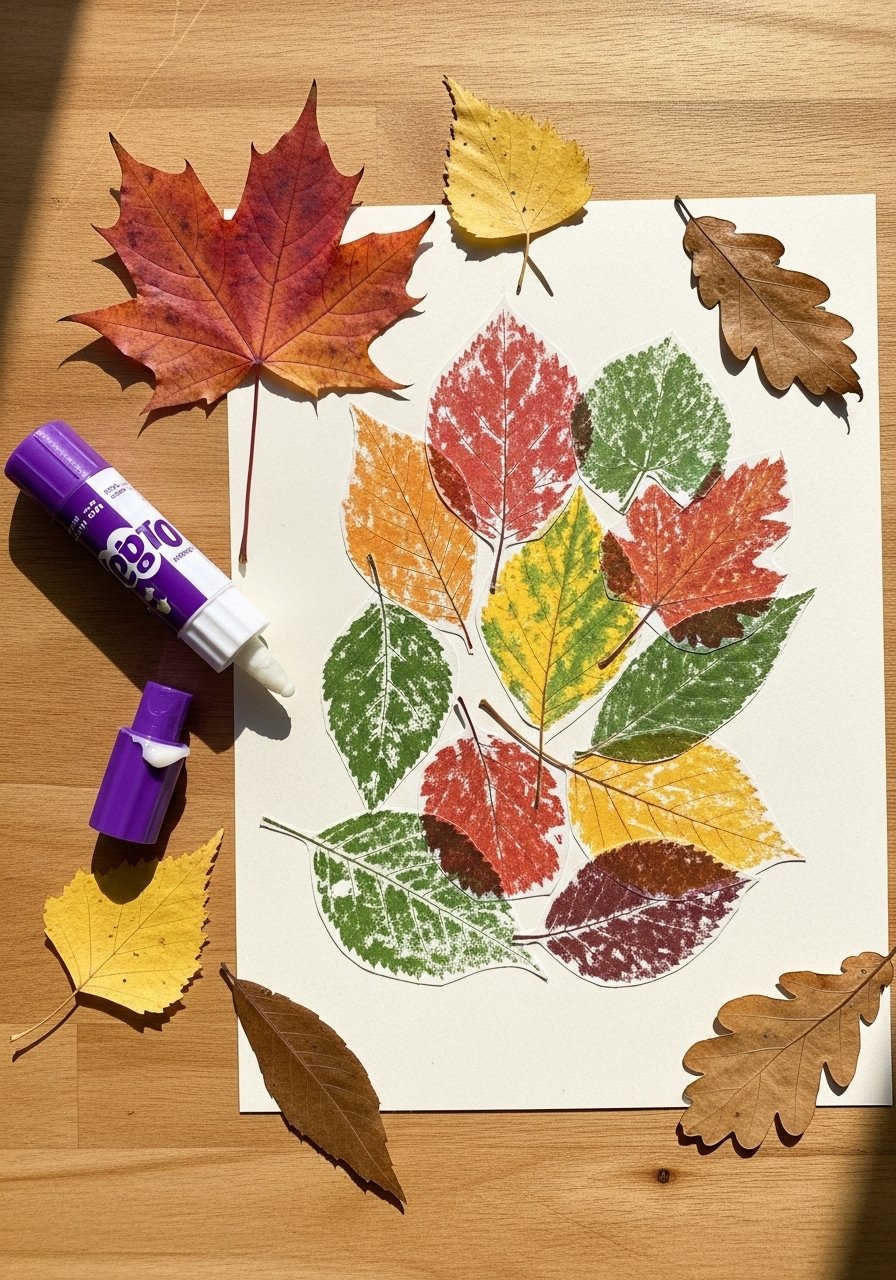
Rubbings are tactile and immediate — perfect for tactile learners. Kids can see leaf veins pop up as textured patterns. The final collage has a layered, stitched-together look that feels happy and hand-made. Use a thick crayon or pastel peeled for broad coverage.
Materials
- 1 sheet heavy cardstock 9 x 12 inches
- Assorted leaves (6–10), varied sizes
- Box of wax crayons or oil pastels (24 colors)
- Scissors (kids’ safe)
- Glue stick (or school glue)
- Pencil and small ruler
Instructions
- Arrange a leaf under the cardstock and hold steady.
- Using the side of a crayon or pastel, rub back-and-forth to reveal veins. Repeat with different leaves and colors.
- Cut out interesting rubbing shapes and trim edges with scissors.
- Arrange the cut rubbings on a fresh cardstock background.
- Glue pieces down, overlapping slightly for depth.
- Press under a book for 30 minutes for glue to set firmly.
How to Display or Gift It
Mount on a clipboard for a rotating gallery. Bundle several collages in a kraft folder as a simple nature book. Keep extra leaves and a crayon roll in a craft organizer for future sessions.
- Rock-Face Forest Friends
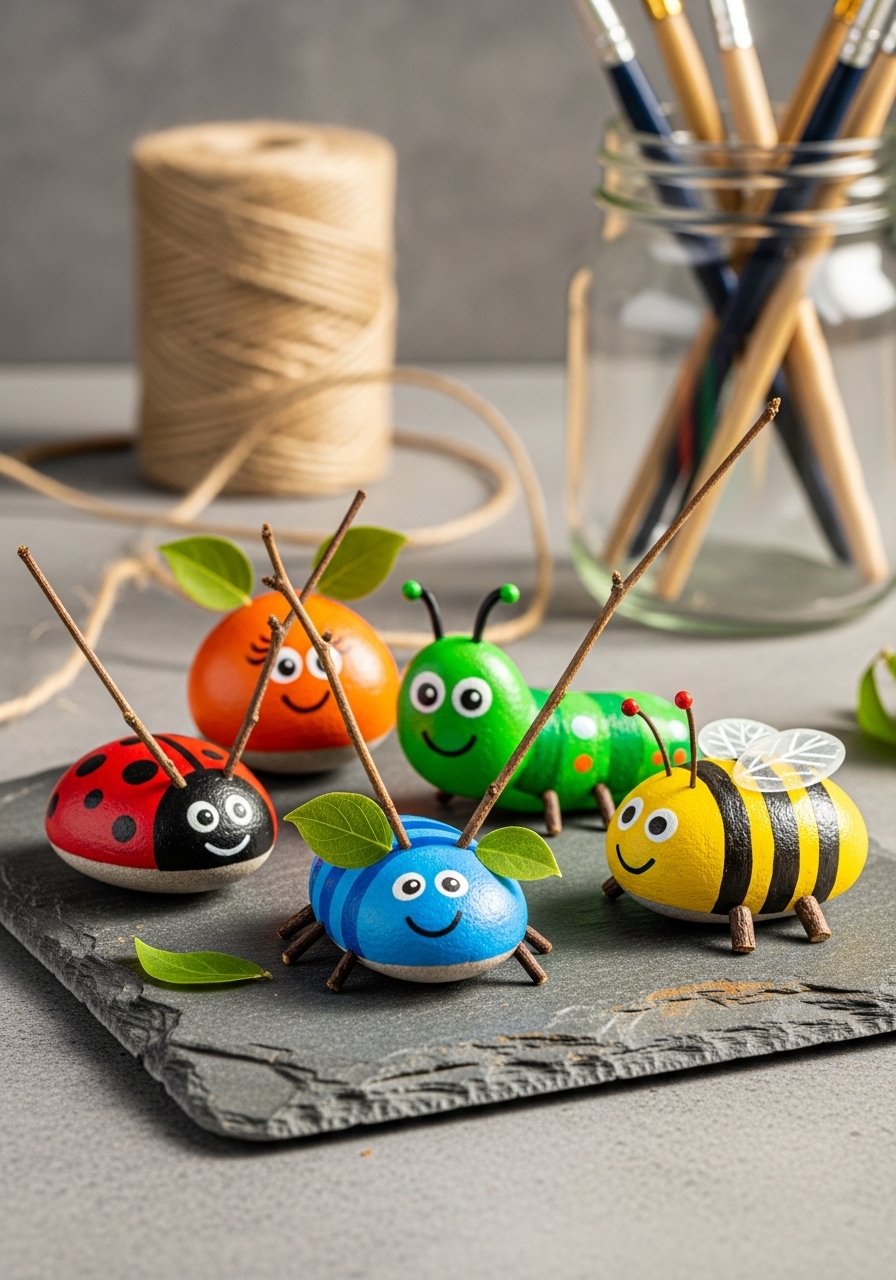
Painting on smooth river rocks helps kids practice small details. These forest-friend rocks make charming desk companions or garden markers. Acrylic dries quickly and stays vivid on stone. Smooth stones work best for little hands.
Materials
- 6 smooth river rocks (about 2–3 inches each), cleaned and dried
- Acrylic craft paint set (12 colors)
- Small detail paintbrush set
- White acrylic paint pen for highlights
- Matte Mod Podge sealer (spray or brush-on)
- Paper towel
Instructions
- Wash and dry rocks fully; baking at 200°F for 10 minutes speeds drying.
- Sketch faces lightly with pencil if you like.
- Paint a base coat with acrylics. Dry 15–20 minutes between coats.
- Add features with a detail brush; use the paint pen for tiny highlights.
- Once paint is dry, seal with 2 thin coats of Mod Podge, letting each dry 30 minutes.
- Let fully cure 24 hours before handling outdoors.
How to Display or Gift It
Group painted rocks in a shallow ceramic dish near a windowsill. Brighten a potted plant by arranging one rock on top of soil. Wrap a trio in tissue and place in a small kraft box for gifting.
- Nature Sketchbook: 30-Minute Field Pages
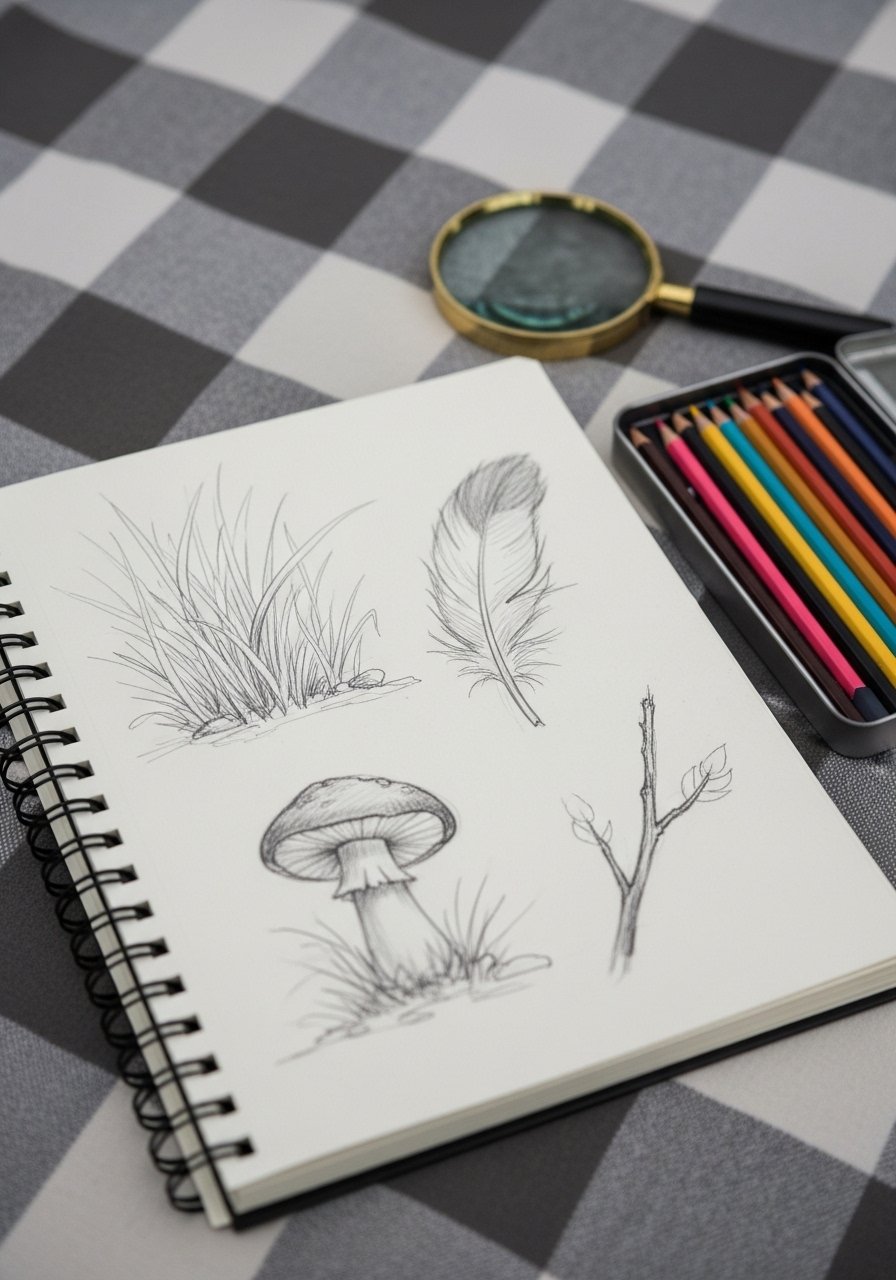
This mini field-sketch routine trains kids to notice small details. It’s quick, portable, and structured. Each page gets a focused 30-minute session — short enough to keep attention, long enough to build skill. A compact tin of colored pencils finishes sketches with gentle color.
Materials
- Spiral sketchbook 8.5 x 11 inches, 50 pages
- Graphite pencil (HB) and sharpener
- Colored pencil set (12–24)
- Small magnifying glass (optional)
- Portable pencil case
Instructions
- Pick a single natural subject (leaf, rock, flower).
- Spend 5 minutes observing shapes, edges, and textures.
- Lightly sketch outline for 10 minutes.
- Add details and shading for 10 minutes.
- Finish with subtle color layering for 5 minutes.
- Date and note location on each page to track progress.
How to Display or Gift It
Bind favorite pages into a mini portfolio or share pages in a homemade zine. Keep completed sketchbooks on a shelf for a personalized nature library. A durable craft organizer stores supplies for easy grab-and-go sessions.
- Pinecone Texture Drawing

Pinecones are great for pattern practice and shading. The finished drawings have a rustic, tactile look that fits cottagecore or farmhouse aesthetics. Use toned paper to add easy mid-tones and highlights.
Materials
- Toned sketch paper pad (9 x 12), 20 sheets
- Graphite pencil set (2B–6B)
- White gel pen or pencil for highlights
- Blending stump
- Eraser (kneaded)
Instructions
- Place a pinecone on the table and rotate it to spot interesting angles.
- Sketch the overall shape lightly with an HB pencil.
- Block in shadow areas with 4B, leaving spaces for highlights.
- Use a blending stump to soften transitions.
- Add crisp white highlights with a gel pen.
- Sign and date the drawing.
How to Display or Gift It
Frame in a simple wooden frame or clip onto a string gallery with clothespins. Create a set of three pinecone studies as a seasonal wall grouping. Store flat in a portfolio folder.
- Nature Stencil Press Prints
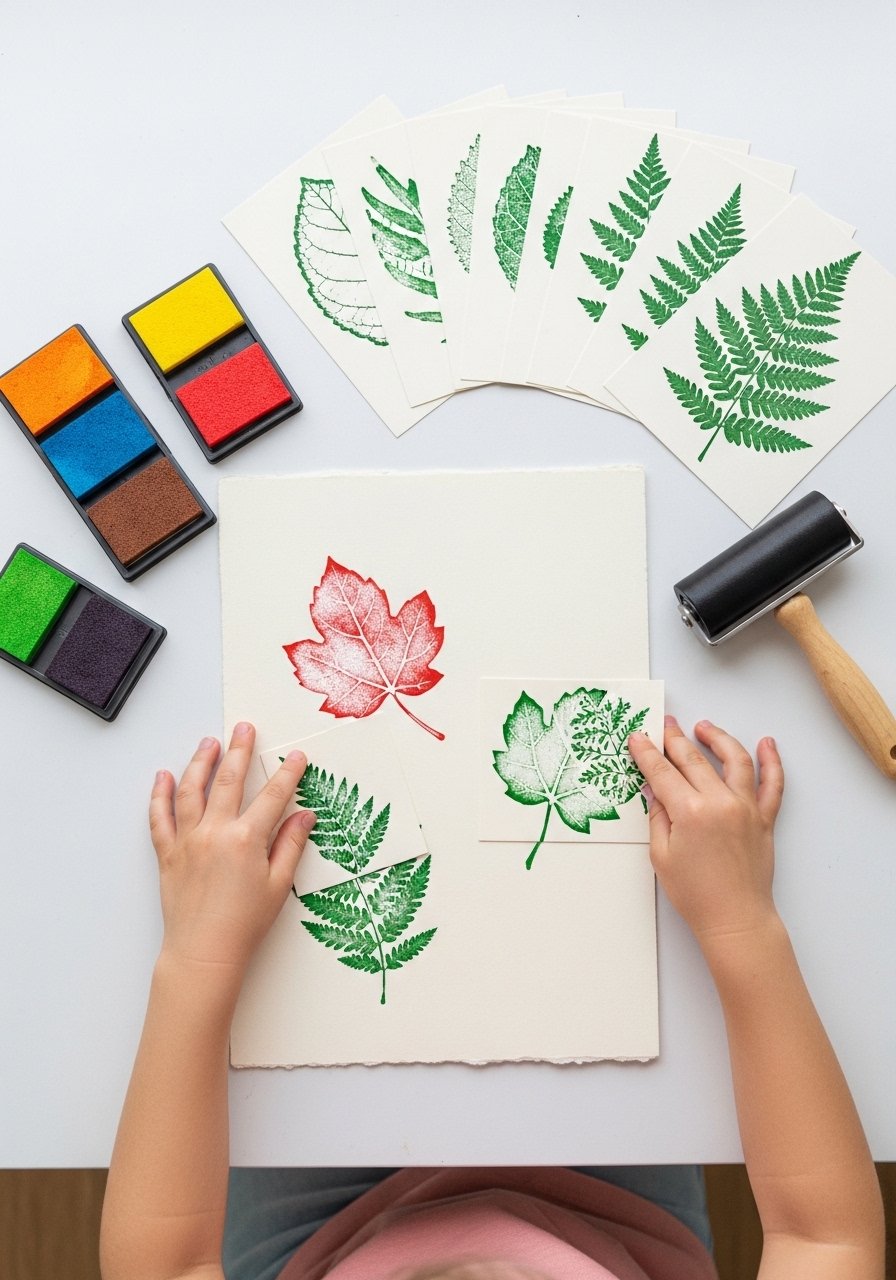
Stenciling turns found shapes into repeat patterns. Kids who like stamping will love layering translucent ink and paint. Use a brayer for even coverage — it’s satisfying and reduces streaks.
Materials
- Pack of nature stencils (leaves, ferns)
- Acrylic ink pads or craft paint (3 colors)
- Brayer roller (2-inch)
- Heavyweight printmaking paper 9 x 12
- Foam brush and paper towels
Instructions
- Secure stencil on paper with painter’s tape.
- Roll ink onto the brayer and press gently over the stencil.
- Lift stencil to reveal print. Clean stencil between colors.
- Layer a second stencil offset for depth; wait 10 minutes for ink to dry between layers.
- Add hand-drawn details once dry.
- Let fully dry 30 minutes before stacking.
How to Display or Gift It
Trim prints to 5 x 7 and tuck into clear sleeves for stationery sets. Stack several and tie with ribbon to gift as a nature print pack. Store stencils flat in a plastic pouch.
- Woodland Creature Drawing — nature drawing ideas for kids
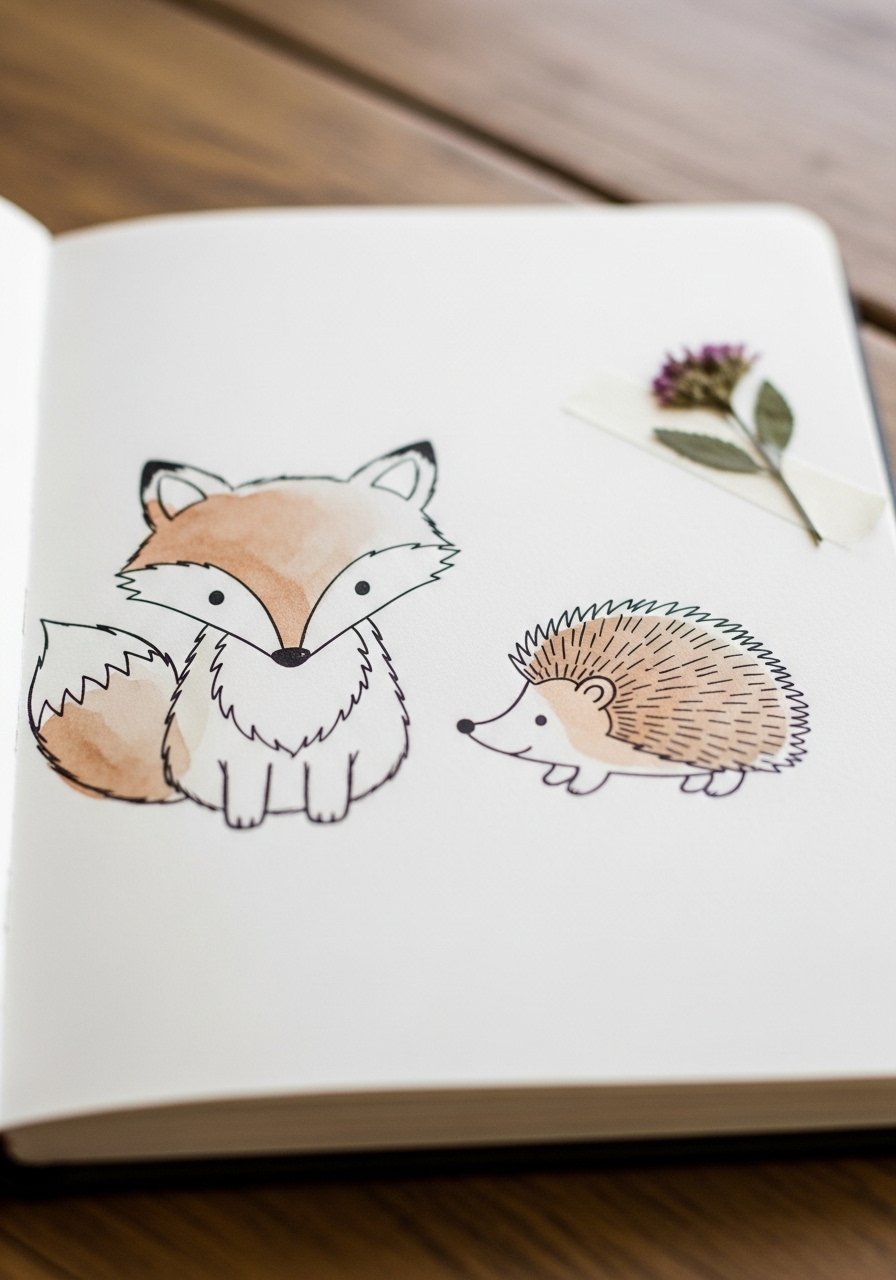
Combine simple line drawing with watercolor washes to make approachable animal portraits. This is perfect for kids who like character drawing. Ink makes lines pop, while the wash softens the background.
Materials
- Watercolor sketchbook, 7 x 10 inches
- Waterproof black fineliner pen (0.3 mm)
- Travel watercolor set
- Round watercolor brush size 6
- Eraser and pencil
Instructions
- Lightly pencil the animal shape — simplify to basic circles and ovals.
- Ink the final lines with the fineliner. Wait 5 minutes to dry.
- Erase pencil marks gently.
- Add a soft watercolor wash for background; dry 5–10 minutes.
- Add fur texture with quick ink lines once dry.
- Sign and add a tiny pressed flower or leaf if you like.
How to Display or Gift It
Mount on a clipboard or frame behind glass to protect ink and pressed additions. Make a set of animal portraits for a nursery wall. Slip pages into clear sleeves for a nature-themed sketchbook.
- Bark Rubbing Mural
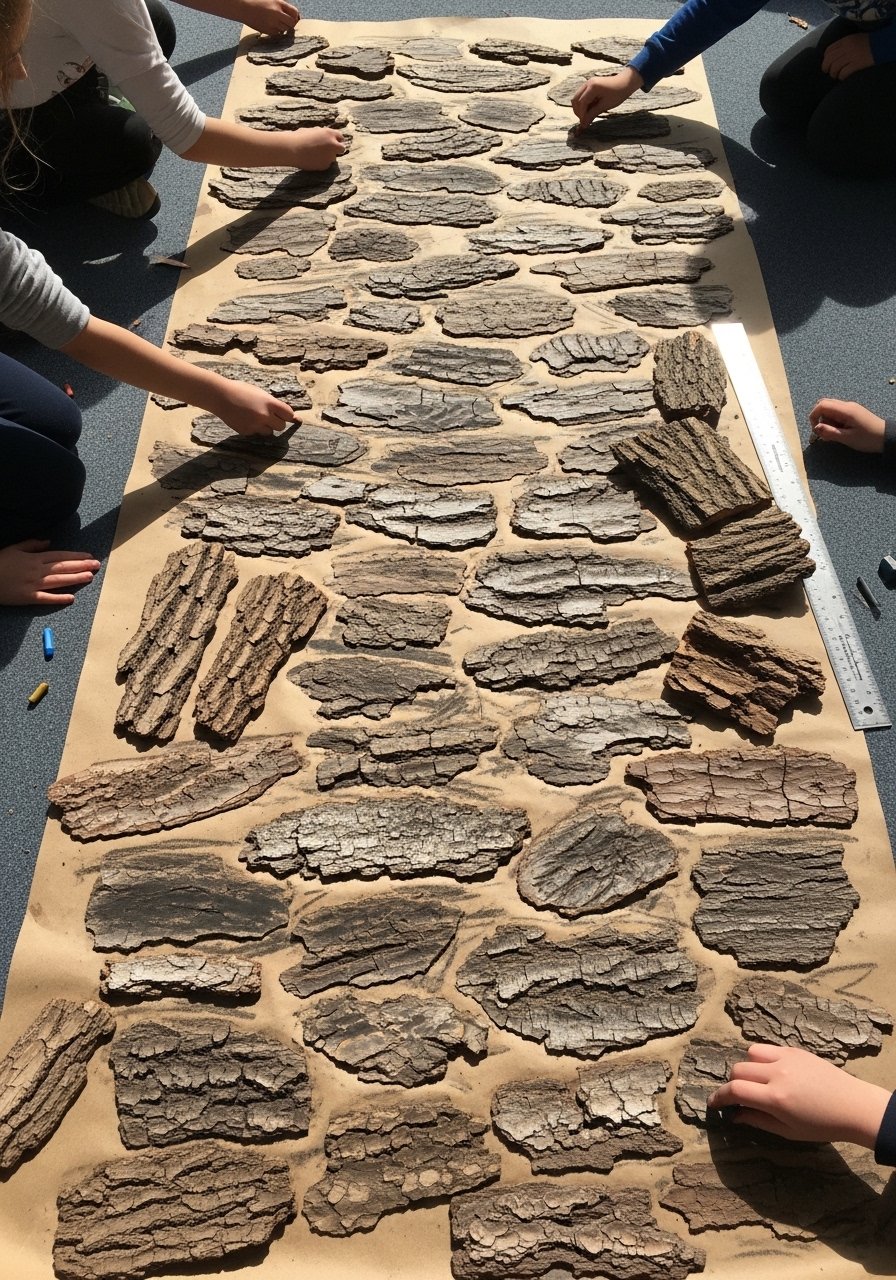
Bark rubbings become a collaborative mural that records a walk through a park. The textures are bold and graphic — perfect for group projects. Use charcoal or soft pastels for dramatic contrast.
Materials
- Roll of butcher paper, 24 inches x 36 inches
- Charcoal sticks and brown crayons or oil pastels
- Masking tape
- Collection of tree bark samples
- Gloves (optional for charcoal)
Instructions
- Tape butcher paper to a flat surface.
- Place a bark sample under the paper and hold steady.
- Rub with the side of a charcoal stick or crayon to reveal texture.
- Continue across the roll, alternating bark types for variety.
- Add labels with tree names in marker.
- Hang the mural once charcoal is fixed with a light spray fixative; allow 15 minutes to set.
How to Display or Gift It
Hang along a hallway for a nature study wall. Cut sections into placemats and laminate as gifts. Store rolled in a cardboard tube for later display.
- Feather Ink Study
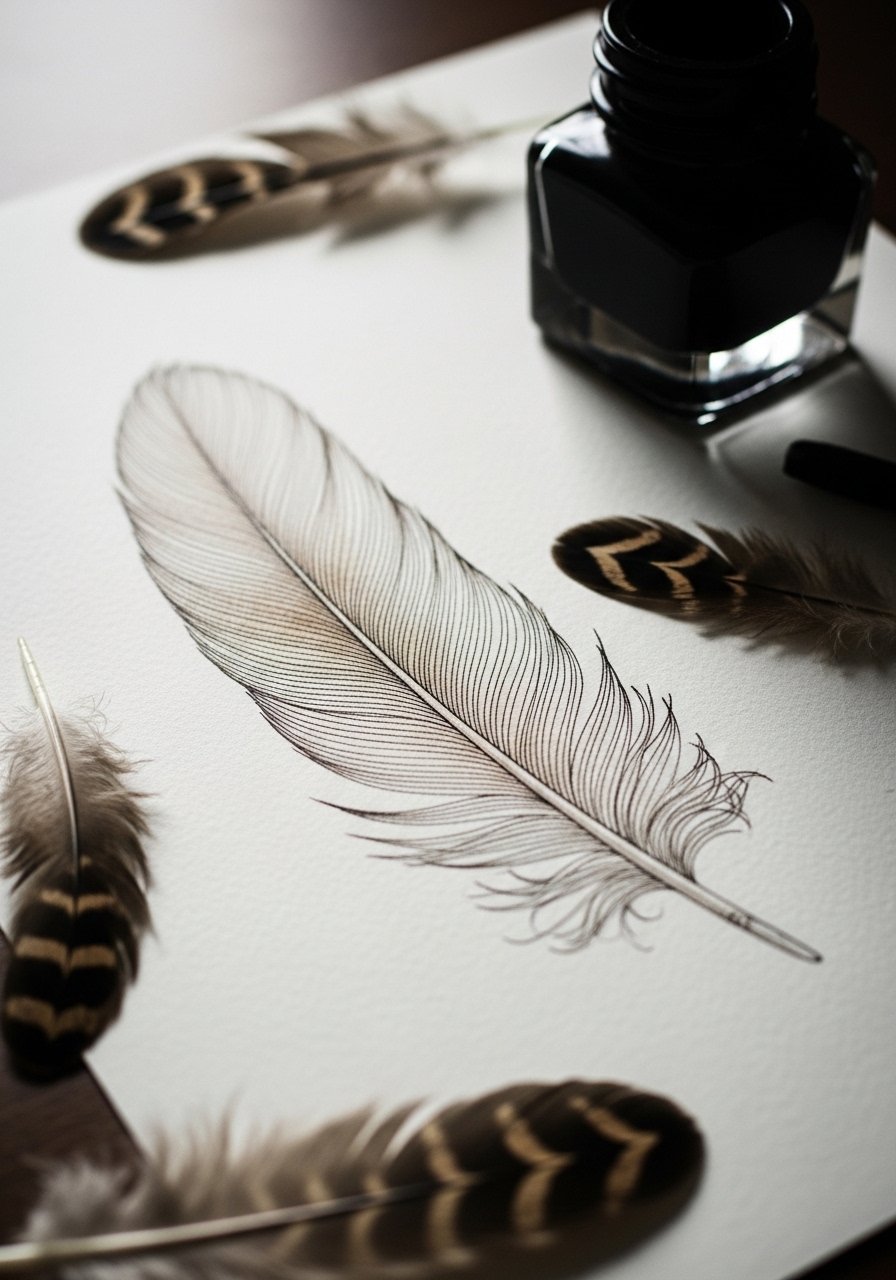
Feathers invite delicate line work and organic patterns. Ink gives feathers a classic study look. Kids learn about weight in line and gentle feather edges.
Materials
- Smooth Bristol paper 8.5 x 11
- Black India ink bottle (small)
- Dip pen or brush pen
- Small wash brush and brown ink wash
- Ruler and pencil
Instructions
- Lightly pencil the feather’s central shaft and outline.
- Use a dip pen to draw long, confident strokes for barbs.
- Vary pressure to get thicker and thinner lines.
- Add a light brown wash behind the feather for depth. Dry 5–10 minutes.
- Use white gel pen for tiny highlights if desired.
- Frame behind glass to protect ink.
How to Display or Gift It
Make a set of three feather studies in matching frames. Tuck a study in a clear sleeve and include a note about where the feather was found.
- Pebble Landscape Mosaic Drawing
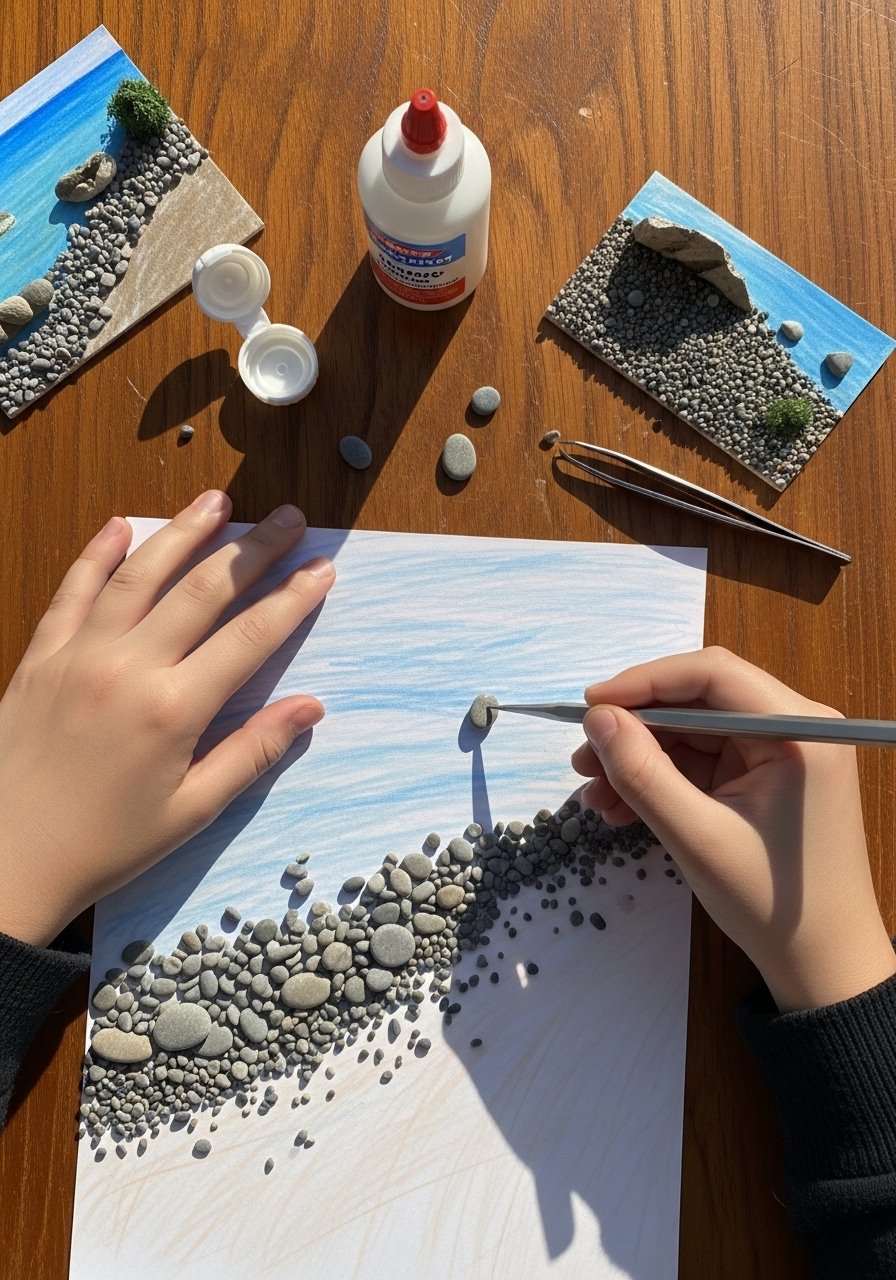
Combine drawing and real pebbles for a mixed-media shoreline. The tactile pebbles add dimension and keep kids engaged. Tweezers help place small stones precisely.
Materials
- Mixed small pebbles (30–40 pieces, 0.25-0.5 inch)
- Heavyweight art paper 9 x 12
- Tacky craft glue or low-temp hot glue
- Colored pencil set (24)
- Tweezers (child-safe)
Instructions
- Sketch the horizon and rough shoreline in pencil.
- Shade water and sky with colored pencils.
- Arrange pebbles in the foreground to create texture.
- Glue pebbles down one at a time using glue. Let tack 10 minutes for tacky glue, 30 minutes for hot glue to set.
- Add pencil details around stones to blend them into the drawing.
- Let fully dry 1 hour before moving.
How to Display or Gift It
Lean on a small wooden easel or glue to a reclaimed wood board for a coastal shelf accent. Wrap in tissue and kraft paper for gifting.
- Seed Packet Nature Sketch Cards
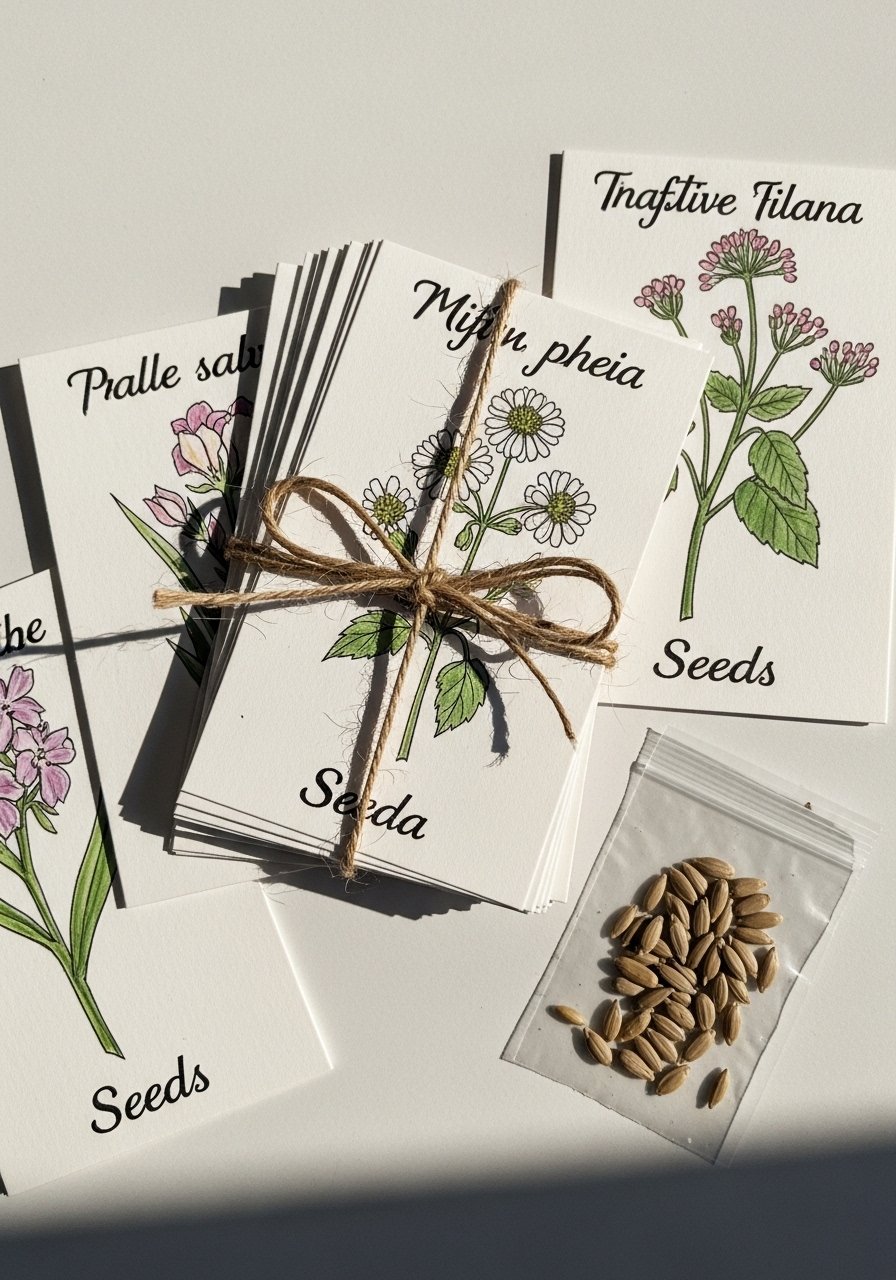
Kids make illustrated seed packets to pair drawing with plant science. The small scale helps focus on line and labeling. These double as gardening prompts.
Materials
- Cardstock cut to 4 x 6 inches (10 cards)
- Fineliner pen (0.5 mm)
- Colored pencils or watercolor markers
- Ruler and pencil
- Envelopes or kraft seed packet sleeves
Instructions
- Fold cardstock in half or leave flat for a small card.
- Lightly pencil the plant or seed image.
- Ink outlines and add labels (plant name, sowing notes).
- Add soft color with colored pencils or a light watercolor wash. Dry 5–10 minutes.
- Slip into envelopes or fold into seed packet sleeves.
- Give as a set with actual seed packets tucked inside.
How to Display or Gift It
Tie a set of illustrated seed cards with twine and include a small pack of seeds. Keep extras in a recipe box or craft organizer for gifting.
- Tree-Ring Cross-Section Drawing — nature drawing ideas for kids
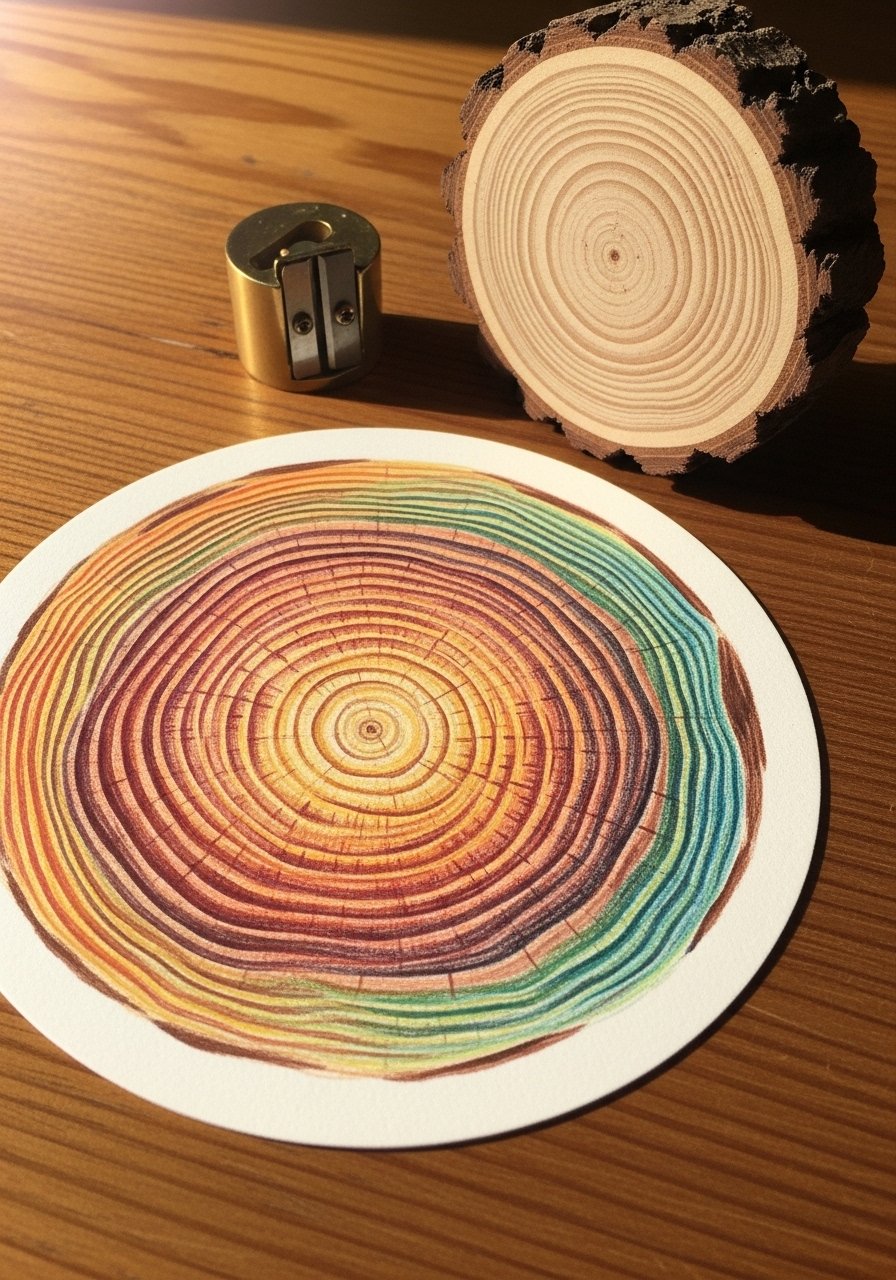
Tree rings teach pattern repetition and time. Drawing rings is meditative and helps kids work on concentric shapes. Colored pencils create good control for layered color.
Materials
- Circular drawing paper 8 inches diameter
- Colored pencil set (24)
- Compass or round lid for tracing
- Eraser and pencil
- Fine-tip marker for labeling
Instructions
- Trace a circle using a compass or lid.
- Lightly draw several concentric rings, varying distance.
- Shade rings with alternating warm and cool browns.
- Blend slightly with white pencil or stump.
- Add small marks for knots and grain.
- Label with “years” or a short found-tree story.
How to Display or Gift It
Frame and pair with a real thin wood slice. Make a “tree ring” set showing different ages as a classroom visual. Store flat in a portfolio sleeve.
- Pressed-Flower Silhouette Drawings
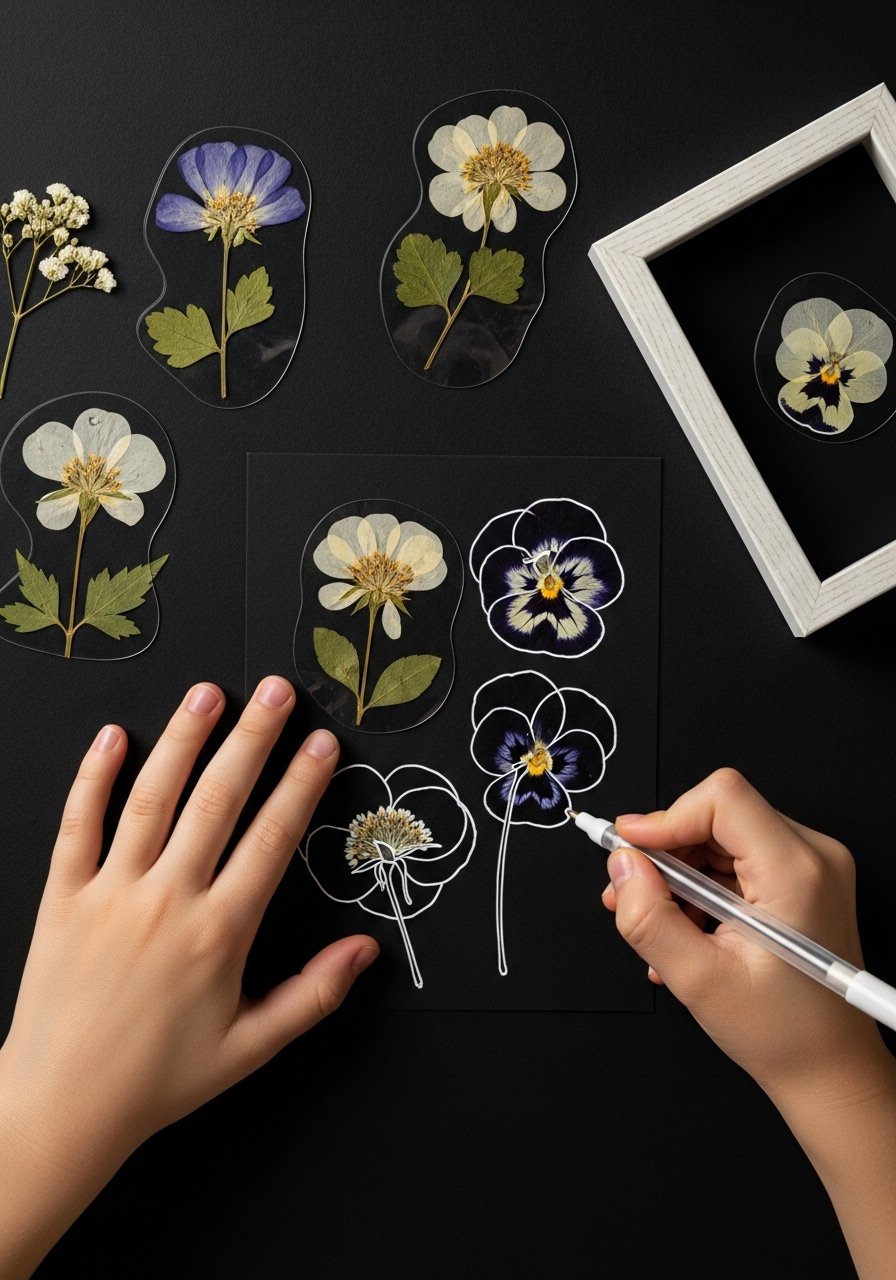
Combining pressed flowers with silhouette drawing gives a delicate, botanical look. Silhouettes are forgiving for beginners and look striking on dark paper.
Materials
- Black cardstock 8 x 10 inches
- Pressed flowers and small leaves
- White gel pen and metallic fine-liner
- Craft glue (small-tip bottle)
- Tweezers
Instructions
- Arrange pressed flowers on black cardstock to create a pleasing composition.
- Glue each piece with small dots of craft glue; press gently.
- Use a white gel pen to draw silhouettes or outlines that complement the pressed shapes.
- Add metallic accents for veins or borders.
- Allow glue to dry 30 minutes.
- Frame under glass to protect delicate pressed flowers.
How to Display or Gift It
Make a set of three framed silhouettes and hang in a row. Slip one into a clear photo sleeve and mail as a botanical postcard.
- Muddy Watercolor Pond Scenes
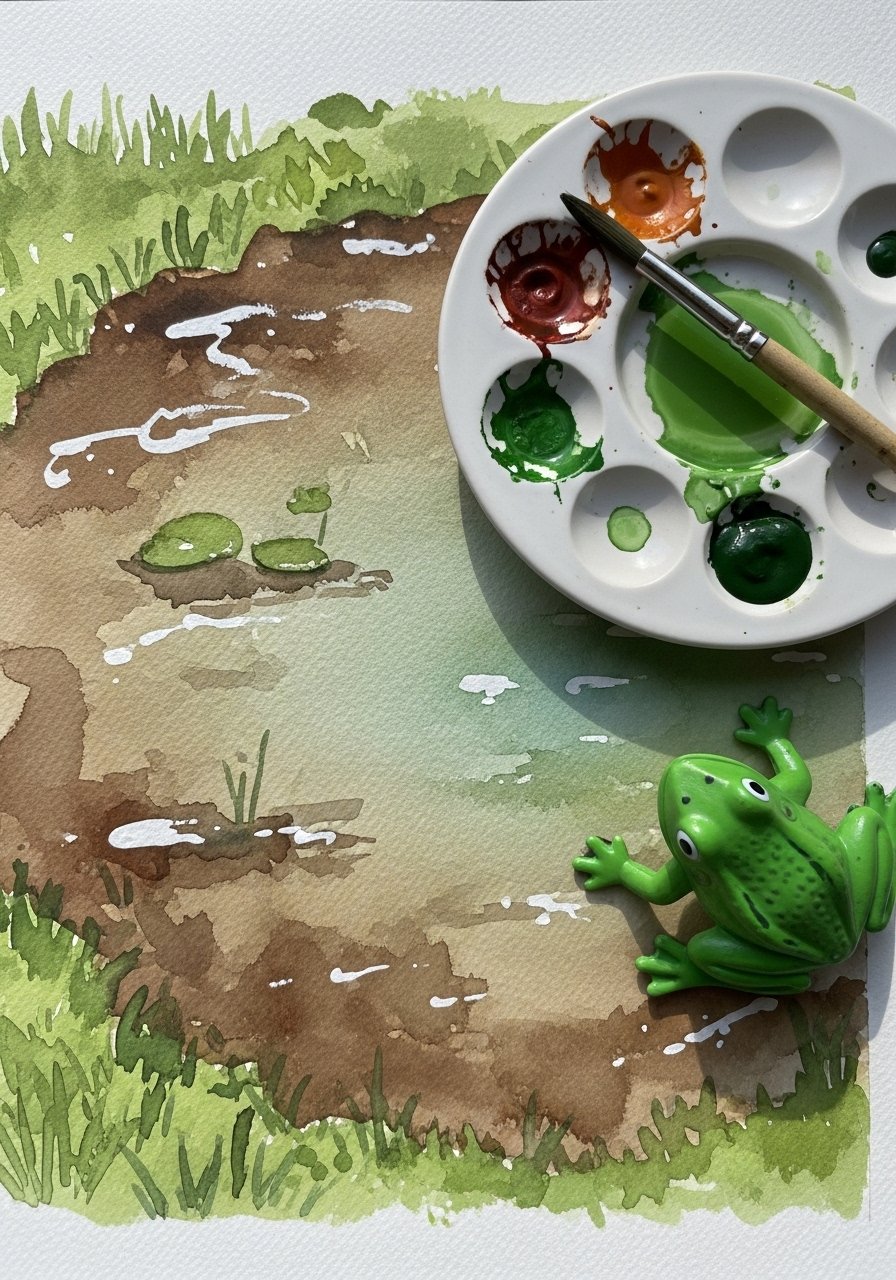
Pond scenes let kids experiment with muddy color blends and reflections. Encourage them to mix rather than use straight tube colors for natural hues. This is great for messy, joyful painting.
Materials
- Watercolor paper 9 x 12
- Watercolor set and palette
- Round brush size 8 and size 2
- Small sponge for texture
- Pencil and eraser
Instructions
- Lightly sketch pond horizon and main shapes.
- Mix muted greens and browns for the base wash.
- Apply wash to sky and pond, leaving spots for highlights. Dry 10 minutes.
- Use sponge to dab texture around reeds and shoreline.
- Paint small reflections by painting inverted shapes lightly.
- Add fine details (insects, frog) with a size 2 brush once dry.
How to Display or Gift It
Mat and frame for a nature-themed gallery. Create a set of seasonal pond scenes to show changes through the year.
- Crayon Batik Leaf Prints
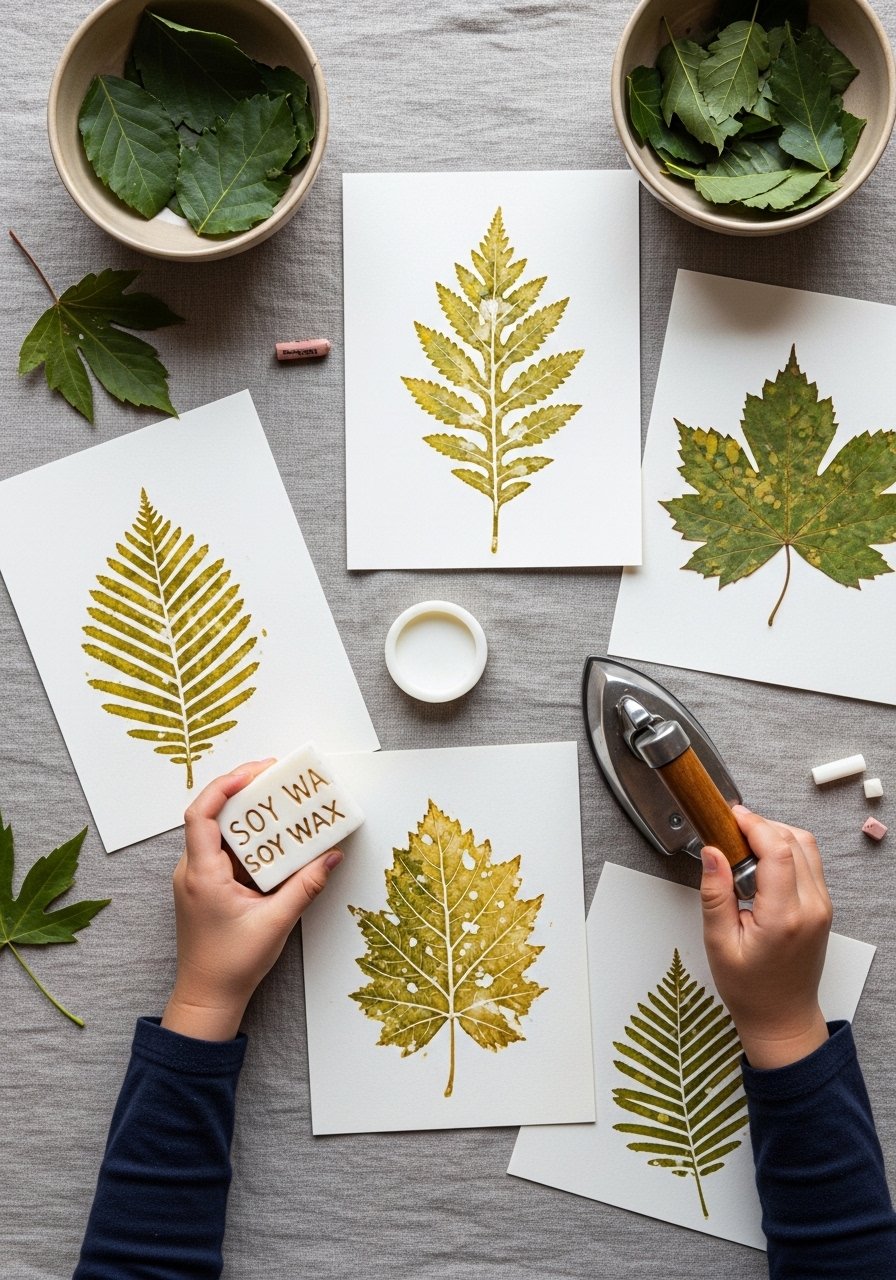
Wax-resist with crayons creates a batik-like look. Kids love the semi-magic of wax lines holding back color. Use low heat and an iron carefully with adult supervision.
Materials
- White cotton fabric squares 10 x 10 inches
- Crayons (peeled, various colors)
- Small household iron and ironing board
- Leaves and twigs
- Fabric paint or diluted acrylic (optional)
Instructions
- Place a leaf on the fabric and rub crayon around it to create wax lines.
- Remove leaf and color the fabric area with crayon shading.
- With adult supervision, place a cloth over the fabric and iron on low to melt wax into fibers for 10–20 seconds.
- Optionally paint a light wash of fabric paint and blot. Dry 24 hours.
- Heat-set using iron per paint instructions if used.
How to Display or Gift It
Turn finished squares into coasters, sachets, or small wall hangings. Wrap a set in tissue for a cozy handmade gift.
- Sun-Print Nature Monotypes

Sun-print paper (cyanotype-style) makes dramatic negative images with sunlight. It’s fast and extremely visual for kids. The images are ghostly and bold.
Materials
- Sun-print paper pack (pre-sensitized)
- Assorted flat leaves and flowers
- A sheet of glass or plexiglass
- Small tray of water for fixing
- Clothespins to dry prints
Instructions
- Arrange objects on sun-print paper outdoors on a bright sunny day.
- Cover with glass to hold items flat.
- Expose to sunlight 2–10 minutes depending on sun intensity.
- Rinse in water tray until pale blue water runs clear.
- Hang to dry; prints deepen a bit as they dry.
- Store finished prints flat.
How to Display or Gift It
Frame the prints in white mats to accent the cyan tones. Make a set of seasonal prints as a calendar gift.
- Twig Frame Nature Sketch
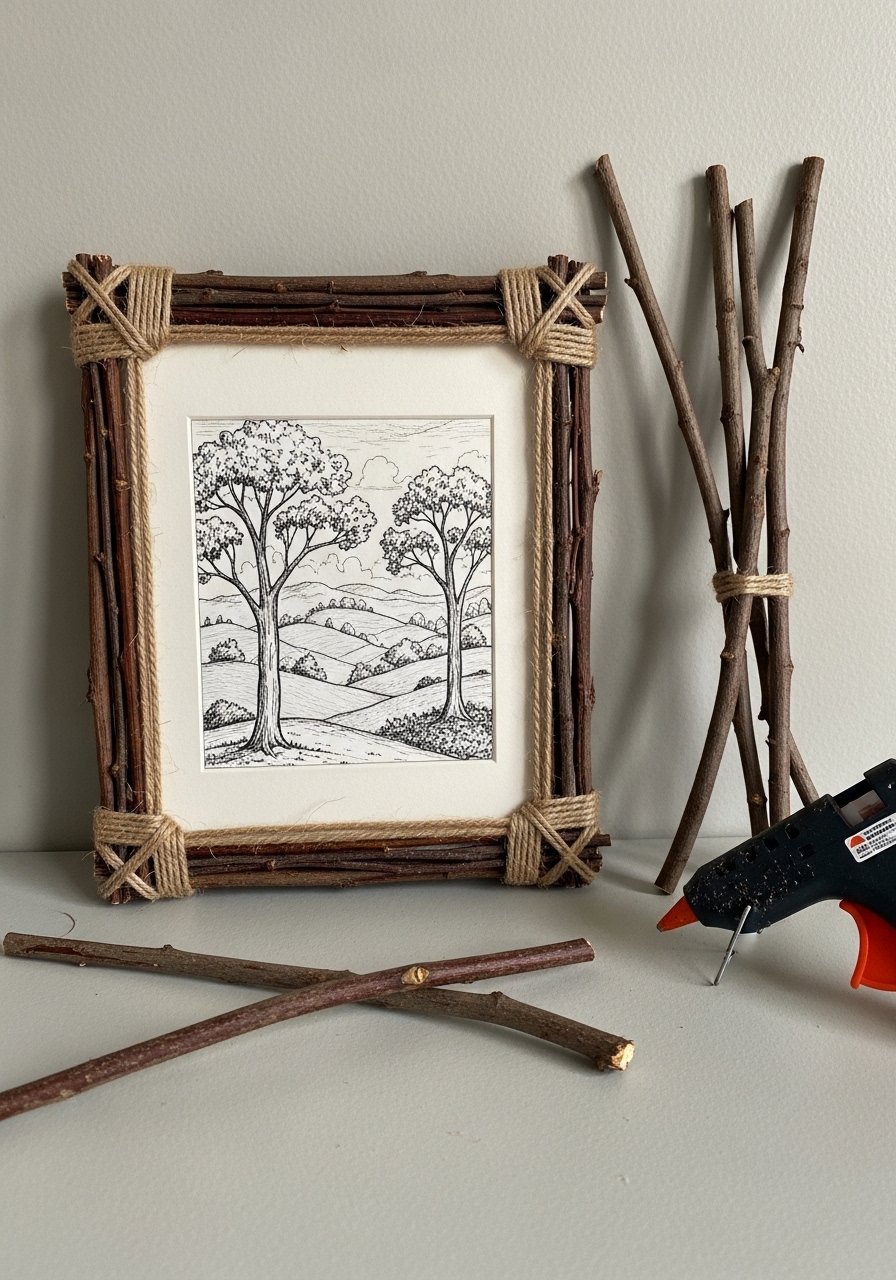
Use foraged twigs to make rustic frames that hold small drawings. It turns a simple page into a nature-ready keepsake. A low-temp hot glue gun makes building frames quick.
Materials
- Small sketch on paper 5 x 7
- Twigs (4 for frame, 6–8 inches each)
- Low-temp hot glue gun and sticks
- Jute twine
- Scissors
Instructions
- Trim twigs to the same length and arrange as a simple frame.
- Glue corners with hot glue; hold 30 seconds till set.
- Wrap corners with jute twine for a decorative finish.
- Back the sketch with cardboard and glue to the frame.
- Let glue cure 30 minutes before display.
- Add a twine hanger on the back if desired.
How to Display or Gift It
Prop on a small wooden easel or hang with twine. Bundle as a nature-themed gift with a note about the find spot.
- Seedpod Stipple Drawing
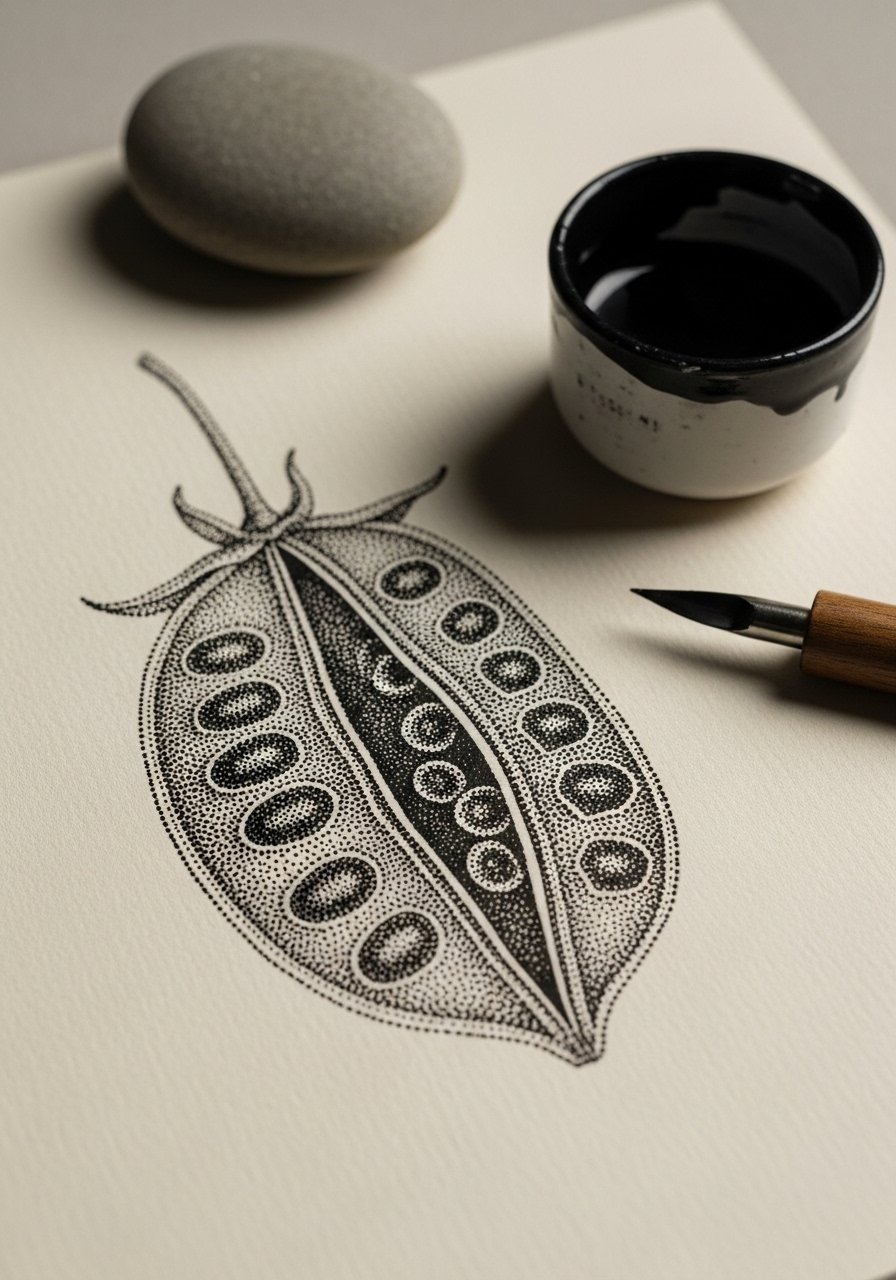
Stippling builds patience and fine motor control. Seedpods with textured surfaces are ideal subjects. Kids can work in short bursts to complete one section at a time.
Materials
- Recycled toned sketch paper 8 x 10
- Black micron pen set (0.1–0.5 mm)
- Pencil for layout
- Small magnifier (optional)
Instructions
- Sketch a light outline of the seedpod.
- Start stippling from the darkest areas, slowly building density.
- Take breaks every 15 minutes to rest the hand.
- Use wider pen for darker clusters and fine pen for soft edges.
- Erase remaining pencil after ink dries 5 minutes.
- Sign and date the study.
How to Display or Gift It
Frame in a gallery-style white mat and hang with other stipple studies. Store flat in a protective sleeve.
- Scented Plant Portraits with Water-Soluble Crayons
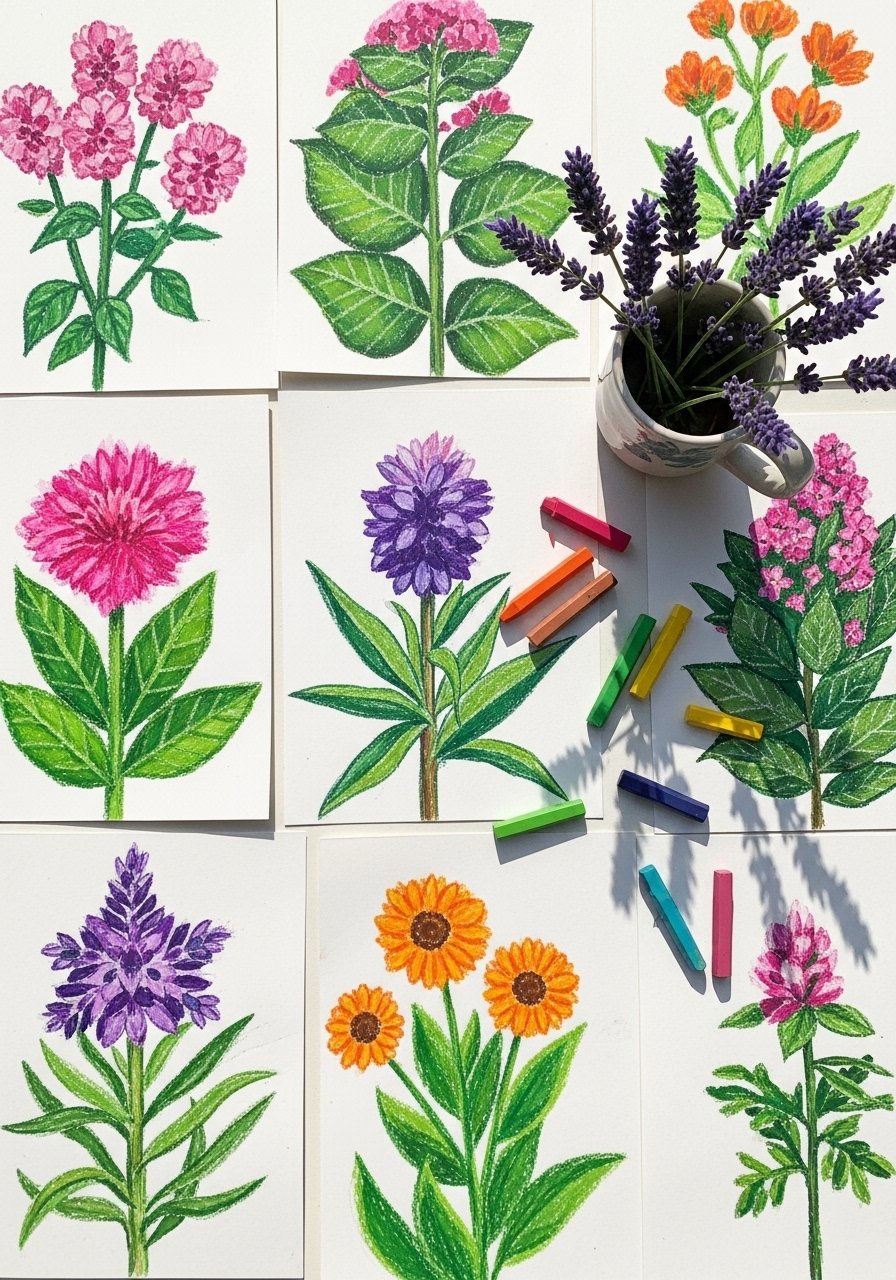
Add sensory delight by pairing drawings with the plant’s scent. Water-soluble crayons allow a painterly finish without a wet paint set. Kids love rubbing stems to smell fragrances while drawing.
Materials
- Water-soluble crayons (12)
- Watercolor paper 9 x 12
- Small spray bottle or wet brush
- Fresh sprigs (mint, rosemary, lavender)
- Pencil
Instructions
- Place a sprig beside the paper and observe shape and scent.
- Sketch the plant loosely.
- Color with water-soluble crayons.
- Activate pigment with a wet brush or light spray. Dry 5–10 minutes.
- Add details with crayon once dry.
- Name the portrait with plant facts.
How to Display or Gift It
Bundle portraits with a small bunch of dried herbs for a scented greeting card. Keep extras in a labeled portfolio folder.
- Pebble Animal Silhouettes (Mosaic Drawing)
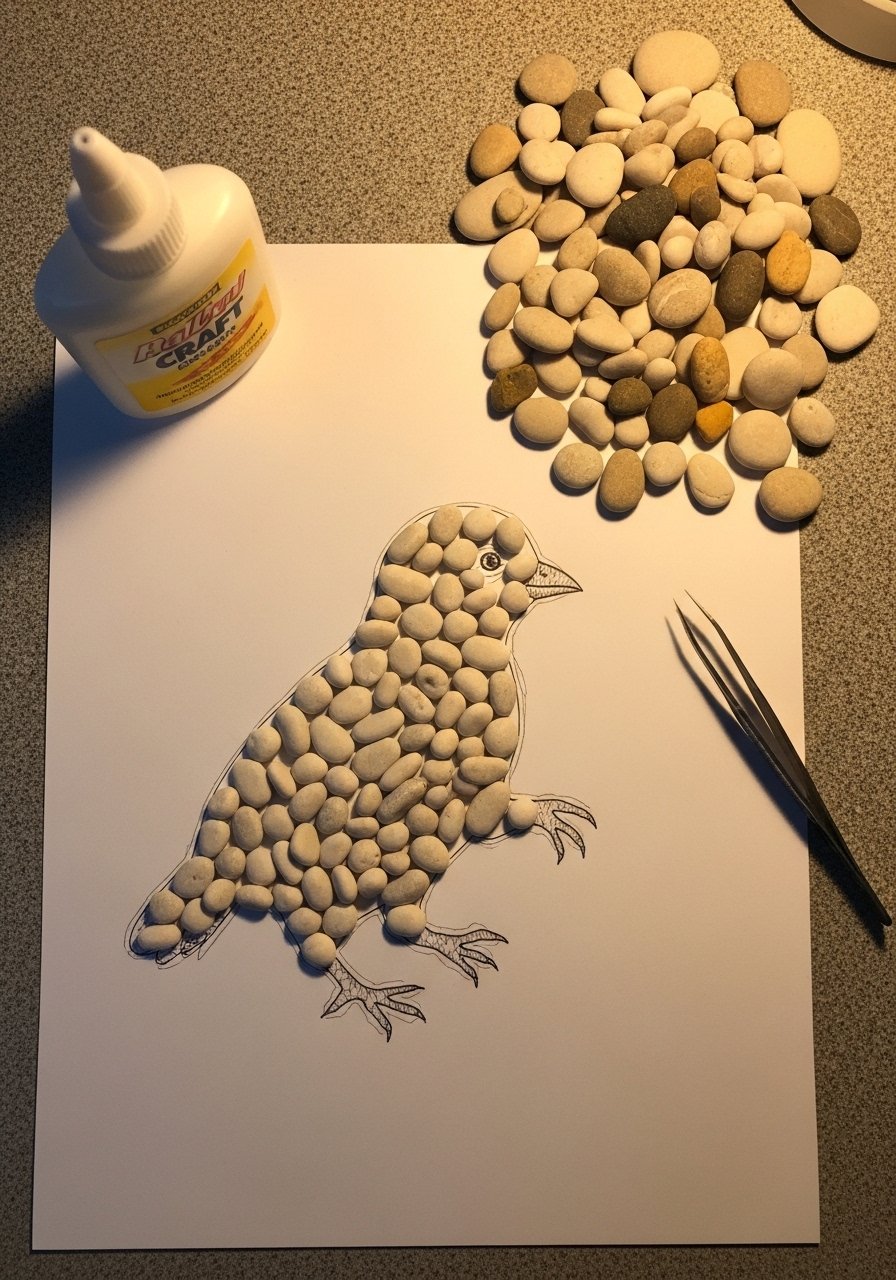
Mix tiny pebbles with drawn outlines to create silhouette mosaics. This blends tactile making with drawing composition. Tweezers help with placement.
Materials
- Heavy art board 9 x 12
- Tiny craft pebbles (100 pieces, 3–5 mm)
- Pencil and fine black pen
- Tacky glue
- Tweezers
Instructions
- Draw a simple animal silhouette lightly in pencil.
- Apply small dots of glue inside the silhouette, working in small sections.
- Use tweezers to place pebbles closely together.
- Fill entire silhouette; adjust spacing as needed.
- Let glue set 1 hour, then fully cure 24 hours.
- Outline silhouette with fine pen for definition.
How to Display or Gift It
Frame behind acrylic if you plan to travel with it. Pair with a nature-themed book for gifting.
- Grass Blades Gesture Drawing
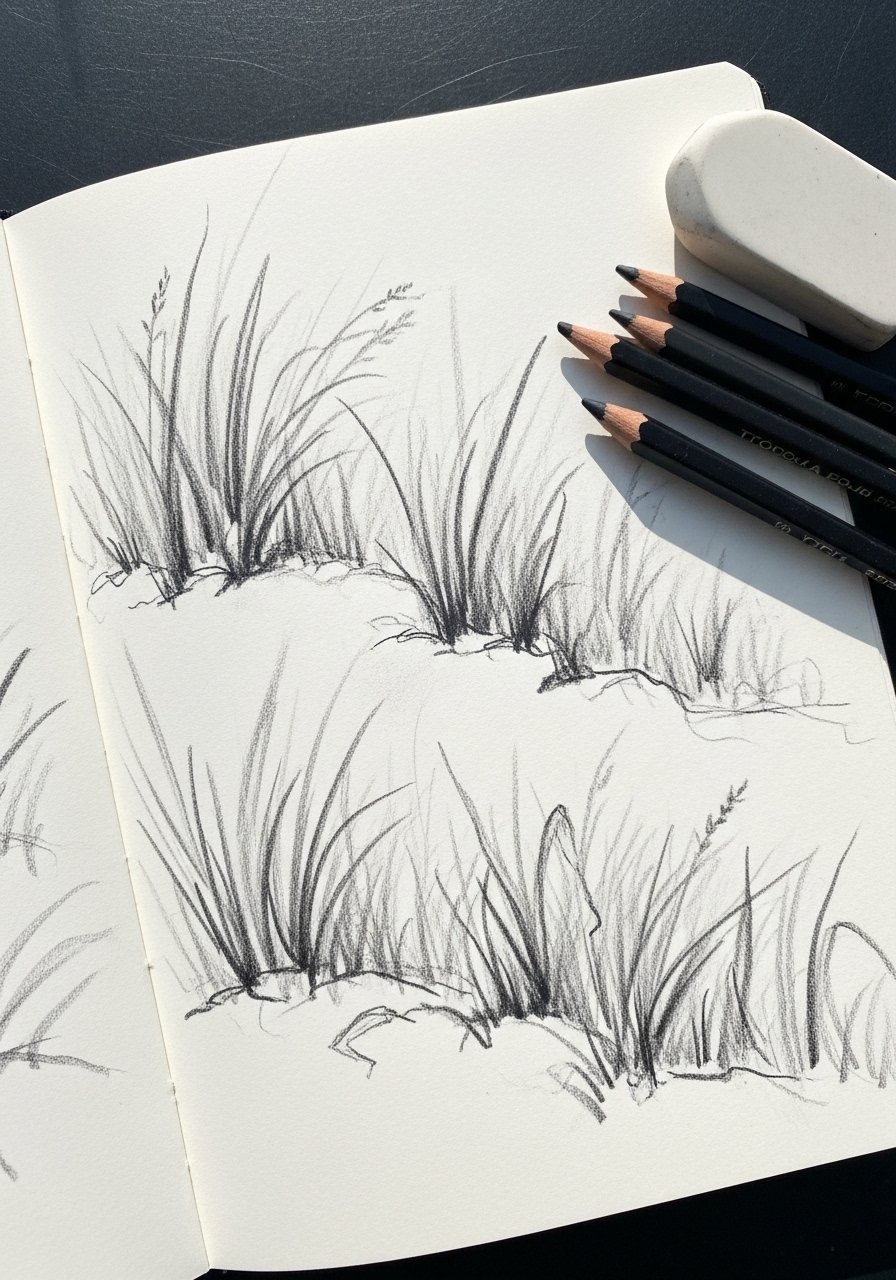
Gesture drawing teaches speed and movement. Quick 30-second sketches help kids capture the overall feel of a scene rather than perfect detail.
Materials
- Newsprint pad or sketchbook 9 x 12
- Vine charcoal and compressed charcoal pencils
- Kneaded eraser
- Timer (phone is fine)
Instructions
- Set a timer for 30 seconds.
- Do loose, flowing marks to suggest clusters of grass.
- Repeat several times, increasing to 1 minute sketches.
- Use eraser to lift highlights.
- Choose one gesture to refine if desired.
- Date and note the location.
How to Display or Gift It
Bind gesture pages into a quick study booklet. Clip onto a display wire for a breezy gallery.
- Bug-Eye Macro Leaf Study
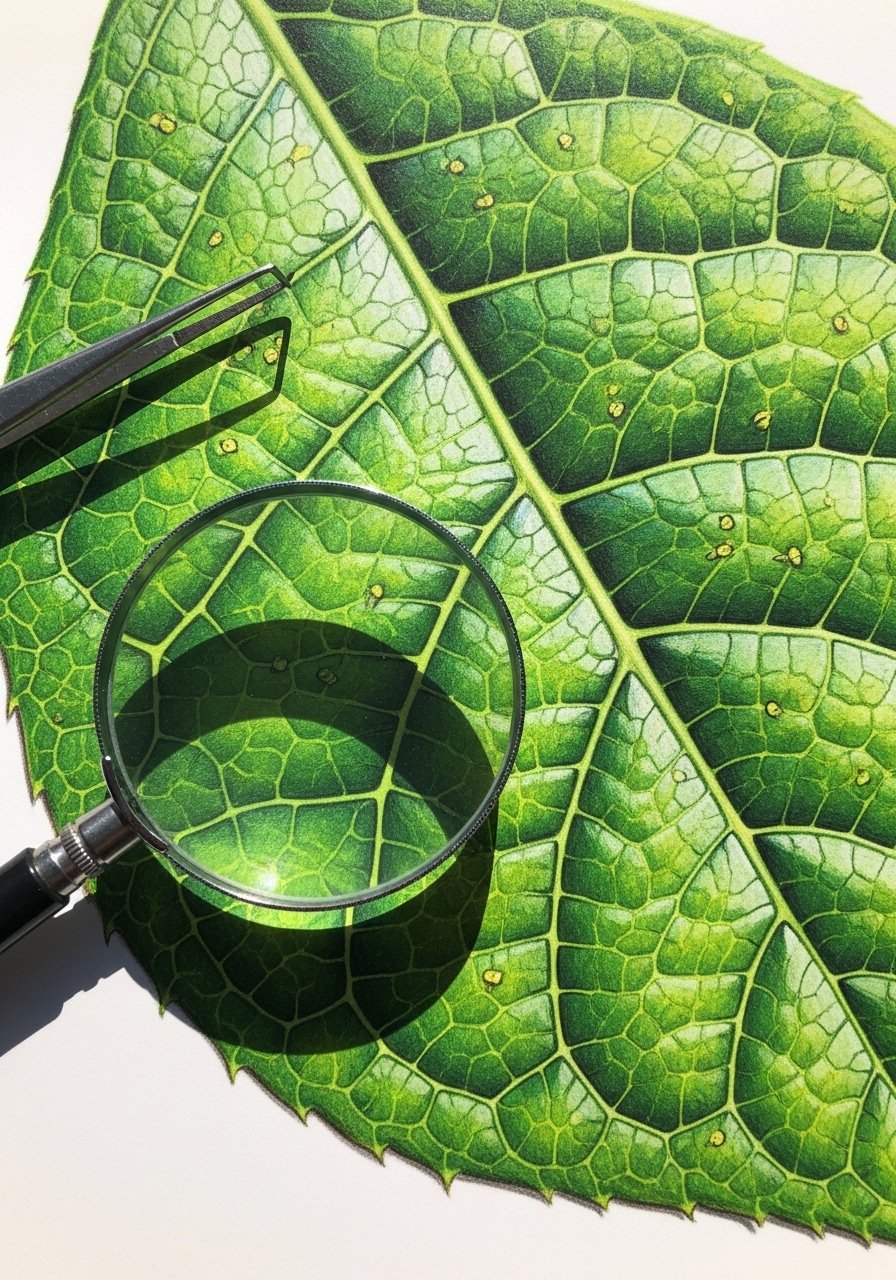
Macro studies train observational skills. Kids learn veins and textures by drawing close-up. Using a magnifier makes tiny details fun and achievable.
Materials
- White drawing paper 8.5 x 11
- Colored pencils (24)
- Magnifying glass
- Tweezers and a small paintbrush for cleaning samples
- Pencil and eraser
Instructions
- Choose a leaf and remove any debris with the brush.
- Observe with magnifier and sketch main vein structure.
- Build color in layers, following vein direction.
- Add tiny insect marks or water droplets with a white gel pen.
- Sign and label the species if known.
- Store flat to prevent curling.
How to Display or Gift It
Frame with a thin white mat and label for an educational display. Include a small note about where the leaf was found.
- Mushroom Cap Pattern Study
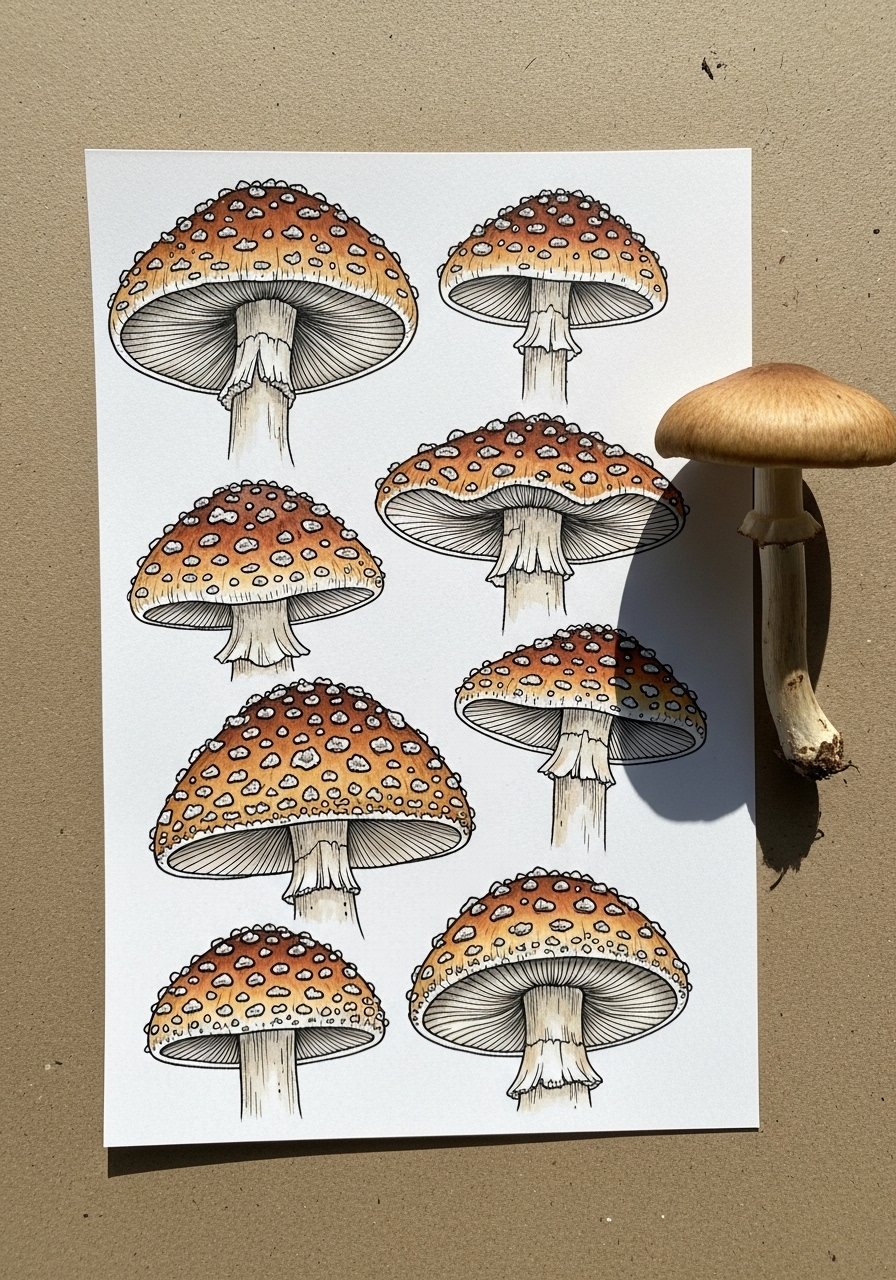
Mushrooms have playful patterns that kids find fascinating. This study emphasizes repeating marks and pattern recognition. It’s great for a nature walk follow-up.
Materials
- Watercolor postcard pack (4 x 6)
- Waterproof fineliner pen
- Watercolor brush and palette
- Pencil
- Small ruler
Instructions
- Sketch several mushrooms lightly across postcards.
- Ink gills and dots with fineliner; wait 3–5 minutes to dry.
- Add light watercolor washes for cap color; dry 5–10 minutes.
- Add layered dots or ring patterns with ink once dry.
- Let cards cure 30 minutes before stacking.
- Mail as nature notes or assemble into a mini set.
How to Display or Gift It
Tie a set of mushroom postcards with twine and include a handwritten note about the hike where you found them. Store flat in a postcard box.
- Wind-Blown Meadow Watercolor Gesture
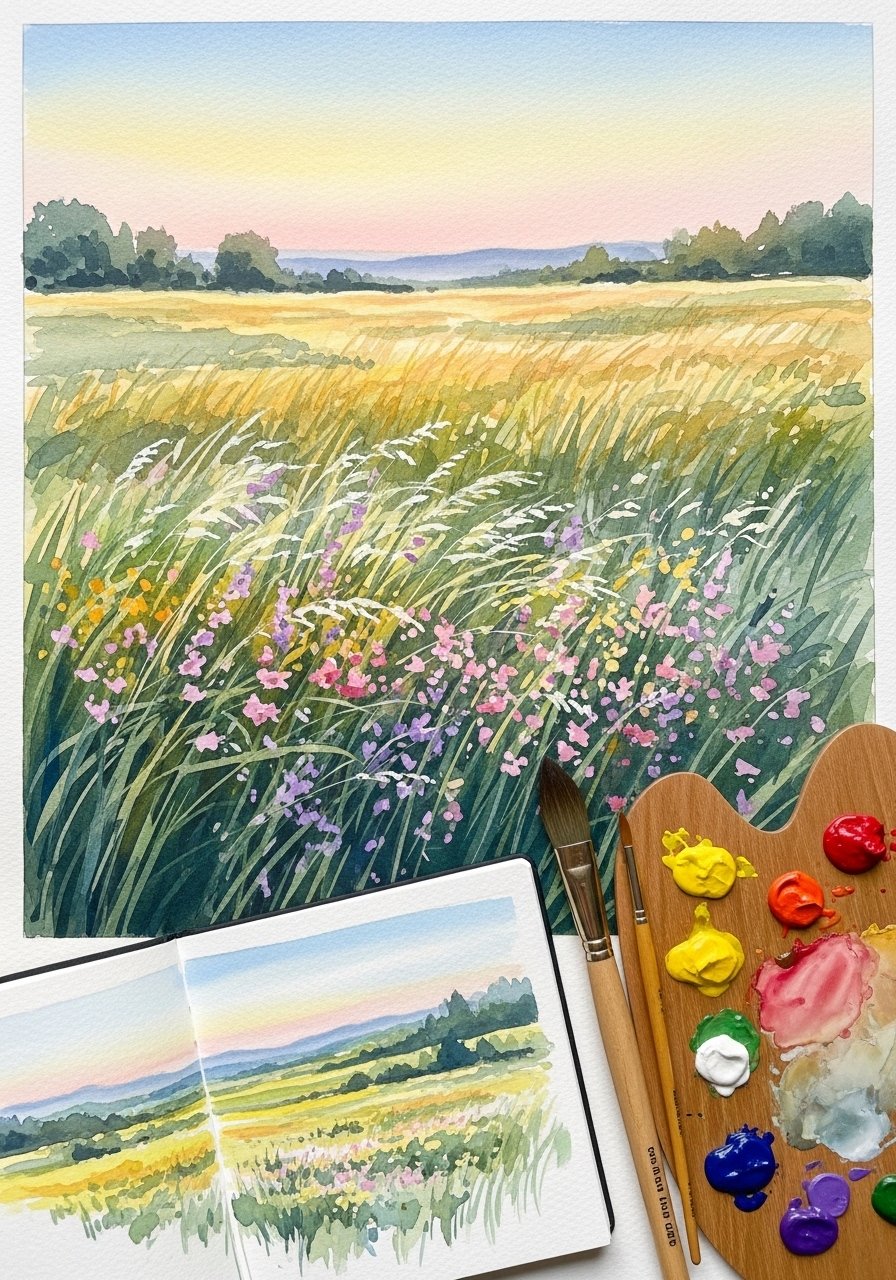
For expressive kids, sweeping watercolors capture wind and motion. Use a large wash and loose brushwork rather than detailed rendering. This is freeing and fun.
Materials
- Large watercolor sheet 11 x 15
- Mop brush size 12
- Watercolor pans (12)
- Masking fluid (optional)
- Salt for texture (kitchen salt)
Instructions
- Wet the paper evenly.
- Drop in sky color and let colors bleed.
- While damp, add grass strokes with mop brush.
- Sprinkle salt in foreground for subtle texture; let sit until dry 10–15 minutes.
- Lift salt and add darker grass lines with a small brush.
- Let fully dry 30 minutes before handling.
How to Display or Gift It
Frame with a wide mat to emphasize openness. Pair with a pressed wildflower tucked into the frame as a keepsake.
- Moonlit Owl Ink Wash
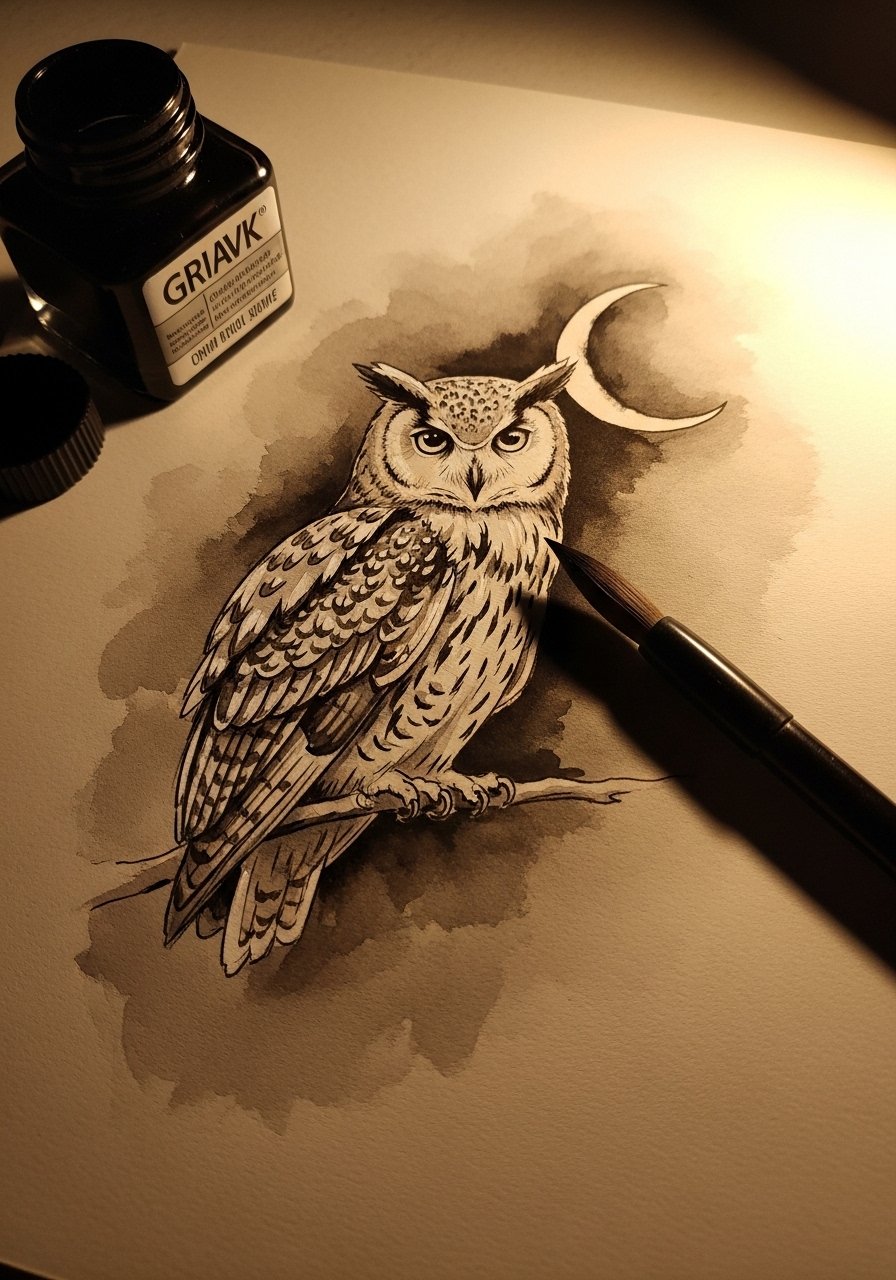
Ink wash creates moody nocturnal scenes. Owls are iconic and a bit theatrical. Teach kids to think in dark values and light accents.
Materials
- Toned charcoal paper 9 x 12
- Black India ink and small wash brush
- White gouache or gel pen for highlights
- Pencil for layout
- Cup of water and paper towel
Instructions
- Lightly sketch the owl silhouette.
- Mix diluted ink for light washes and block in shadow shapes.
- Build darker layers, letting each dry 5–10 minutes.
- Use white gouache sparingly for moon glow and feather highlights.
- Add tiny ink strokes for feather detail.
- Let dry 30 minutes and frame behind glass.
How to Display or Gift It
Hang above a bedside for a story-time corner. Pair with a printed short poem about owls in a simple frame.
- Cloudscape Chalk Pastel Study
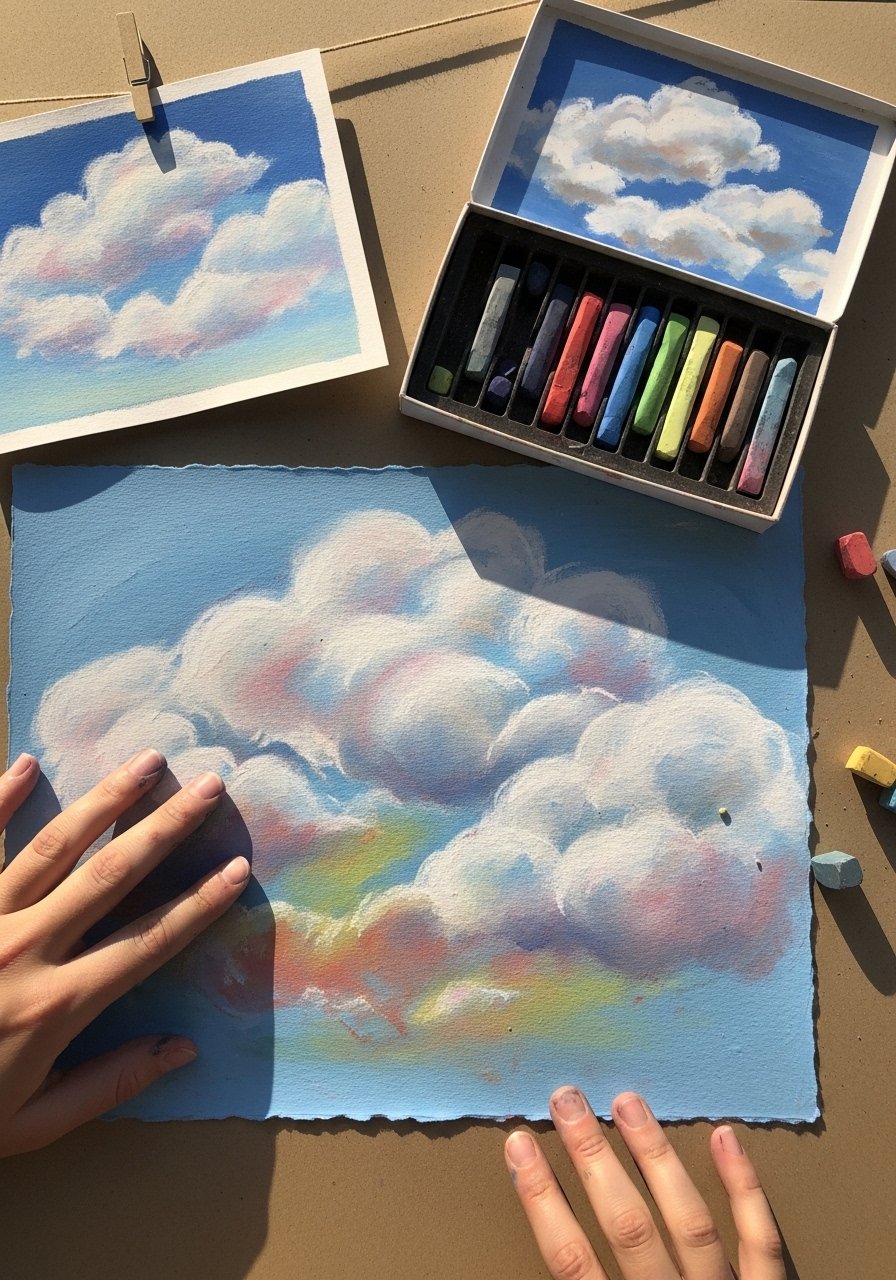
Cloud studies are soothing and teach blending technique with pastels. Kids can experiment with finger blending and layering. The result feels dreamy and soft.
Materials
- Textured pastel paper 9 x 12
- Chalk pastel set (12)
- Blending stumps or fingers (use smock)
- Fixative spray
- Cloth for wiping hands
Instructions
- Lightly draw horizon with a pencil.
- Block in sky color with broad pastel strokes.
- Layer whites and grays for clouds, blending with fingers or stumps.
- Add subtle warm tones at the base for sunset scenes.
- Set work with a light spray of fixative; allow 15 minutes to dry.
- Store flat in a pastel portfolio.
How to Display or Gift It
Frame under glass to protect chalk. Gift as a calming set of sky studies for a bedroom or reading nook.
You did it — 26 playful, nature-focused drawing projects designed to get kids outside looking and inside drawing. There are quick scribble challenges, mixed-media adventures, and projects that pair observation with hands-on making. Try a few back-to-back to see which activities hold interest longest, and keep a small craft organizer with your favorite supplies on hand so sessions start with minimal setup.
Pin this collection for rainy-day inspiration and share with friends who’d love simple, outdoorsy art projects. If you’re equipping a home art station, a quality hot glue gun with temperature control makes several of these projects go faster and cleaner — and it changed how many of my mixed-media builds turn out. Which project will you try first?


