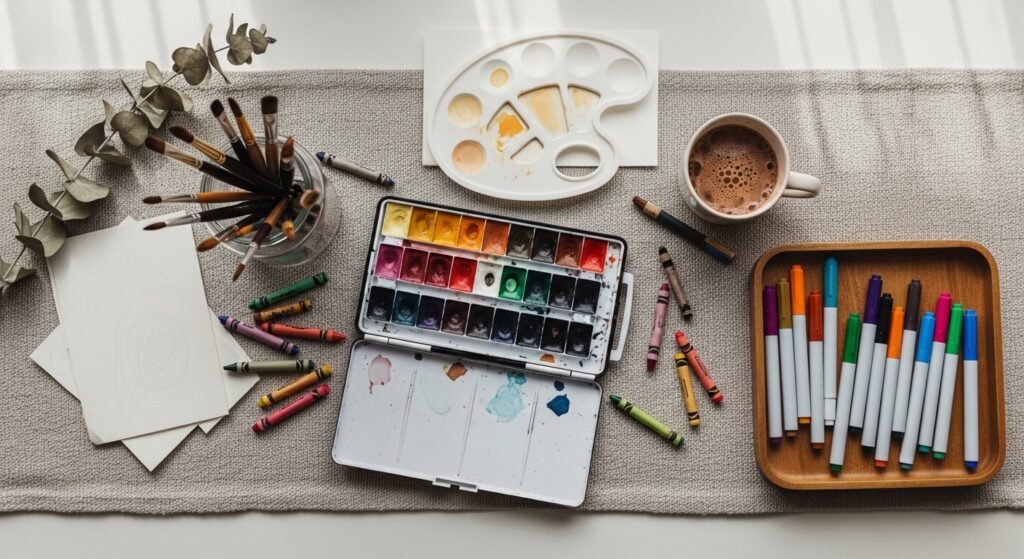
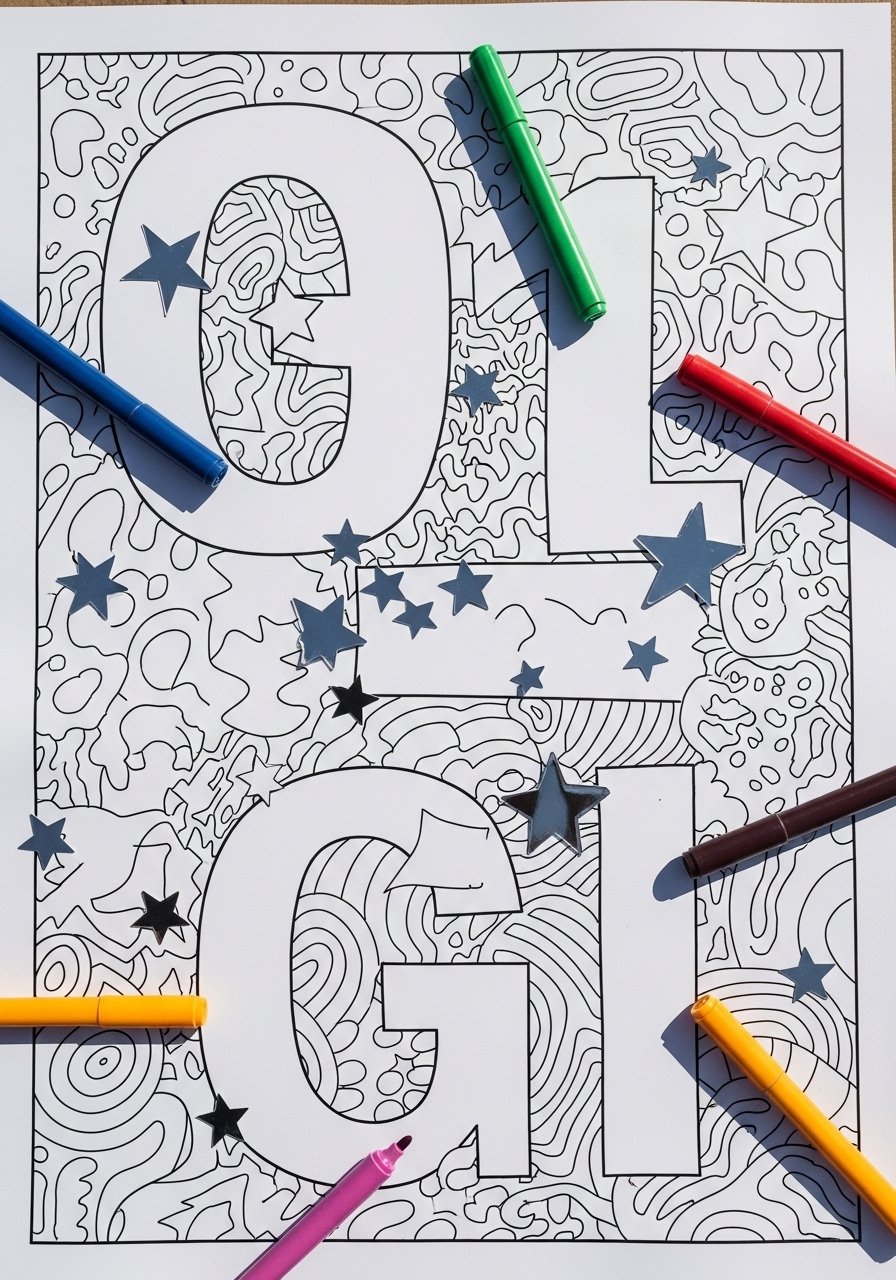
Rainy days can turn into the best kind of cozy craft time — especially when you have a stack of kid-friendly drawing prompts that spark imagination and keep little hands busy. These 23 rainy day drawing ideas for kids rainy day are indoor-friendly, low-mess, and designed to beat boredom with projects that range from quick scribble games to more finished keepsakes. You’ll find simple prompts, playful techniques, and step-by-step projects that use supplies most parents already have or can grab in one click.
I mention brands and tools you’ll actually want in your craft kit because they smooth the process — for example, I reach for a sturdy self-healing cutting mat when cutting templates and a reliable student watercolor set for vibrant, kid-safe washes. Each idea below includes a full materials list, step-by-step instructions with drying times, troubleshooting tips, and ways to display or gift the finished piece. Pin your favorites and let’s make the next rainy afternoon one the kids will ask to repeat.
1. Scribble Monster Mash (drawing ideas for kids rainy day)
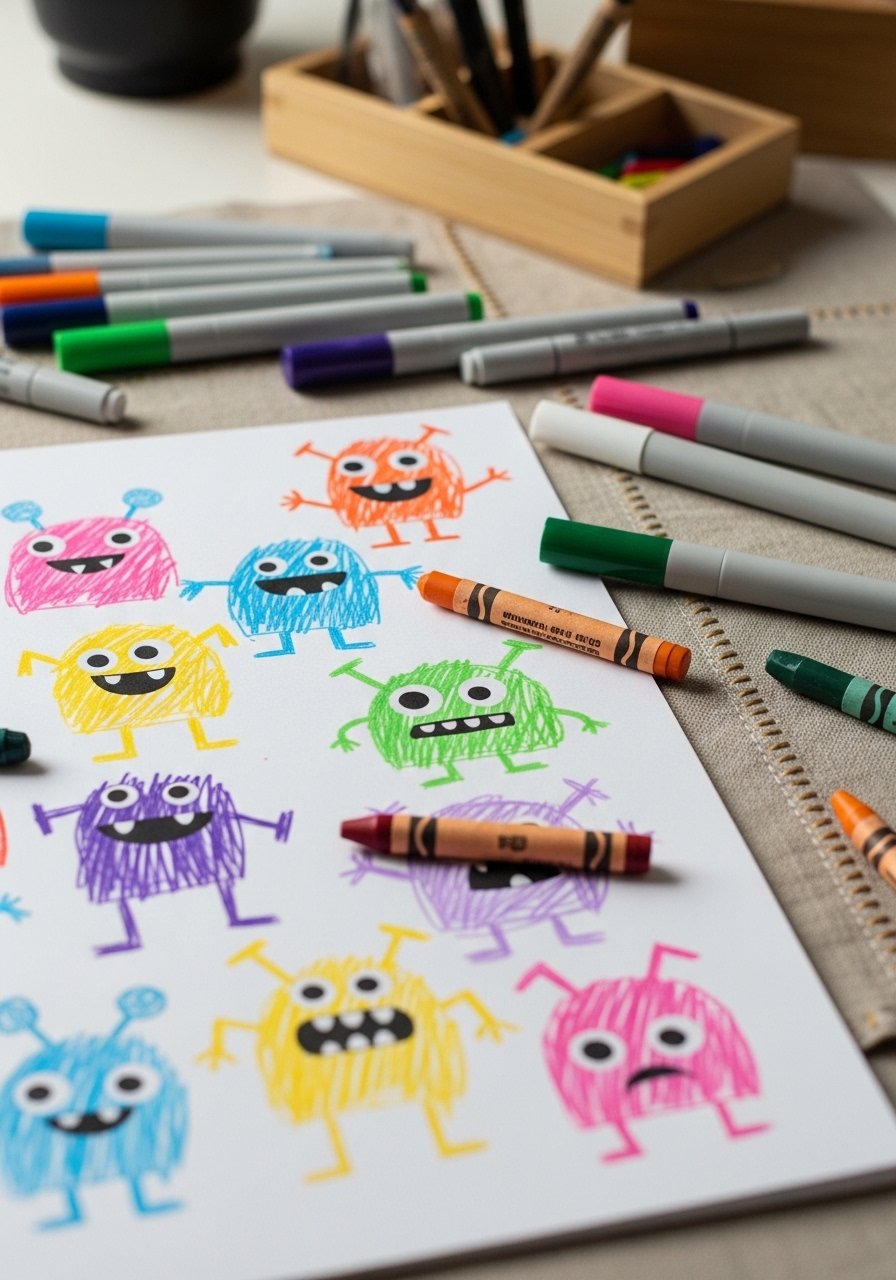
This is a fast, imaginative warm-up that turns uninhibited scribbles into silly creatures. Kids love the surprise of discovering eyes, teeth, and personalities in chaotic lines. It’s great for preschoolers through early elementary learners and helps with fine motor skills and storytelling.
Materials
- 8.5 x 11 in white printer paper, 20 sheets
- Crayola washable markers, 12-count
- Crayola crayons, 24-count
- Black fineliner pen (0.5 mm)
- White gel pen for highlights
- Sticker eyes (optional), pack of 200
Instructions
- Give each child a sheet and ask them to fill the page with random scribbles using crayons or markers (5–10 minutes).
- Let the scribble dry for marker sheen to set (~2 minutes).
- Look over the page and circle interesting shapes with a black fineliner to form heads, mouths, and limbs.
- Add eyes, teeth, horns, or hair using the fineliner.
- Color smaller details with crayons; add highlights with the white gel pen.
- If desired, stick on sticker eyes for a 3D effect and press firmly (no drying time).
How to Display or Gift It
- Mount favorite monsters on colored cardstock and frame in small wooden frames for a hallway gallery.
- Punch a corner and bind several into a “Monster Mash” mini-book.
- Store flat in a stackable craft organizer until you rotate displays; try a small wooden easel for shelf display.
2. Window Rain Scene Resist Painting
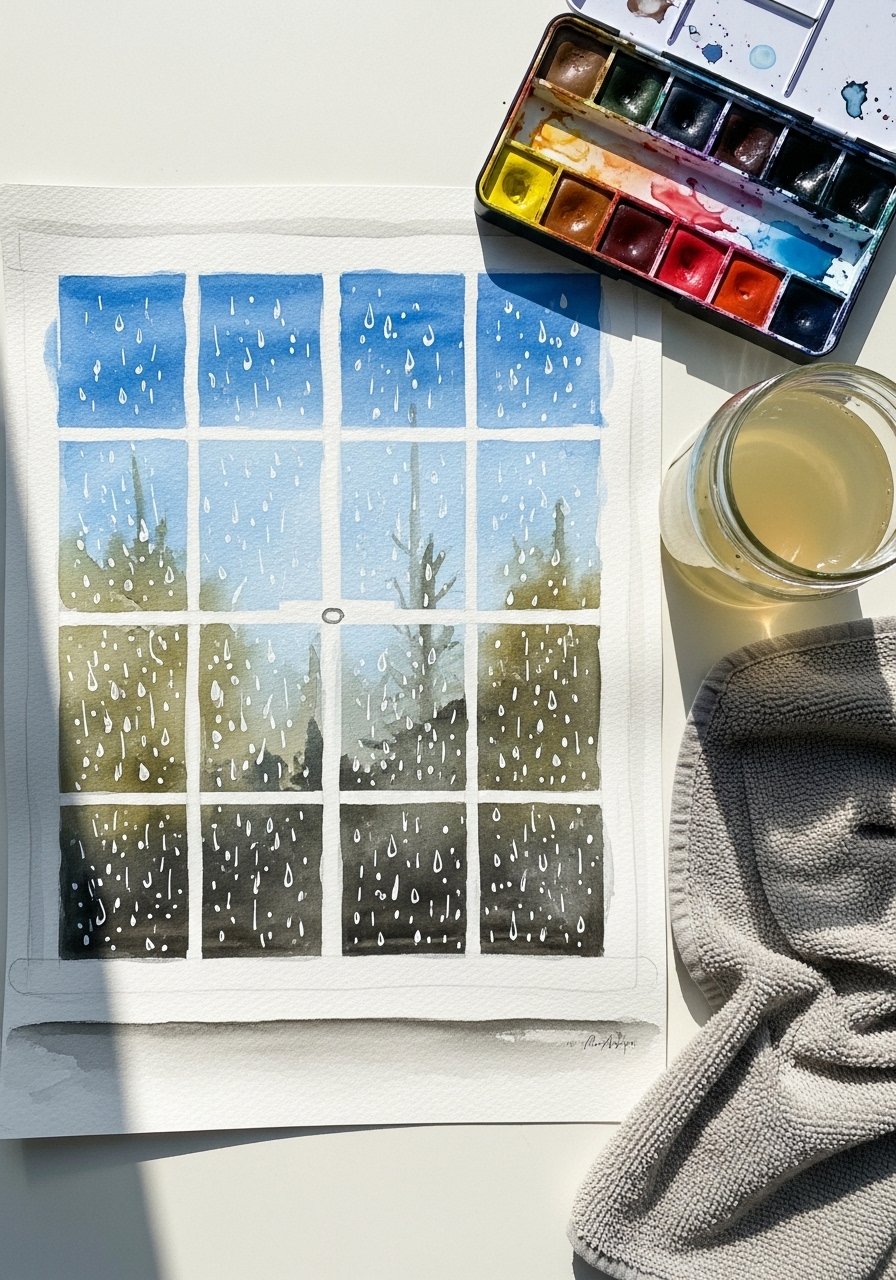
This technique uses a white crayon to resist watercolor, creating bright windows and glossy rain. It’s tactile and magical for younger kids who love seeing colors bloom around invisible lines. Works well for rainy afternoon storytelling.
Materials
- 9 x 12 in 140 lb cold-press watercolor paper (10 sheets)
- Crayola white crayon, single
- Student watercolor set (12 pans)
- Round watercolor brush, size 6
- Pencil and eraser
- Masking tape (painter’s tape works too)
Instructions
- Tape paper edges to a board with painter’s tape to prevent warping.
- Draw window panes, raindrops, or umbrella shapes with the white crayon. Press firmly so wax is noticeable.
- Wet brush and pick up color from palette; apply washes, letting pigment pool against wax lines.
- Rinse brush and layer a second wash for richer color if desired; dry 20–30 minutes between washes.
- Peel tape slowly for crisp borders when fully dry.
- Flatten under a book overnight if paper buckled.
How to Display or Gift It
- Frame in a simple white frame and hang in a playroom window.
- Mount on kraft cardstock and tuck into a care-package for a rainy-day friend.
- Store flat in a portfolio sleeve or a craft organizer tray.
3. Story Stones: Draw + Tell
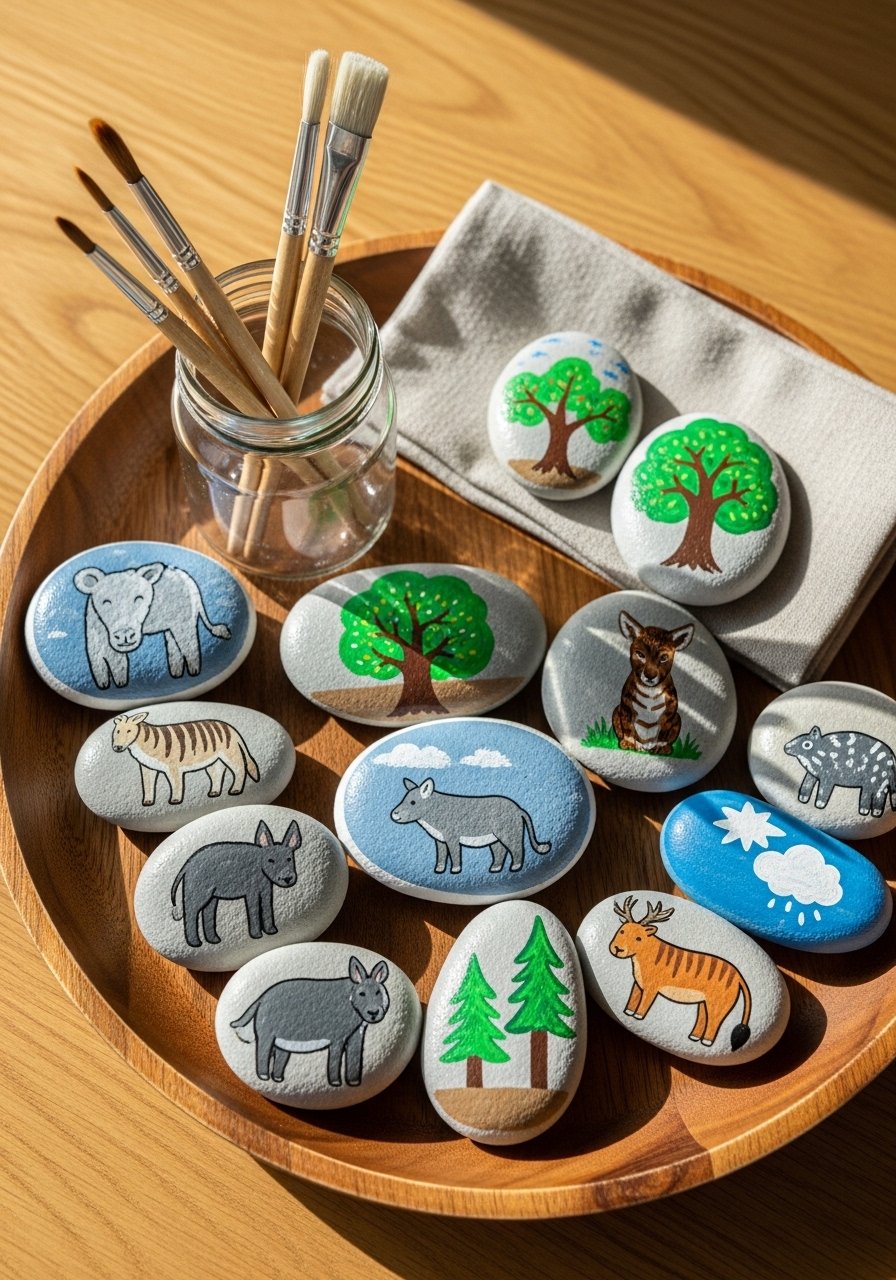
Turn simple river stones into drawing prompts. Kids draw characters, then use stones to build a story sequence — perfect for cooperative play and language skills. This project combines painting and drawing for a tactile rainy-day activity.
Materials
- Smooth river stones (3–4 in), pack of 12
- Acrylic craft paint set (12 colors)
- Fine-tip paint pens (black)
- Matte Mod Podge, 2 oz
- Foam brush
- Small paint palette or cupcake tray
Instructions
- Wash stones and let dry completely (drying time 30–60 minutes).
- Paint a thin white base on each stone for better color payoff; dry 20–30 minutes.
- Sketch simple icons with a pencil, then fill with acrylic paint (animals, weather, objects).
- Once paint is dry (30–60 minutes), use fine-tip paint pen for outlines and faces.
- Seal with 1–2 thin coats of matte Mod Podge; dry 1 hour between coats, fully cured in 24 hours.
- Let kids arrange stones to make stories or prompts for drawing.
How to Display or Gift It
- Store in a cloth drawstring bag and use as a storytelling prompt box.
- Display in a shallow wooden bowl on a play table.
- Wrap in kraft tissue and tuck into a small gift box for a rainy-day present.
Product tip: I use a small acrylic paint set that washes easily.
4. Patterned Raindrop Collage Cards
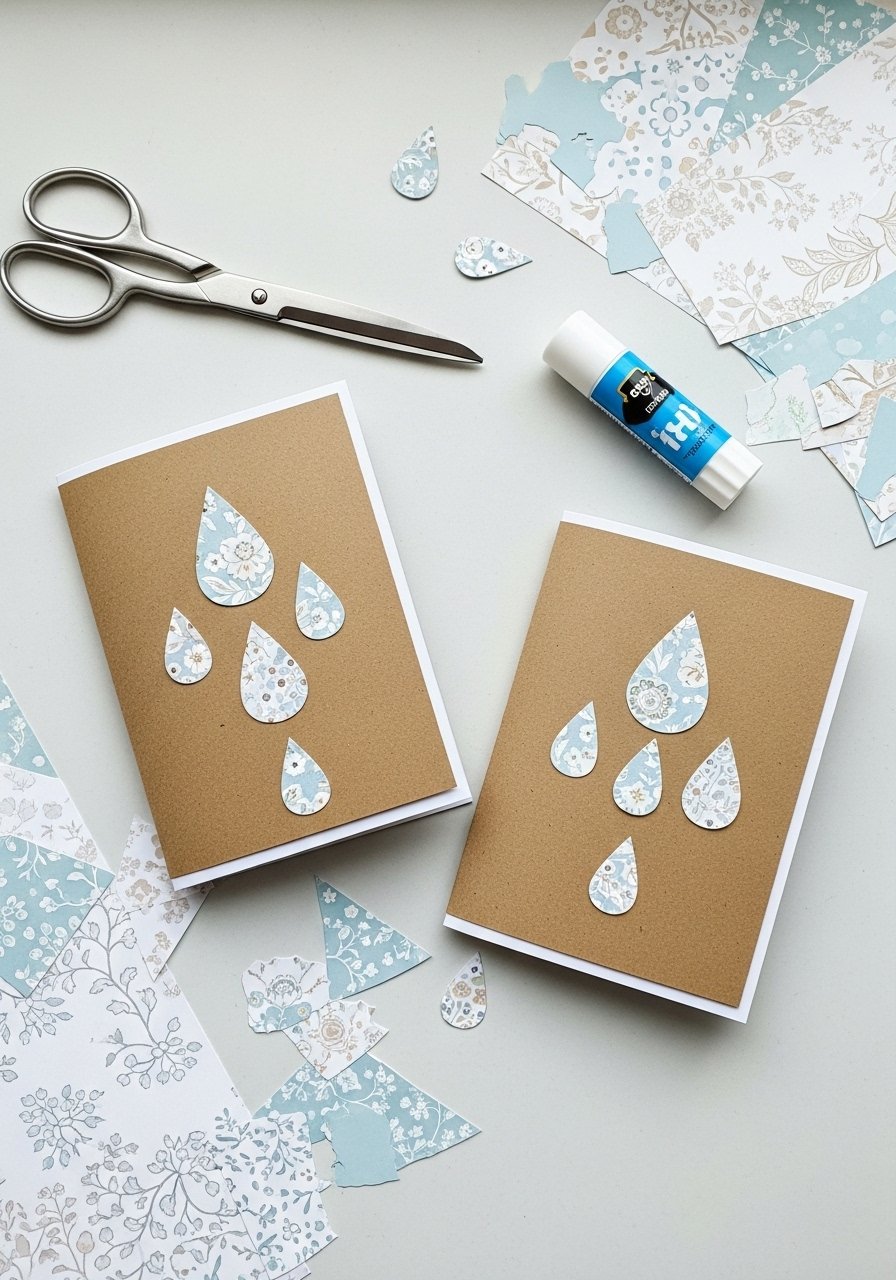
Kids cut patterned paper into raindrop shapes and arrange them into a card or mini poster. It teaches cutting skills and composition and leaves a sweet keepsake for grandparents.
Materials
- Kraft A2 blank cards, pack of 20
- Patterned scrapbook paper sheets (12 x 12), 3 sheets
- Glue stick
- Scissors (kid-safe)
- Pencil and ruler
- Optional: metallic gel pen
Instructions
- Fold cards if not pre-folded and set aside.
- Draw raindrop templates on scrap paper or freehand with pencil.
- Cut raindrops from patterned paper, aim for 12–20 drops per card depending on size.
- Arrange drops on the card in columns or a heart shape before gluing.
- Glue each piece with a glue stick; press firmly for even adhesion (no drying time).
- Add accents with metallic gel pen for sparkle.
How to Display or Gift It
- Write a note inside and send as simple snail-mail.
- Store flat in a stackable craft box until you need a quick card.
- Pair with a kraft gift bag for a coordinated gift.
5. Cloud Dough Texture Drawings
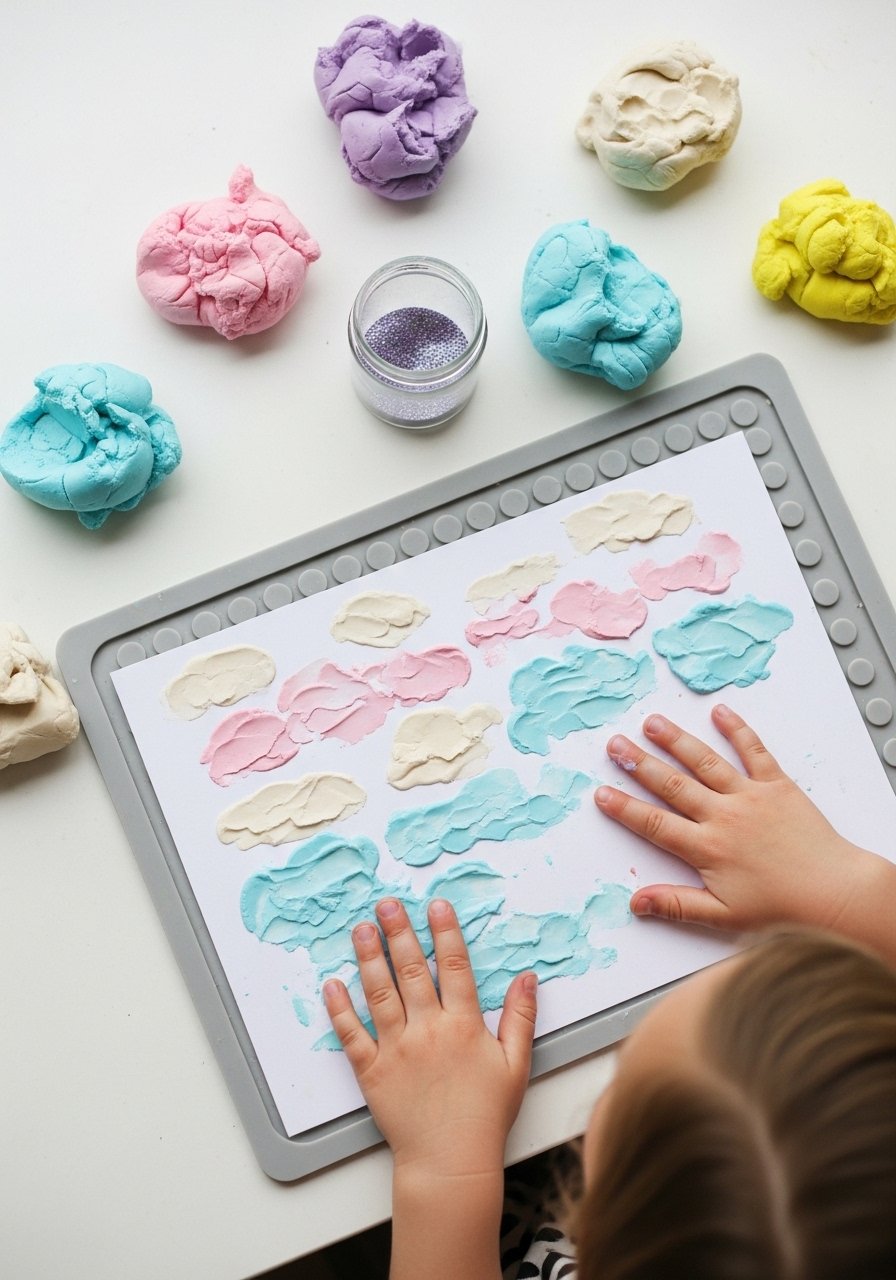
Combine drawing with cloud dough (a soft, moldable sensory dough) to create textured skies and landscapes. Great for toddlers and sensory play incorporated into drawing.
Materials
- Cloud dough recipe: 2 cups baking soda + 1 cup hair conditioner (mix)
- 8.5 x 11 in heavy cardstock, pack of 20
- Child-safe glitter (optional)
- Plastic knife or spreading tool
- Silicone mat for easy cleanup
- Wet wipes
Instructions
- Make cloud dough by mixing 2 cups baking soda with 1 cup scented conditioner until crumbly-soft.
- Spread a thin layer of dough on cardstock using a plastic knife to create clouds (10–15 minutes).
- Use finger or small tool to add swirls and texture.
- Add tiny glitter for raindrops, press lightly.
- Let pieces air-dry overnight; texture firms but remains slightly crumbly (full cure ~24–48 hours).
- Store finished pieces flat; dust off excess baking soda before framing.
How to Display or Gift It
- Photograph the finished texture and print as mini art cards.
- Place in a shallow shadow box to preserve texture.
- Wrap in cellophane for a tactile sensory gift and slip into a small gift box.
Troubleshooting: If dough is too wet, add more baking soda 1 tbsp at a time.
6. DIY Comic Strip Squares
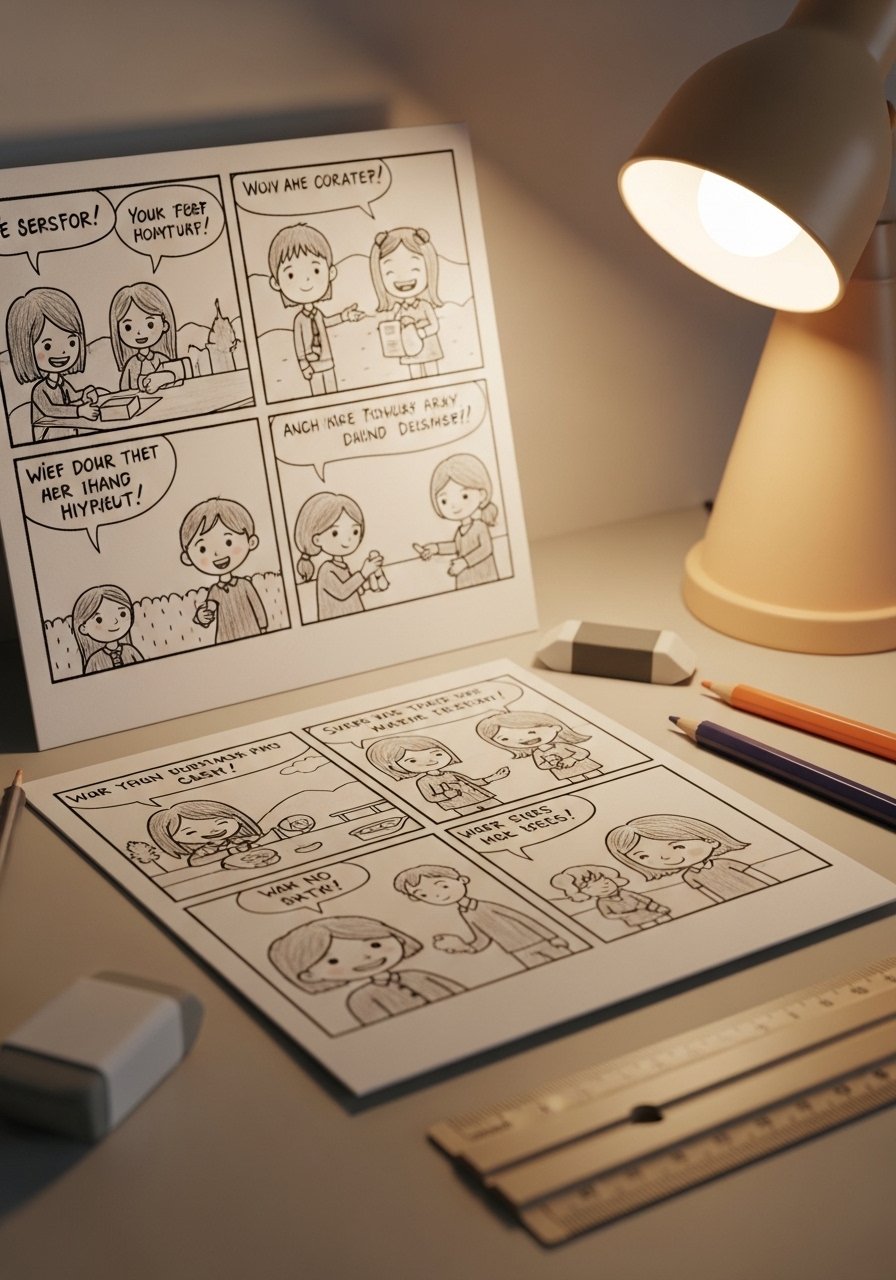
Teach simple storytelling with a four-panel comic. Kids plan a small plot, draw characters, and practice speech bubbles. Perfect for early writers.
Materials
- Square index cards, 4 x 4 in, pack of 50
- Pencils and eraser
- Colored pencils set (24)
- Ruler (12 in)
- Fine-tip black pen
- Speech bubble stencil (optional)
Instructions
- Use ruler to divide card into four panels (two-by-two).
- Sketch a quick story arc: setup, complication, action, punchline.
- Pencil each panel lightly, then ink with a black pen.
- Erase pencil lines once ink is dry (about 5 minutes).
- Color with colored pencils; press lightly for texture.
- Staple or bind multiple strips into a comic booklet.
How to Display or Gift It
- Pin comics to a rotating mini-gallery board.
- Create a comic zine and duplicate for friends.
- Store completed comics in a stackable craft organizer drawer.
7. Rainbow Umbrella Doodles (drawing ideas for kids rainy day)
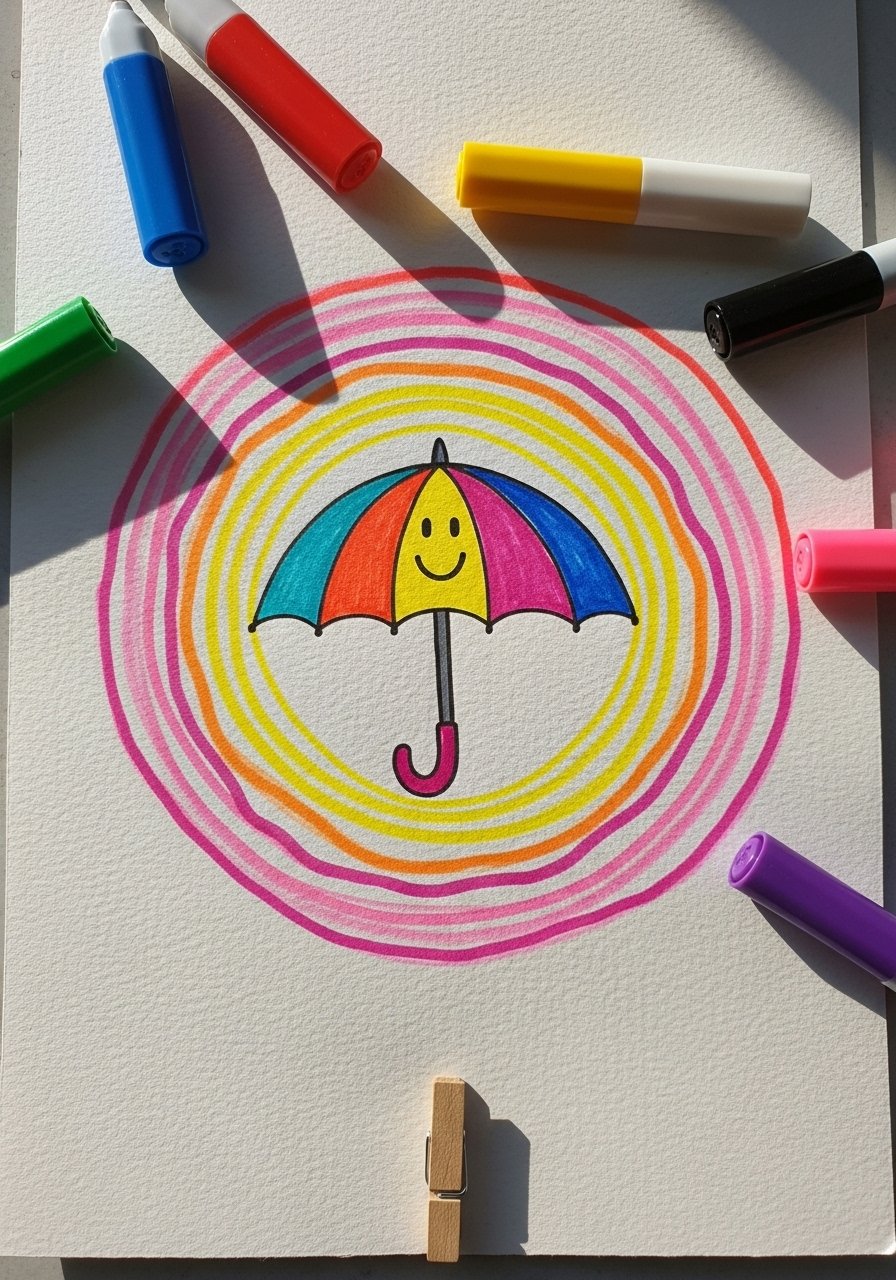
A colorful exercise in concentric shapes and pattern play. Kids decorate umbrella sections with different patterns and colors. Simple, satisfying, and photo-worthy.
Materials
- 9 x 12 in mixed-media paper
- Washable markers, 24-count
- Pencil and eraser
- Ruler and compass (or round lid)
- White gel pen for highlights
- Black marker for outlines (1.0 mm)
Instructions
- Lightly sketch an umbrella dome with compass or circular lid.
- Divide dome into 6–8 segments with pencil lines.
- Assign a pattern to each segment (dots, stripes, waves).
- Fill patterns with markers, letting colors dry 1–2 minutes.
- Outline with black marker and add white gel highlights.
- Sign and date; set aside to dry completely.
How to Display or Gift It
- Mount on a bright mat and frame for a cheerful hallway piece.
- Make a series and bind into a rainy-day pattern book.
- Store in a flat portfolio or display on a small wooden easel.
8. Folded Paper Cityscape (Pop-up Drawing)
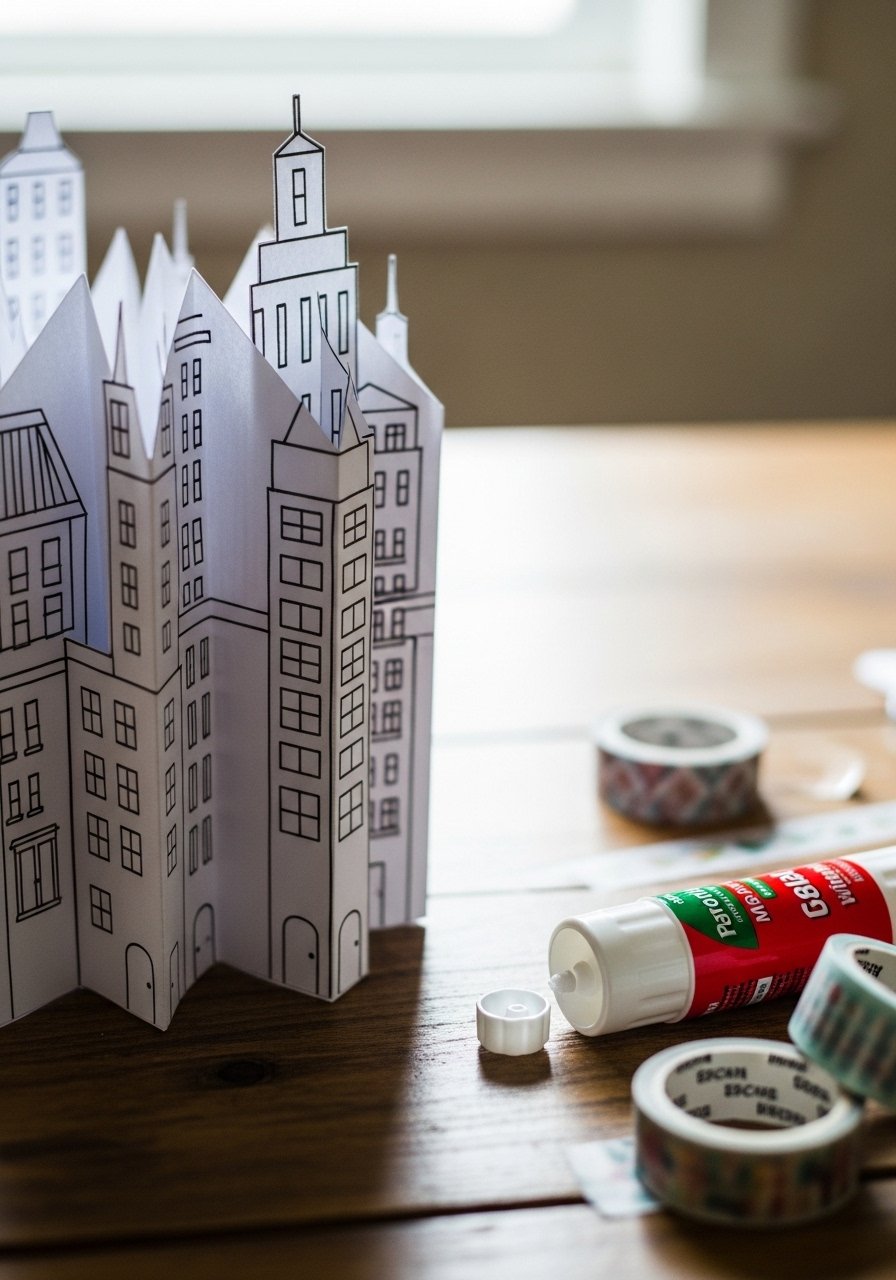
Kids draw buildings and cut them into pop-up forms to create a layered city. It introduces basic paper engineering and perspective in a playful way.
Materials
- Cardstock base (11 x 17 in)
- Various colored paper scraps
- Glue stick
- Craft knife (adult use) and self-healing cutting mat
- Ruler and pencil
- Washi tape for embellishment
Instructions
- Fold cardstock base in half; this becomes the city base.
- Draw building shapes on colored paper, keeping bottoms straight.
- Cut building fronts; on each, cut two parallel slits to form a tab that will fold inward for the pop-up.
- Fold tabs toward center and crease sharply.
- Glue building backs onto base so they pop when the base opens.
- Add windows, rooftops, and street details with markers.
How to Display or Gift It
- Stand open on a shelf as a 3D diorama.
- Recreate at different scales to build a neighborhood.
- Store flat by collapsing pop-ups and slipping into a large envelope pack.
Safety note: Use craft knife only with adult supervision.
9. Button-Pressed Rainy Day Prints

Use buttons as stampers to create raindrop patterns, flowers, or abstract textures. It’s easy for toddlers and gives rich layered effects with simple materials.
Materials
- White printer paper or cardstock, 8.5 x 11
- Assorted buttons (flat-backed), 100 g
- Acrylic paint (diluted with water 1:1)
- Small paint trays or palettes
- Foam brush
- Paper towels
Instructions
- Pour diluted acrylic paint into trays.
- Dip button into paint and press firmly onto paper to stamp circles.
- Overlap colors or use different button sizes for variety.
- Let each layer dry 15–20 minutes before stamping over it to avoid smudging.
- Add details or outlines with a fine-tip marker once dry.
- Clean buttons promptly to reuse.
How to Display or Gift It
- Make a set of note cards using stamp prints.
- Frame as a series of modern, colorful prints.
- Store spare buttons in a labeled mason jar for future projects — try a set of mason jars.
10. Chalk Pastel Stormy Skies
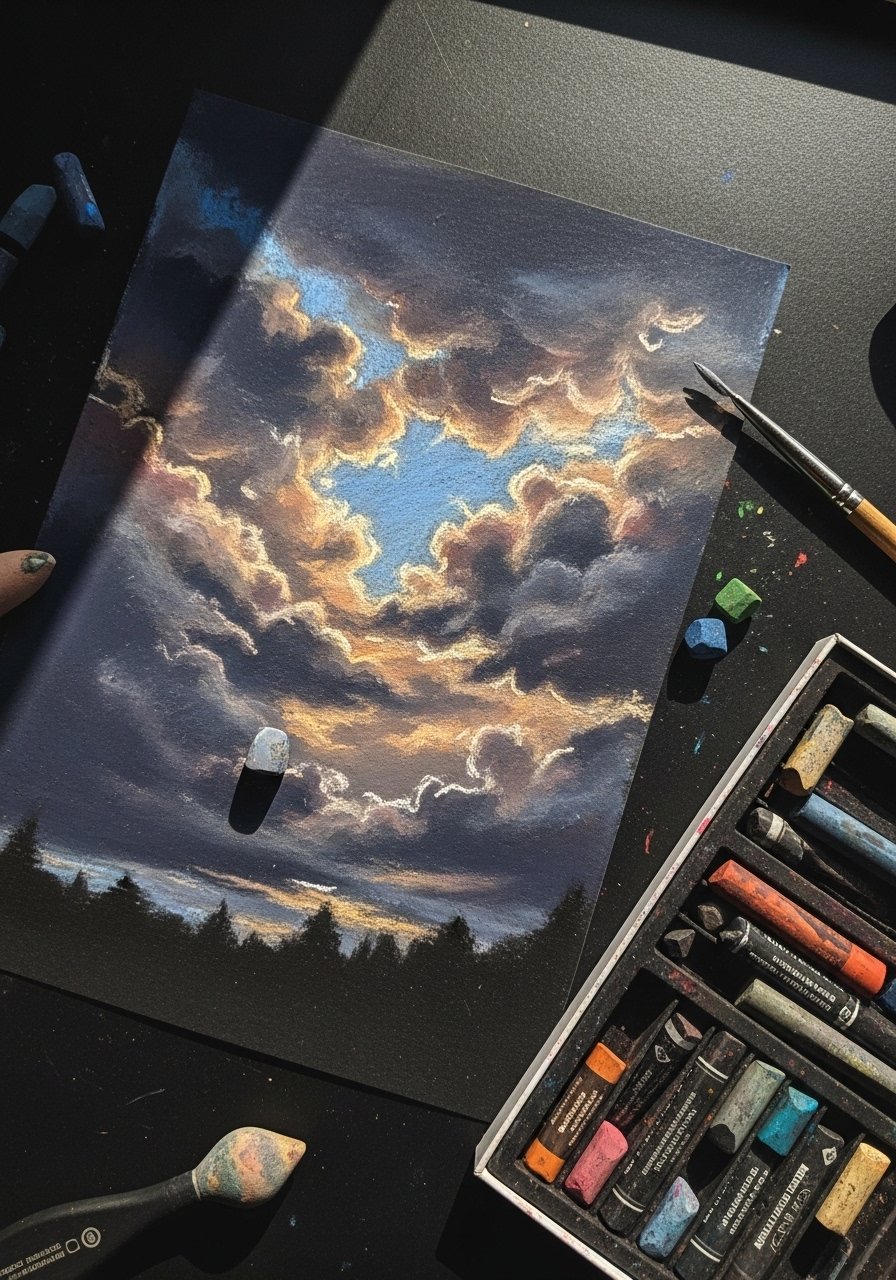
Soft chalk pastels blend easily into moody skies and gentle raindrops. This project teaches blending and layering while producing soft textures kids love to smudge.
Materials
- Black or navy pastel paper, 9 x 12 in
- Soft chalk pastel set (12 colors)
- Blending stumps or Q-tips
- Fixative spray (workable)
- Paper towels
- Gloves or apron
Instructions
- Sketch horizon line with light pastel chalk.
- Layer colors for sky (lavender, blue, gray), blending with stump or Q-tip.
- Add lighter clouds by tapping pastel onto paper and smudging edges.
- Use the edge of pastel for fine raindrop streaks; blend lightly.
- Spray with a light coat of workable fixative from 12–18 inches away; dry 10 minutes.
- Store flat; fixative fully cures per manufacturer (check label).
How to Display or Gift It
- Frame under glass to protect pastel dust.
- Make a set of stormy-sky postcards for thoughtful notes.
- Keep pastels organized in a portable art case.
Safety tip: Use fixative in a ventilated area.
11. Sticker Storyboard Collage
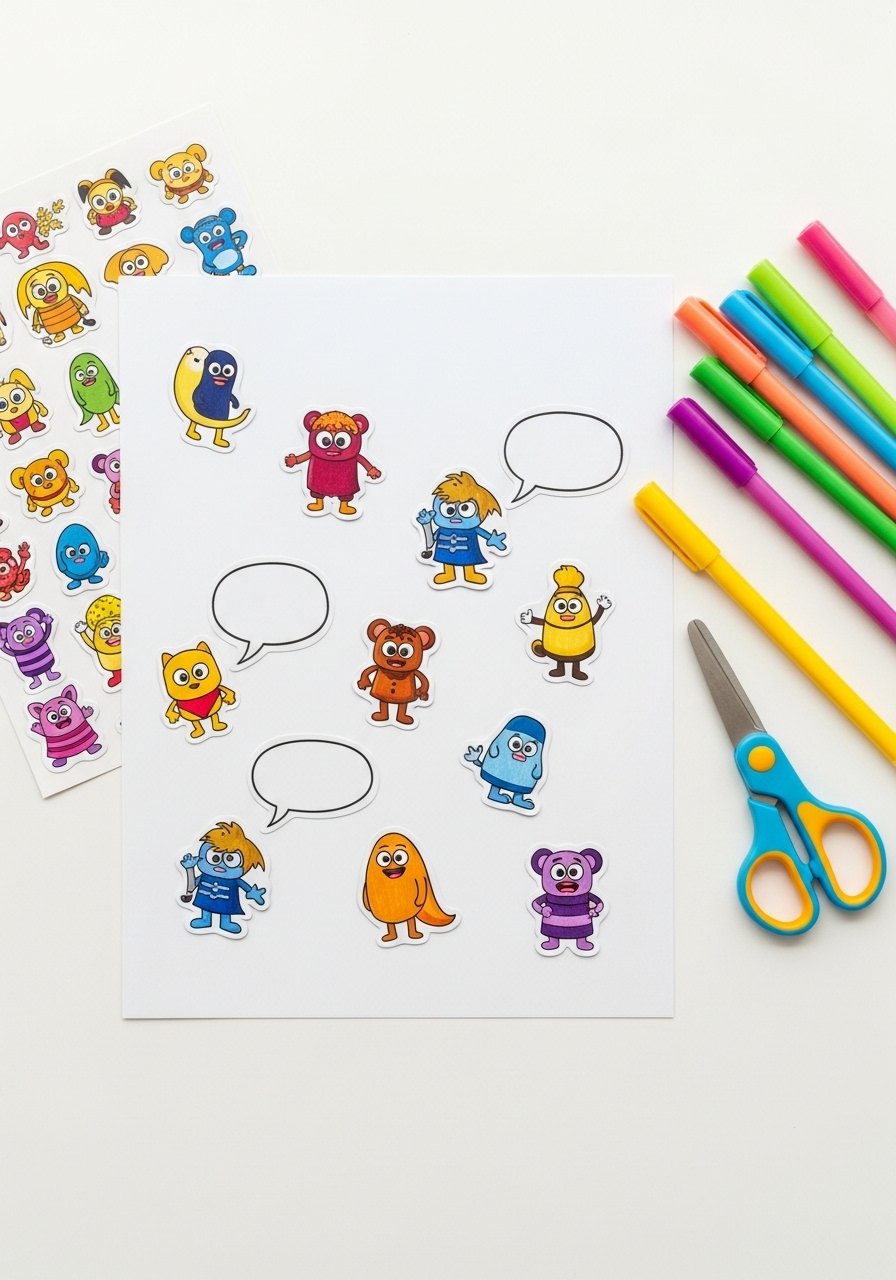
Combine stickers and drawing to build characters and little scenes. It’s low-pressure and great for kids who prefer placing over freehand drawing.
Materials
- Blank storyboard templates (printable, 4-6 panels)
- Sticker sheets (characters, animals)
- Colored gel pens
- Pencil and eraser
- Double-sided tape
- Small craft knife for precise sticker trimming (adult use)
Instructions
- Place stickers in panels to create action or emotion.
- Draw speech bubbles and captions with gel pen.
- Add backgrounds with light pencil shading or crayons.
- Trim oversized stickers with small scissors for better fit.
- Press everything firmly; no drying time.
- Assemble multiple storyboards into a mini zine.
How to Display or Gift It
- Punch holes and bind with ribbon for a sticker storybook.
- Slip in a clear sleeve and add to a scrapbook.
- Store sticker sheets in a sticker organizer book.
12. Glow-in-the-Dark Moon and Rain
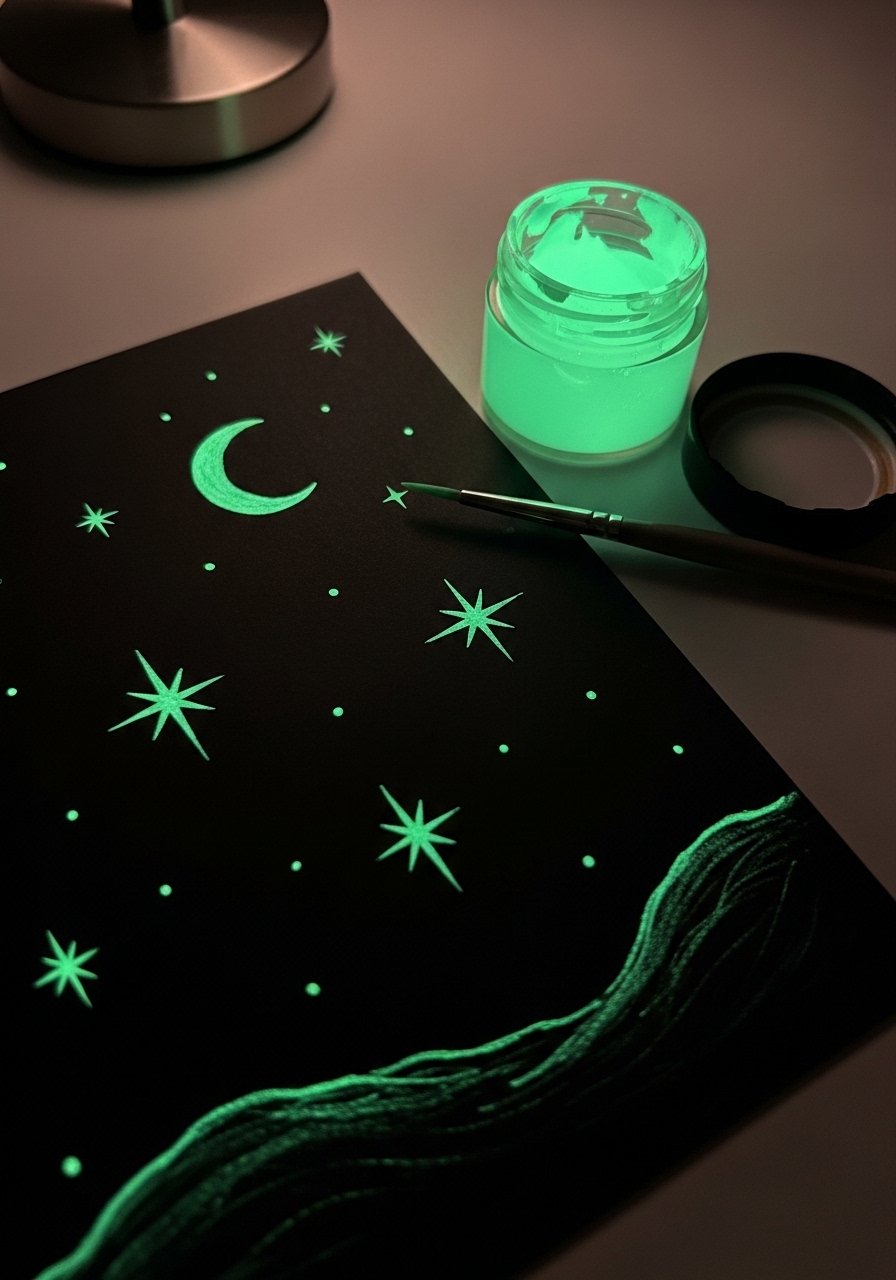
Use glow-in-the-dark paint to make a nighttime rainy scene. Kids love turning the lights off to reveal their art.
Materials
- Black cardstock, 9 x 12 in
- Glow-in-the-dark acrylic paint
- Small round paintbrush (size 2)
- White pencil or gel pen for sketches
- Sealant spray (optional)
- Rubbing alcohol wipes for cleanup
Instructions
- Sketch moon and cloud outlines with white pencil.
- Paint glow areas using 1–2 thin coats; dry 15–20 minutes between coats.
- Add silver or metallic accents for raindrops.
- Charge the glow paint under a lamp for 10–15 minutes before testing in the dark.
- Optionally seal lightly with spray for longevity; dry 10 minutes.
- Store flat away from sunlight to avoid fading.
How to Display or Gift It
- Use a small clip string with multiple glow drawings for a bedroom display.
- Gift in a black envelope for a nighttime reveal.
- Store flat in a portfolio sleeve to protect glow pigments.
Product tip: A little glow paint set goes a long way.
13. Rainy Day Drawing Bingo (drawing ideas for kids rainy day)

A game-based drawing prompt where kids fill a bingo card by drawing small themed items. It turns list-making into a playful challenge and keeps multiple kids engaged.
Materials
- Printable bingo cards (3.5 x 3.5 in grid)
- Colored pencils set (24)
- Small tokens (buttons or coins)
- Timer (optional)
- Clipboard or hard surface
Instructions
- Print bingo cards and give each child pencils.
- Call out items (umbrella, frog, splash) and set a 2-minute timer per square.
- Kids draw the item to claim the square and place a token.
- First to line up three wins; rotate cards so everyone tries different prompts.
- Play multiple rounds, switching categories: weather, animals, city items.
- Store completed cards in a folder as a rainy-day memory book.
How to Display or Gift It
- Laminate cards and reuse with dry-erase markers; store in a laminating pouch kit.
- Make a tournament out of it and award handmade badges.
- Keep tokens in a small wooden box for reuse.
14. Fold-and-Draw Flipbook Animation
Teach the basics of animation by drawing incremental motion across a stack of index cards. Kids get a tangible result: a flipbook they can watch come alive.
Materials
- Index cards, 3 x 5 in, pack of 100
- Pencil and eraser
- Black gel pen
- Binder clip
- Lightbox (optional for tracing) — small LED panel
Instructions
- Stack 20–40 index cards and clip at the top.
- Draw a simple character on the first card.
- On each subsequent card, redraw the character with a small change (arm up, leg forward).
- Use a lightbox to trace the previous frame for smoother motion if available.
- Ink frames lightly, then flip by pressing the binder clip and running thumb along the edge.
- Store flipbook flat in a sleeve when finished.
How to Display or Gift It
- Tie a small ribbon around the finished flipbook and gift.
- Create a series and keep in a labeled box.
- Use a small LED tracing pad for cleaner frames.
15. Nature Rubbings: Leafy Rain Patterns
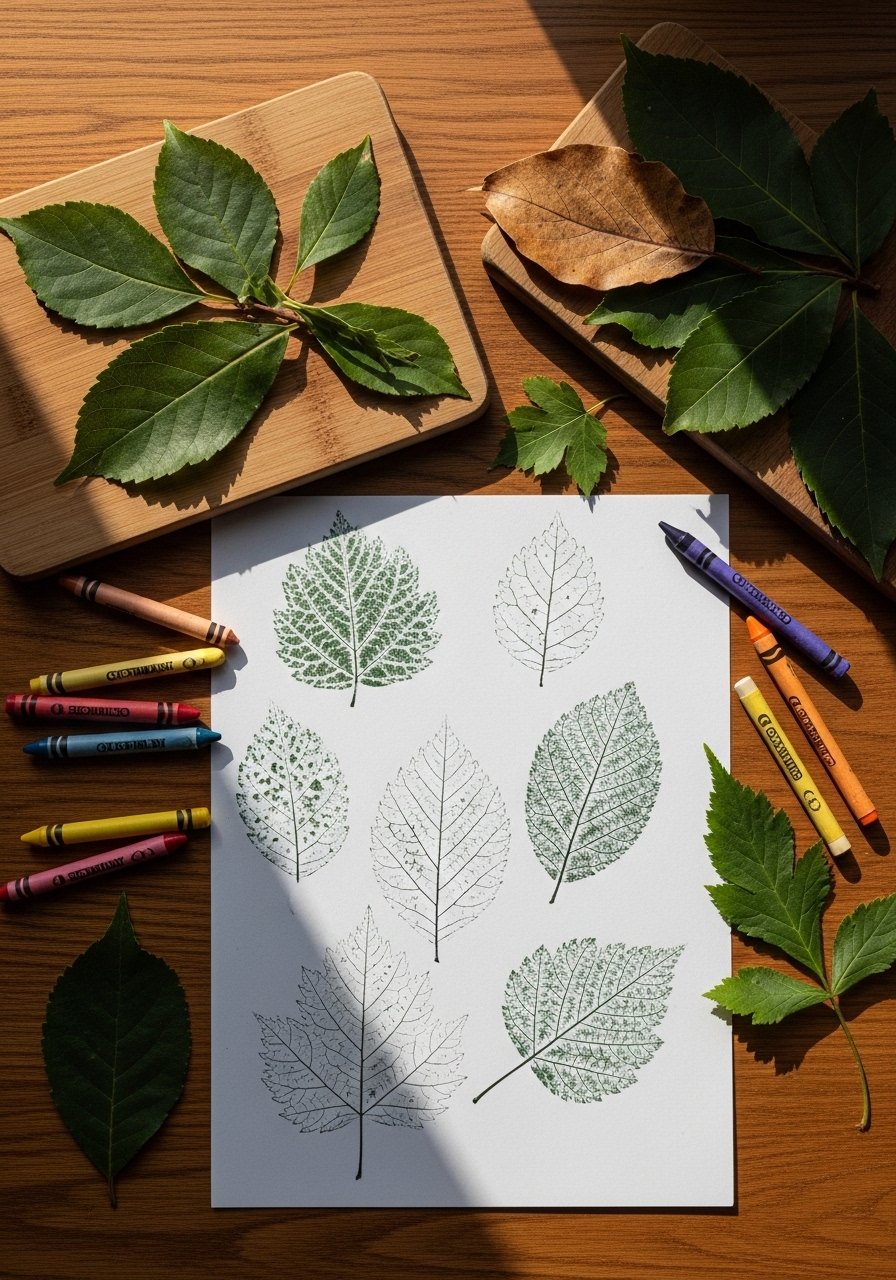
Collect leaves (from a walk) and make rubbings to form rain-inspired patterns. It’s a calm, observation-based activity linking outdoors to indoor creativity.
Materials
- Leaves of various sizes
- White printer paper
- Crayola crayons (remove paper sleeve)
- Masking tape
- Pencil
- Clipboard or cardboard backing
Instructions
- Tape leaf onto clipboard with vein side up.
- Place paper over leaf and rub side of crayon across to reveal texture.
- Repeat with different leaves and colors, overlapping for pattern.
- Arrange rubbings into a collage or rainy scene on a larger sheet.
- Mount and sign when complete; no drying time.
- Press leaves flat between books for keepsake if desired.
How to Display or Gift It
- Make notecards from small rubbings.
- Frame a large leafy rain collage in a wood frame.
- Store rubbings flat in a portfolio folder.
16. Scribble-to-Scene Guided Drawing
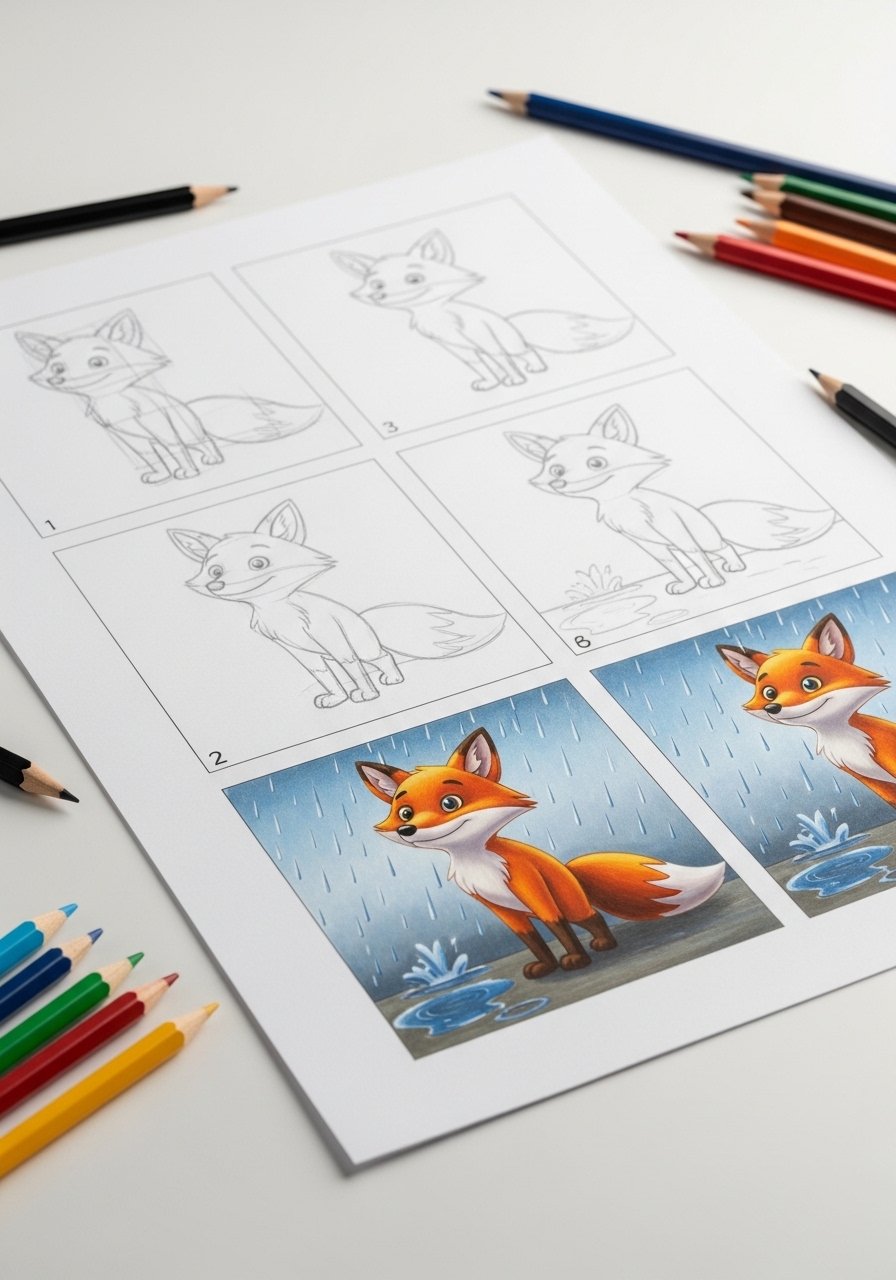
A guided activity where kids begin with a scribble and follow prompts to turn it into a recognizable scene (fox, boat, tree). It builds confidence and creativity.
Materials
- Guided drawing printable sheets (8.5 x 11)
- HB pencil and eraser
- Colored pencils (set of 24)
- Black fineliner (0.3–0.5 mm)
- Brayer for smoothing (optional)
Instructions
- Give a scribble warm-up on the first sheet.
- Follow numbered prompts to find shapes in the scribble and refine with pencil.
- Trace final lines with fineliner; let ink dry 2–3 minutes.
- Erase pencil marks and color with colored pencils.
- Add background details and textures.
- Stack finished sheets into a folder.
How to Display or Gift It
- Bind into a beginner drawing workbook.
- Use a brayer roller to flatten pages for scanning.
- Frame the best transformation piece for encouragement.
17. Tape Resist Rainbow Boots
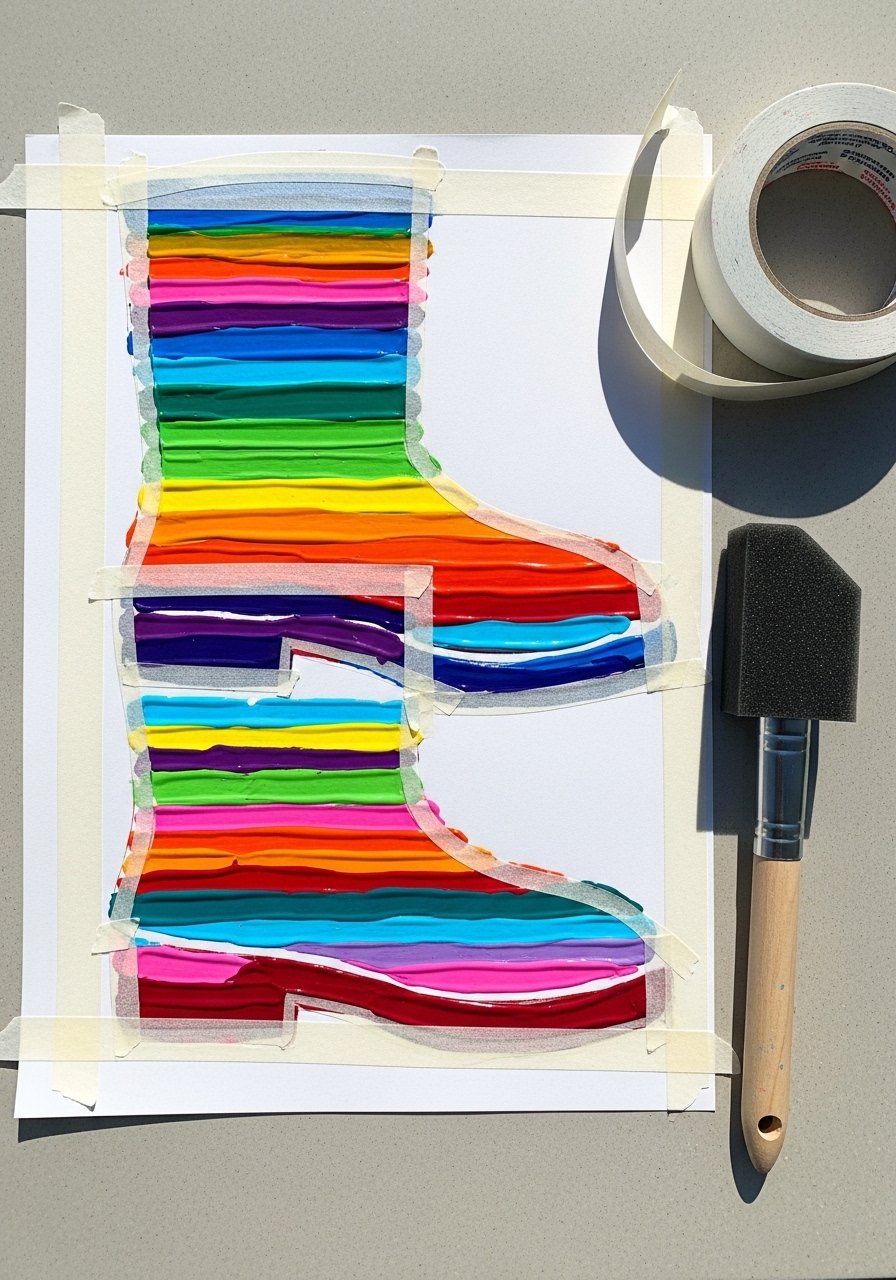
Use painter’s tape to mask boot shapes, paint colorful stripes, and remove tape to reveal crisp lines. Great for teaching planning and layering.
Materials
- Painter’s tape (1/4 in)
- Mixed-media paper, 9 x 12 in
- Acrylic craft paints (6 colors)
- Foam brush
- Scissors
- Paper towel
Instructions
- Arrange painter’s tape on paper to outline boot shape, pressing edges firmly.
- Paint stripes between tape lines with foam brush.
- Wait 15–20 minutes for paint to be touch-dry.
- Carefully peel tape at a 45-degree angle to reveal crisp lines.
- Touch up edges with a small round brush if needed.
- Let fully cure 1–2 hours before framing.
How to Display or Gift It
- Make a series and mat them together for a lively gallery.
- Attach the art to a greeting card front.
- Keep painter’s tape rolls in a craft tape dispenser for future projects.
18. Felt-Tip Resist Watercolor Houses
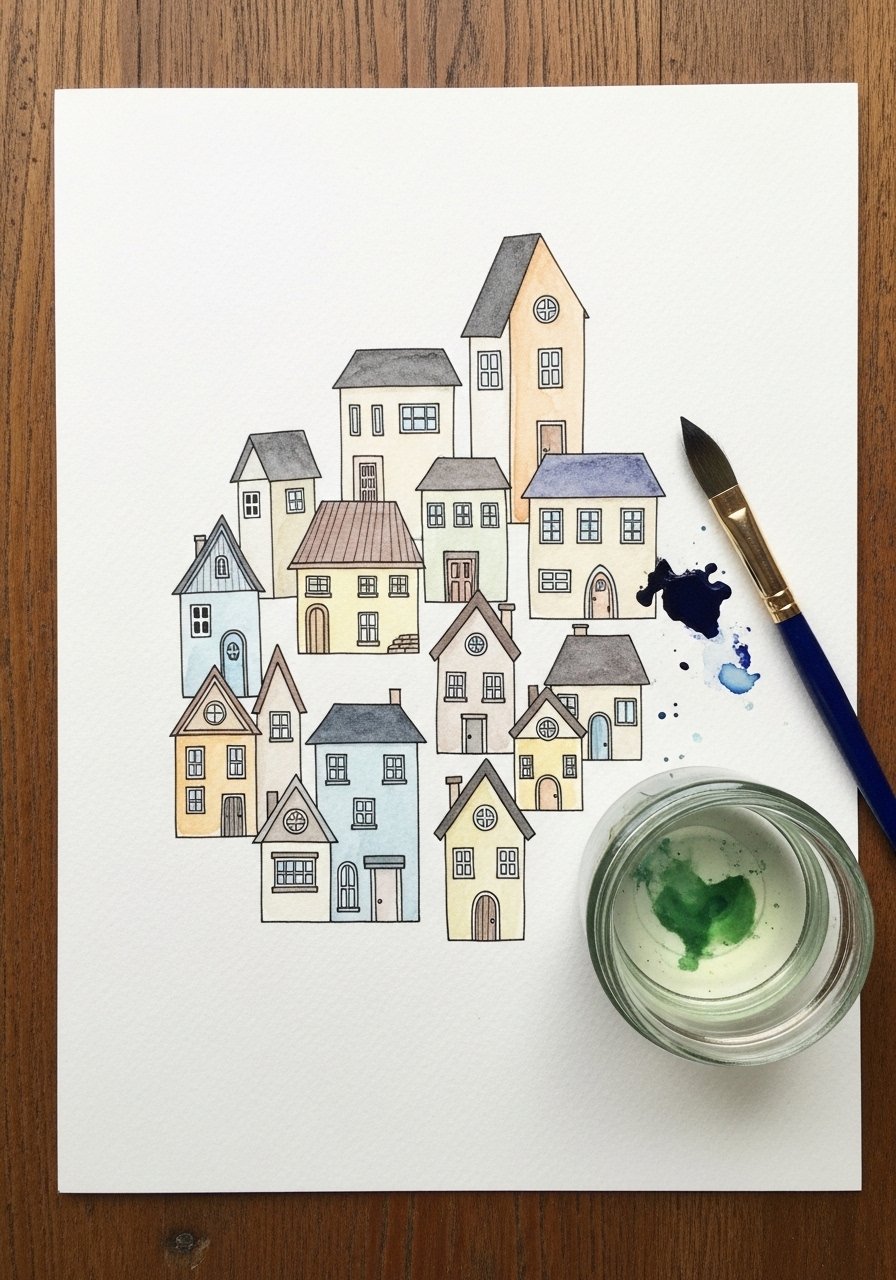
Draw houses with a waterproof black pen, then fill with watercolor washes. The pen lines stay crisp for a charming illustrated look.
Materials
- Watercolor paper (140 lb), 9 x 12 in
- Waterproof black fineliner pen
- Student watercolor set
- Round brush size 4
- Ruler
- Paper towel
Instructions
- Sketch simple house outlines on watercolor paper with pencil.
- Trace over sketches with waterproof fineliner; let ink dry 2–3 minutes.
- Apply watercolor washes inside shapes; allow 20–30 minutes to dry between layers.
- Add pattern or texture with pen after paint is dry if desired.
- Erase any remaining pencil.
- Flatten under a book if slight warping occurs.
How to Display or Gift It
- Create a set of village prints to hang in a row.
- Scan and make printed notecards.
- Protect in a clear art sleeve.
19. Puffy Paint Cloud Doodling
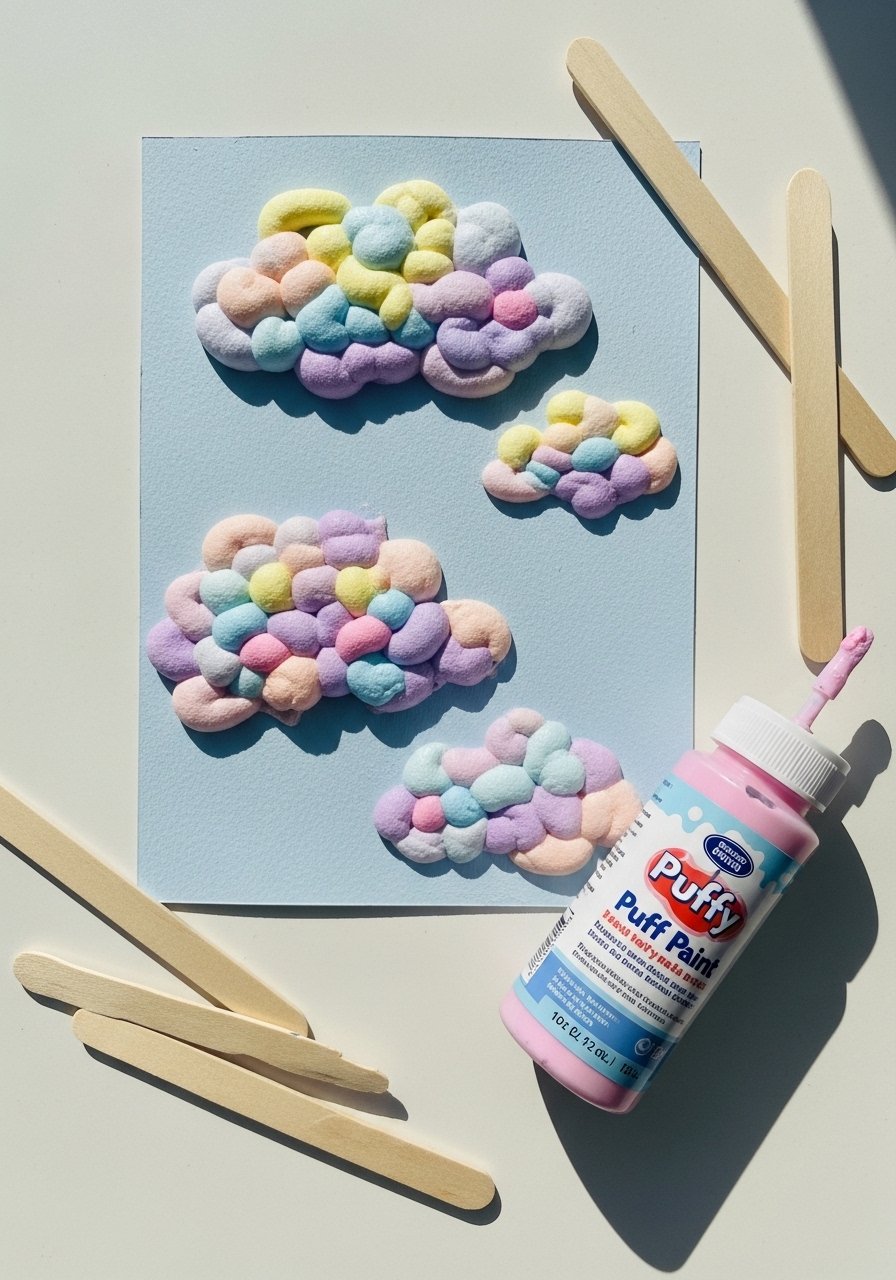
Make raised, tactile clouds and raindrops using puffy paint (or a simple DIY mix). Kids enjoy squeezing and shaping puffs into whimsical skies.
Materials
- Puffy paint bottles (varied colors)
- Cardstock, 8.5 x 11
- Disposable piping bags (optional)
- Toothpicks for shaping
- Craft tray to dry pieces
Instructions
- Squeeze puffy paint onto cardstock forming cloud shapes and raindrops.
- Shape with toothpick if needed.
- Let air-dry 4–6 hours depending on thickness.
- Add details with markers when paint is fully dry.
- Trim excess dried paint from card edges.
- Store flat until giving or displaying.
How to Display or Gift It
- Add to greeting cards for tactile interest.
- Make a set of puffy-cloud bookmarks and gift in a small box.
- Store completed pieces in a flat archival box.
20. Travel-Sized Sketch Dice Game
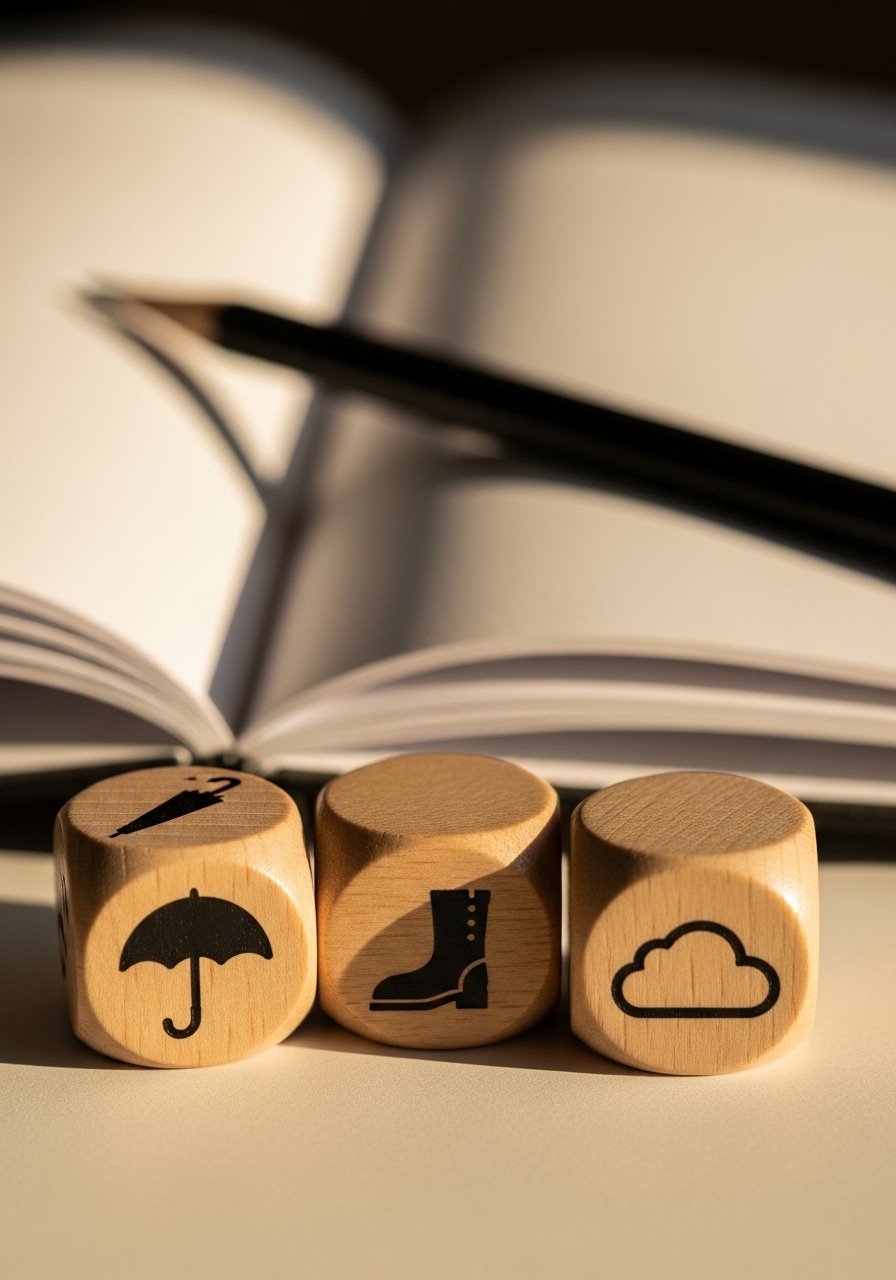
Create a set of dice with prompts on each face. Roll to determine subject, style, or color, then draw. It adds chance and excitement to rainy-day drawing.
Materials
- Blank wooden craft dice (1 inch), set of 3
- Acrylic paint pens
- Pencil
- Small sketchbook (3.5 x 5.5 in)
- Small box for storage
Instructions
- Decide categories for each die (subject, style, color).
- Draw tiny icons on each face with a pencil.
- Trace over icons with acrylic paint pens; let dry 10–15 minutes.
- Roll dice and sketch according to the combination rolled.
- Repeat for timed rounds (2–5 minutes per sketch).
- Store dice in a small box for travel.
How to Display or Gift It
- Keep sketchbook in a pocket for rainy-day travel.
- Bundle dice and sketchbook as a compact gift.
- Use a small wooden box for tidy storage.
21. Newspaper Collage Weather Report
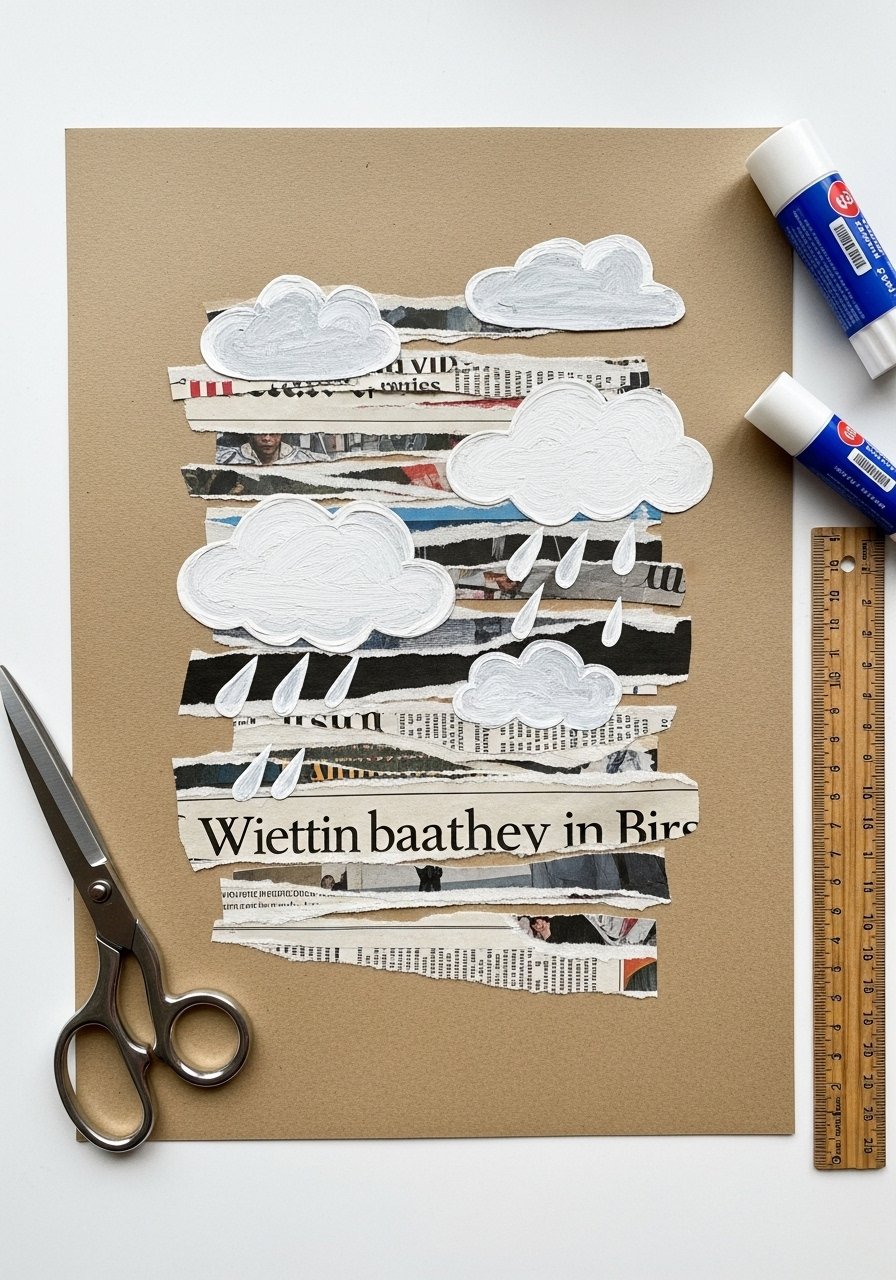
Tear newspaper to form textured skies and combine with drawn or painted details. It’s eco-friendly and visually striking.
Materials
- Kraft paper or large scrap paper (12 x 18 in)
- Old newspapers or magazines
- Glue stick or craft glue
- Scissors
- Acrylic paint for accents
- Brush
Instructions
- Tear newspaper into strips and arrange into cloud and sky shapes.
- Glue pieces down, overlapping for texture.
- Add painted accents for raindrops or sunbeams; dry 20–30 minutes.
- Outline shapes with black pen after paint is dry.
- Add headlines or typography for a mixed-media effect.
- Let fully dry 1 hour before framing.
How to Display or Gift It
- Frame as an eco-art piece for a modern gallery wall.
- Roll and tie with twine for mailing.
- Store flat in a large tube or between boards.
22. Doodle Fill-In Posters
Create large posters with big outlined shapes for kids to fill in with doodles and textures. Works great for group projects and family collaboration.
Materials
- Poster board, 18 x 24 in
- Black marker (thick)
- Assorted markers and pens
- Pencil and eraser
- Ruler
- Sticky notes for pattern planning
Instructions
- Lightly sketch large shapes across poster with pencil.
- Trace outlines in thick black marker.
- Assign areas to different kids or time slots.
- Fill sections with doodles, patterns, and colors.
- Step back and adjust balance as you go.
- Let markers dry 10–15 minutes and display.
How to Display or Gift It
- Hang as a family art piece on a playroom wall.
- Roll and gift as a collaborative memory.
- Store rolled in a poster tube or flat in a large art portfolio.
23. Rainy-Day Gratitude Tree Drawing
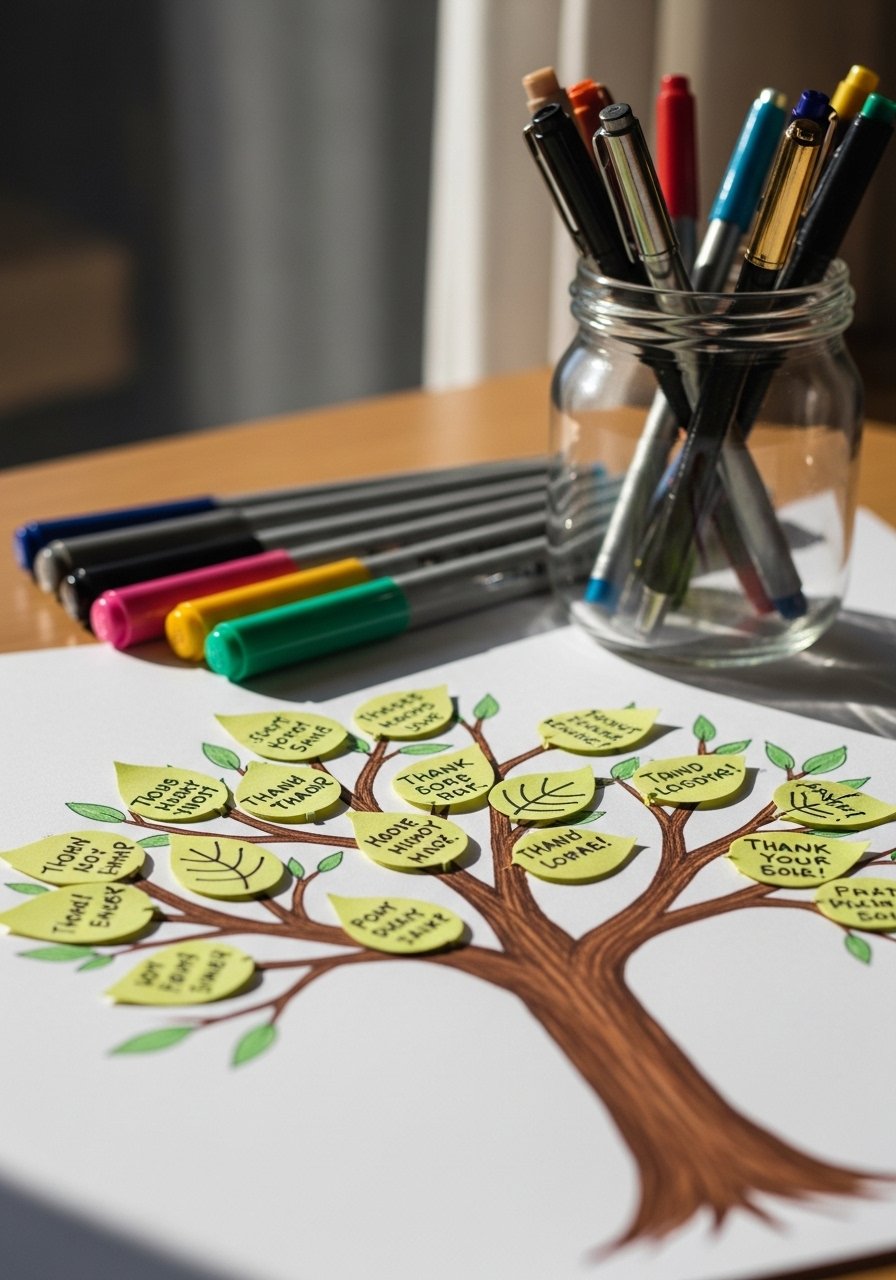
Finish your rainy day with a gratitude drawing: kids draw a bare tree then add paper leaves listing things they’re thankful for. It fosters reflection and wraps up the craft session warmly.
Materials
- Large drawing paper, 11 x 17 in
- Brown marker for trunk
- Colored sticky notes (leaf-shaped)
- Black gel pen for writing
- Tape or glue dots
- Small basket for notes
Instructions
- Draw a bare tree with branches on large paper.
- Give each child colored sticky notes to write one thing they’re grateful for.
- Attach the notes as leaves on the branches.
- Add decorative drawings (birds, raindrops) around the tree.
- Swap leaves and read them aloud if kids agree.
- Keep displayed for a week; replace leaves with new notes as needed.
How to Display or Gift It
- Hang on the fridge or a prominent wall and rotate leaves.
- Photograph the tree and make a printed postcard to send.
- Keep spare sticky notes in a desktop organizer near your craft area.
You made it through 23 cozy, creative, and genuinely doable rainy day projects that will keep kids happily drawing indoors. From quick scribble monsters to tactile cloud-dough pieces and mini animations, there’s a mix of sensory play, fine motor practice, and storytelling to suit different ages and moods. Pin your favorites so they’re ready for the next stormy afternoon, try a new prompt a week, and share any happy surprises with a friend.
One tool I recommend for keeping this whole kit together is a sturdy stackable craft organizer — it makes clean-up faster and pulls supplies into reach for spontaneous creativity. Which of these drawing ideas for kids rainy day are you trying first? Tag a friend who needs a rainy day rescue and enjoy the cozy art time together.


