Welcome — grab a cup of tea and a few smooth stones from your garden. If you’ve ever clicked “rock painting ideas for beginners” and felt overwhelmed by glossy tutorials, this list is for you. These 22 projects break down simple, satisfying designs you can finish in an afternoon, whether you’re painting with kids, gifting friends, or adding a sweet shelf display.
You’ll find easy dot mandalas, cozy cottagecore fairy-door rocks, seasonal favorites, and a couple of slightly bolder techniques like galaxy stones and resin geodes. Each project includes a realistic materials list with exact quantities, step-by-step instructions with drying times, troubleshooting tips, and display or gifting ideas. I also drop helpful product picks where they actually make the job easier — like a reliable set of acrylic paint pens for tiny details and a weatherproof Mod Podge gloss sealer for outdoor rocks.
Keep your workspace simple: a small palette, a jar of water, and a sheet of paper towel. These rock painting ideas for beginners will help you build confidence fast — and give you beautiful, tactile pieces you’ll want to show off.
- Polka Dot Pebbles — Classic and Cheerful
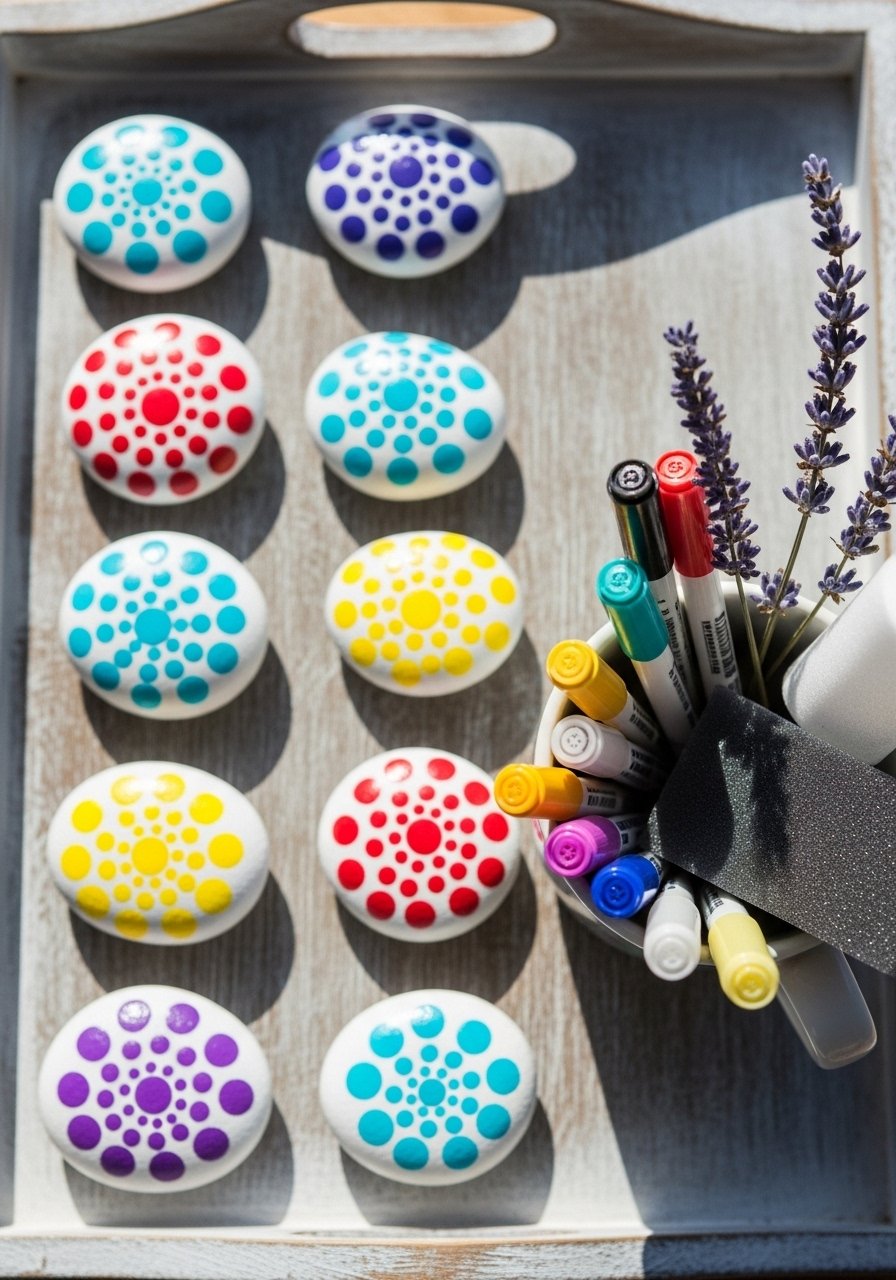
This cheerful project uses simple dots to make instant personality. It’s forgiving, great for kids, and perfect for turning awkward-shaped stones into eye-catching decor. The finish is slightly textured from paint pens and feels playful in your hand. Use a round-tip paint pen for crisp dots.
Materials
- 12–20 smooth river stones (3–5 cm each), washed and dried
- Acrylic craft paint (white) — 2 oz for basecoat
- Acrylic paint pens, assorted colors (set of 10)
- Foam brush, 1.5-inch
- Fine grit sandpaper, 120–220 grit (one sheet)
- Mod Podge gloss sealer, 4 oz
- Paper towels and small plastic palette
- Small jar of water for cleaning
Instructions
- Sand any rough spots with the 120–220 grit sandpaper. Wipe clean.
- Apply one thin basecoat of white acrylic with a foam brush. Let dry 20–30 minutes.
- Inspect for coverage. Apply a second thin coat if rock isn’t fully opaque; dry 20–30 minutes.
- Use paint pens to add dots. Press the pen tip briefly for small dots, longer for larger ones.
- Let the paint pens dry 15 minutes; check for smudging.
- Seal with one even coat of Mod Podge gloss using a foam brush. Dry 1 hour to the touch; cure 24 hours for full hardness.
- Optional second sealer coat for outdoor durability; allow 24 hours between coats.
How to Display or Gift It
Arrange polka dot pebbles in a shallow ceramic bowl for a mantel or coffee table. Tie a set of three together in tissue and place in a kraft box for a simple gift. Store extra painted pebbles in a stackable craft organizer until the sealer cures fully.
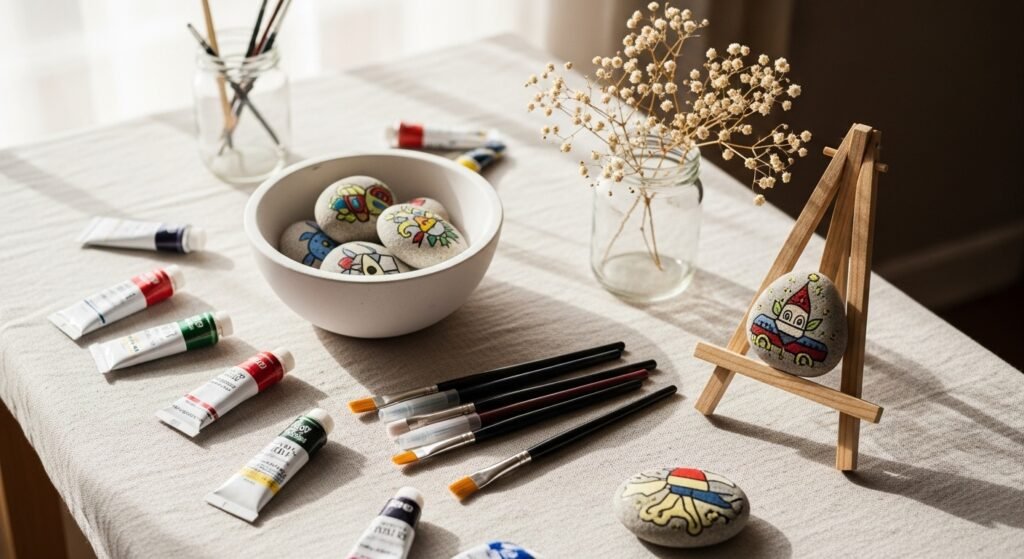
- Dot Mandala Rocks — Meditative and Detailed
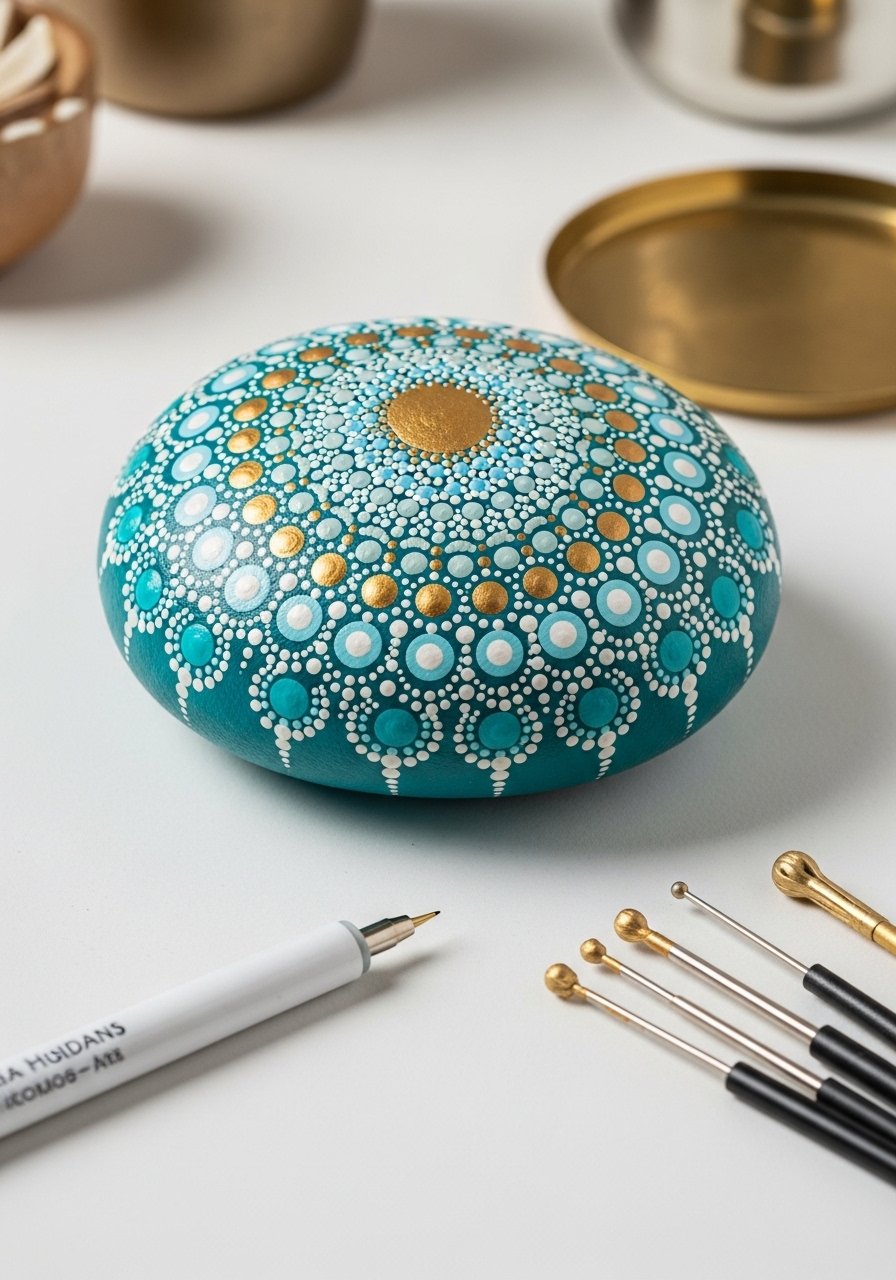
Mandala dots feel complex but are built from repeating simple marks. This project is calming and great for practicing steady hands. A set of dotting tools or the back end of paint brushes helps you get clean, even dots.
Materials
- 1 large smooth rock (6–8 cm), flat face preferred
- Acrylic craft paint (teal) — 0.5 oz
- White acrylic paint — 0.5 oz
- Gold metallic paint pen, fine tip
- Dotting tool set (6 sizes) or toothpicks
- Small mixing palette
- Paper towel
- Mod Podge satin sealer, 4 oz
Instructions
- Clean and sand the rock lightly. Wipe away dust.
- Paint base color in two thin coats, drying 15–20 minutes between coats.
- Plan dot layout with a light pencil dot at the center.
- Load the dotting tool with paint and press straight down for even dots. Work outward in concentric circles.
- Alternate white and metallic accents. Let dry 15 minutes between layers.
- Final seal with Mod Podge satin. Dry 1 hour to touch; cure 24 hours.
How to Display or Gift It
Place on a small wooden easel on a bookshelf or tuck into a planter. For gifting, add a kraft tag tied with twine and a dried lavender sprig. For storage, use a padded craft drawer to avoid chipping.
- Ladybug Rocks — Cute Gifts for Kids
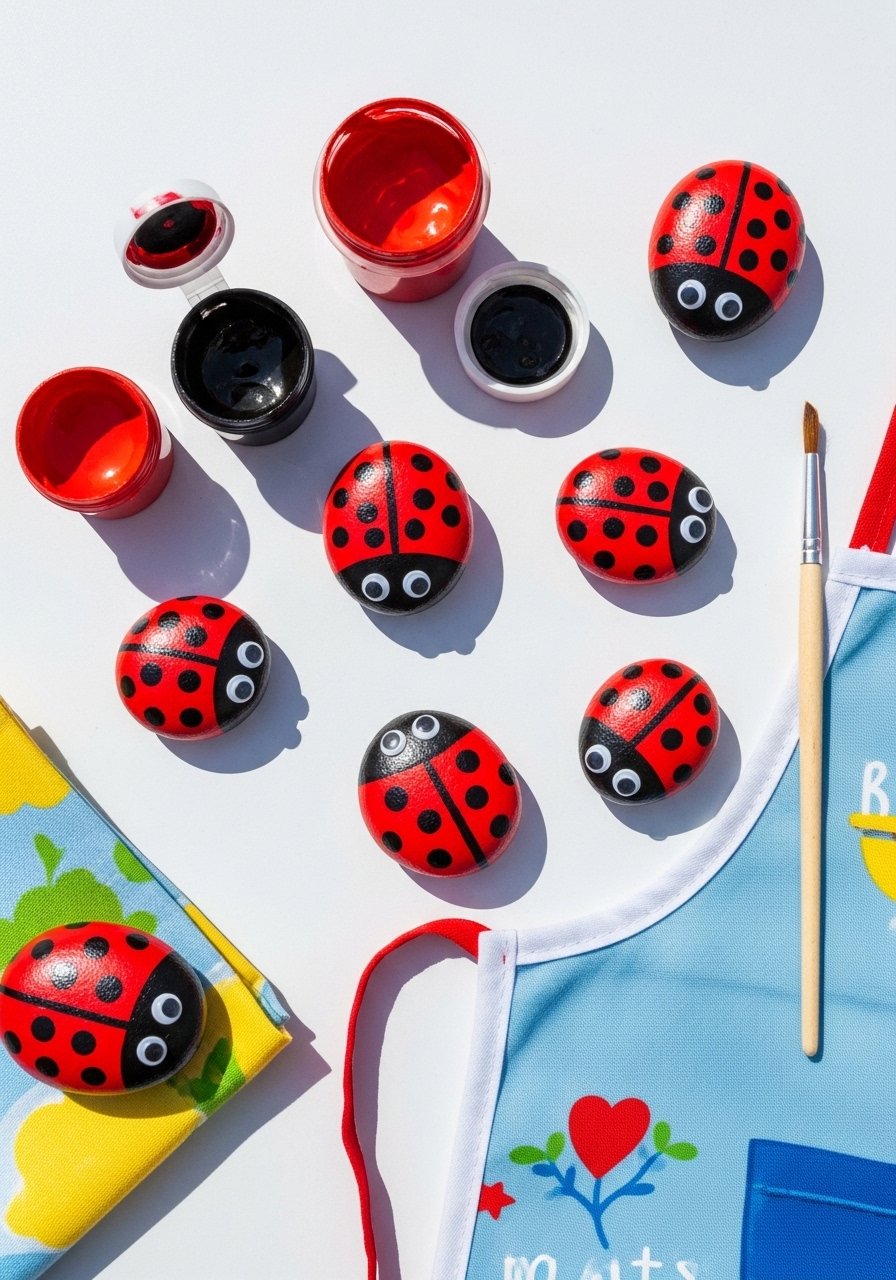
Ladybug rocks are fast, adorable, and perfect for little helpers. The glossy red looks great against garden greens. Use a small round brush for spot work and a black paint pen for tiny details.
Materials
- 10 small stones (2–3 cm)
- Acrylic paint (bright red) — 1 oz
- Black paint pen, fine tip
- White paint pen or small brush and white paint
- Small round paintbrush, size 2
- Glue-on googly eyes (optional), 10 pairs
- Gloss sealer spray, 6 oz
- Paper plates for palettes
Instructions
- Clean stones and apply one coat of red; dry 20 minutes.
- Apply second red coat if needed; dry 20 minutes.
- Add a black line down the middle with a fine paint pen. Add spots with the paint pen or brush.
- Dot tiny white highlights on eyes with the white pen.
- If using googly eyes, attach with a drop of craft glue; let set 30 minutes.
- Spray with a light coat of gloss sealer outdoors in a well-ventilated area. Dry 15 minutes; repeat for two coats. Cure 24 hours.
How to Display or Gift It
Tuck a pair into potted plants as garden markers or create a “rock pet” set in a small box for kids. Store in a divided craft organizer to keep individual pieces safe.
- Inspirational Word Stones — Minimalist Good Vibes
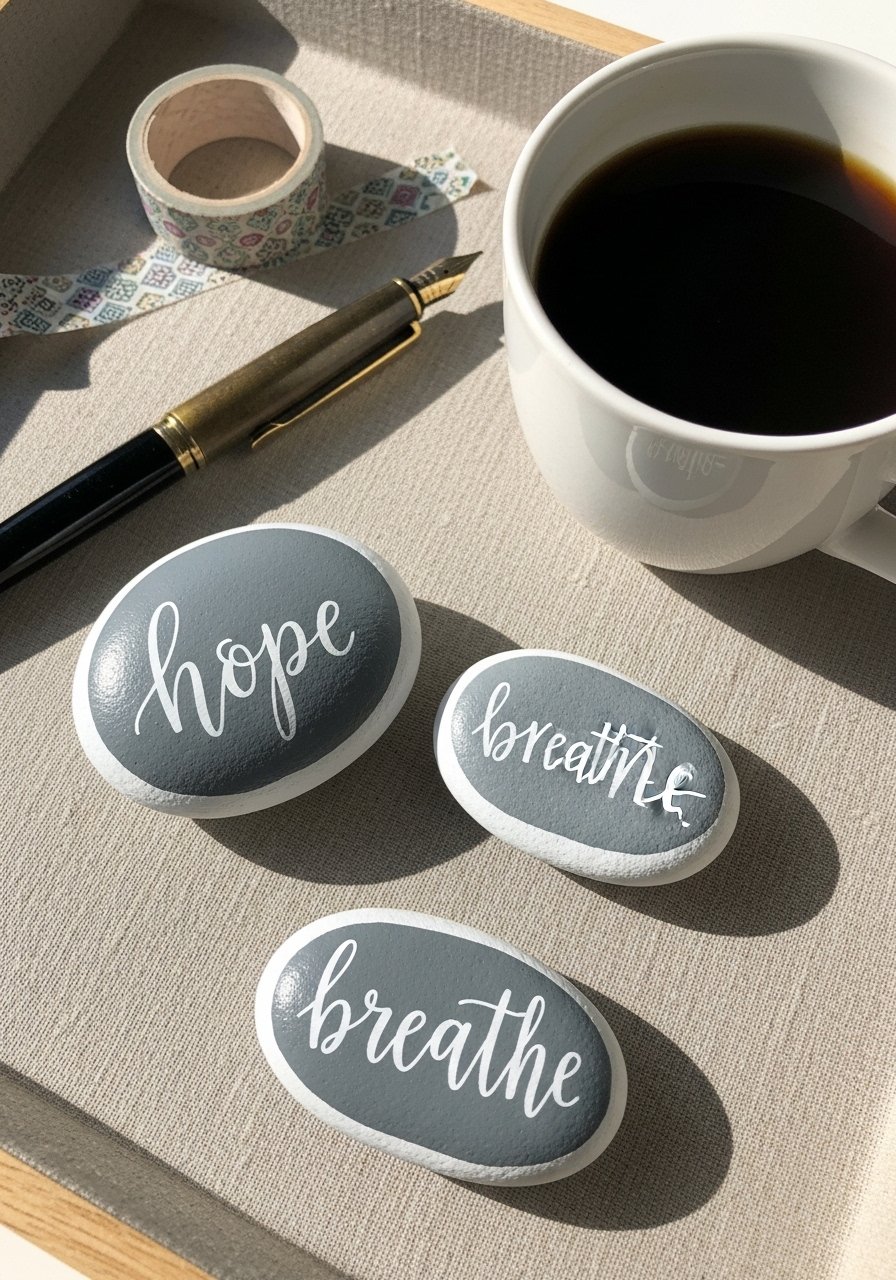
A simple painted background plus a hand-lettered word creates calm accents for desks or gifts. Use a fine-tip paint pen or a tiny round brush for lettering; stencils work if you prefer uniform type.
Materials
- 8 medium oval stones
- Chalky matte paint (soft gray) — 2 oz
- White paint pen, ultra-fine tip (pack)
- Pencil for layout
- Small round brush, size 0
- Matte sealer spray, 6 oz
- Clear label stickers (optional) for practice
Instructions
- Clean stones. Paint base in one even coat; dry 20 minutes.
- Lightly sketch words with a pencil.
- Trace over pencil with the white paint pen or small brush. Allow 10–15 minutes drying.
- Erase any visible pencil after paint fully dries.
- Spray two light coats of matte sealer, 10 minutes apart. Cure 24 hours.
How to Display or Gift It
Arrange a trio on a bedroom nightstand or tuck one into a journal gift set. For storage, lay finished stones flat in a stackable craft organizer.
- Galaxy Stones — Dramatic Night-Sky Effects
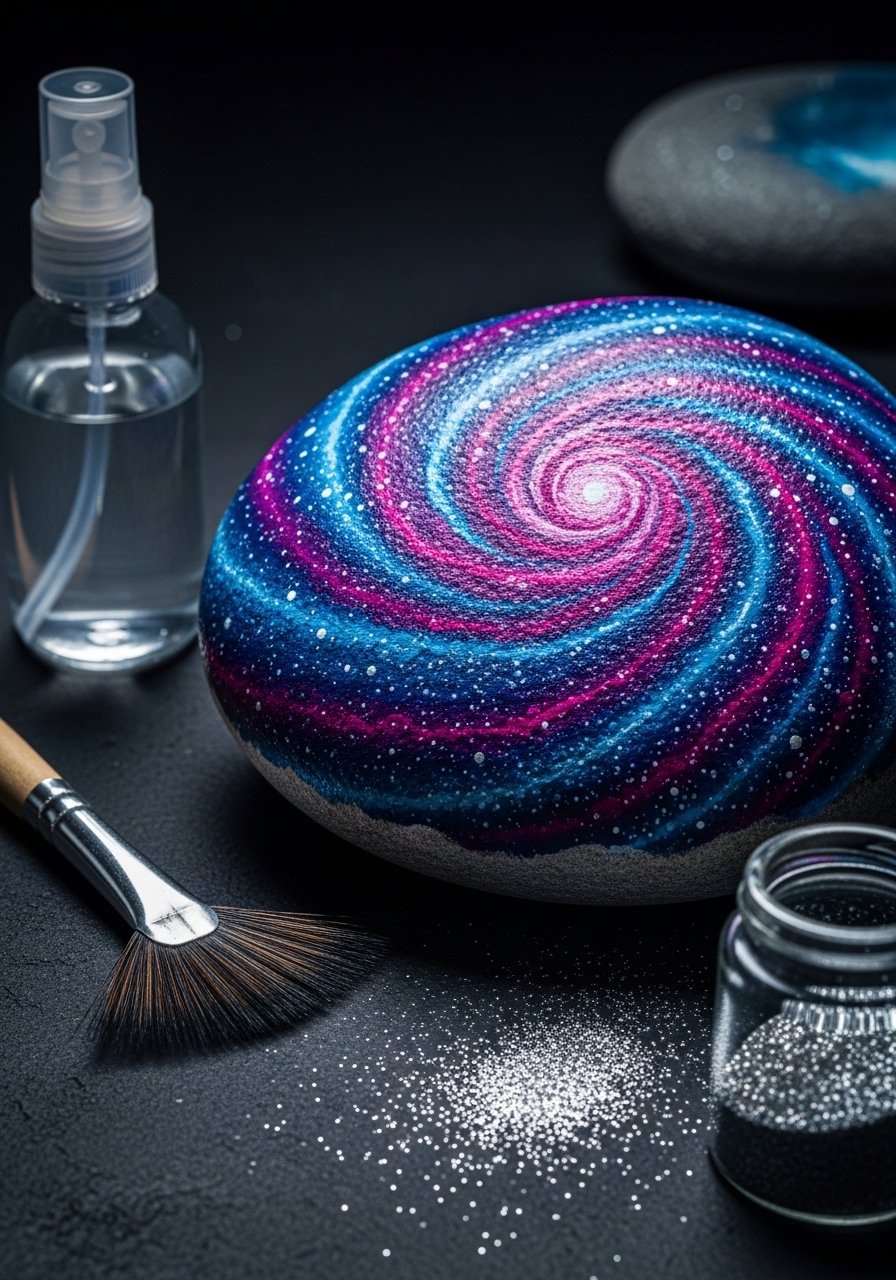
Galaxy stones look complex but are all about layering quick washes and splatters. Use a fan or toothbrush for star splatters and a metallic pen for tiny star highlights.
Materials
- 1–3 large flat stones
- Acrylic craft paints: navy, ultramarine, violet, black, white — 0.5 oz each
- Metallic silver paint pen
- Small fan brush or toothbrush for splatter
- Sponge for blending
- Gloss sealer, 4 oz
- Disposable palette and gloves
Instructions
- Prime stone with black basecoat. Dry 20–30 minutes.
- Sponge layers of navy and violet, dabbing and blending wet-on-wet. Work quickly; each layer dries in 10–15 minutes.
- Add lighter blues near center to create depth.
- Dip toothbrush in thinned white paint and flick for stars. Start with light splatter; allow 10 minutes to dry.
- Add a few larger stars with a metallic pen.
- Seal with two thin coats of gloss sealer; allow 24–48 hours cure for full hardness with gloss clarity.
How to Display or Gift It
Place on a bedside tray or in a small velvet pouch for a night-themed gift. For long-term storage, wrap in tissue and keep in a small craft storage box.
- Ombre Smoothies — Soft Gradient Stones
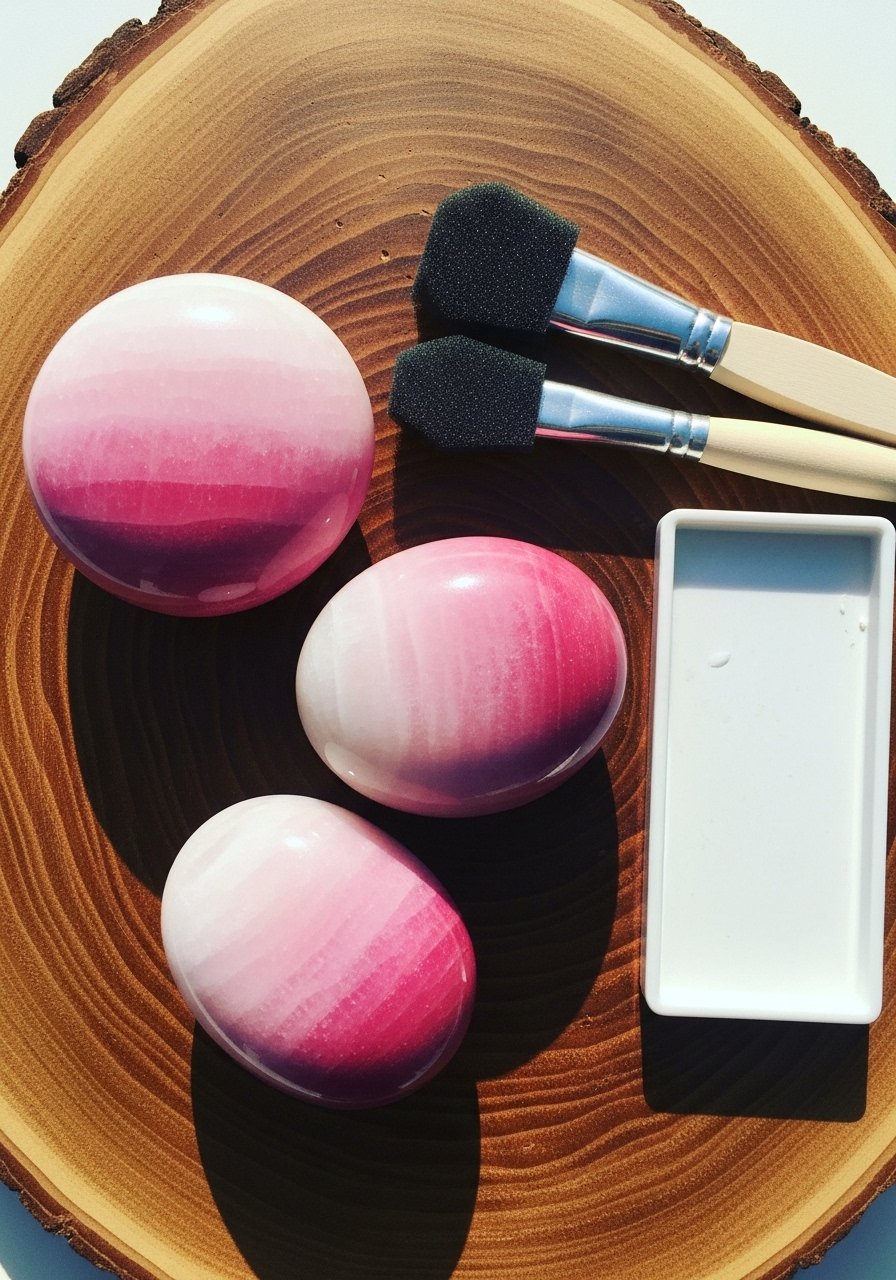
Ombre rocks are soothing and beginner-friendly. Wet blending with foam brushes creates smooth transitions. Use thinned acrylics for softer fades.
Materials
- 3 medium stones
- Acrylic paints: pale pink, rose, deep rose — 0.25 oz each
- Flat foam brush, 1-inch
- Small water spray bottle
- Paper towel
- Matte sealer, 4 oz
Instructions
- Sand and wipe rocks. Apply a thin white basecoat; dry 15 minutes.
- Paint the lightest color on one side, darkest on the other.
- Use a slightly damp foam brush to blend where colors meet in sweeping strokes.
- Mist lightly with water if edges dry too fast and continue blending.
- Repeat two thin layers for depth; dry 20 minutes between coats.
- Seal with a matte sealer; dry 1 hour; cure 24 hours.
How to Display or Gift It
Cluster ombre stones in a ceramic bowl or use as paperweights. Store flat in a padded drawer until fully cured.
- Succulent Painted Rocks — Tiny Planters Without the Watering
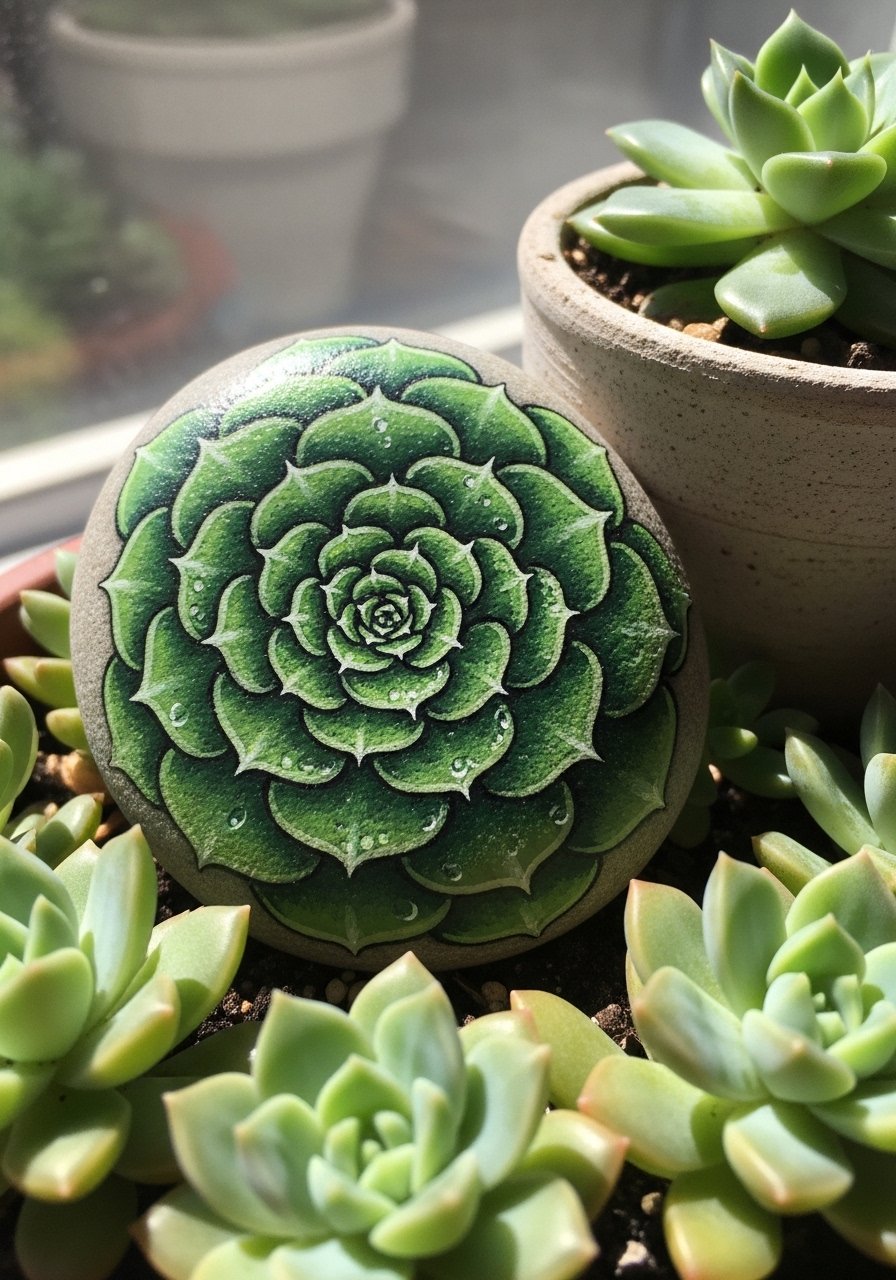
Succulent rocks mimic real plants and are perfect for low-maintenance decor. Use small round brushes and a paint pen for fine leaf veins.
Materials
- 1 large flat rock
- Acrylic paints: sea green, sage, dark green, white — 0.5 oz each
- Fine round brush, size 1
- White paint pen for highlights
- Matte sealer, 4 oz
Instructions
- Basecoat in sage. Dry 20 minutes.
- Paint leaf shapes in layered rows, darkest at base, lighter at tips.
- Add tiny white highlights on leaf edges. Dry 10 minutes.
- Seal with a matte finish; dry 1 hour to touch; cure 24 hours.
How to Display or Gift It
Mix succulent rocks into a real succulent planter for contrast or gift singly tucked into kraft boxes. Store in small craft trays before sealing.
- Painted Pet Rocks — Personalized and Playful
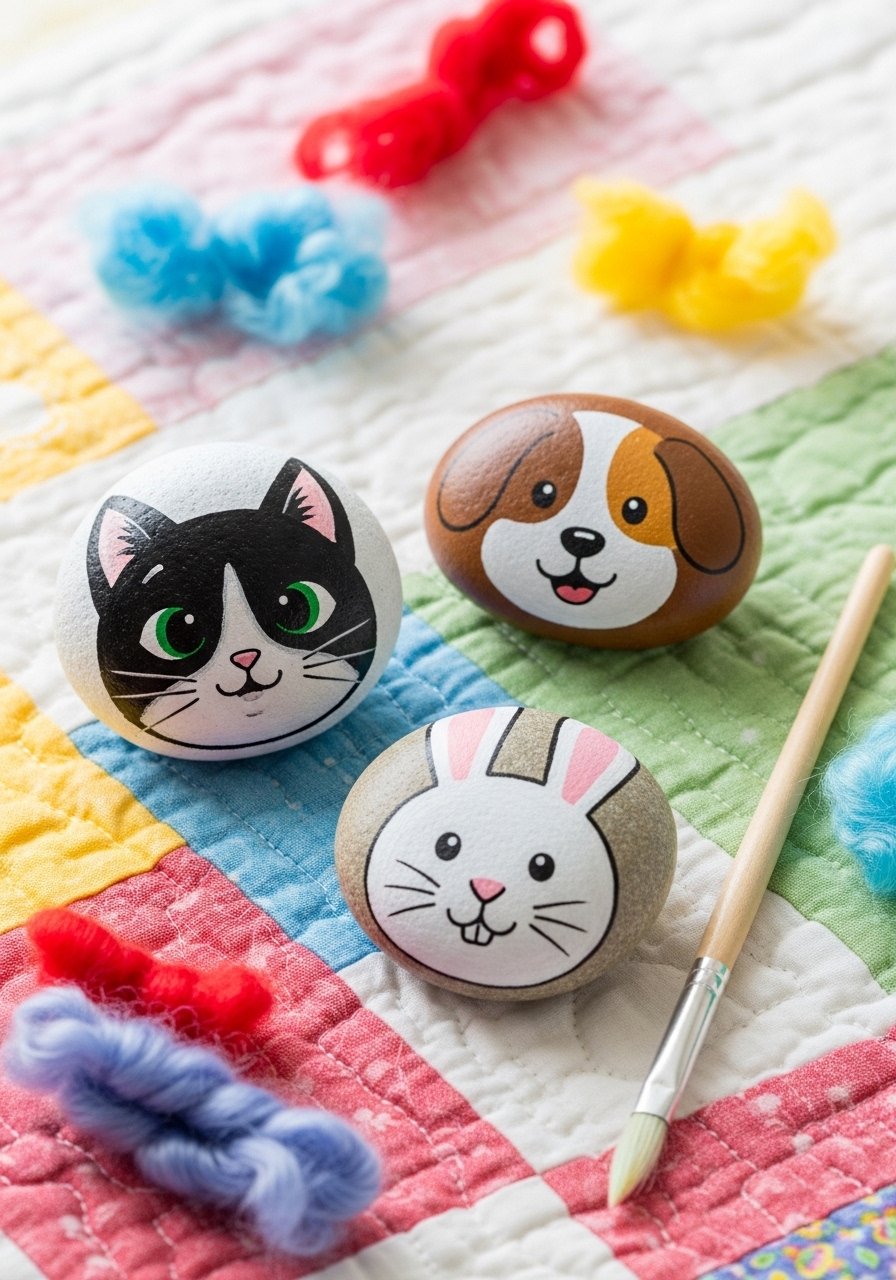
Turn stones into tiny pet companions. Use paint pens for facial details and varnish for a friendly sheen. Perfect for kids’ bedrooms or small animal-lovers.
Materials
- 6 small smooth stones
- Acrylic base paint, assorted pastel shades — 1 oz total
- Black and white paint pens
- Small round brush, size 0
- Gloss varnish spray, 6 oz
Instructions
- Paint a soft base color; dry 20 minutes.
- Sketch facial placement in pencil.
- Use paint pens for eyes, noses, and whiskers.
- Let dry 15 minutes between details.
- Seal with two light coats of gloss varnish; dry 15 minutes between coats; cure 24 hours.
How to Display or Gift It
Place in a small gift box with shredded paper and a tiny printed adoption certificate. Store wrapped in tissue until varnish fully cures.
- Tiny Christmas Gnome Rocks — Festive Shelf Decor

Gnome rocks are a seasonal favorite that blend simple shapes with cozy textures. Add felt beards and a dab of hot glue to attach hats for dimension.
Materials
- 8 small rounded rocks
- Acrylic paints: red, skin tone, white — 0.5 oz each
- Felt sheets for hats, small scraps
- White wool roving for beards, 5 g
- Hot glue gun and low-temp glue sticks
- Fine paintbrush, size 0
- Gloss sealer, 4 oz
Instructions
- Paint faces and hats; dry 20 minutes.
- Cut small felt triangles for hats and glue to tops.
- Pull and attach wool roving beards with hot glue. Let glue cool 5 minutes.
- Add tiny nose and eyes with paint pens.
- Seal painted areas lightly with gloss spray, avoiding glued wool; cure 24 hours.
How to Display or Gift It
Line a mantle with gnomes, add mini pinecones, or place in small glass jars for a cute hostess gift. Keep glued embellishments protected in a shallow box.
- Beachy Shell Rocks — Nautical Charm
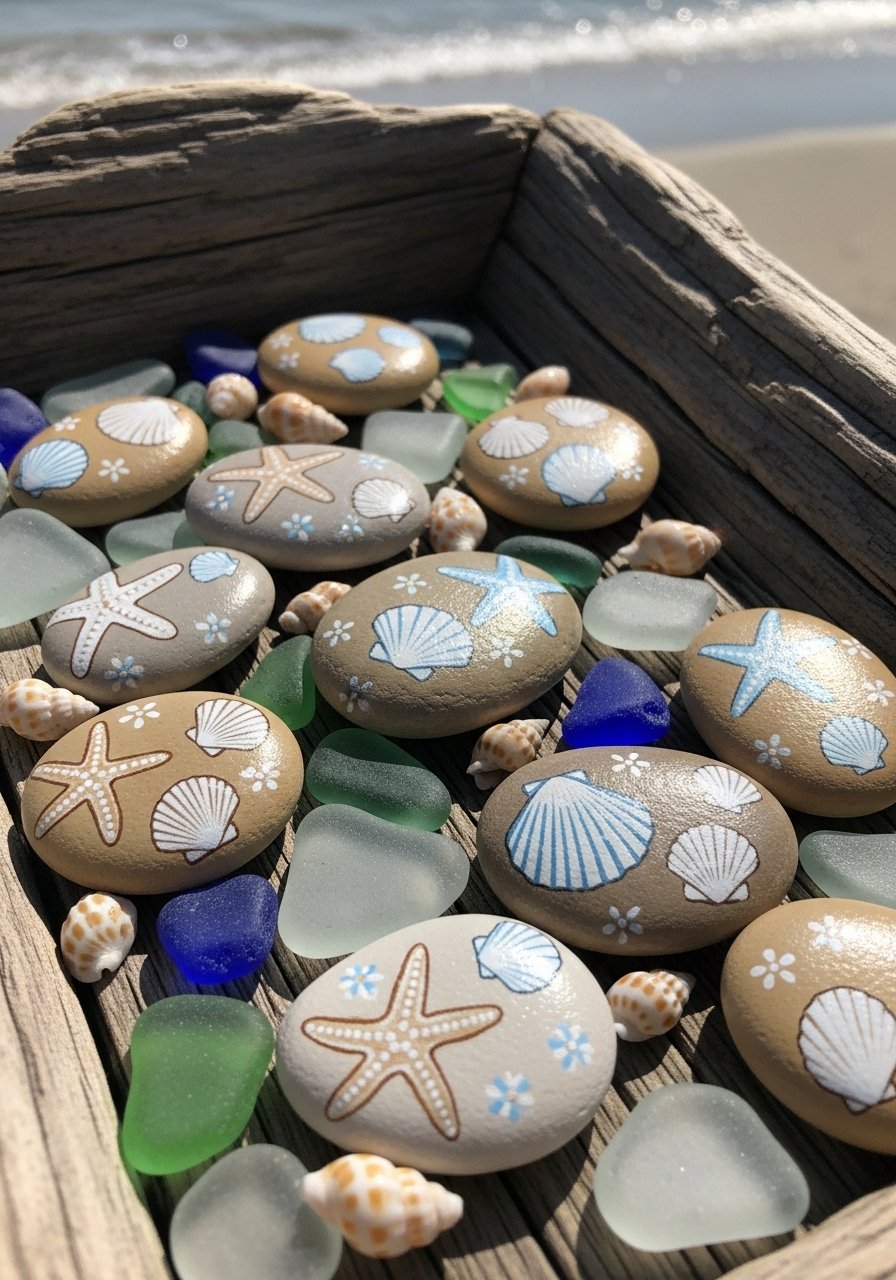
Channel the coast by painting shells and adding a sandy texture with a dry brush. Use muted beach tones for a calm aesthetic.
Materials
- 4 flat stones
- Acrylic paints: sand, cream, coral, seafoam — 0.25 oz each
- Dry brush, small
- Fine liner paint pen for shell details
- Matte sealer, 4 oz
Instructions
- Basecoat stones in sand color; dry 20 minutes.
- Dry brush cream over ridges for sandy texture.
- Paint small shells and starfish with a fine liner; dry 10 minutes.
- Seal with matte sealer; dry 1 hour; cure 24 hours.
How to Display or Gift It
Tuck a trio into a glass jar with sand for a table centerpiece, or gift as a set in a kraft box with twine and a small shell. Store flat in a padded tray.
- Geometric Stripe Stones — Modern and Clean
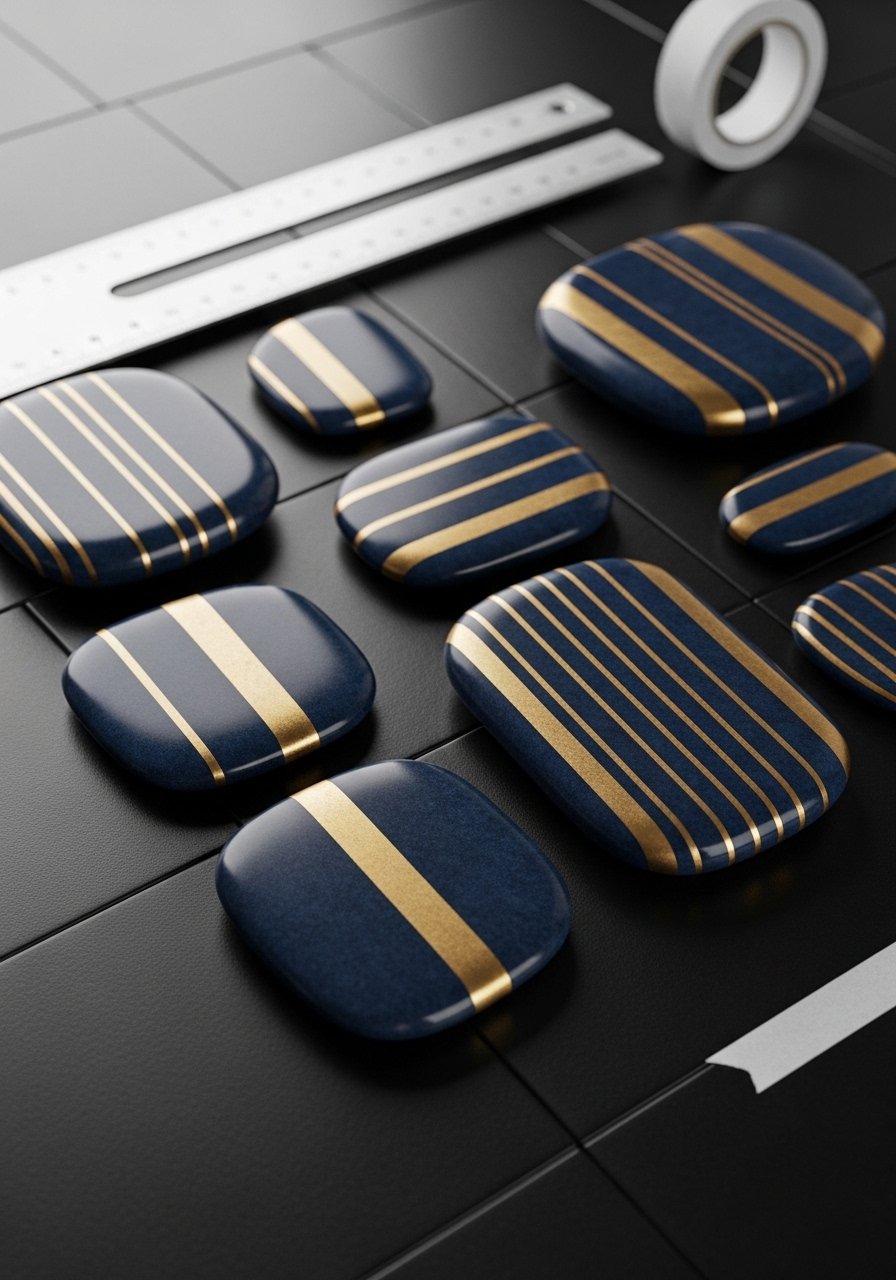
Sharp stripes are easy when you use painter’s tape. This technique gives a chic, modern finish ideal for farmhouse or japandi spaces.
Materials
- 6 flat stones
- Acrylic paints: navy and white — 0.5 oz each
- Painter’s tape, 1/2 inch roll
- Gold metallic paint pen
- Small foam brush
- Matte sealer, 4 oz
Instructions
- Basecoat stones in white; dry 20 minutes.
- Apply painter’s tape to block off stripes.
- Paint navy sections with a foam brush; allow 15–20 minutes to dry before removing tape.
- Touch up crisp lines with a small brush or gold pen accent.
- Seal with matte sealer; dry 1 hour; cure 24 hours.
How to Display or Gift It
Display on a small easel or scatter across a coffee table tray. Store finished stones flat in a stackable organizer.
- Marbleized Nail-Polish Rocks — Shiny and Surprising
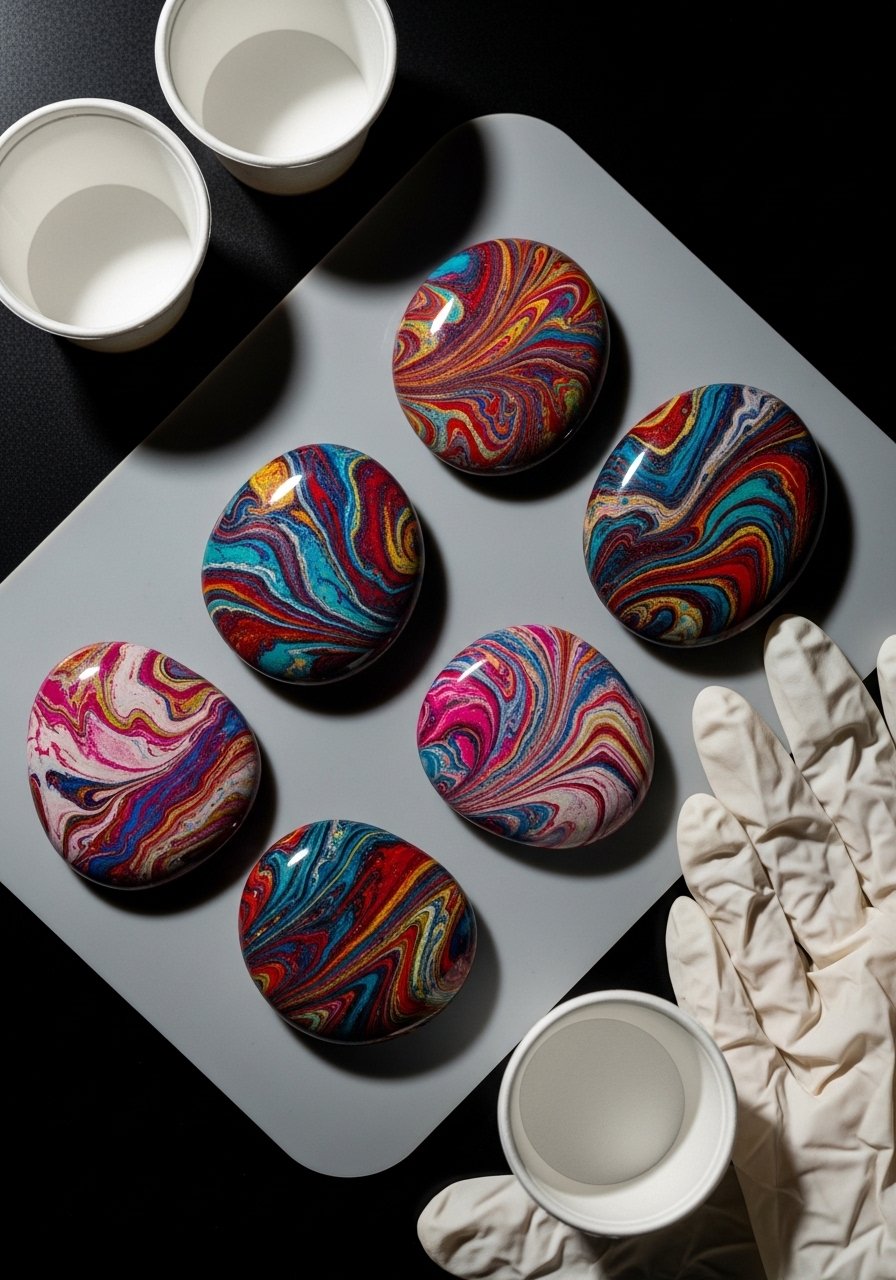
This uses nail polish marbling for glossy, unpredictable results. Work outdoors or over a silicone mat to avoid mess.
Materials
- 5 medium stones
- Assorted nail polish bottles, 3 colors plus top coat
- Disposable silicone mat
- Disposable cups for water dip
- Gloves
- Urethane top coat (optional for outdoor durability)
Instructions
- Fill a disposable cup with room-temp water.
- Drip multiple polishes into the water, one at a time, to create rings.
- Dip stone face down into polish pattern. Lift and let excess drip 10–20 seconds.
- Place on silicone mat to dry 30–60 minutes.
- Apply a clear top coat for extra gloss and protection; dry 1 hour; cure 24 hours.
How to Display or Gift It
Present as a shiny set in a velvet-lined box or use as drawer pulls for a DIY furniture project. Store wrapped in tissue until fully cured.
- Painted Animal Silhouettes — Rustic Farmhouse Feel
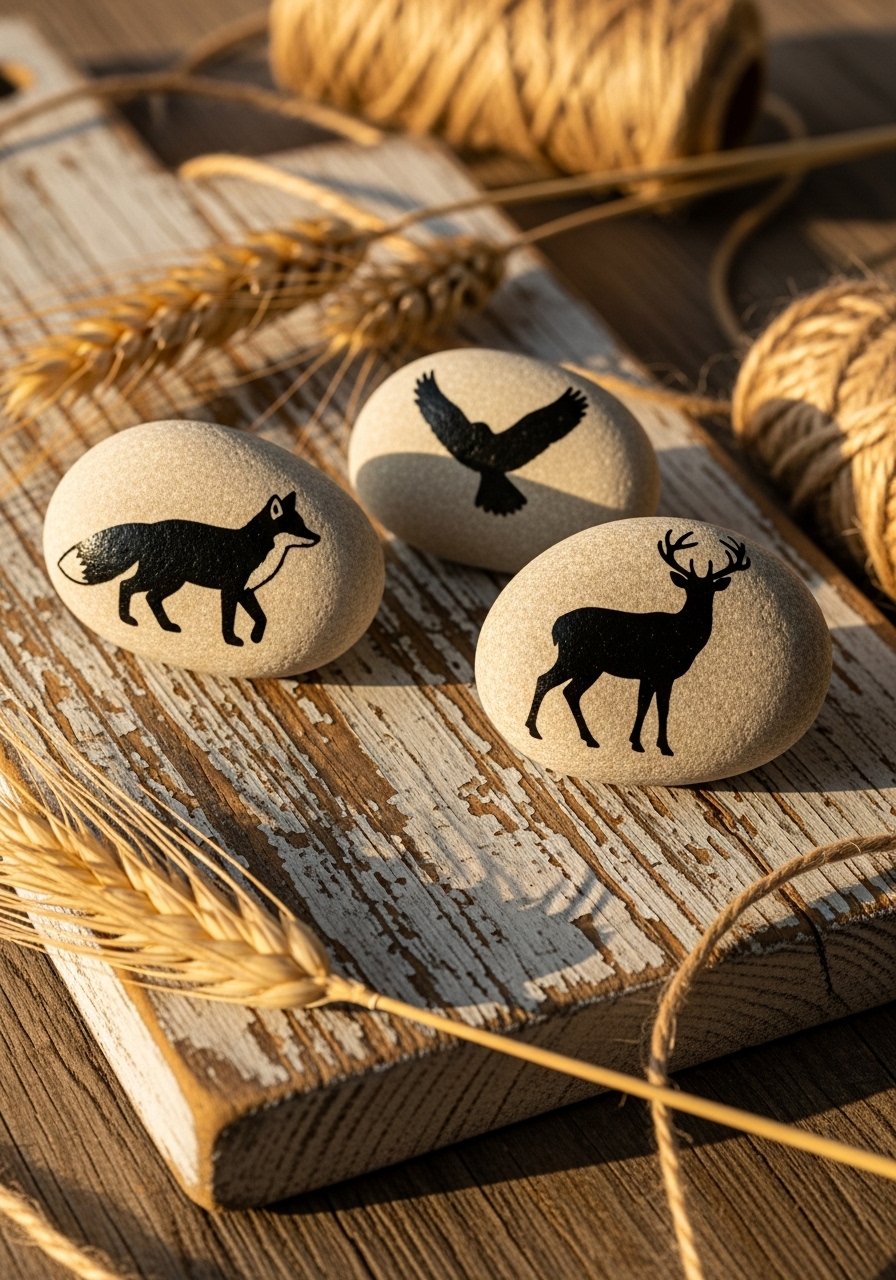
Silhouette rocks bring a rustic, farmhouse charm. Use a small stencil or hand-paint with a fine brush for folksy detail.
Materials
- 10 small-medium stones
- Black acrylic paint, 1 oz
- White base paint (optional), 1 oz
- Fine liner brush
- Printed animal silhouette templates
- Matte sealer, 4 oz
Instructions
- Paint a light base if needed; dry 20 minutes.
- Trace silhouettes lightly in pencil.
- Fill with black paint using a fine brush. Dry 15 minutes.
- Seal with matte sealer; cure 24 hours.
How to Display or Gift It
Group on a reclaimed wood board for wall decor or tie as gift tags to wrapped packages. Store flat in a padded drawer.
- Watercolor Wash Rocks — Soft and Ethereal

Watercolor effects on rocks are made with thinned acrylics. This creates soft, layered washes that mimic paper watercolors but stay weather-resistant after sealing.
Materials
- 6 small stones
- White acrylic base paint, 1 oz
- Acrylic paints: ultramarine and teal — 0.25 oz each
- Small watercolor brush
- Mixing cup for water
- Matte sealer, 4 oz
Instructions
- Paint stones white for a receptive base; dry 20 minutes.
- Thin acrylics with water (about 3:1 water to paint) and apply in light washes. Let each wash dry 10–15 minutes.
- Layer until you reach desired depth.
- Seal with matte finish; cure 24 hours.
How to Display or Gift It
Tuck a wash rock into a notebook or small tin for a calming pocket gift. Store flat until fully dry.
- Painted Sunflower Rocks — Bright Garden Cheer
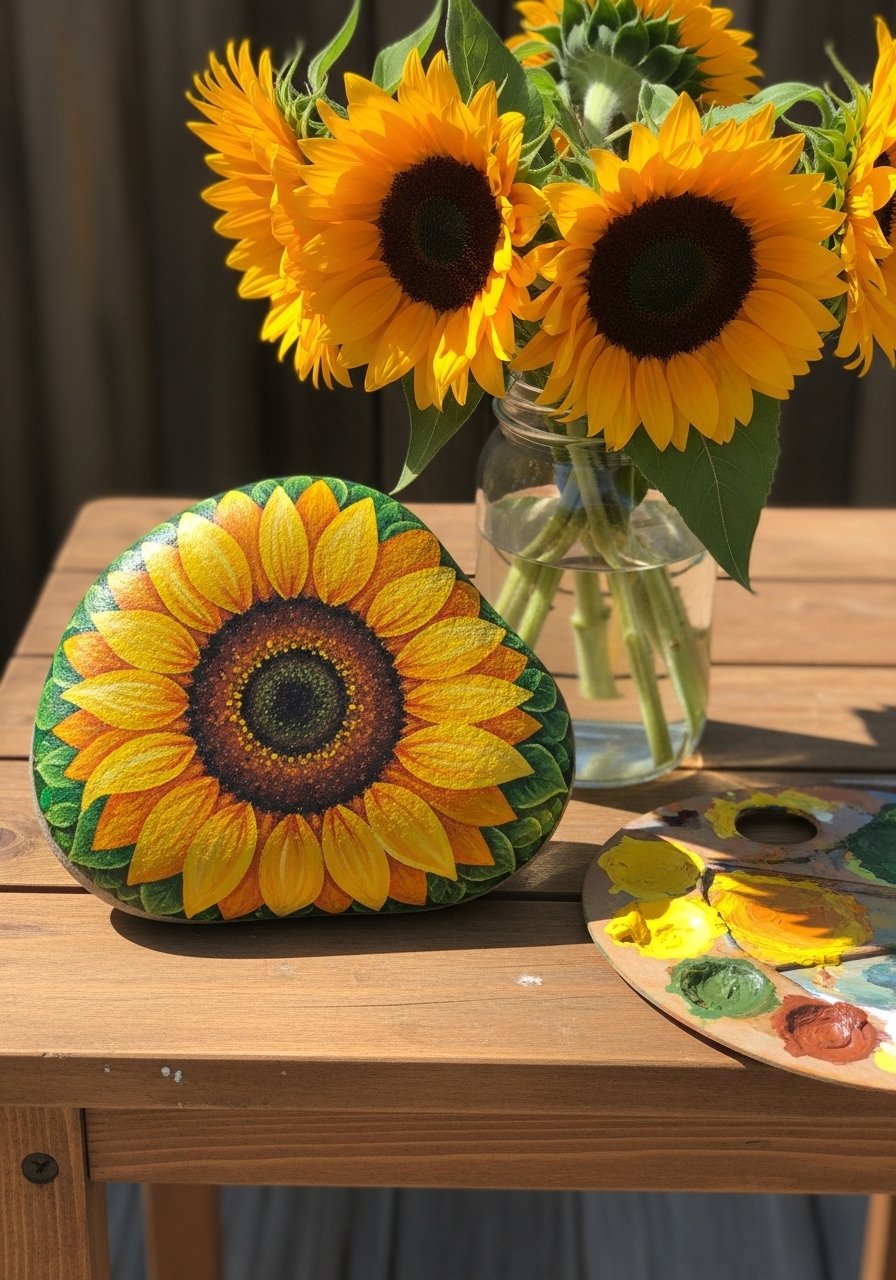
Sunflower rocks make cheerful accents with bold brushstrokes. Use a small round brush for petal shapes and a stippling brush for the center texture.
Materials
- 3 medium flat stones
- Acrylic paints: yellow, burnt umber, olive green, white — 0.25 oz each
- Small round brush, size 2
- Stippling brush or toothbrush for center texture
- Gloss sealer, 4 oz
Instructions
- Prime with a pale sky-blue base; dry 20 minutes.
- Paint sunflower petals in layered strokes from base outward. Dry 10–15 minutes.
- Stipple the center with burnt umber and highlight with gold.
- Add simple leaf shapes at the base. Dry 10 minutes.
- Seal with gloss for a vibrant finish; cure 24–48 hours.
How to Display or Gift It
Use as garden markers or tie in a bouquet for a summer hostess gift. Store in a padded box until sealer fully cures.
- Minimalist Heart Stones — Romantic and Simple
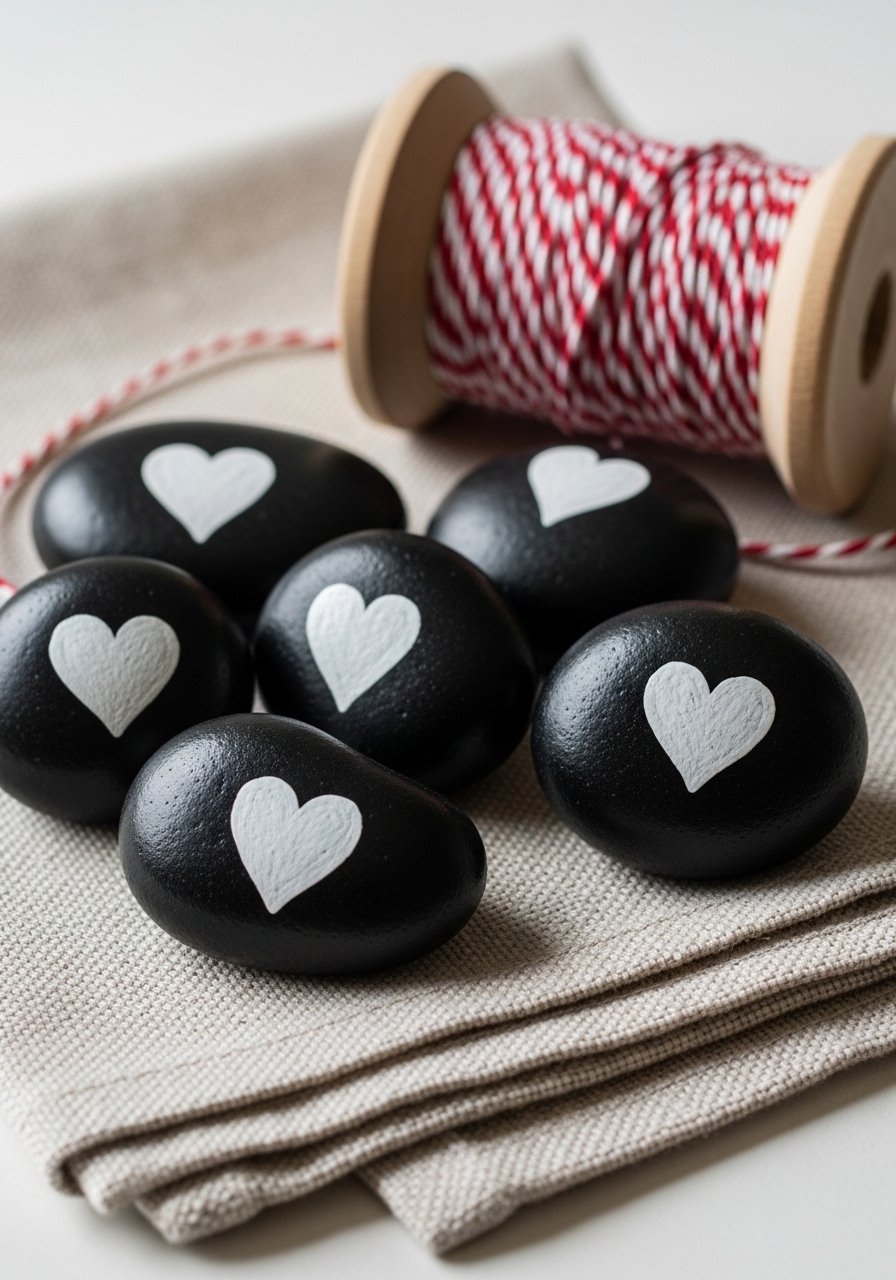
A single heart can be very impactful. Keep lines clean using a fine paint pen and finish matte for a modern look.
Materials
- 12 small stones
- Matte black acrylic paint, 1 oz
- White ultra-fine paint pen
- Matte sealer, 4 oz
- Small foam brush
Instructions
- Paint stones matte black; dry 20–30 minutes.
- Draw hearts with a white ultra-fine paint pen.
- Allow 10–15 minutes for ink to dry.
- Seal with matte sealer; cure 24 hours.
How to Display or Gift It
Scatter heart stones in wedding table decor or tuck into a Valentine’s gift box. Store flat in a craft drawer.
- Woodland Mushroom Stones — Cottagecore Charm
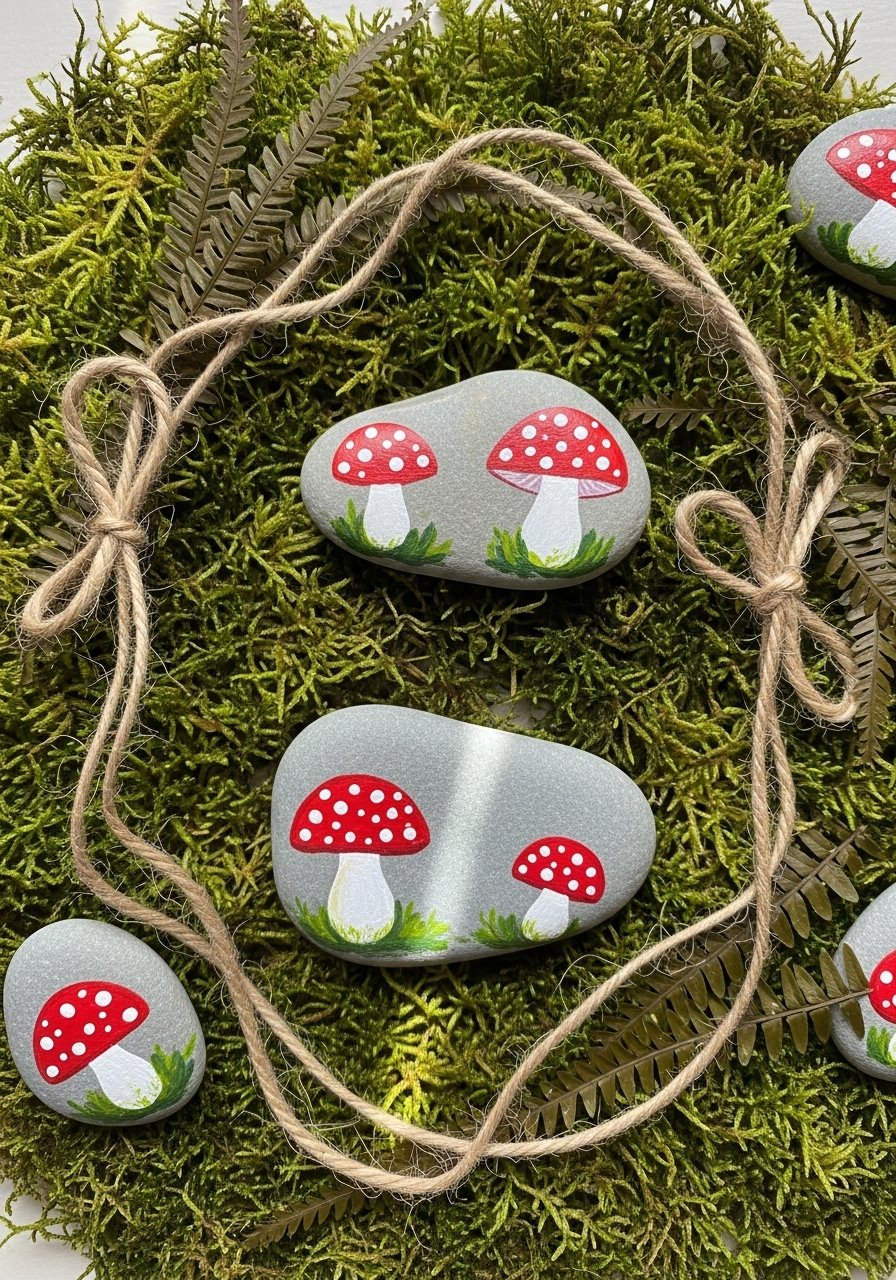
Mushroom rocks fit cottagecore or boho shelves. Use bright red for caps and tiny white dots for charm. Matte finish keeps the look natural.
Materials
- 6 flat stones
- Acrylic paints: red, white, brown, cream — 0.25 oz each
- Fine liner brush
- Matte sealer, 4 oz
Instructions
- Paint base in cream; dry 20 minutes.
- Sketch mushroom shapes and paint caps red. Dry 10–15 minutes.
- Add white spots and stems in brown/cream shadows.
- Seal with matte sealer; cure 24 hours.
How to Display or Gift It
Cluster with real moss in a shallow dish for a tabletop vignette. Store in a small padding-lined box.
- Geode-Inspired Resin Rocks — Sparkly Centerpiece
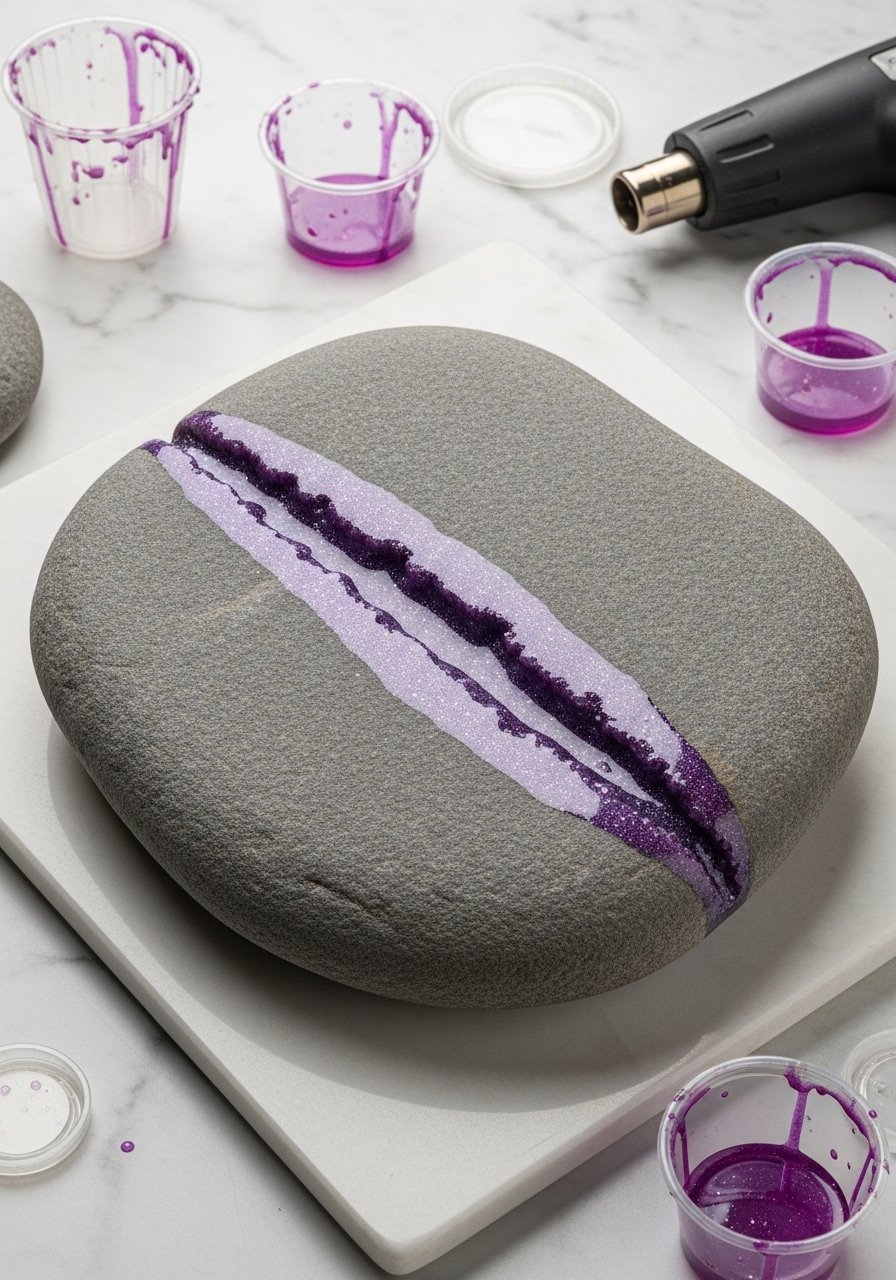
This is a beginner-friendly resin geode: pour tinted resin into a carved or glued-in groove and add mica powder for shimmer. Resin requires ventilation and proper safety gear.
Materials
- 1 large flat stone
- 2 oz epoxy resin kit (clear)
- Mica powder in purple and silver, 2 colors
- Small silicone mixing cups
- Heat gun (light pass)
- Latex gloves and respirator mask
- Small stirring sticks
Instructions
- Carve a shallow groove with a craft knife or glue a small ring of clay. Clean and dry.
- Mix resin per kit instructions (often 1:1 ratio) in silicone cups.
- Tint portions with mica powder and pour into groove in layers.
- Use a heat gun for 2–3 seconds to remove bubbles.
- Allow to cure 24–72 hours depending on resin — check kit instructions for exact cure time.
- Trim any overflow with a craft knife and sand edges if needed.
How to Display or Gift It
Display as a tabletop accent or paperweight. For gifting, protect with a padded box. Store mixed resin and tools separately; keep finished piece on a flat surface while curing.
- Leaf Print Stones — Nature-Imprinted Decor
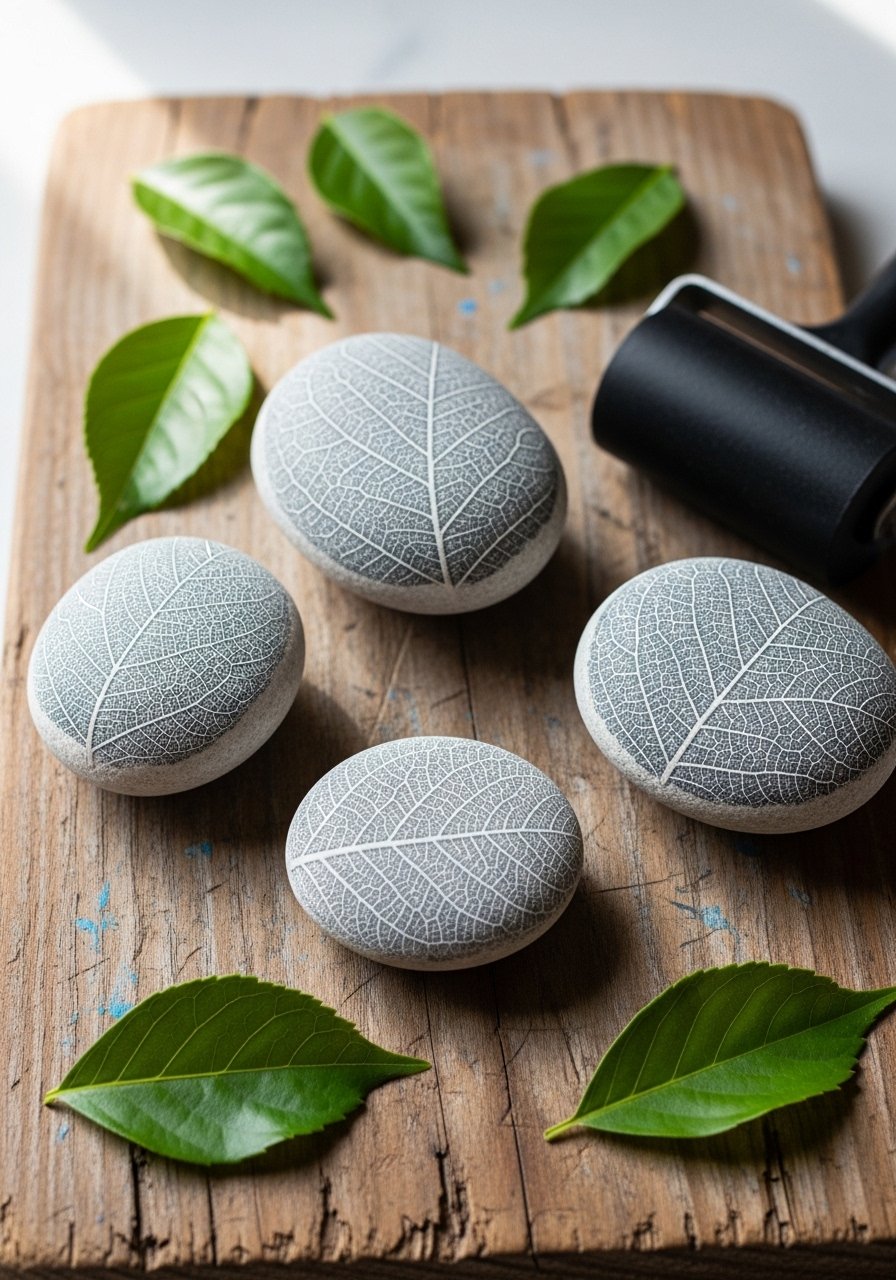
Leaf prints capture natural textures and are great for seasonal decor. Use real leaves and a brayer roller to transfer paint evenly.
Materials
- 6 medium stones
- Acrylic paint: green and brown, small amounts
- Fresh leaves (varied sizes)
- Brayer roller (2-inch)
- Small sponge
- Matte sealer, 4 oz
Instructions
- Paint the back of a leaf with a thin layer of paint.
- Press leaf paint-side down onto the stone and roll gently with brayer for 10–15 seconds.
- Lift carefully to reveal print. Allow 15 minutes to dry.
- Repeat with different leaves for layered effects.
- Seal with matte sealer; cure 24 hours.
How to Display or Gift It
Create a nature platter or gift with a botanical-themed note. Store flat and avoid stacking while sealer cures.
- Chevron Rocks — Bold Graphic Accents
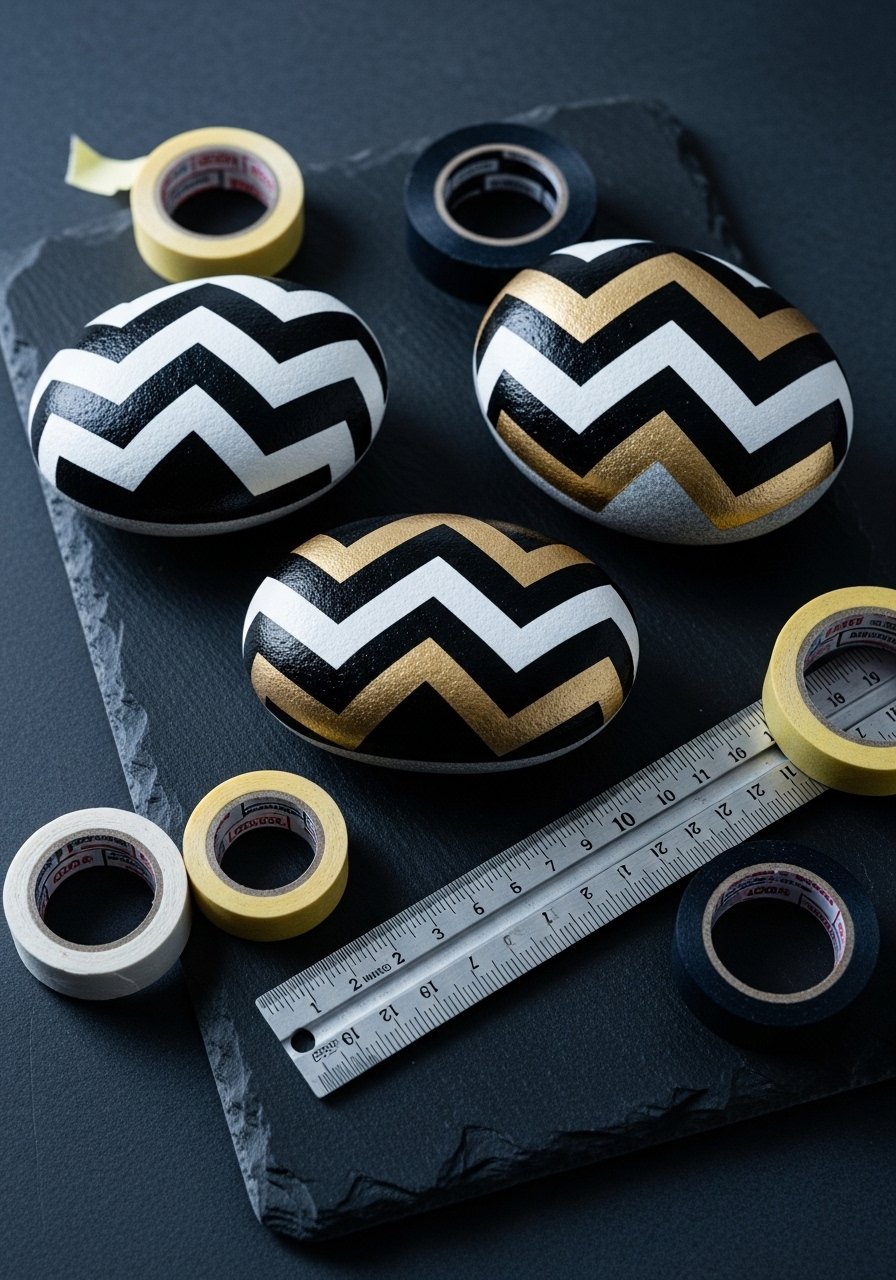
Chevron patterns are graphic and modern. Painter’s tape helps you get crisp angles; metallic accents add warmth.
Materials
- 6 flat stones
- Black acrylic paint, 0.5 oz
- Gold metallic paint pen
- Painter’s tape, 1/4-inch
- Small angled brush
- Matte sealer, 4 oz
Instructions
- Paint base color (white or black) and dry 20 minutes.
- Apply painter’s tape in chevron pattern and paint contrasting color.
- Remove tape gently after 10–15 minutes. Touch up edges if needed.
- Add gold accents with pen. Dry 10 minutes.
- Seal with matte sealer; cure 24 hours.
How to Display or Gift It
Scatter as bold accents on a modern coffee table or gift in a minimal kraft box. Store in a divided organizer to protect edges.
- Glow-in-the-Dark Rocks — Night Garden Markers
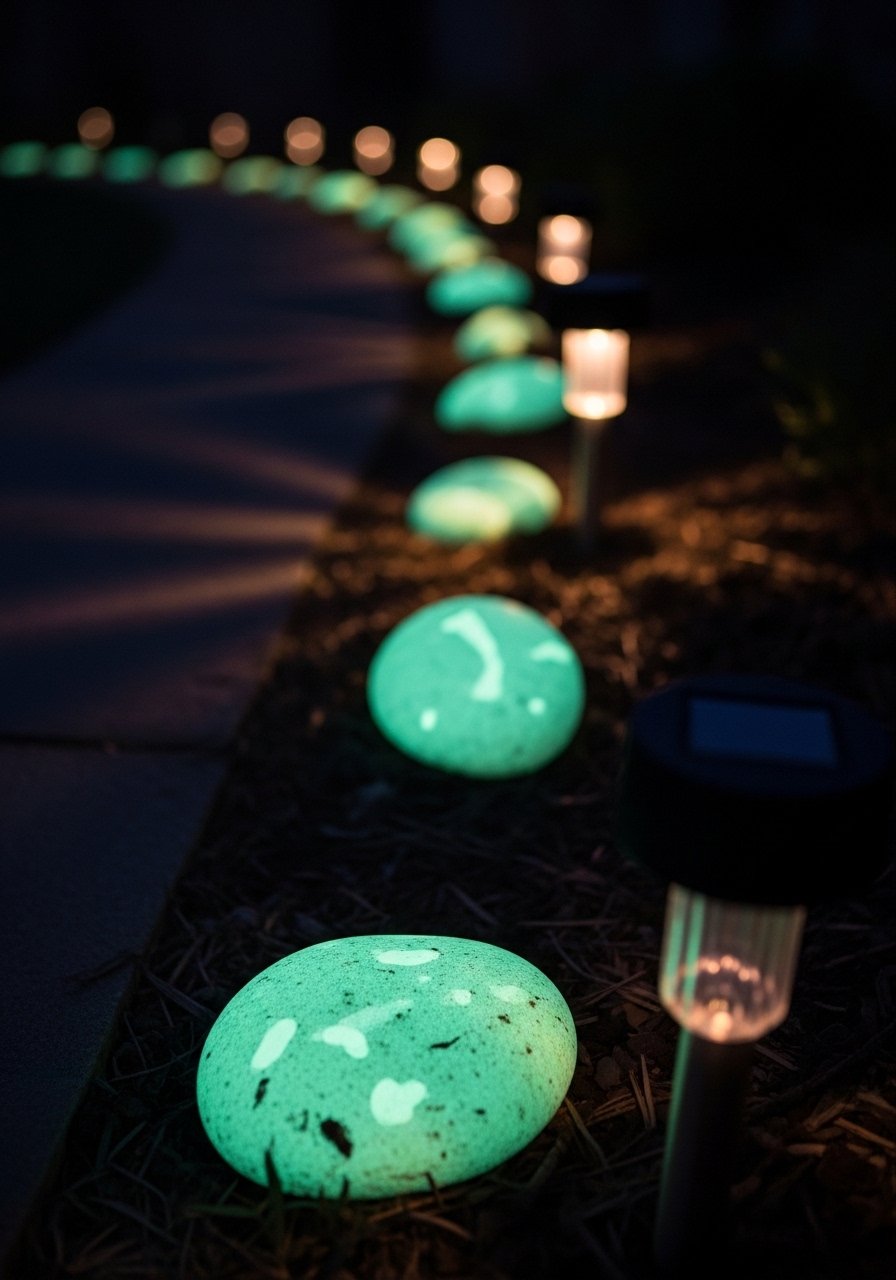
Glow rocks are practical and playful for night gardens. Use a charged glow paint and seal for longevity.
Materials
- 10 medium stones
- Glow-in-the-dark acrylic paint, 2 oz
- White base paint for undercoat, 1 oz
- Small round brush
- Outdoor matte sealer spray, 6 oz
Instructions
- Basecoat in white to help glow pigment pop; dry 20 minutes.
- Apply two thin coats of glow paint; dry 30 minutes between coats.
- Charge the paint under bright light for at least 30 minutes before testing glow.
- Seal with outdoor matte sealer for weather resistance; allow 24 hours cure.
How to Display or Gift It
Line a pathway with glow stones or make a set for nighttime porch decor. Store in a dry box until sealer cures completely.
- Painted Map Stones — Travel-Inspired Keepsakes
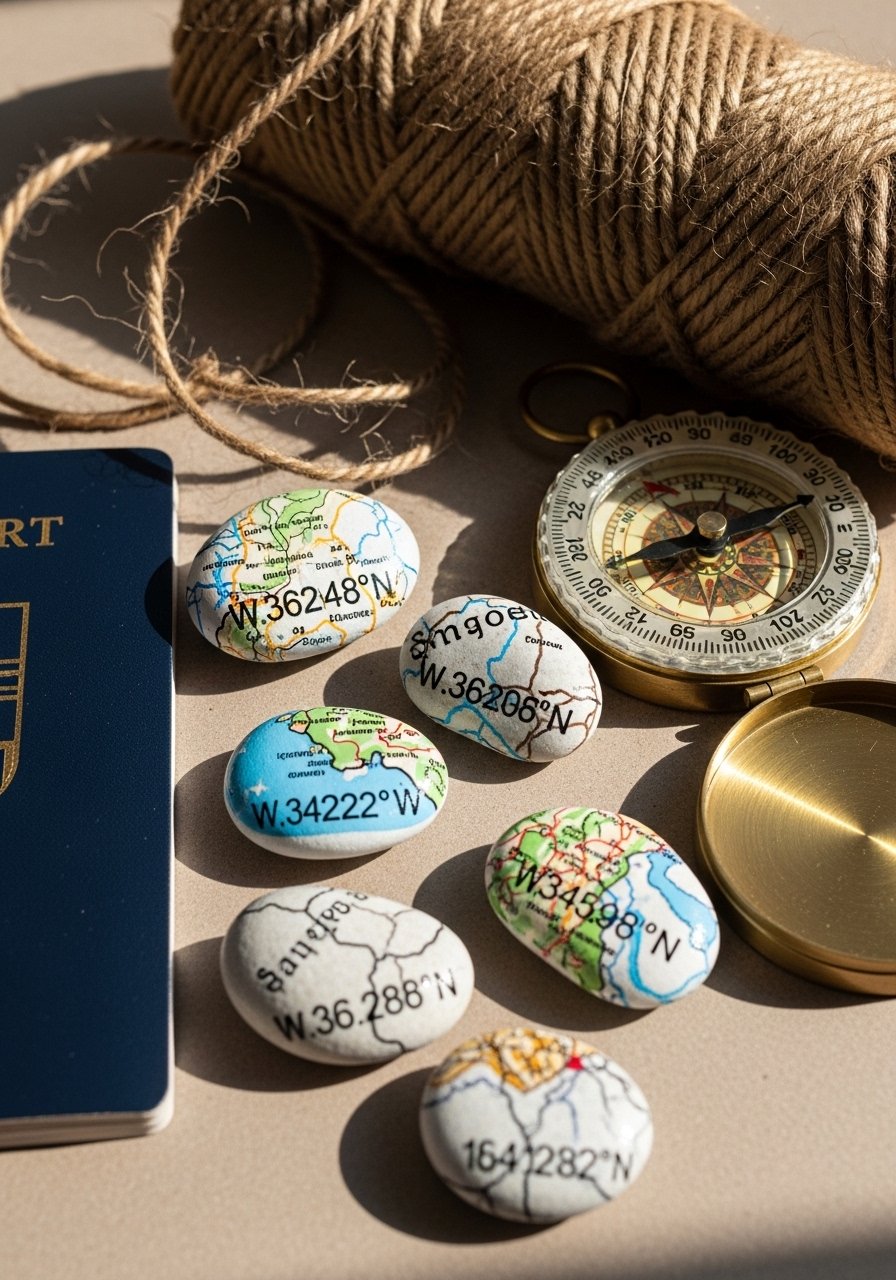
Map rocks are personal and perfect as keepsakes from special trips. Paint small map shapes or coordinates for personalized meaning.
Materials
- 6 small stones
- Acrylic paint: pale blue, sandy beige — 0.25 oz each
- Fine-tip paint pen in black
- Ruler and pencil for layout
- Matte sealer, 4 oz
Instructions
- Basecoat stones in pale blue or beige; dry 20 minutes.
- Lightly sketch map fragments or coordinates with pencil.
- Trace in black paint pen; add tiny landmark dots.
- Seal with matte sealer; cure 24 hours.
How to Display or Gift It
Package as travel mementos in a small kraft box with a printed note about each location. Store flat in a protective box until sealer cures.
Thanks for painting along — didn’t those projects look fun? You’ve now got 22 approachable rock painting ideas for beginners to try, from dot mandalas to resin geodes and glow-in-the-dark path markers. Save this guide so you can come back when inspiration strikes, and pin your favorite projects to your Pinterest boards.
Which one will you try first — a calming mandala, a glittery geode, or a set of polka dot pebbles? Share a photo with a friend or gift a handmade set; simple projects like these make thoughtful little surprises.
One tool that sped up many of these projects for me is a reliable set of acrylic paint pens — they give clean lines for lettering and tiny details. Happy painting!


