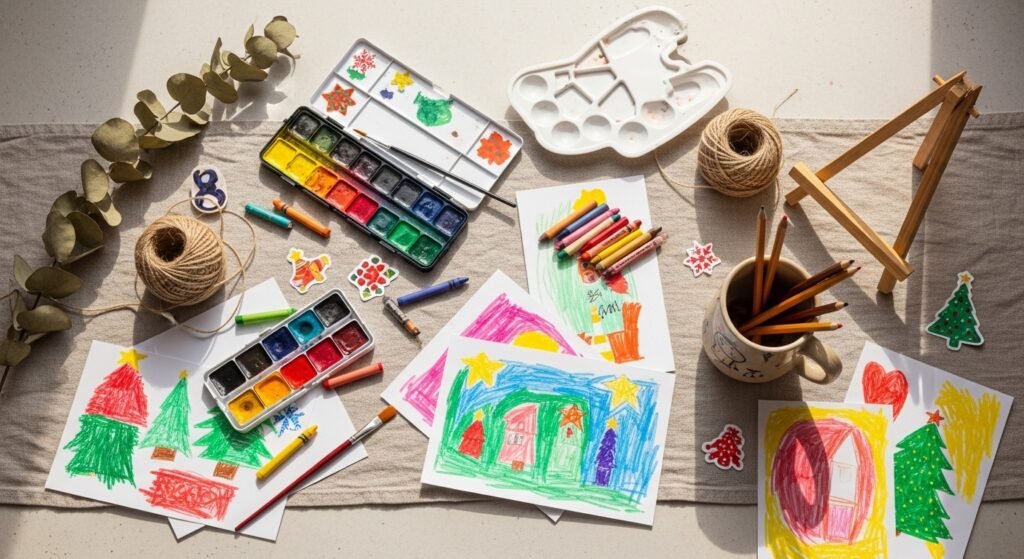
Nothing wakes up the holidays like a stack of cheerful drawings made by little hands. Whether you're prepping classroom activities, filling holiday cards, or planning a cozy family craft night, these holiday drawing ideas for kids are built to be festive, colorful, and totally doable at home. You’ll find quick warm-ups, multi-step cards, easy stencils, and projects that pair drawing with collage, stamping, or simple painting.
I keep a small set of watercolor pans and a pack of thick drawing paper on hand so ideas move from brain to table fast. For precise cut shapes I sometimes use my Cricut Joy cutting machine, but a craft knife works fine for many of these. This list has 25 holiday drawing ideas for kids—each with a materials list, step-by-step instructions, drying times, and display or gifting tips. Grab the crayons and let’s make something bright.
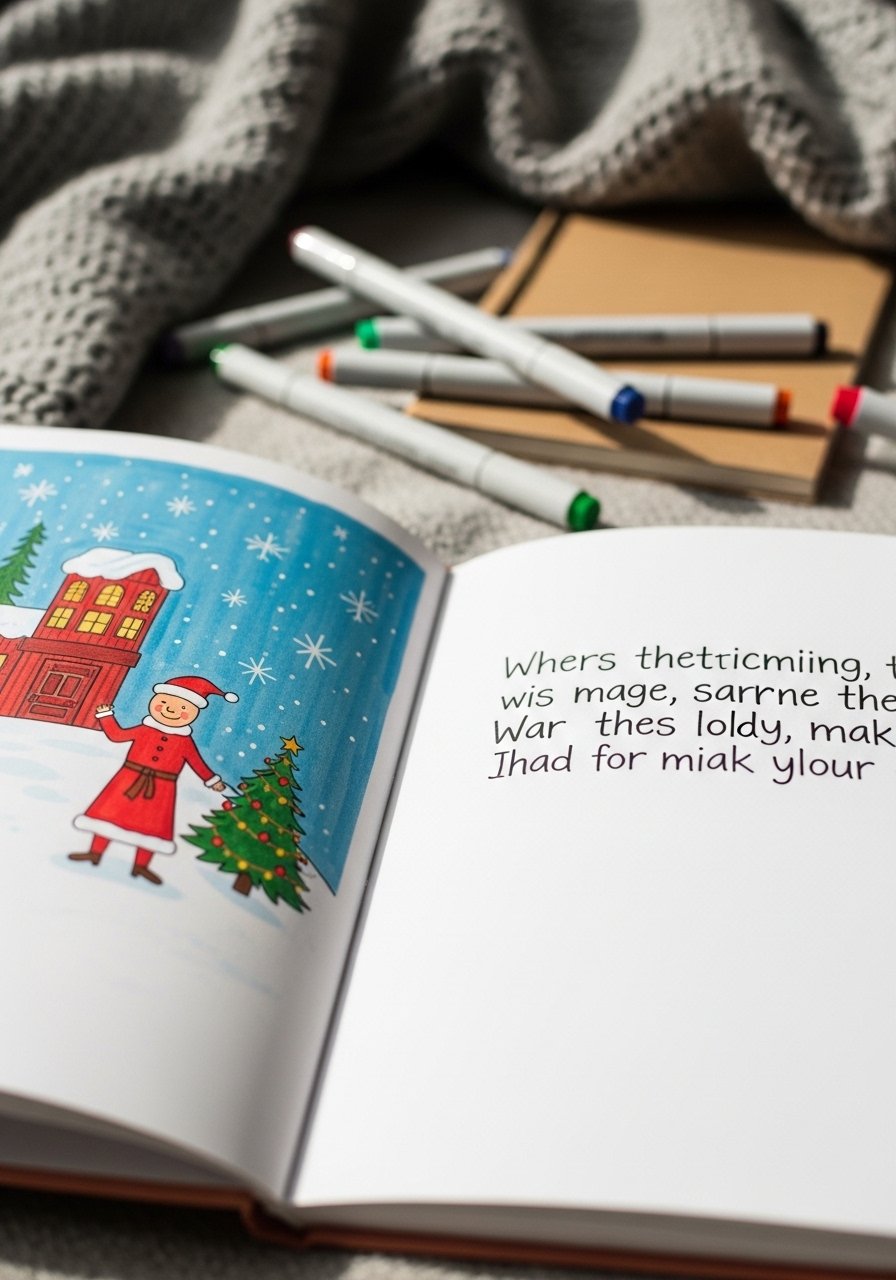
1. Tiny Gingerbread House Scene
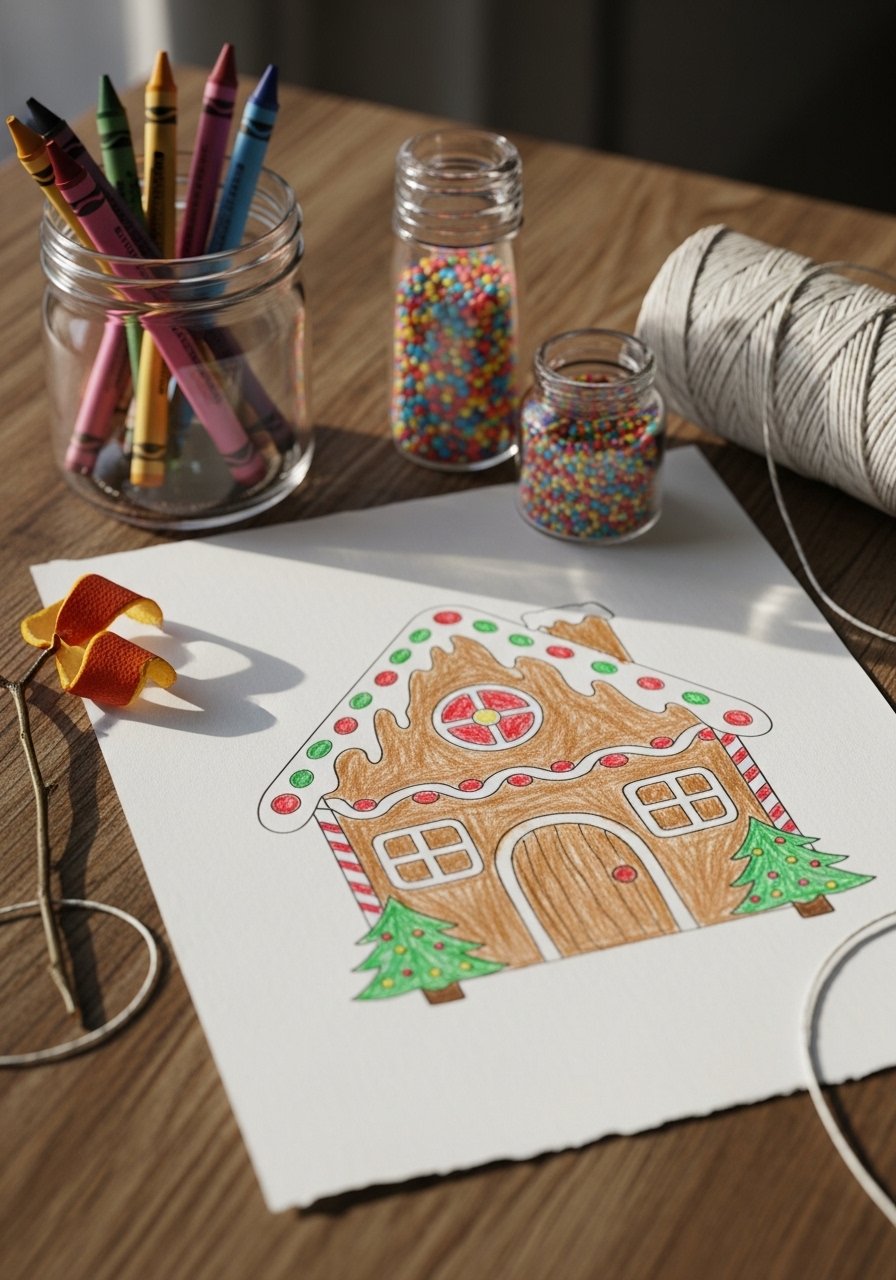
This sweet scene is perfect for younger kids—bold outlines, chunky shapes, and lots of color. The finished piece feels cozy and slightly textured thanks to wax crayon layering. Great for winter celebrations and holiday cards. I like to keep a set of washable crayons close by for easy cleanup.
Materials
- 9 x 12 in heavyweight drawing paper (1 sheet)
- Washable crayon set (8–16 colors)
- Black washable marker, fine tip
- White gel pen for highlights
- Pencil and eraser
- Ruler (12 in)
Instructions
- Lightly sketch a simple house with pencil: square base, triangle roof, candy details.
- Trace outlines with the black marker and let it dry 5 minutes.
- Color large areas with crayons, pressing harder for richer pigment.
- Layer a lighter crayon over dark areas for texture.
- Add candy dots and icing lines with white gel pen.
- Erase any visible pencil lines once marker is dry to the touch.
How to Display or Gift It
Frame on a small wooden easel for a kids’ art display. Slip the drawing into a clear cellophane sleeve and tuck with a homemade cookie for a classroom gift. Store flat in a shallow craft organizer until delivered.
2. Sparkly Snow Globe Drawing (Mixed Media)
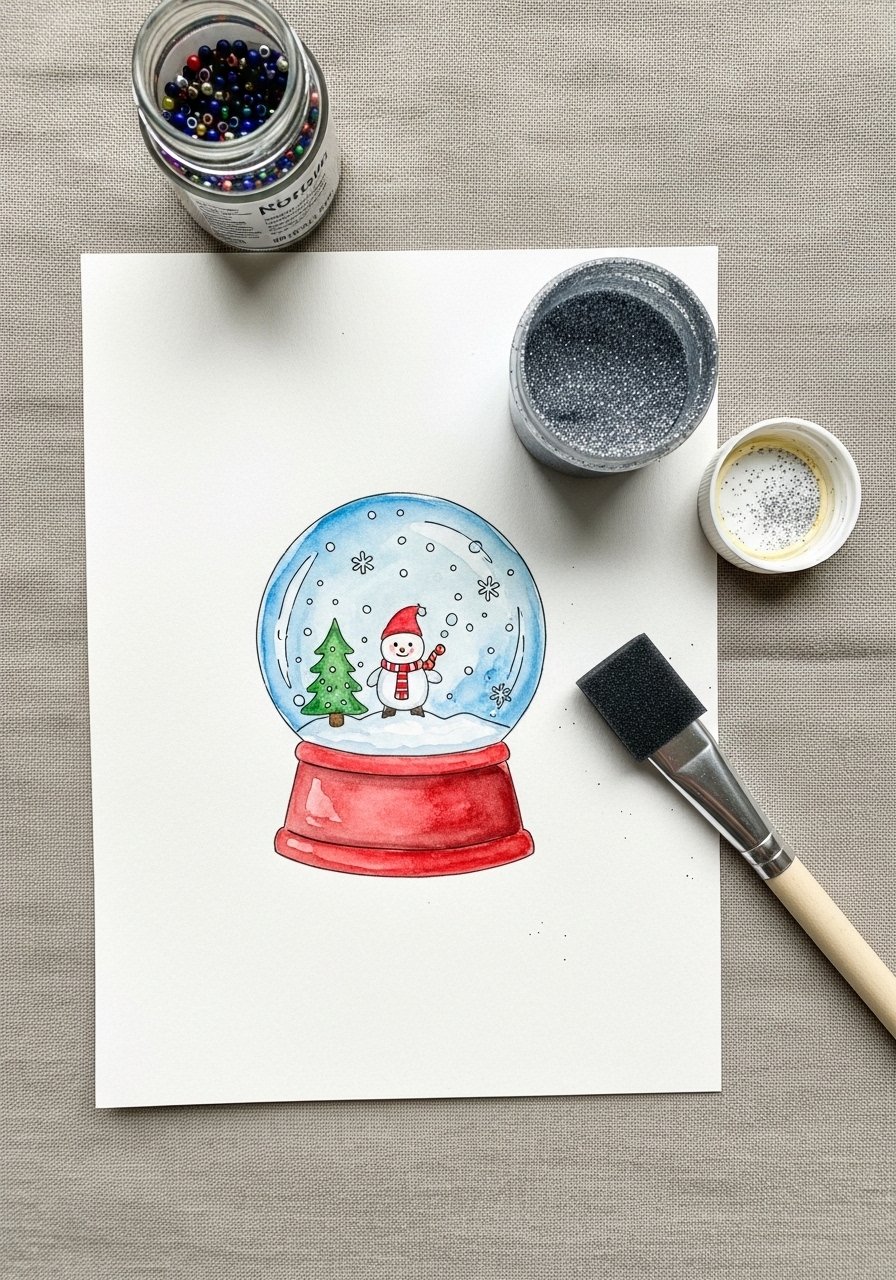
A drawing that doubles as a little glitter globe—this one uses watercolor pencils and a touch of glitter glue for sparkle. It’s tactile and magical, and kids love the shimmer. A small foam brush helps spread glue neatly.
Materials
- 6 x 8 in watercolor paper
- Watercolor pencils set
- Small watercolor brush
- Glitter glue (clear with fine sparkle)
- White gouache or opaque paint, 5 ml
- Glue stick
- Scissors
Instructions
- Sketch a round globe and simple winter scene inside.
- Color with watercolor pencils; activate with a damp brush for soft washes.
- Let paper dry 10–15 minutes.
- Add white gouache snowflakes with a tiny brush; wait 10 minutes.
- Trace globe rim in glitter glue; allow 30 minutes to dry
- Add a thin layer of glitter glue inside the globe for shimmer; dry 60 minutes.
How to Display or Gift It
Mount on card stock and fold into a greeting card. Place inside a clear mailing sleeve for gifting. Keep finished pieces flat in a craft box until ready to share.
3. Holiday Drawing Ideas for Kids: Reindeer Thumbprint Cards
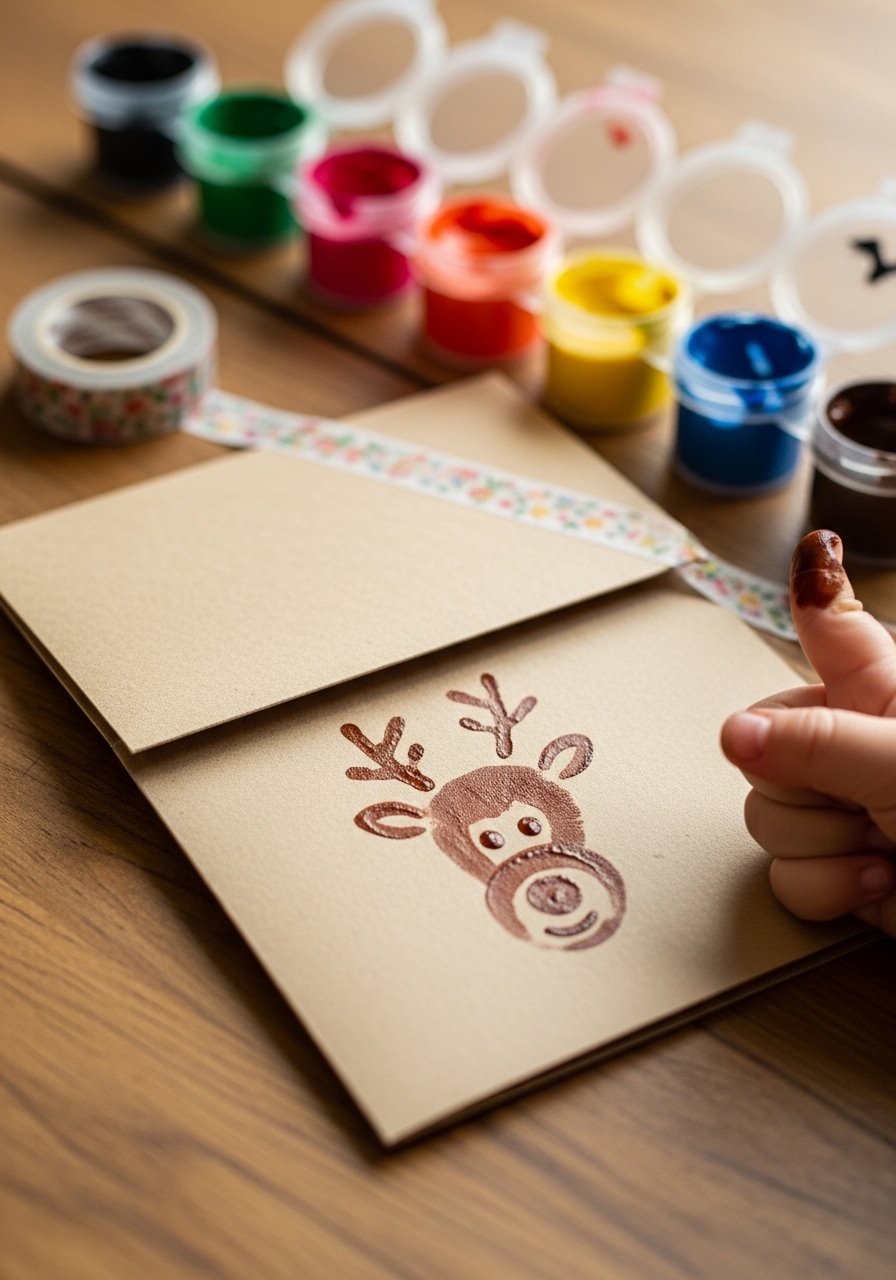
This thumbs-on project is a timeless favorite. Kids paint thumbprints for the reindeer bodies, then add antlers, eyes, and scarves with markers. It’s tactile and perfect for preschoolers. I use washable tempera for easy cleanup.
Materials
- Folded kraft cards 5 x 7 in (4 cards)
- Washable tempera paint: brown and red (5 ml each)
- Fine-tip black marker
- White paint pen
- Paper towel and wet wipes
- Small paint palette
Instructions
- Squeeze small dabs of brown paint onto palette.
- Press thumb into paint, then onto card for body; repeat for each reindeer.
- Use a marker to draw antlers and legs.
- Add eyes with black marker and shine with white paint pen.
- Paint tiny red noses or scarves; let dry 20–30 minutes.
- Clean child’s hands with wet wipes.
How to Display or Gift It
Write a message inside and tuck into a simple kraft envelope. Stack multiple cards and tie with baker’s twine for a bundled gift. Store flat in a card organizer.
4. Festive Wreath Doodle Page
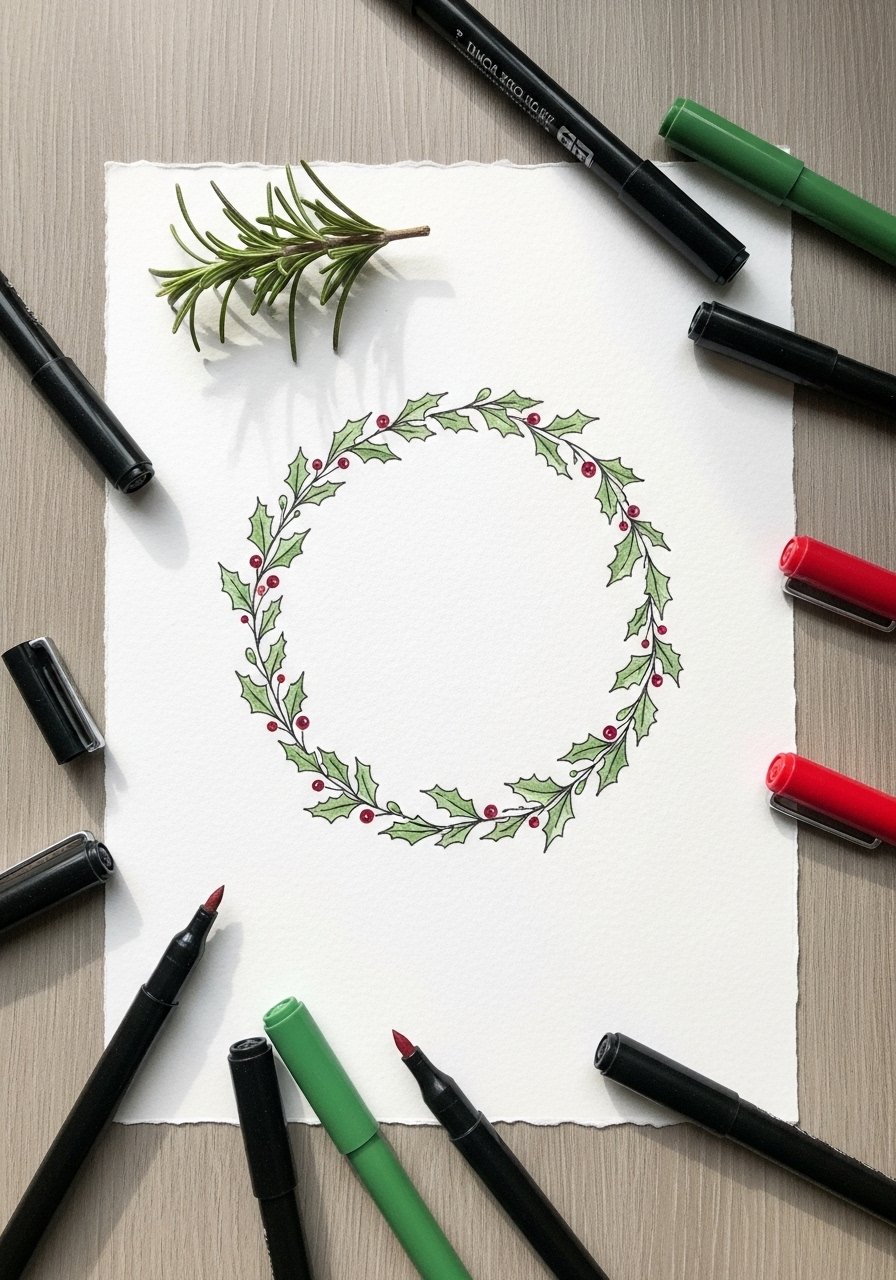
Wreath doodles teach pattern repetition and color theory. Kids can mix styles—cottagecore pressed-leaf look or bright Scandinavian dots. A set of fine-tip markers keeps small details crisp.
Materials
- 8.5 x 11 in drawing paper
- Fine-tip marker set (black and colored)
- Watercolor set (small pans)
- Pencil and eraser
- Circle template (mug or round lid)
Instructions
- Trace two concentric circles with a mug for the wreath base.
- Sketch branches, loops, and leaf clusters lightly in pencil.
- Ink outlines with a fine black marker; allow 5 minutes to dry.
- Fill leaves with watercolor washes; dry 15 minutes.
- Add tiny berry dots and highlights with marker.
- Erase stray pencil marks carefully.
How to Display or Gift It
Trim and mount onto colored card stock to make a door tag. Punch a hole and hang with ribbon on a kitchen hook. Store flat in a portfolio folder.
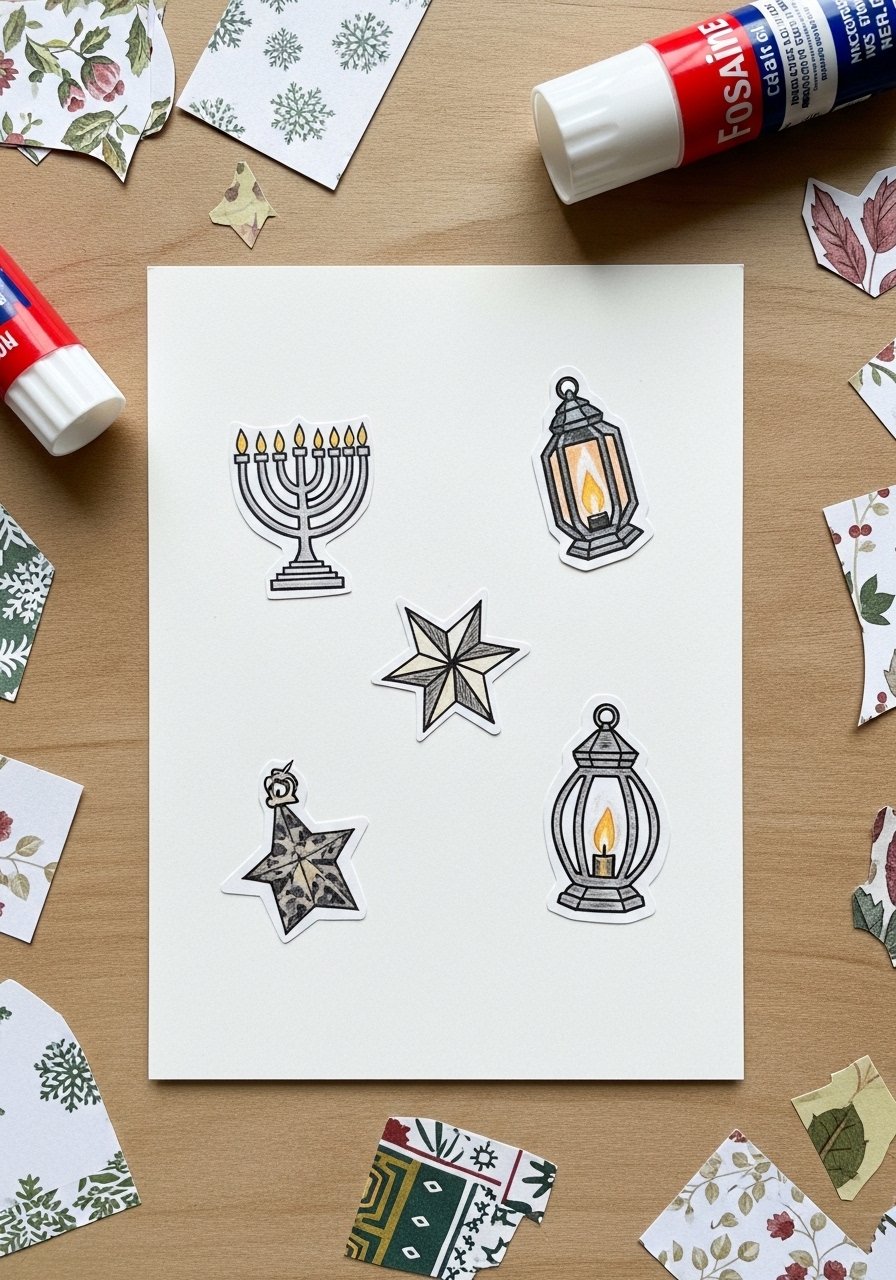
5. Hanukkah Menorah Sketch and Color
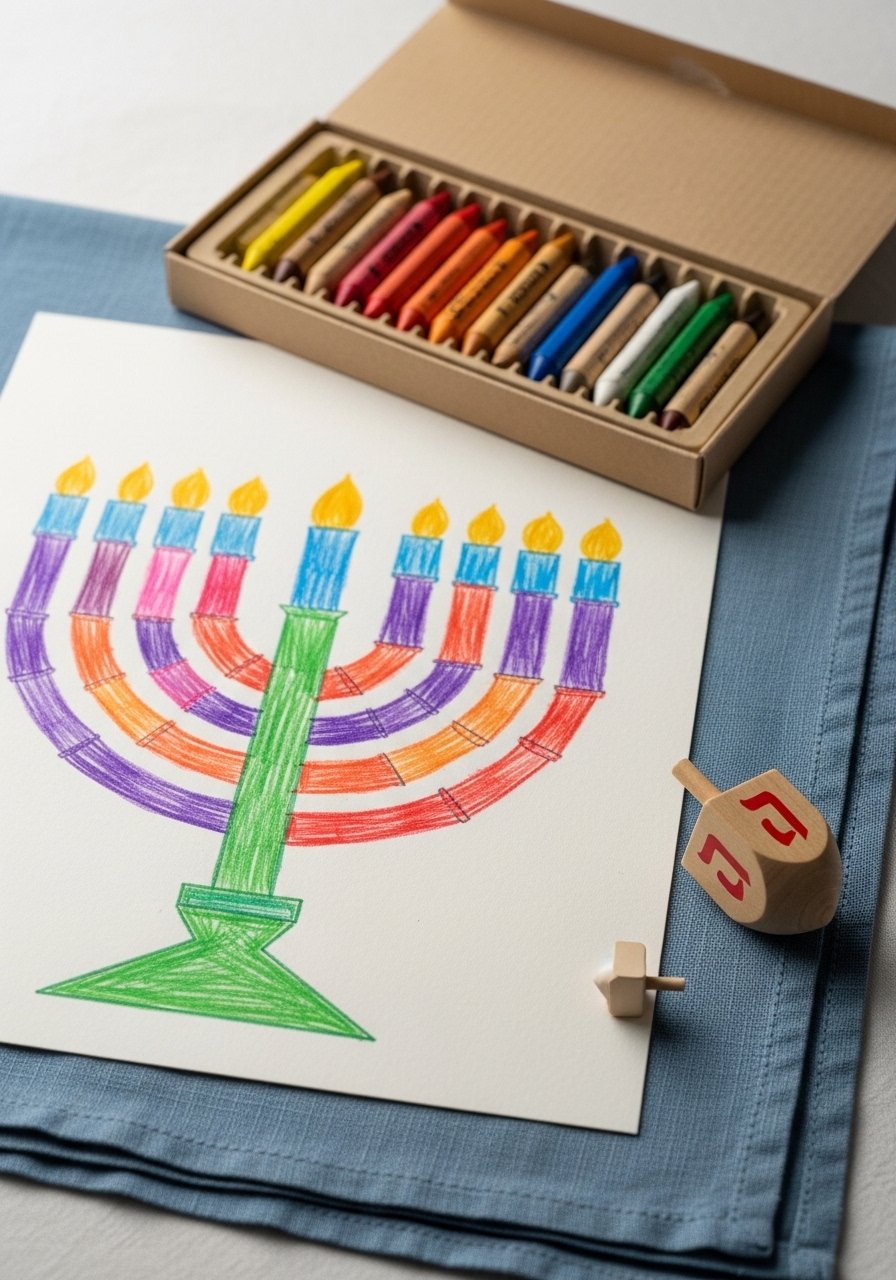
Simple line work makes this great for different ages. Kids can decorate candles with patterns or gradients. Pair the drawing with a short note about traditions for a meaningful gift.
Materials
- 9 x 12 in drawing paper
- Crayon or oil pastel set
- Pencil and ruler
- Metallic gel pen (silver or gold)
- Eraser
- Small washi tape rolls for borders
Instructions
- Draw a straight horizontal base with a ruler.
- Mark nine candle positions evenly.
- Sketch simple candle shapes and flames.
- Color candles with crayons or oil pastels, layering for depth.
- Add metallic accents with gel pen; let gel pen dry 2–3 minutes.
- Tape a patterned washi border if desired.
How to Display or Gift It
Fold into a card or frame for a mantel display. Pair with a handmade gift tag for presents. Keep in a flat folder until sharing.
6. Kwanzaa Kinara and Patterned Background
This bold, graphic drawing introduces pattern work and color symbolism. Use paint pens or markers to keep edges sharp. Kids learn about shape and rhythm while creating.
Materials
- 8.5 x 11 in heavyweight paper
- Acrylic paint pens (red, black, green, yellow)
- Pencil and straightedge
- Fine black marker
- Ruler
Instructions
- Lightly sketch the kinara base and candle holders.
- Ink major outlines with a fine black marker.
- Fill candles with corresponding colors using paint pens.
- Let paint pen ink set 10 minutes.
- Add patterned background stripes or dots with a ruler and pens.
- Allow full cure 24 hours before cushioning or framing.
How to Display or Gift It
Mount on a small tabletop easel or attach to a gift box. Store flat in a protected art portfolio until you’re ready to present.
7. Lunar New Year Dragon Doodle (Easy)
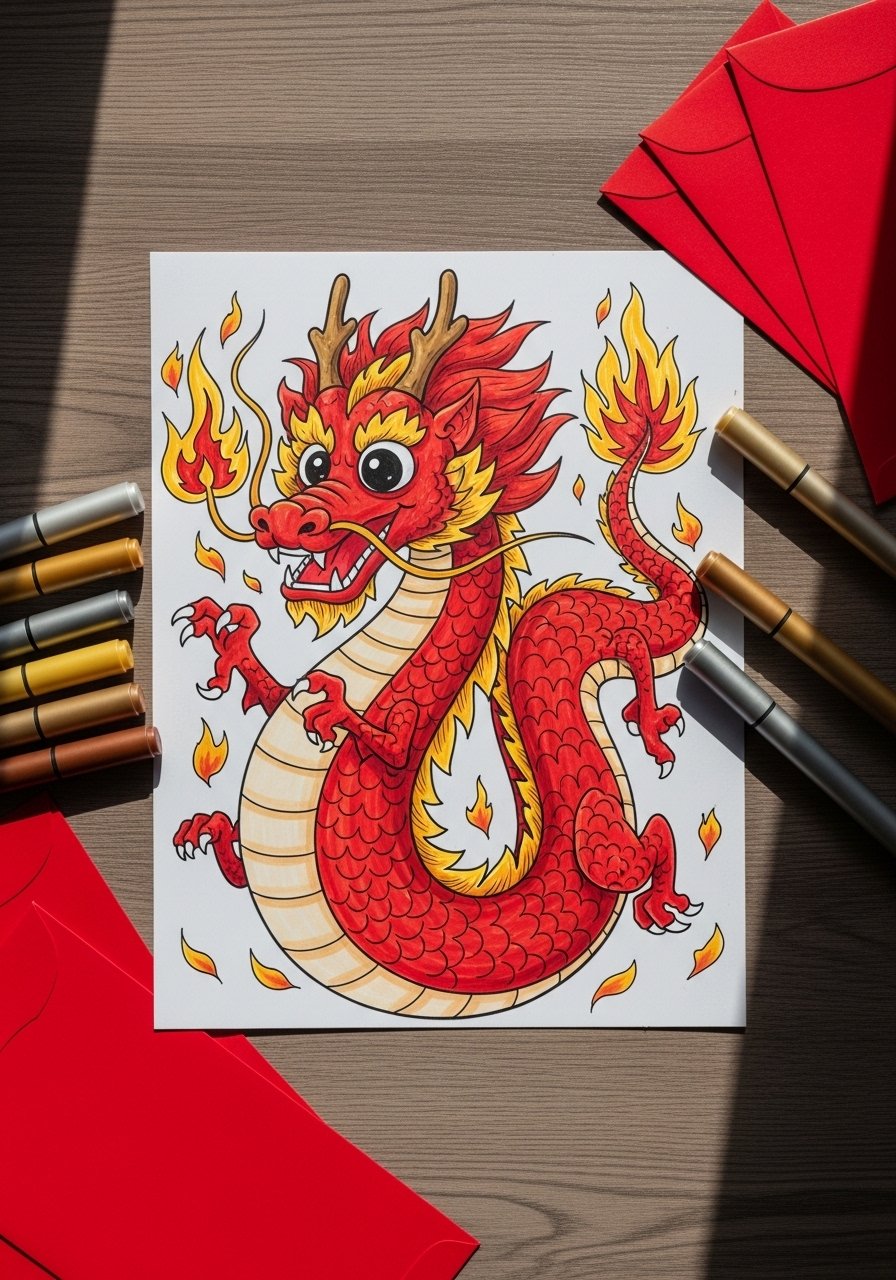
Dragons are fun to stylize—curly bodies, scalloped scales, and lots of decorative motifs. Metallic markers add festive shimmer. This is great for kids who love pattern and movement.
Materials
- 9 x 12 in drawing paper
- Metallic marker set (gold, silver, red)
- Colored markers or fineliners
- Pencil and eraser
- Scissors for optional cutout
Instructions
- Sketch a sinuous dragon body with large loops.
- Draw scalloped scales along the back.
- Ink the drawing with colored fineliners.
- Add metallic accents to scales and whiskers.
- Cut around the dragon for a silhouette if desired.
- Allow ink to dry 5–10 minutes before handling.
How to Display or Gift It
Mount on red card stock and slip into a bright envelope for sharing. Hang as a garland by stringing several together. Store in a flat drawer between craft sessions.
8. Festive Fireplace Drawing with Texture
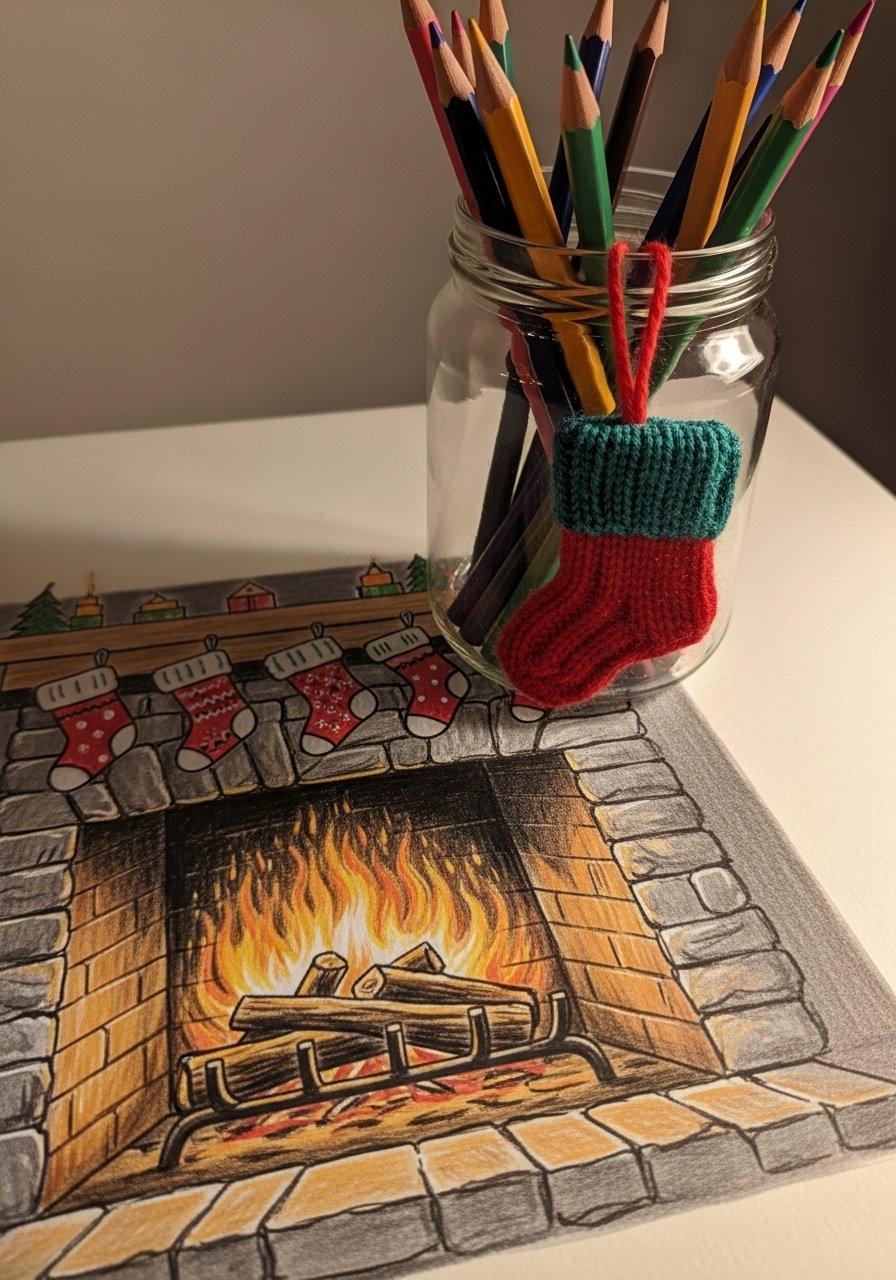
This cozy scene uses colored pencils to create wood grain and hearth shadows. Encourage kids to layer colors for warm textures. A quality colored pencil set makes blending easier.
Materials
- 8 x 10 in textured drawing paper
- Colored pencil set (24 colors)
- Black pencil for shading
- White colored pencil for highlights
- Pencil sharpener
Instructions
- Sketch the mantel and fireplace structure in pencil.
- Draw logs and stockings—add patterns to stockings.
- Shade logs with brown and burnt sienna pencils, layering for grain.
- Add warm glow in the fire with yellows and oranges.
- Use white pencil for highlights; blend lightly.
- Erase stray lines; sharpen edges for clarity.
How to Display or Gift It
Frame in a small frame for a mantel vignette. Slip into a greeting card with a written note. Keep flat in a shallow portfolio until gifting.
9. Diwali Diyas and Rangoli Borders
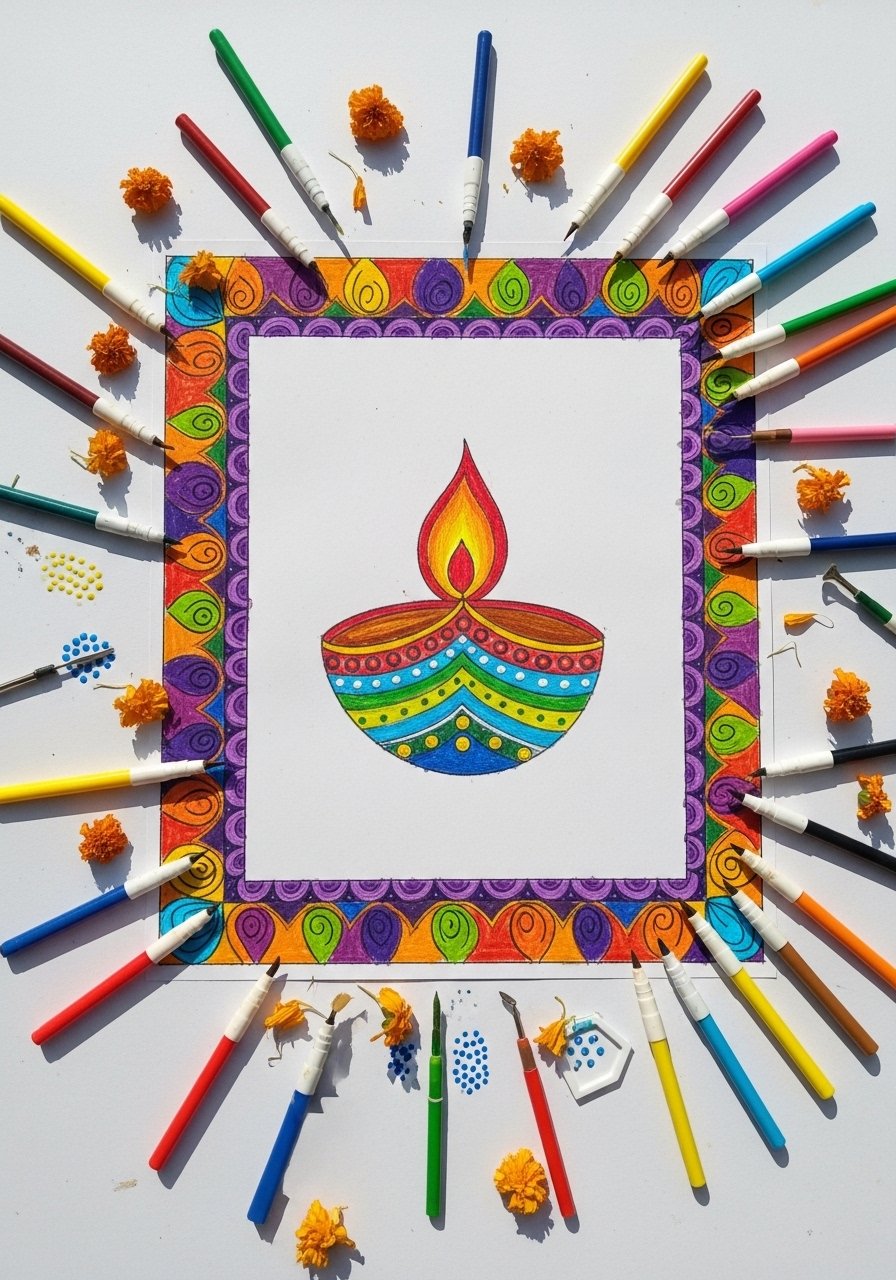
Diwali drawings are perfect for pattern practice—dots, petals, and concentric rings. Dotting tools and paint pens make precise patterns simple and satisfying.
Materials
- 8.5 x 11 in drawing paper
- Acrylic paint pens (assorted bright colors)
- Dotting tool or blunt pencil
- Pencil and eraser
- Small sponge brush for background wash (optional)
Instructions
- Lightly sketch diyas and a central rangoli circle.
- Fill diyas with warm colors using paint pens.
- Create rangoli using concentric dots with a dotting tool.
- Add small petal and leaf motifs around the main design.
- Let paint pen ink cure 30 minutes.
- If you added a background wash, allow 60 minutes to dry fully.
How to Display or Gift It
Mount on vibrant card stock and include as a Diwali greeting. Frame in a narrow white frame for a pop of color. Store flat in an archival sleeve.
10. Festive Tree with Sticker Ornaments
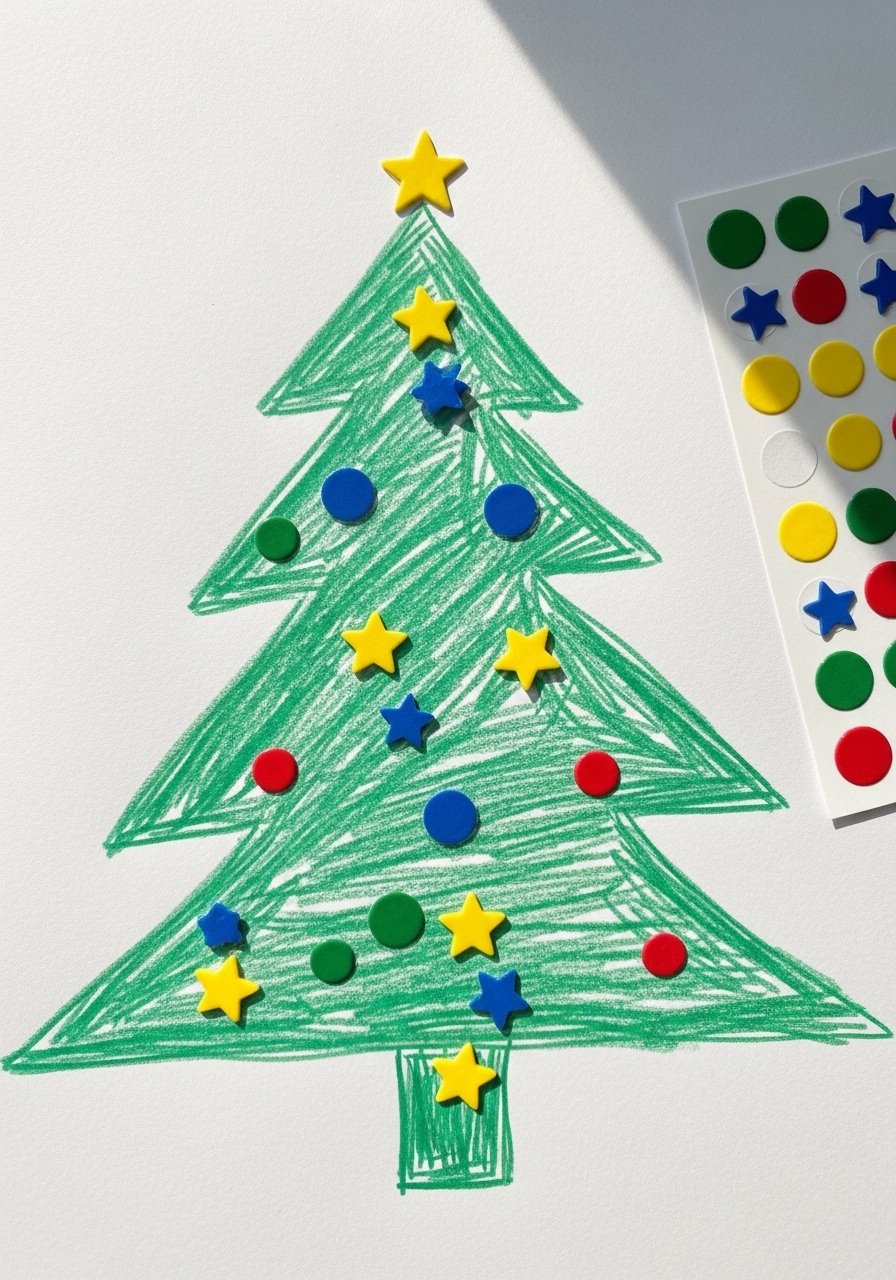
Combine drawing with stickers for fast gratification—perfect for younger kids and group craft tables. A sheet of assorted stickers makes ornamenting quick and playful.
Materials
- 9 x 12 in drawing paper
- Sticker sheet with stars/circles
- Crayons or markers
- Fine-tip black marker
- Glitter glue for accents
Instructions
- Draw a simple triangular tree outline.
- Color the tree with green markers or crayons.
- Peel and place stickers as ornaments.
- Add garland lines and a star with marker.
- Dab tiny glitter glue dots for extra sparkle; let dry 30 minutes.
- Outline tree with black marker for definition.
How to Display or Gift It
Fold into a card, or punch a corner and attach as a gift tag. Bundle with a sticker sheet as a little activity kit. Store stickers in a small organizer box.
11. Kwanzaa Patterned Card (Drawing + Washi Tape)
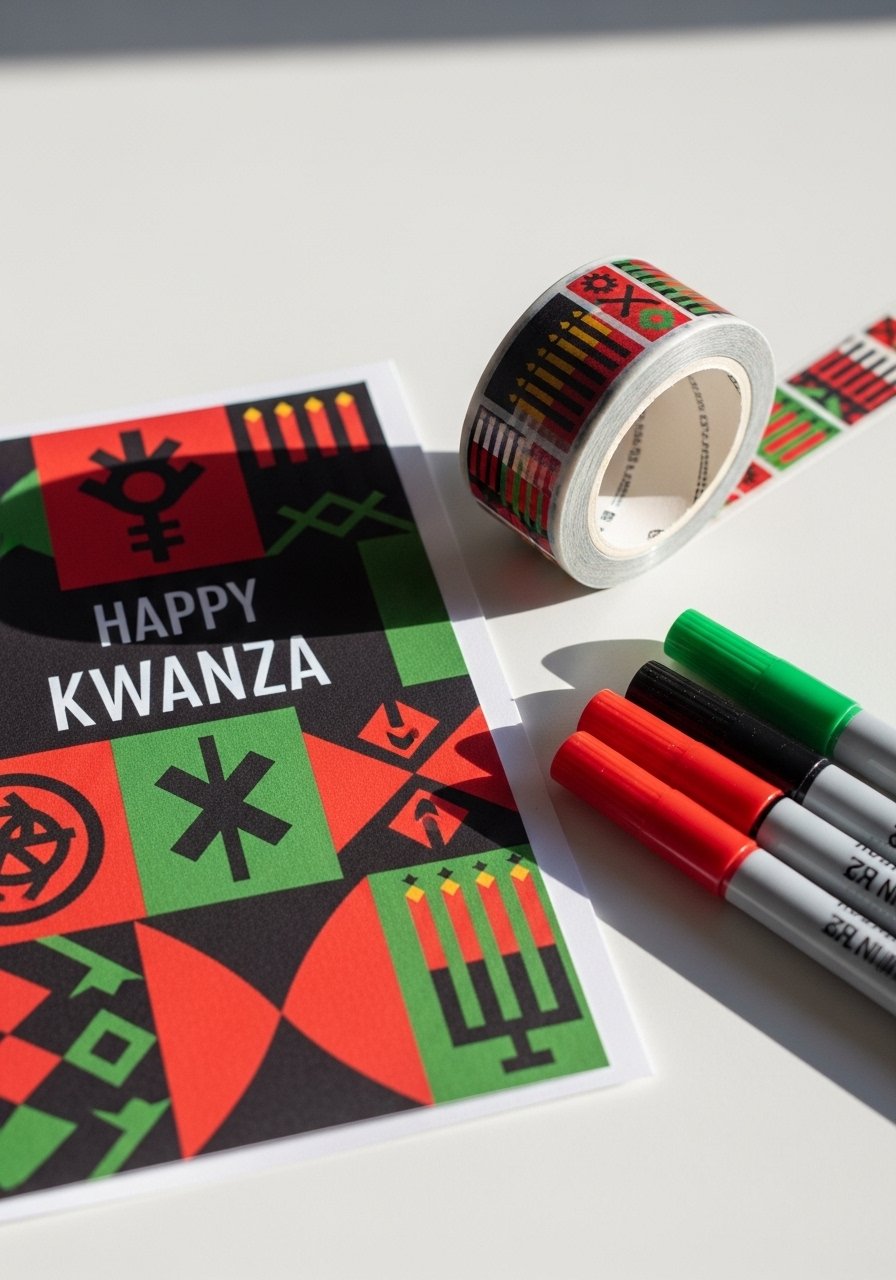
Washi tape adds instant pattern without complicated cutting. Kids draw symbols and use tape for crisp bands and color blocking. This hybrid approach is forgiving and fast.
Materials
- Folded card 5 x 7 in
- Washi tape rolls (red, black, green)
- Fine-tip markers
- Pencil and eraser
- Scissors
Instructions
- Plan your design lightly in pencil.
- Apply washi tape strips to create color blocks.
- Draw symbols and patterns within the blocks.
- Remove extra tape edges with scissors for a clean finish.
- Add handwriting message inside.
- Allow marker ink 2–3 minutes to dry before stacking.
How to Display or Gift It
Place inside a matching envelope and tie with twine. Keep stacks of completed cards in a flat envelope organizer.
12. Holiday Drawing Ideas for Kids: Multicultural Holiday Collage Drawing
Celebrate many traditions in one page. Kids draw small holiday symbols, then collage patterned paper around them. This project teaches respect and creativity through art.
Materials
- 11 x 14 in heavyweight paper
- Assorted patterned scrap paper (10–12 pieces)
- Glue stick
- Colored pencils
- Scissors
- Fine black marker
Instructions
- Sketch small holiday symbols spaced across the paper.
- Cut patterned scraps into background shapes.
- Glue scraps in place and smooth with a brayer roller or finger.
- Draw over the symbols with colored pencils and marker.
- Add small accents with white paint pen if desired.
- Let glue set 15–20 minutes before framing.
How to Display or Gift It
Mount on a foam board and frame without glass to show texture. Gift as a classroom poster or family keepsake. Store flat in a portfolio sleeve.
13. New Year’s Fireworks Scribble Art
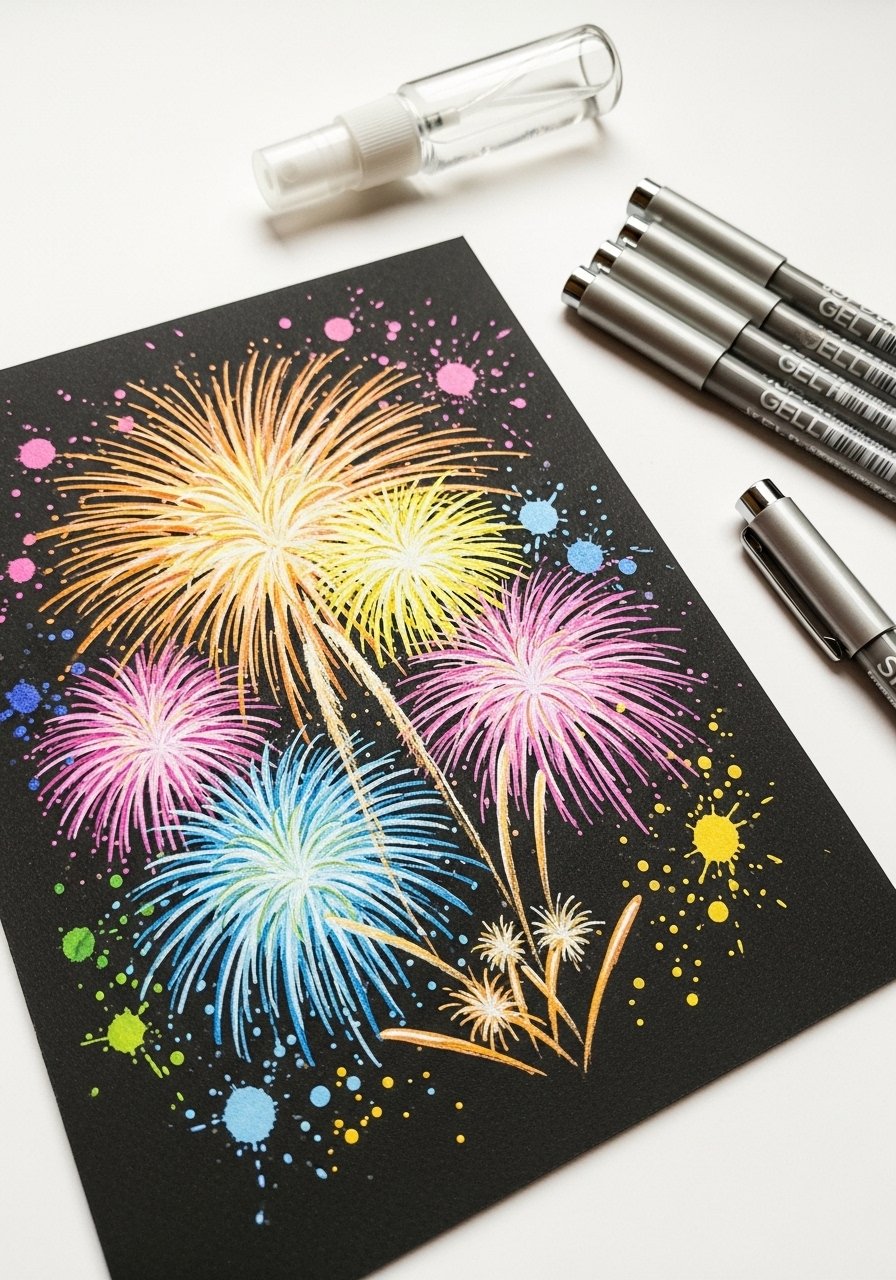
Kids draw fireworks in bright metallic pens on dark paper—dramatic and quick. Encourage scribbles and bursts rather than precise shapes for energetic results.
Materials
- Black cardstock 9 x 12 in
- Metallic gel pens set
- White acrylic paint (small drop)
- Small brush for splatter
- Pencil for layout
Instructions
- Lightly mark several centers for fireworks.
- Draw outward bursts with metallic gel pens.
- Thin white paint with water and flick with a brush for stars.
- Add smaller dots with a gel pen for depth.
- Allow gel ink and paint to dry 10–15 minutes.
- Frame against a light background for contrast.
How to Display or Gift It
Hang as a New Year’s party banner or glue into a memory book. Keep cardstock flat in a drawer until ready to use.
14. Festive Parade of Holiday Characters
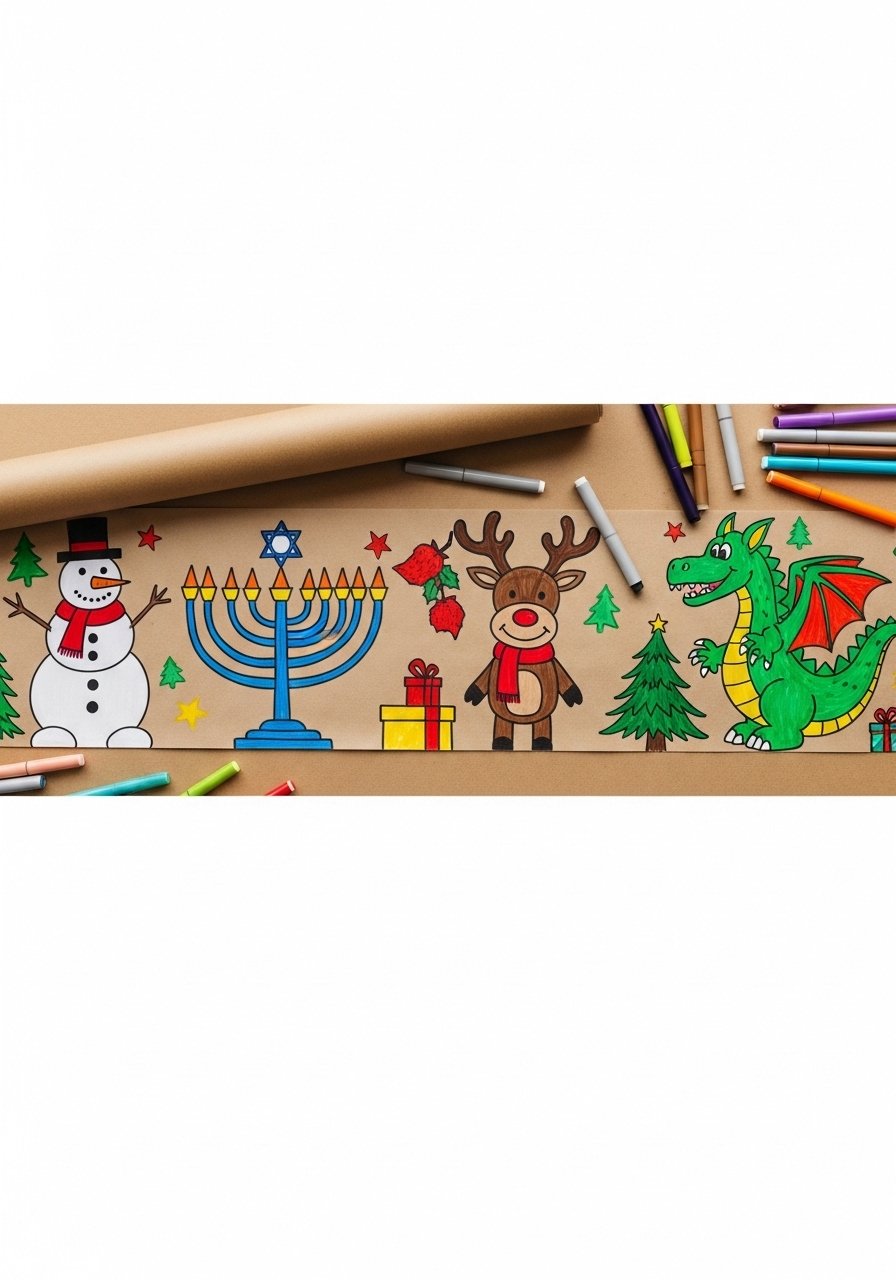
Draw multiple simple characters on a long paper roll to create a parade. This is excellent for group activity or classroom display and encourages storytelling.
Materials
- Long kraft paper roll, 24 in wide, 3 ft length
- Permanent markers (assorted colors)
- Pencil and eraser
- Masking tape to secure paper
Instructions
- Tape paper to table and mark character spacing.
- Sketch each character lightly.
- Ink outlines with permanent markers.
- Color characters with marker fill-ins.
- Add background details like banners or confetti.
- Let ink dry 10 minutes then hang with tape.
How to Display or Gift It
Hang along a hallway as a parade mural. Roll and store in a mailing tube for gifting. Use a small label to note the creators’ names.
15. Candy Cane Pattern Drawing with Watercolor Resist
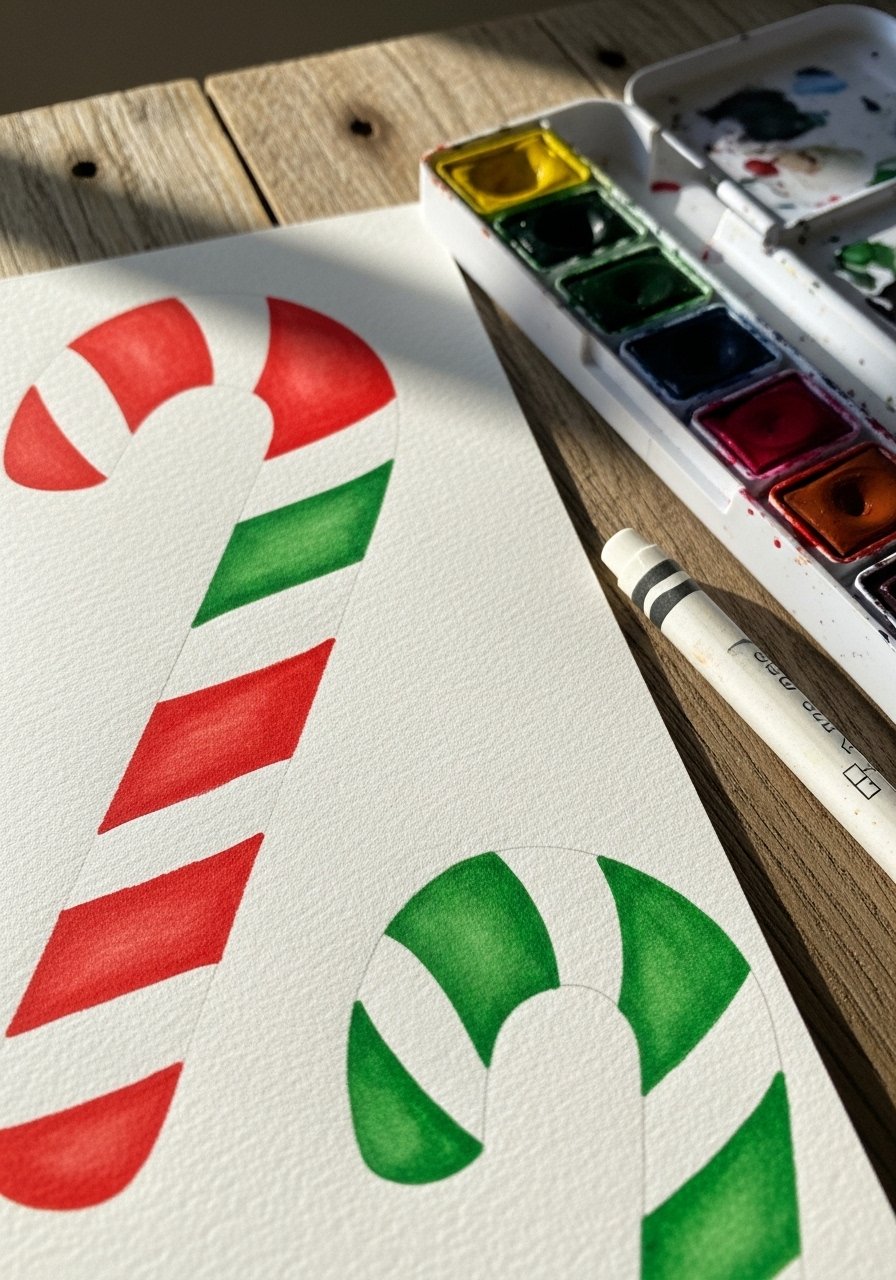
Use white crayon as a resist to keep stripes crisp when painting with watercolor. This simple technique looks polished and gives kids instant success.
Materials
- Watercolor paper 6 x 8 in
- White wax crayon
- Watercolor set
- Round watercolor brush size 6
- Pencil and ruler
Instructions
- Draw candy cane stripes lightly with pencil.
- Trace stripes with white crayon firmly for resist.
- Paint over with watercolor stripes; water beads where crayon resists.
- Rinse brush and add shadow under the candy cane; dry 15 minutes.
- Erase visible pencil lines gently.
- Let fully dry 30 minutes before framing.
How to Display or Gift It
Glue onto a bright red card and add a baker’s twine bow. Store flat in a sleeve until ready to send.
16. Hanukkah Star of David Pop-Up Drawing Card
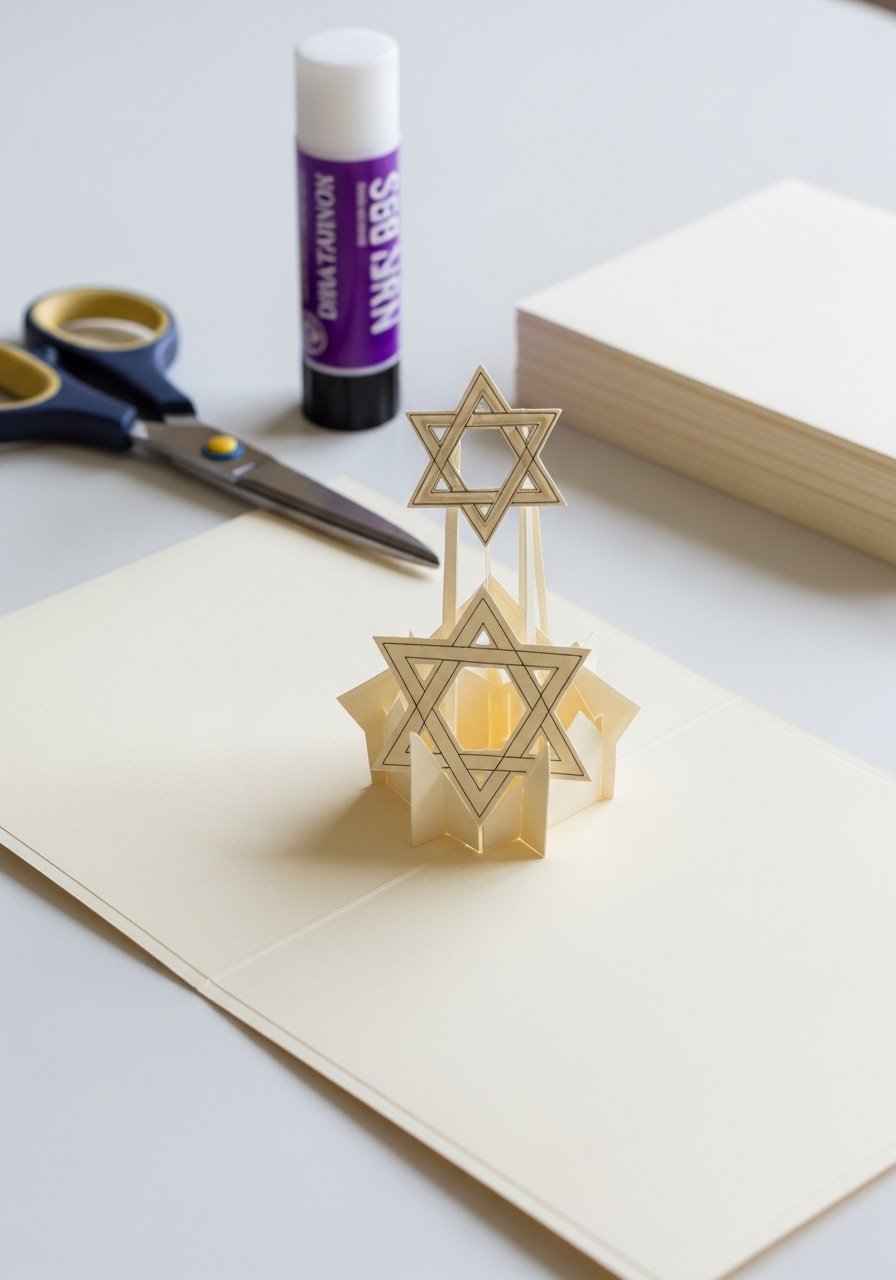
Combine simple folding with drawing to make a pop-up card. Kids draw patterns on the star before cutting—fun and surprising for recipients.
Materials
- Pre-scored card base 5 x 7 in
- Heavyweight drawing paper for pop-up (4 x 6 in)
- Craft glue or glue stick
- Scissors
- Colored markers
- Pencil
Instructions
- Fold lightweight drawing paper in half and draw half the star across the fold.
- Cut out the star so it pops when opened.
- Decorate both sides of the star with markers.
- Apply glue to pop-up tab and adhere inside card base.
- Press and close; allow glue to set 10 minutes.
- Write a message and let marker ink dry 2–3 minutes.
How to Display or Gift It
Slip into a padded envelope for mailing. Keep extra pop-up pieces in a small craft envelope for easy repeat crafting.
17. Holiday Lights String Drawing (Glow-in-the-Dark Option)
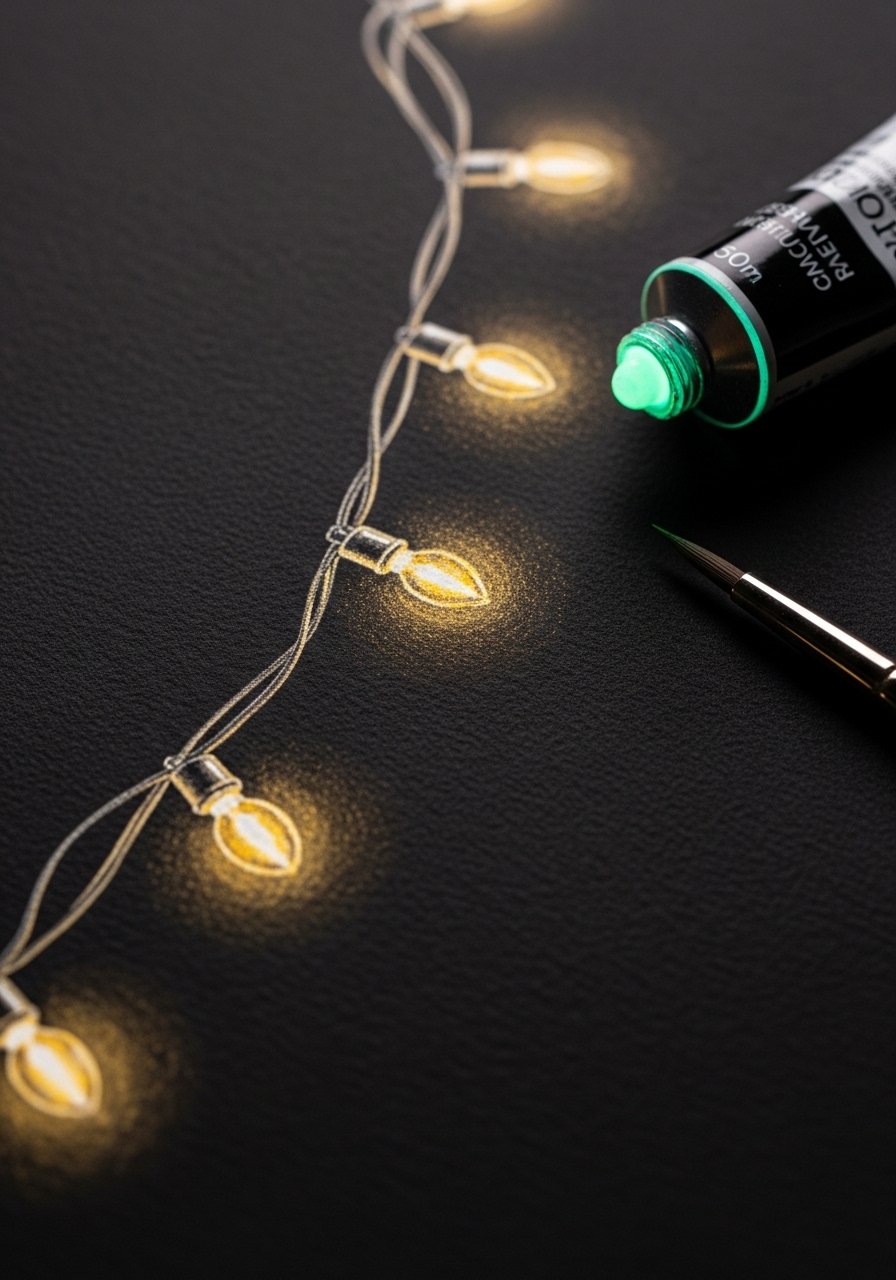
Kids draw light bulbs then color with bright markers or glow paint for a nighttime effect. Glow paint gives a fun twist for bedtime displays.
Materials
- Dark construction paper 9 x 12 in
- Bright markers
- Glow-in-the-dark paint (small tube)
- Fine-tipped paintbrush
- Pencil and eraser
Instructions
- Sketch a wavy wire line across the paper.
- Mark bulb positions and draw bulbs.
- Color bulbs with bright markers.
- Apply a thin coat of glow paint to selected bulbs; dry 30 minutes.
- Add highlight dots with white gel pen.
- Charge glow paint under a lamp for 1–2 minutes before showing in dim light.
How to Display or Gift It
Hang near a child’s bedside for a magical glow. Store flat in a portfolio away from direct sunlight.
18. Kwanzaa Unity Symbol Poster (Big and Bold)
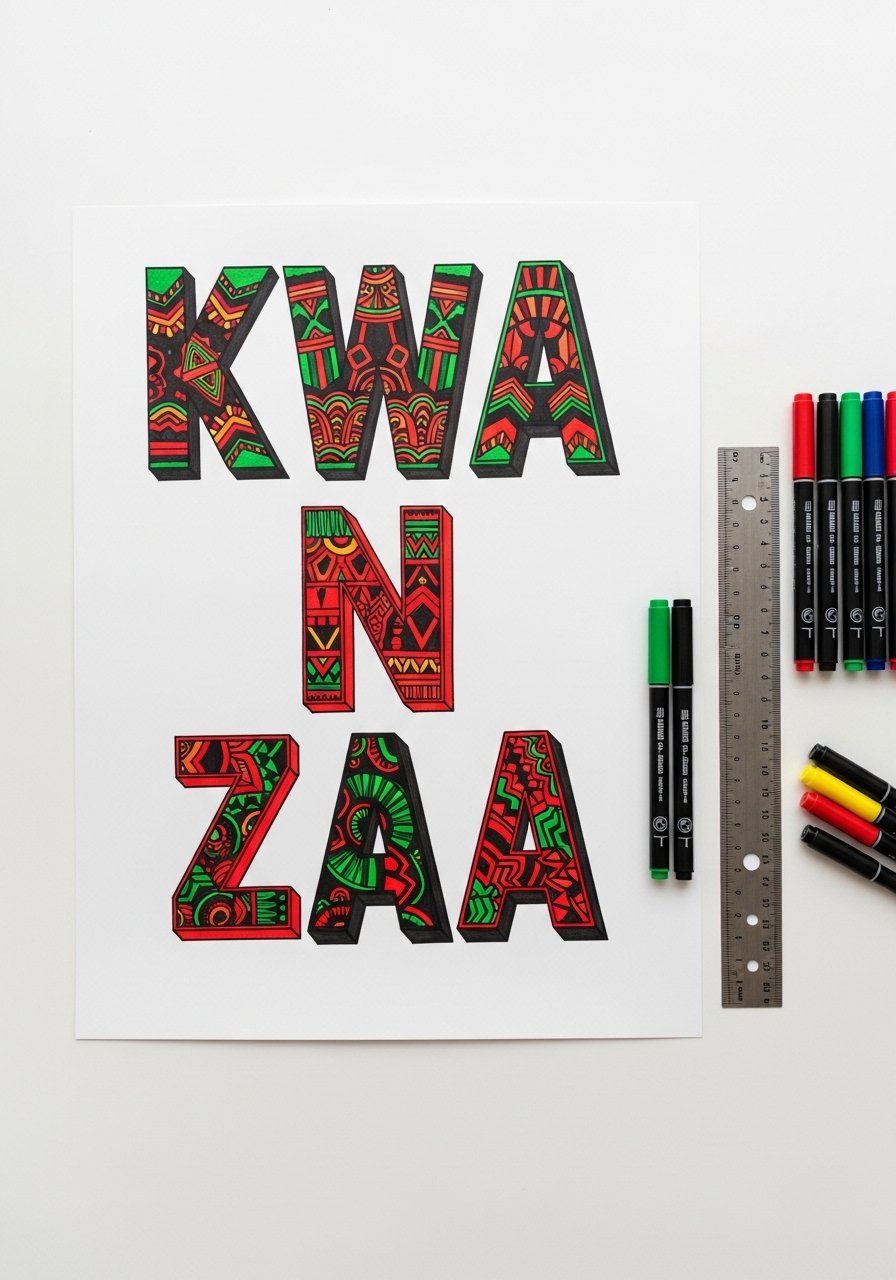
Large-format posters let older kids practice lettering and layout. Use rulers and bold markers for clean lines. This makes for a vibrant classroom display.
Materials
- Poster board 18 x 24 in
- Bold marker set
- Pencil and ruler
- Acrylic paint pens for accents
- Eraser
Instructions
- Plan layout with pencil—leave space for a big Unity symbol.
- Draw and ink large letters and the symbol.
- Fill letters with pattern or gradient using markers.
- Add painted accents with acrylic paint pens; dry 15 minutes.
- Erase pencil marks carefully.
- Allow all inks to cure 24 hours before rolling or framing.
How to Display or Gift It
Mount on a bulletin board or frame for a school display. Store rolled in a mailing tube between events.
19. Festive Ornament Design Sheet
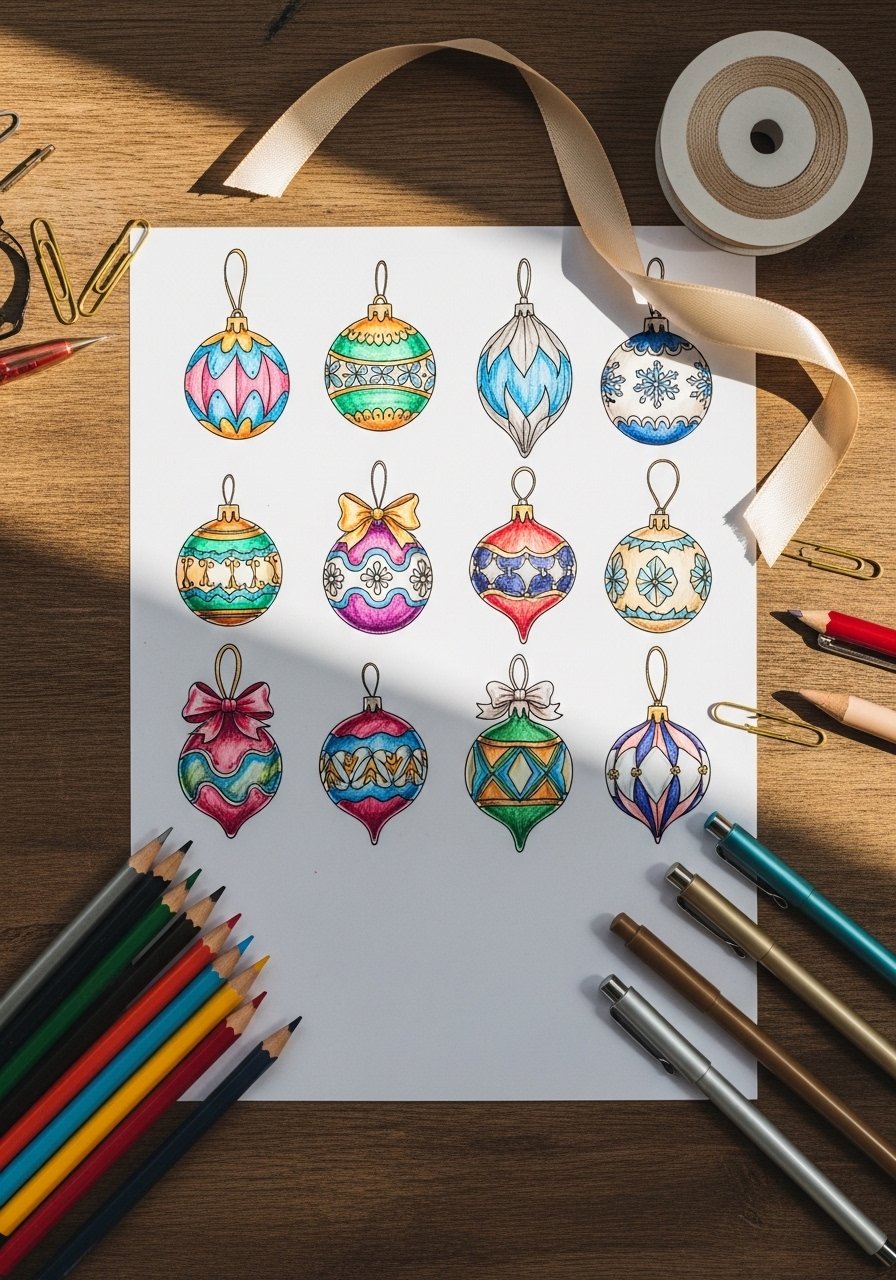
Design multiple ornaments on a single sheet for practice and variety. Kids can then choose one to cut out and turn into a real ornament.
Materials
- 9 x 12 in drawing paper
- Colored pencil set
- Metallic gel pens
- Scissors
- Hole punch
Instructions
- Draw several small ornament circles spaced evenly.
- Decorate each with patterns and metallic accents.
- Cut out favorite designs.
- Punch a hole at the top and thread ribbon.
- Tie a loop for hanging.
- Let gel ink dry 5–10 minutes before handling.
How to Display or Gift It
Hang on a mini tabletop tree or bundle as a hostess gift. Store ornaments in a small ornament box with tissue paper.
20. Holiday Drawing Ideas for Kids: Festive Storybook Page
Make an illustrated page that tells a short holiday moment—great for older kids who love storytelling. Encourage a sentence or two and a full-color drawing.
Materials
- Small sketchbook 6 x 8 in
- Mixed media pen set
- Watercolor brush pen
- Colored pencils
- Pencil and eraser
Instructions
- Brainstorm a one-sentence story and write it lightly.
- Sketch basic scene thumbnails.
- Choose the best layout and draw final illustration.
- Ink with a mixed media pen and add watercolor with brush pen.
- Color with pencils and add details with gel pen.
- Let ink/watercolor dry 20–30 minutes before closing book.
How to Display or Gift It
Bind several pages into a mini book for gifting. Store in a small craft box for safe keeping.
21. Snowman Family Portrait
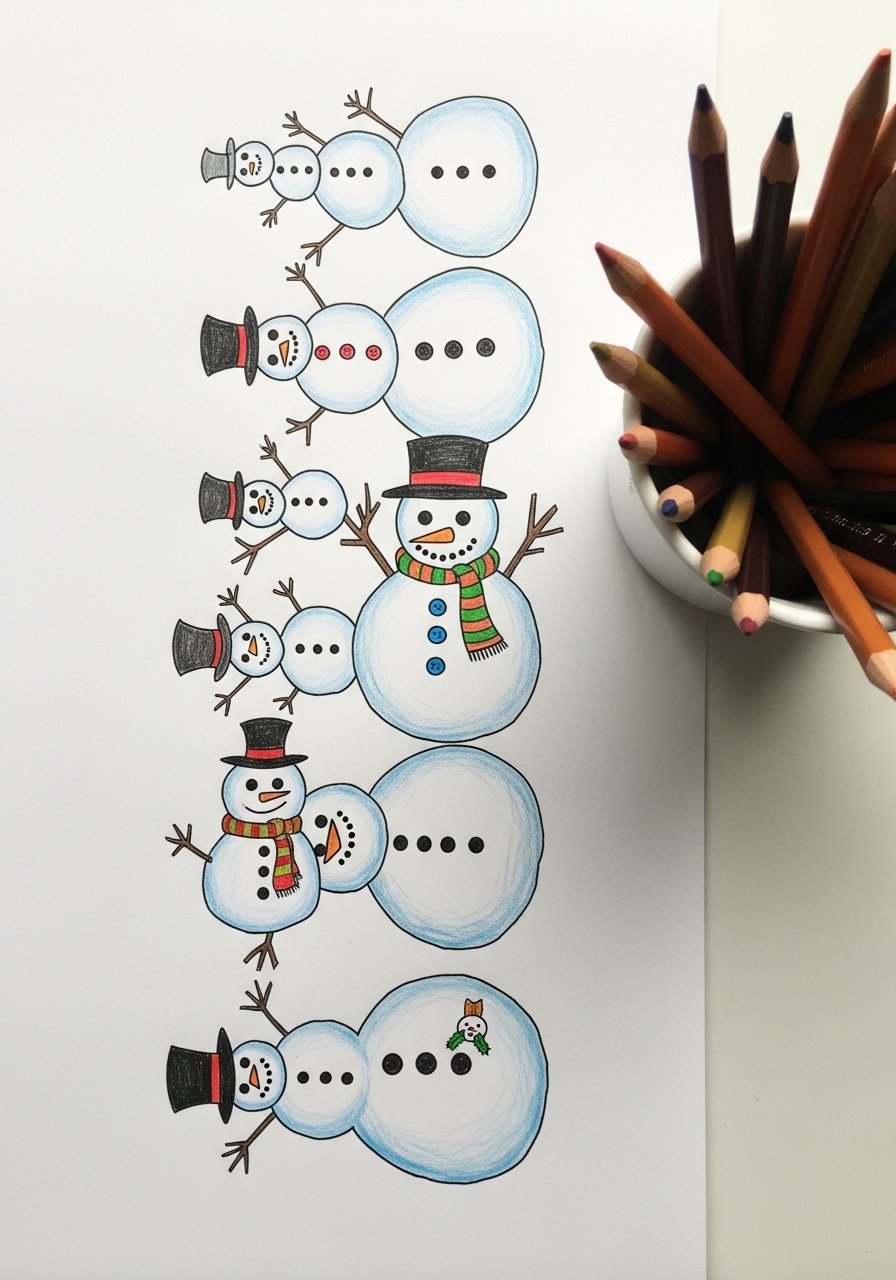
Kids draw a whole snowman family with unique scarves, hats, and buttons. This is great for practicing proportions and personal details.
Materials
- 9 x 12 in drawing paper
- Colored pencil set
- Black marker for outlines
- Cotton swab for blending
- Pencil and eraser
Instructions
- Sketch three snowmen of different heights.
- Add hats, scarves, and facial features.
- Ink outlines with a black marker; dry 5 minutes.
- Color with pencils, blending snow shadows with a cotton swab.
- Add small background details like falling snow.
- Frame or mount once fully dry.
How to Display or Gift It
Frame for a family room or use to make personalized gift tags. Store in a flat art portfolio.
22. Holiday Patterned Stocking Sketchbook Page
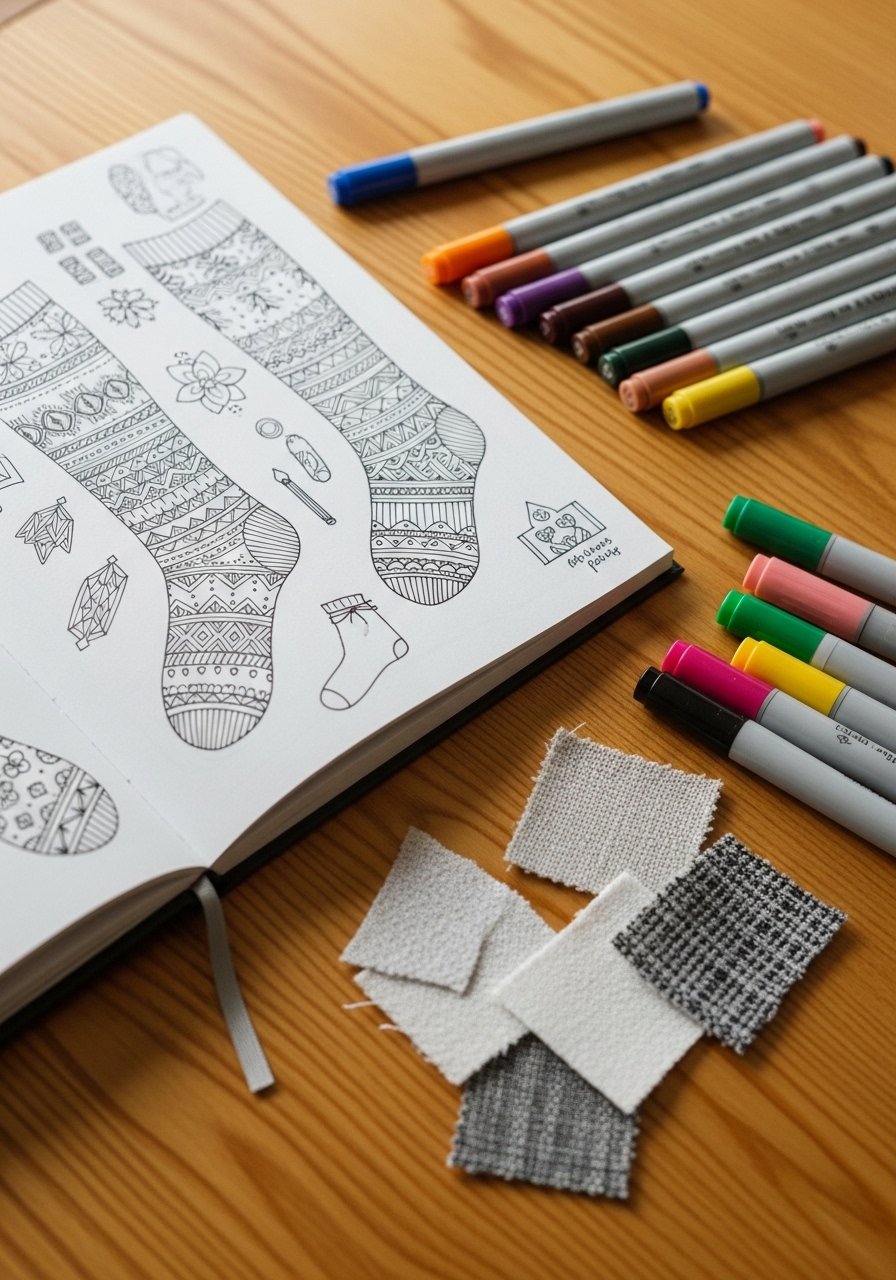
Design several stockings on a sketchbook page exploring pattern combos—boho fringe, japandi minimal lines, or farmhouse plaid. Great for older kids experimenting with style.
Materials
- Sketchbook 7 x 10 in
- Fine liners and marker set
- Ruler
- Colored markers
- Fabric swatch scraps for inspiration
Instructions
- Draw several stocking outlines in pencil.
- Plan patterns—stripes, dots, plaid—and mark lightly.
- Ink patterns with fine liners and markers.
- Color in with markers, layering shades for depth.
- Add fabric texture by sketching seam lines.
- Let markers dry 5–10 minutes before flipping pages.
How to Display or Gift It
Cut and paste a favorite design onto cardstock to make a real stocking template. Store sketchbook flat.
23. Lunar New Year Lantern Drawing with Folded Cutout
Combine drawing with simple cutting to make a 3D paper lantern. Kids love the folding step and the final dimensional piece.
Materials
- Colored construction paper 8.5 x 11 in
- Pencil and ruler
- Scissors
- Glue stick
- Metallic markers for decoration
Instructions
- Fold paper in half lengthwise and draw parallel cut lines.
- Cut slits without cutting through the edges.
- Unfold and decorate with metallic markers.
- Roll into a cylinder and glue the short edges.
- Attach a paper handle and let glue set 10 minutes.
- Add drawn tassels or stickers as finishing touches.
How to Display or Gift It
Hang a row of lanterns as a party garland. Store flat before cutting and assemble later.
24. Festive Nativity Silhouette Drawing
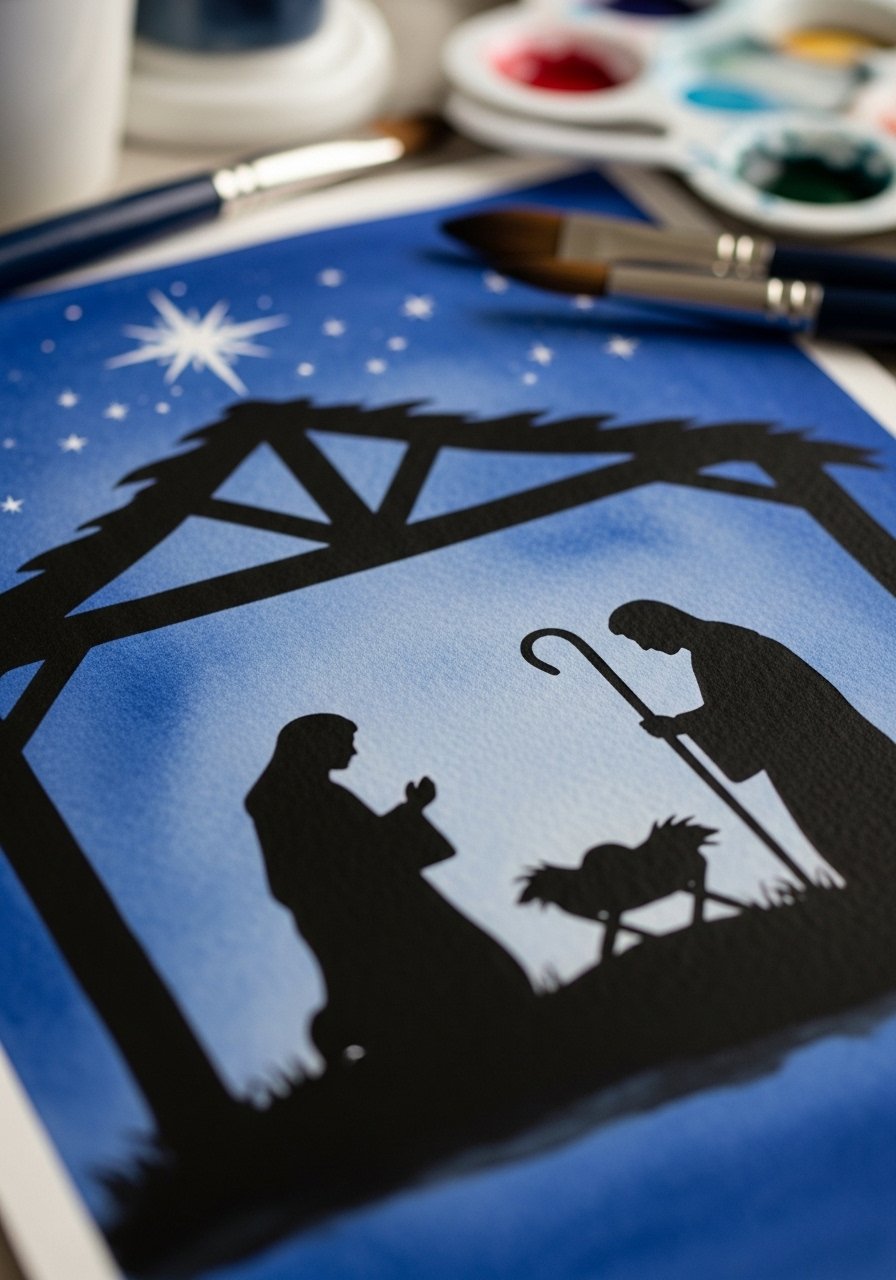
Silhouette drawing simplifies a complex scene—fill a background wash and then layer black silhouettes for a dramatic effect. Good for older kids learning composition.
Materials
- Watercolor paper 9 x 12 in
- Watercolor set (indigo, ultramarine)
- Round brush size 8
- Black India ink or marker
- Pencil and eraser
Instructions
- Paint a gradient evening sky with indigo and ultramarine; dry 20–30 minutes.
- Sketch silhouette shapes lightly in pencil.
- Fill silhouettes with black ink or marker; let dry 10 minutes.
- Add star accents with white paint pen.
- Allow all media to cure 24 hours before framing.
- Clean brushes and store.
How to Display or Gift It
Frame in a simple black frame or mount on gold card stock for contrast. Store flat in an art folder until display time.
25. Cozy Holiday Pajama Drawing (Portrait)
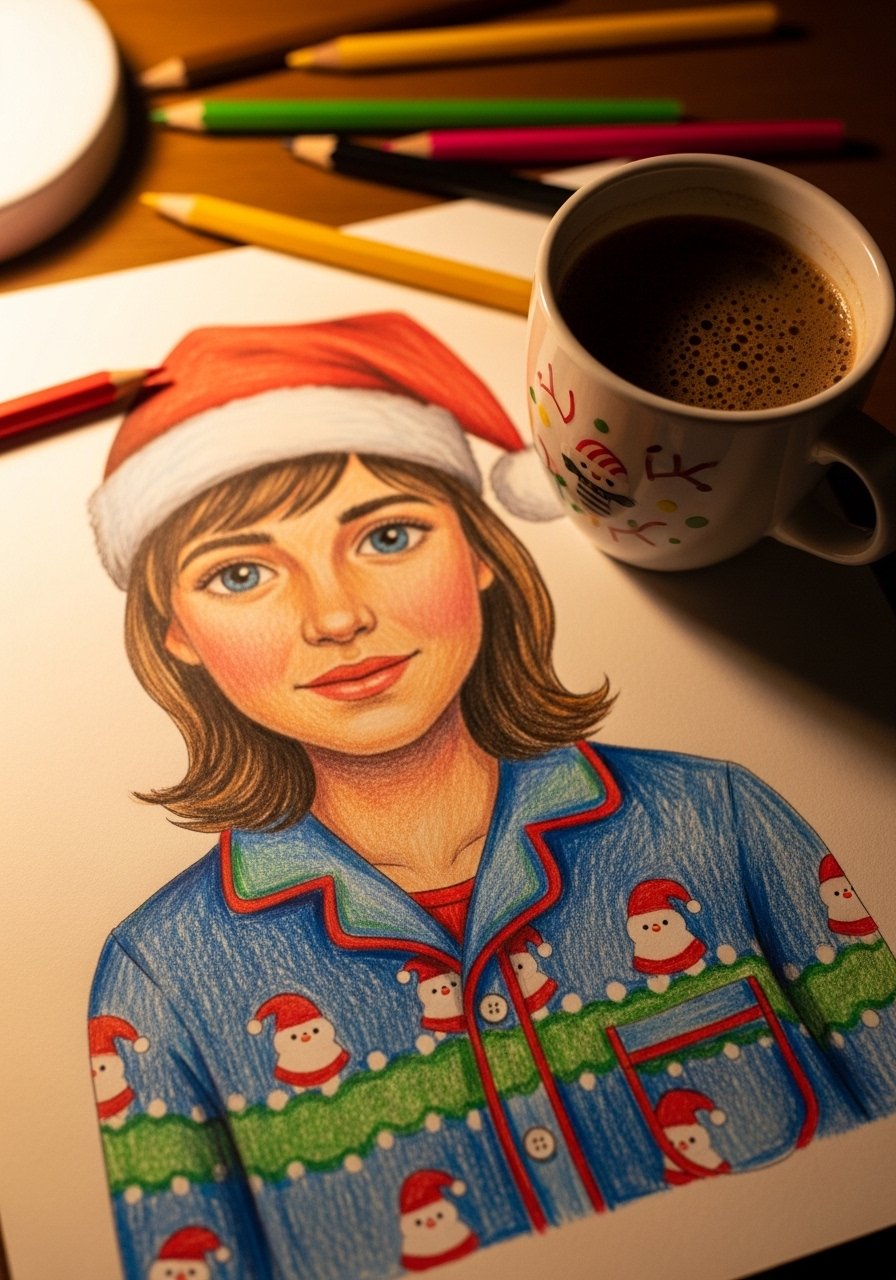
Portrait practice with a holiday twist—kids draw a family member or pet in festive pajamas. This is a sweet keepsake and great for practicing facial features.
Materials
- Drawing paper 8 x 10 in
- Colored pencil set
- Blending stump or cotton swab
- Pencil and kneaded eraser
- Reference photo
Instructions
- Lightly sketch head and shoulders using a reference photo.
- Block in pajama shapes and patterns.
- Add facial features with careful proportioning.
- Layer colored pencils for skin tone and fabric texture.
- Blend lightly with a stump for soft shading.
- Let graphite set 10 minutes, then erase stray lines.
How to Display or Gift It
Frame for bedroom décor or give as a heartfelt gift. Slide into a protective sleeve for storage.
A handful of simple supplies can unlock all these projects: crayons, a basic watercolor set, and a fine-line marker are the workhorses. Trust me, picking up a quality hot glue gun with temperature control changed how many of my mixed-media pieces came together—less stringing, fewer burns, better hold.
Which of these holiday drawing ideas for kids will you try first? Pin this list for easy access during craft time and share one project with a friend or teacher who’d love a ready-made holiday activity. If you’re building a basic craft kit, consider a reliable self-healing cutting mat and a small set of foam brushes to keep at the table—both save time and make these projects more fun and less fussy.
Happy drawing, and don’t forget to pin your favorites for later!


