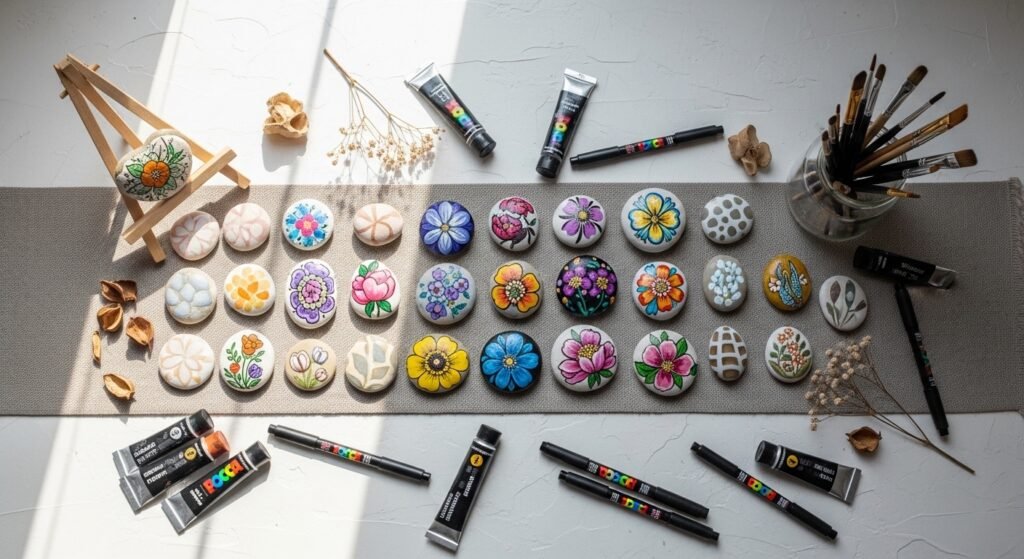
Painted rocks are one of those tiny pleasures that fit into any day. Whether you’re carving out a quiet half-hour or planning a weekend craft binge, these easy stone painting ideas come together with simple supplies and deliver gorgeous, giftable results. You’ll find projects for beginners, kids, and slightly fussy makers who love clean lines.
This list includes 27 distinct projects — everything from minimalist dots and cottagecore mushrooms to resin-coated keepsakes and holiday ornaments. I often start with a reliable acrylic paint set and a few fine-tipped markers. Try my go-to acrylic paint set and a pack of Posca-style paint pens for crisp details: Acrylic craft paint set and fine-tip paint pens. Grab a small foam brush for sealer coats and let’s get painting.
- Polka-Dot Pebbles — Minimalist Dot Rocks

These polka-dot pebbles are breezy, modern, and great for group crafts. The look is clean and graphic — single-color backgrounds with crisp dots. Kids and beginners will love this one because the result is forgiving and satisfying.
Materials
- 12 smooth river stones, 2–3 inches each, cleaned
- Acrylic craft paint (matte) in 3 colors, 2 oz each
- White acrylic paint, 1 oz for dots
- Fine-tip paint pen (0.7 mm) for small dots — 1 pen
- Medium foam brush, 1
- Fine sandpaper, 120 grit, 1 sheet (for prepping)
- Gloss sealer spray, 12 oz, 1 can (optional for shine)
- Paper towels and small disposable plate for mixing
Instructions
- Wash stones with soap, rinse, and let dry completely (30–60 minutes).
- Lightly sand any glossy stones so paint adheres well.
- Paint the entire top of each stone with a foam brush and one thin coat of base color. Let dry 20–30 minutes.
- Apply a second coat for opacity if needed. Wait 20–30 minutes.
- Use a fine-tip paint pen or a dotting tool (the back of a paintbrush) to place dots. Hold steady and apply even pressure.
- Let painted dots dry 15 minutes, then add a tiny gold accent dot with a metallic paint pen.
- When fully dry (about 1 hour after last paint), spray two light coats of gloss sealer, waiting 15 minutes between coats. Let cure 24 hours before handling heavily.
How to Display or Gift It
- Display a trio on a small wooden easel for a shelf vignette.
- Tie a few in a kraft bag with tissue and a twine bow for hostess gifts.
- Keep extras in a craft organizer tray for seasonal swaps.
- For outdoor use, choose an outdoor-grade sealer and store sealed stones in a covered box.
- Cottagecore Mushroom Stones — Whimsical Toadstools
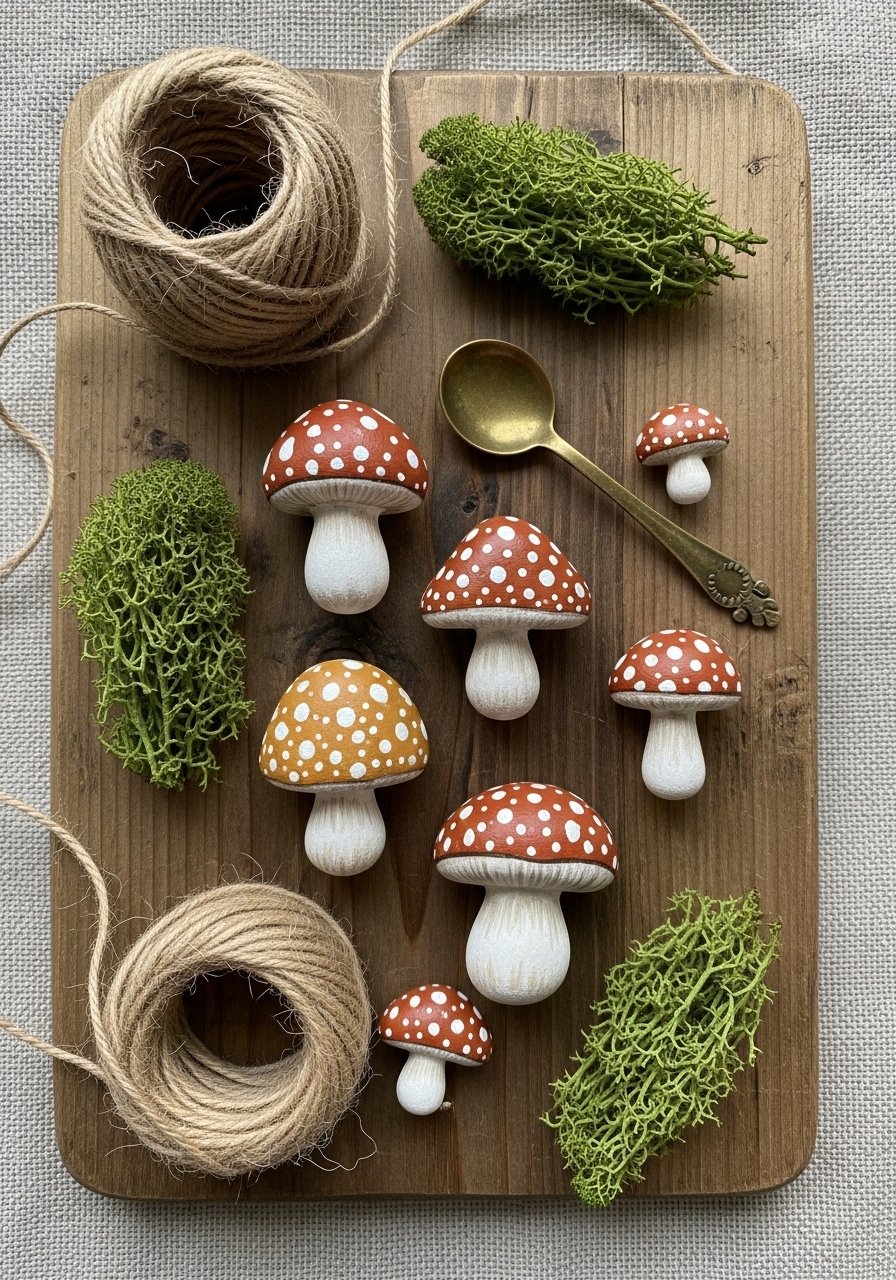
These little mushroom rocks bring cottagecore charm to windowsills and planters. They’re textured and slightly rustic, so imperfections add character. A small round brush and a sable detail brush help with cap speckles and stem shading.
Materials
- 10 assorted oval stones, 1.5–2.5 inches
- Acrylic craft paints: sienna, cream, deep red, soft pink — 2 oz each
- Sable detail brush, size 0
- Round brush, size 4
- White acrylic paint for speckles, 1 oz
- Matte varnish, 4 oz
- Small jar of dried moss for staging
Instructions
- Clean stones and dry fully; sand rough spots.
- Paint each stone stem with cream using a round brush. Dry 20 minutes.
- Mix a slightly darker tone to add a shadow along one side of the stem. Dry 15 minutes.
- Paint caps in red or pink with 1–2 thin coats, drying 20 minutes between coats.
- Add white speckles with a fine round brush or a toothpick. Let dry 15 minutes.
- Seal with one coat of matte varnish. Let cure 24 hours.
How to Display or Gift It
- Nestle them into potted succulents or a terrarium rim.
- Create a mini forest in a shallow wooden tray.
- Pack in clear boxes with shredded kraft for a sweet gift.
- Store finished pieces flat in stackable craft organizers to avoid scuffs.
- Geode-Inspired Metallic Rocks — Faux Crystal Accents
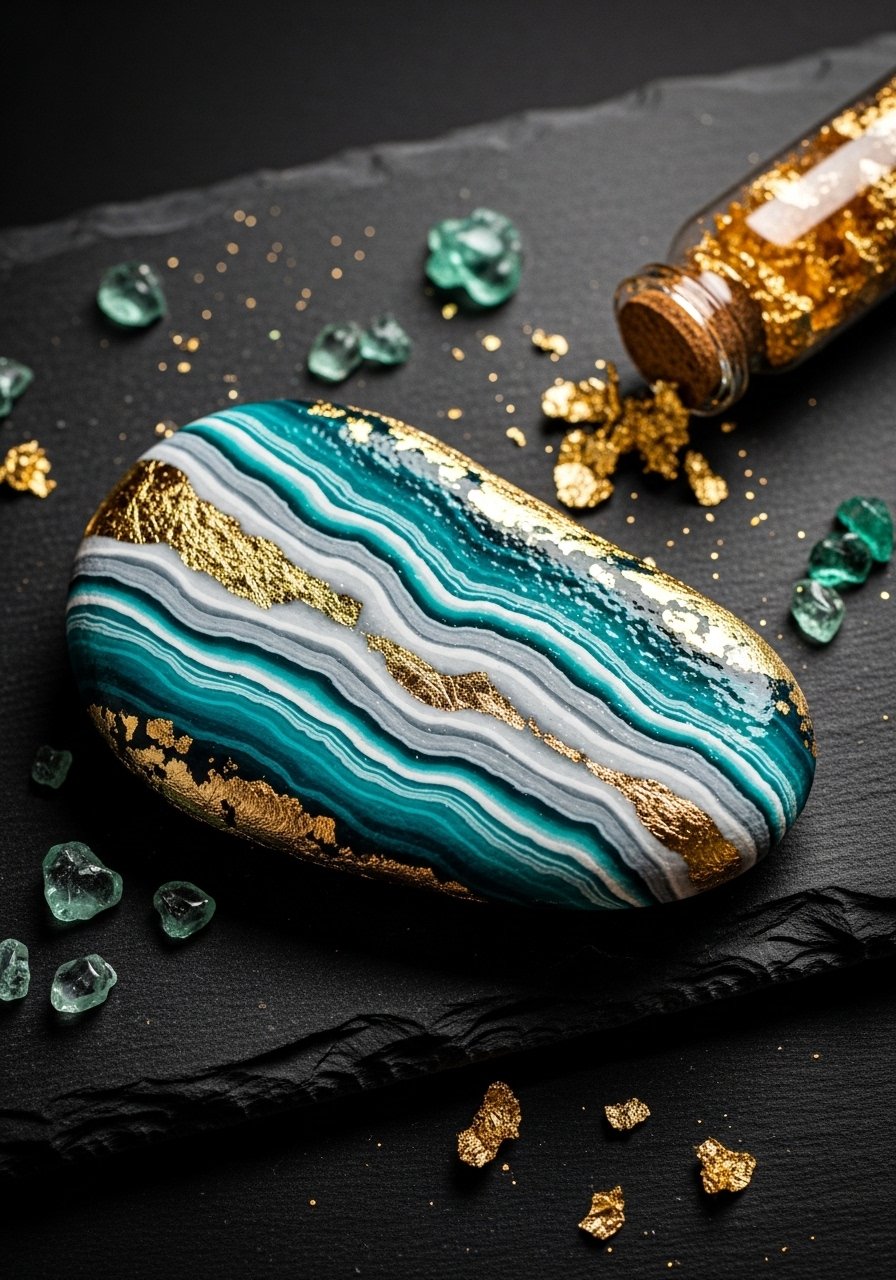
If you love sparkle but want a low-effort route, this geode look delivers. Layered paints with metallic accents mimic crystal veins. Use metallic acrylics and gold leaf for an upscale finish.
Materials
- 6 flat stones, 2–3 inches
- Acrylic paints: teal, navy, white — 2 oz each
- Gold acrylic or gold leaf flakes, 1 small packet
- Detail liner brush, 00
- Gloss medium or Mod Podge, 2 oz
- Fine glitter (optional), 1 teaspoon
- Small palette knife or toothpick for veining
Instructions
- Clean and dry stones. Paint base teal across the center and fade to navy edges. Let dry 20–30 minutes.
- Drag thin lines of white paint through the center with a palette knife to suggest crystal seams. Dry 15 minutes.
- Apply a thin layer of gloss medium where you want metallic leaf. Press flakes gently, then brush away excess.
- Seal the entire piece with two coats of glossy Mod Podge, waiting 20 minutes between coats. Cure 24 hours.
How to Display or Gift It
- Group three on a mirrored tray for a glam vignette.
- Wrap in tissue and place in a black gift box for birthday gifts.
- Use a small easel to feature one on a desk.
- For durability, choose a UV-resistant gloss sealer for sunlit displays.
- Mandala Meditation Stones — Dot Art for Calm
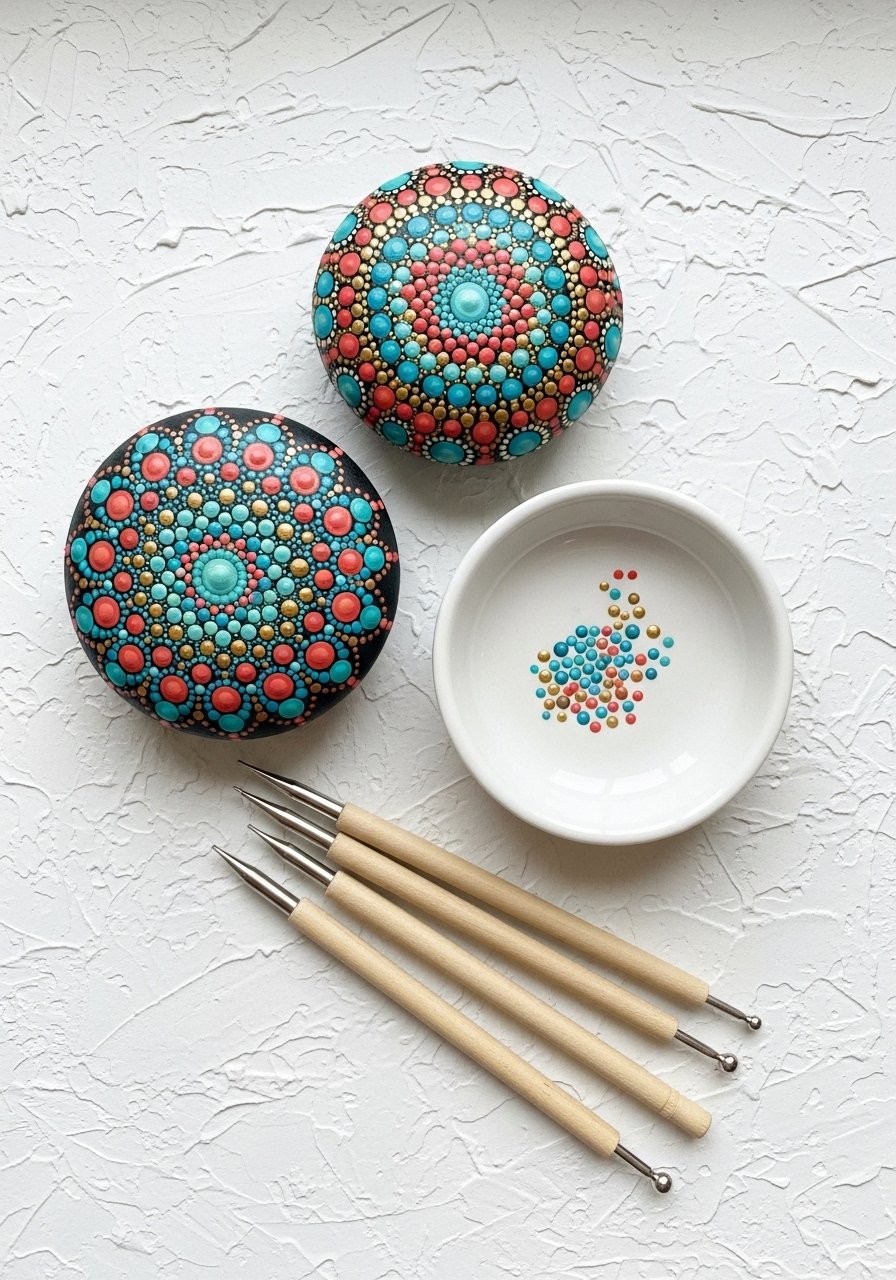
Mandala dots are meditative and great for making while you listen to a podcast. A dotting tool set makes consistent dots simple. This suits adults and older kids who enjoy repetitive patterns.
Materials
- 8 round pebble stones, 2–3 inches
- Acrylic craft paint: 4–5 coordinating colors, 1 oz each
- Dotting tool set (various sizes)
- Pencil for faint center marks
- Sealant spray, matte, 12 oz
- Small disposable palette
Instructions
- Prep stones by washing and drying. Paint base coat (optional) and dry 20 minutes.
- Mark center with a pencil dot.
- Use largest dotting tool and start from center, working outward with decreasing tool sizes.
- Let each color set a few minutes if you worry about smudging.
- Finish with a matte sealant, two light coats, 15 minutes apart. Cure 24 hours.
How to Display or Gift It
- Arrange a set in a shallow wooden bowl as a coffee table accent.
- Tie three stones to a twig with twine for a rustic hanging.
- Store in a small craft drawer between seasons.
- Pack sets in kraft boxes for calming pocket gifts.
- Nautical Stripe Rocks — Coastal Painted Stones (easy stone painting ideas)
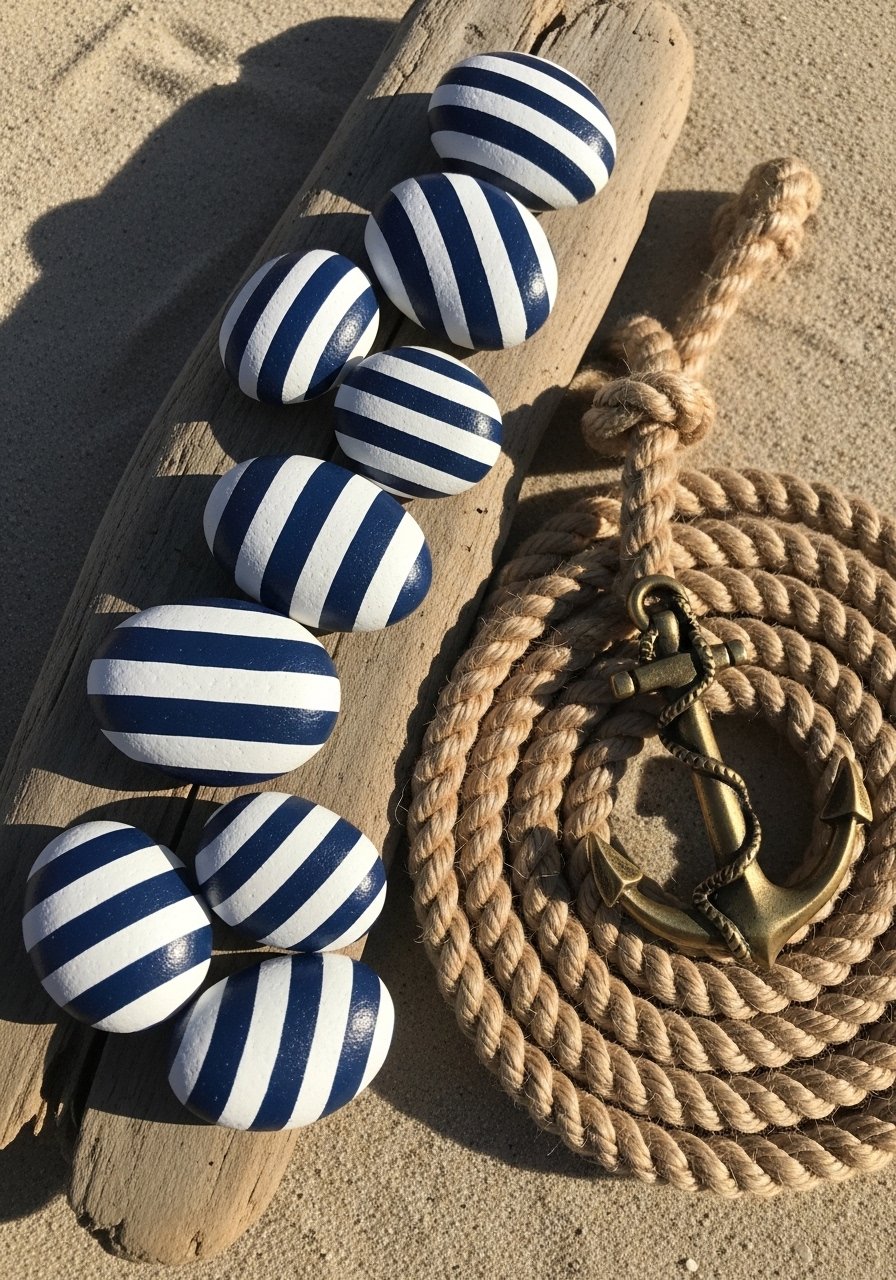
These crisp striped stones bring coastal vibes to any shelf. Painter’s tape creates perfect lines. This project is an easy way to use tape and a brayer for smooth edges.
Materials
- 10 oval stones, 2–3 inches
- Navy and white acrylic paint, 2 oz each
- Painter's tape, 1 roll (1/2 inch)
- Small brayer roller to press tape
- Flat foam brush, 1
- Gloss sealer spray, 12 oz
Instructions
- Clean stones and let dry.
- Paint a base coat of white. Dry 20–30 minutes.
- When dry, apply painter's tape strips where you want white stripes.
- Press tape edges firmly with a brayer to avoid bleed.
- Paint over exposed areas with navy. Let dry 30 minutes.
- Remove tape slowly to reveal crisp lines. Touch up small bleeds with a detail brush.
- Seal with two coats of gloss, 15 minutes apart. Cure 24 hours.
How to Display or Gift It
- Group in a shallow bowl with shells.
- Use as paperweights for a beach-themed desk.
- Wrap in clear organza for small hostess gifts.
- Store finished stones flat in a craft organizer drawer.
- Tiny Animal Faces — Pet Portrait Pebbles
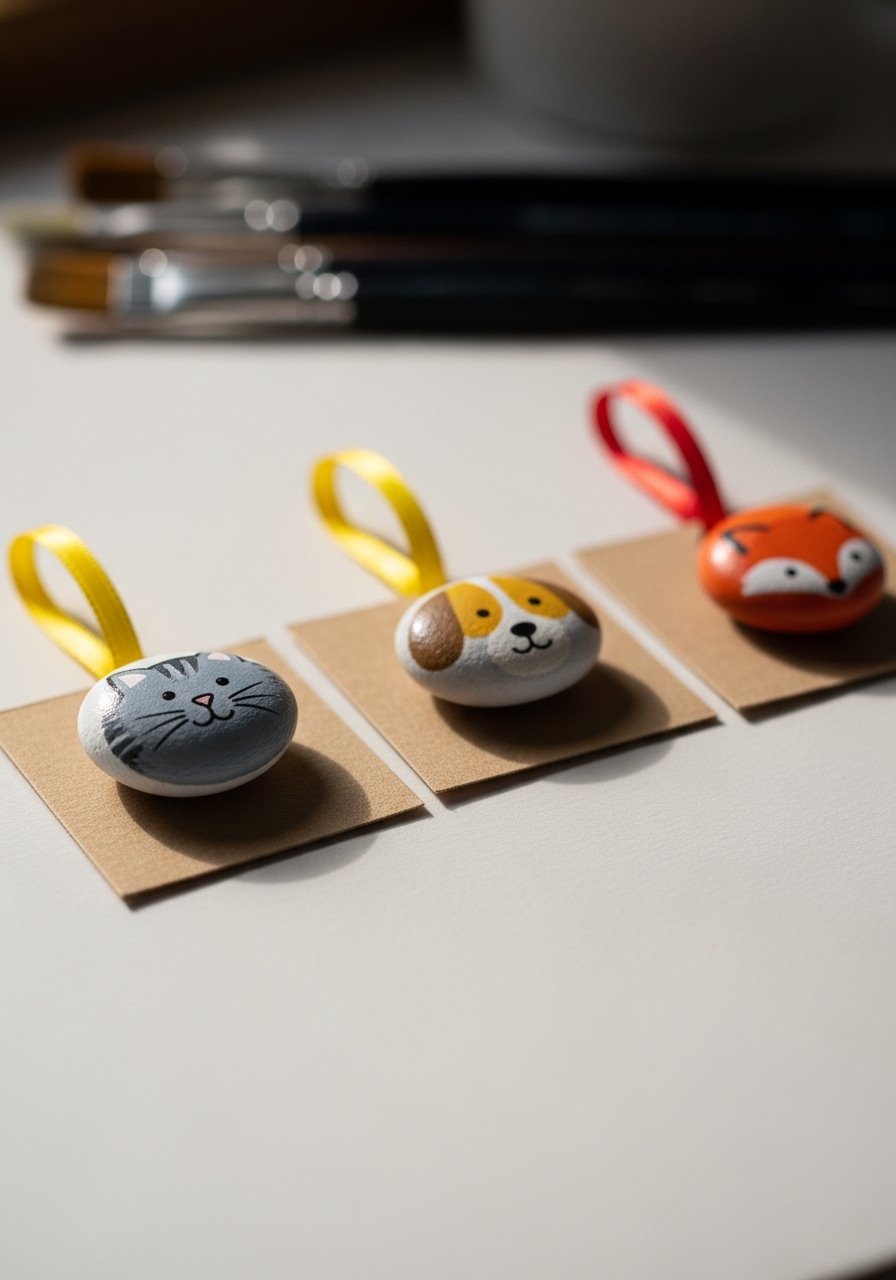
These mini pet portraits are adorable keepsakes. Use fine-tip paint pens for facial features. Great as magnets, cake toppers, or tiny gifts for friends.
Materials
- 12 small pebble stones, 1–1.5 inches
- Fine-tip paint pens in black, white, and accent colors
- Acrylic paint for base tones, 1 oz jars
- Small round brush, size 0
- Clear adhesive magnet dots, 12 pairs (if making magnets)
- Gloss varnish, 2 oz
Instructions
- Clean stones and paint a thin base coat if needed. Dry 20 minutes.
- Sketch tiny face shapes lightly with a pencil.
- Use fine-tip pens to draw eyes, noses, and whiskers.
- Add highlights with white pen for lively eyes.
- Seal with gloss varnish and let cure 24 hours.
- If making magnets, attach adhesive magnet dots after varnish cures.
How to Display or Gift It
- Glue magnet dots for fridge art.
- Tuck into gift boxes as a sweet personalized token.
- Arrange in a shadowbox and frame as wall art.
- Keep extras in craft organizers to swap faces for holidays.
- Botanical Pressed-Leaf Stones — Decoupage Nature Rocks
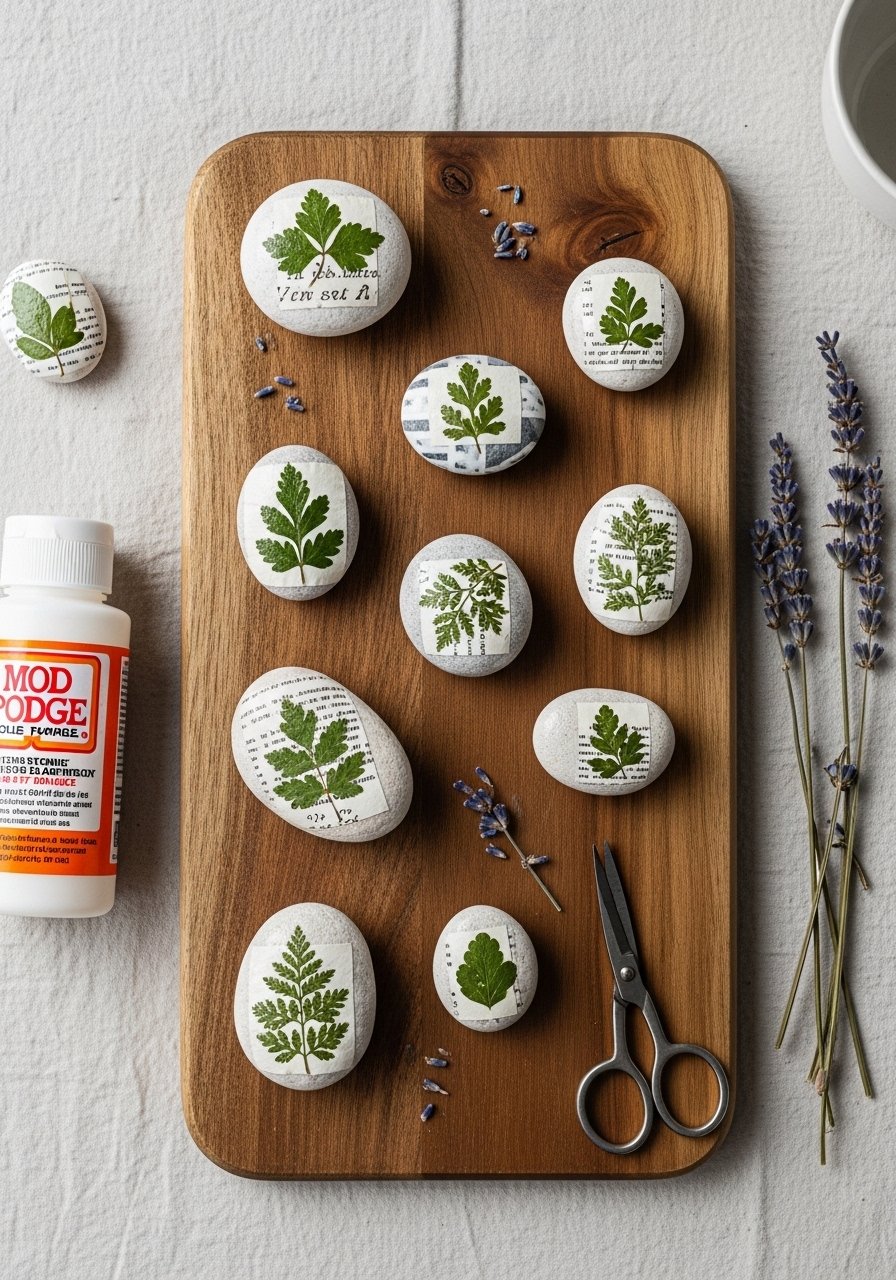
Decoupage is forgiving and yields delicate, nature-inspired stones. Use Mod Podge in matte or outdoor finish depending on use. This is a great way to preserve small pressed flowers.
Materials
- 8 flat stones, 2–3 inches
- Pressed leaves/flowers, small pieces, 8–16 pieces
- Mod Podge (matte or outdoor), 8 oz
- Small scissors
- Foam brush
- Fine sandpaper, 220 grit
Instructions
- Sand stone tops lightly and wipe dust away.
- Arrange pressed leaves on the stone until you like the composition.
- Brush a thin layer of Mod Podge where the leaf will sit.
- Lay leaf gently and smooth with a clean finger or brush.
- Brush a thin coat of Mod Podge over the top. Let dry 20–30 minutes.
- Apply 2–3 top coats for durability, 20 minutes between coats. Full cure 48 hours.
How to Display or Gift It
- Use as paperweights or place in a centerpiece bowl with twine.
- Wrap in glassine and tuck into floral-themed gift sets.
- Store flat while curing in a shallow box.
- For garden use, choose the outdoor formula and let cure 72 hours before placing outside.
- Chalkboard Rocks — Write-and-Wipe Messages

Chalkboard stones are interactive and great for labels or place cards. Use chalk paint and sand the surface lightly for best chalk adherence.
Materials
- 15 small stones, 1–2 inches
- Chalkboard paint, 2 oz
- White chalk pencil or chalk marker
- Foam brush
- Clear matte sealer (optional), 4 oz
Instructions
- Clean stones and paint two coats of chalkboard paint, letting each coat dry 30 minutes.
- Cure the surface 24 hours.
- Prime by rubbing a piece of chalk over the surface and wiping away.
- Write messages with chalk pencils. Wipe clean with a damp cloth and re-dry.
- If you want permanent designs, trace in white paint pen and seal.
How to Display or Gift It
- Use as place cards on a dinner table.
- Stick in potted herbs as plant labels.
- Bundle with little chalk boards and gift to teachers.
- Keep extra chalk and a cloth in a small craft jar for storage.
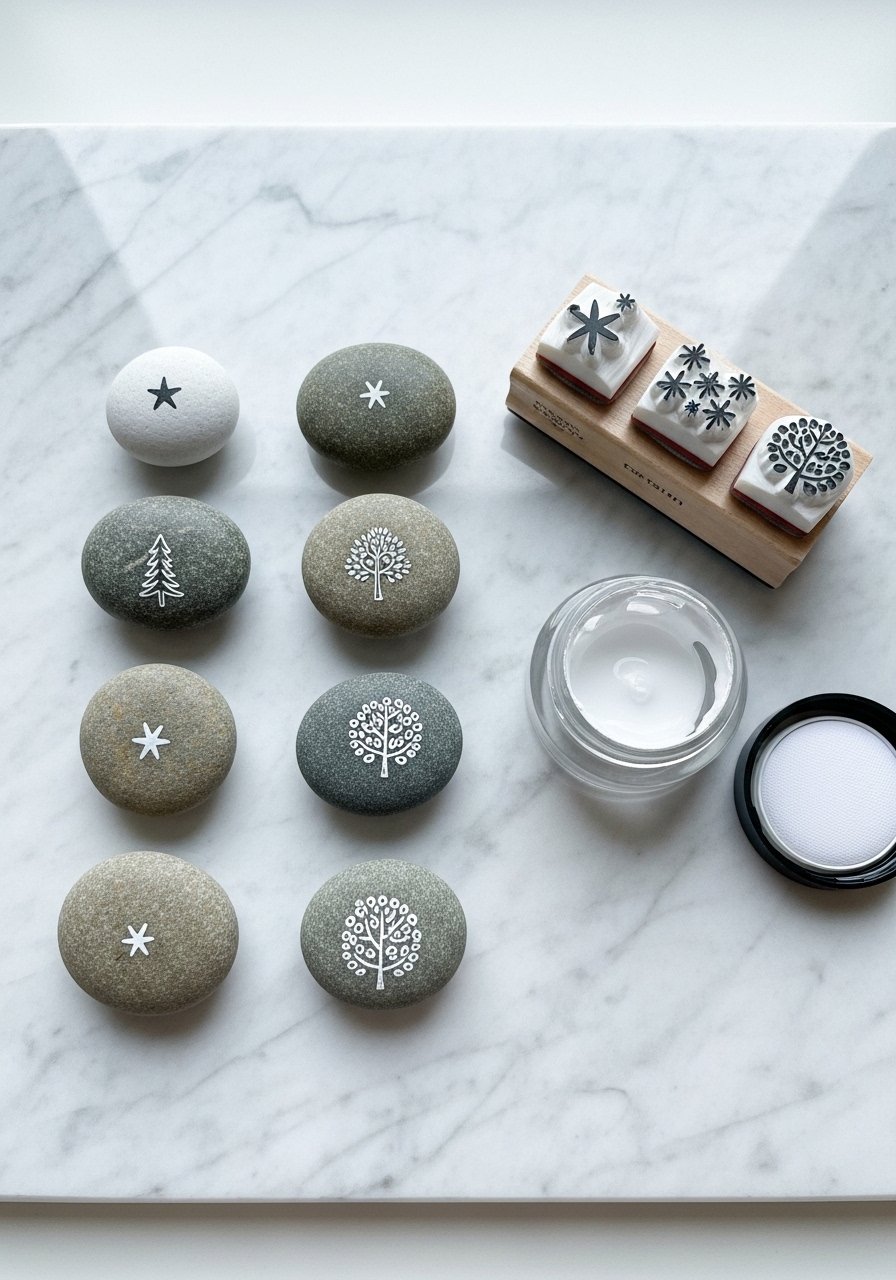
- Holiday Ornament Rocks — Painted Gift Tags
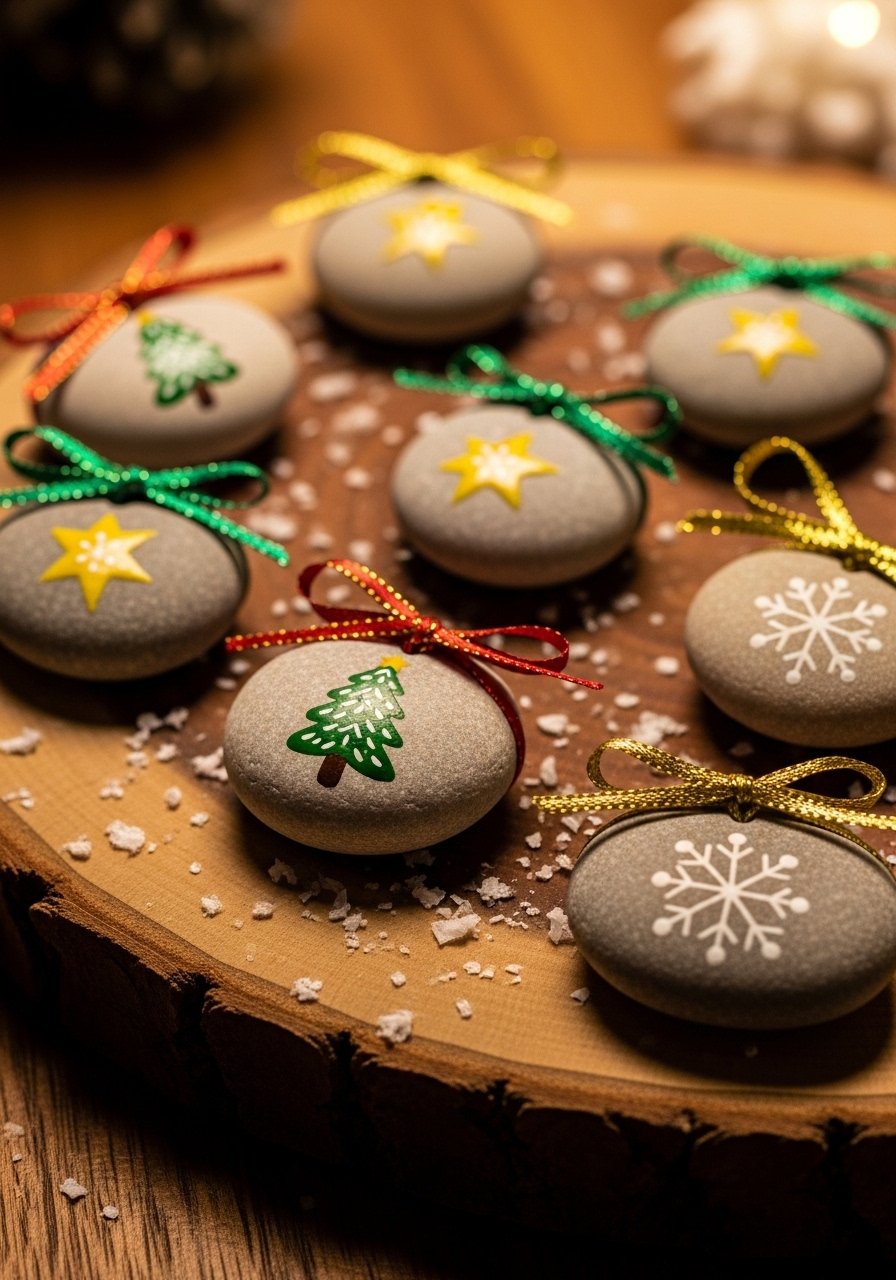
Turn stones into ornaments for a rustic holiday. Drill a small hole or tie with ribbon around the stone. Use metallic paint for a festive shimmer.
Materials
- 10 flat stones, 2–3 inches
- Acrylic paints in red, green, white, gold — 1–2 oz each
- Gold paint pen
- Small drill with 1/16" bit (or ribbon loop method)
- Thin ribbon or twine, 5 yards
- Gloss varnish, 2 oz
Instructions
- Clean and paint simple icons like trees or stars. Dry 20 minutes.
- Add metallic accents with a gold paint pen.
- If drilling holes, clamp the stone and drill slowly with water to keep cool.
- Thread ribbon and secure with a knot.
- Seal with gloss varnish when dry. Cure 24 hours.
How to Display or Gift It
- Hang on the tree or use as gift tags.
- Pack in kraft holiday boxes with tissue.
- Use as bowl fillers for festive displays.
- Store ornaments in a divided craft organizer during off-season.
- Ombre Gradient Stones — Soft Color Fades
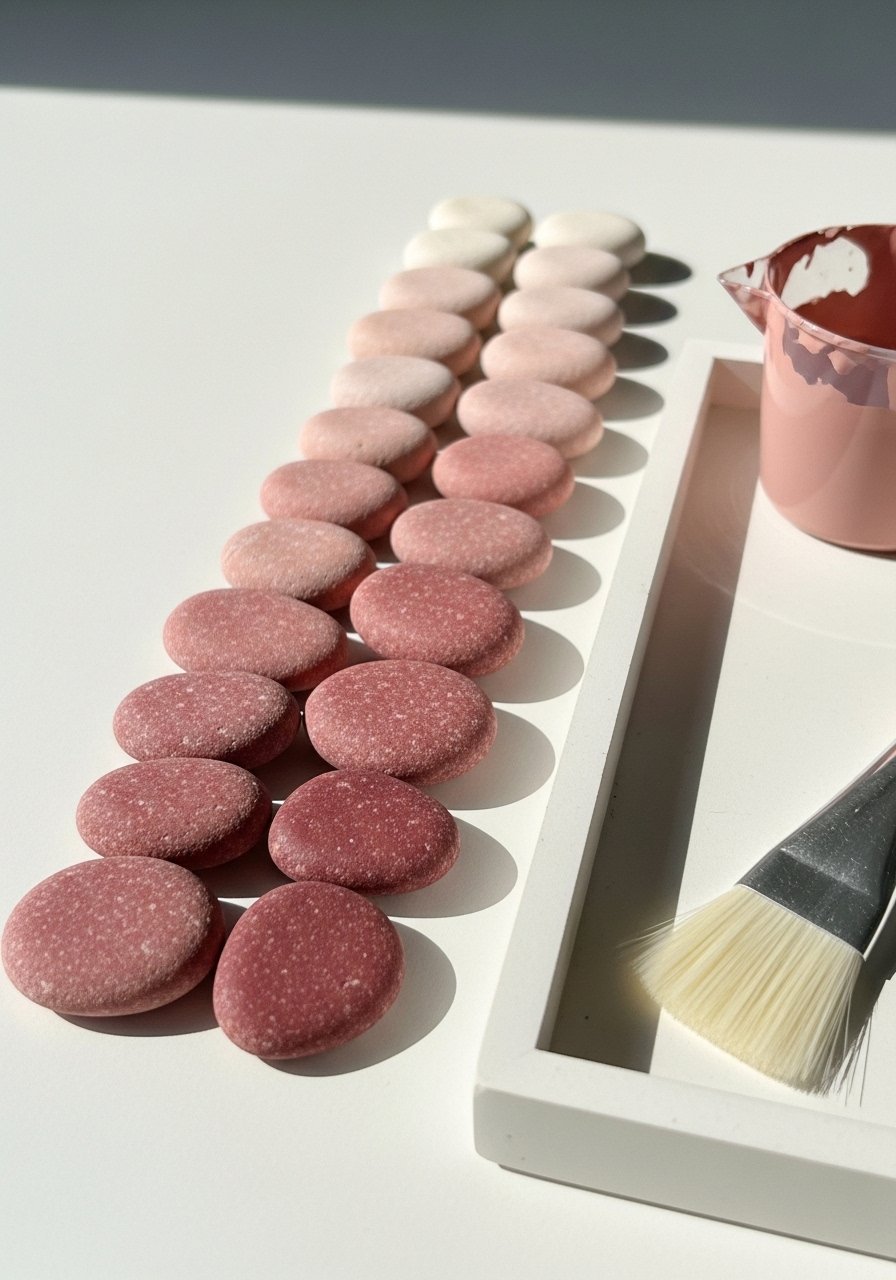
Ombre rocks are soothing and chic. Blend colors wet-on-wet for smooth transitions. Use a flat synthetic brush and quick blending.
Materials
- 10 smooth stones, 2–3 inches
- Acrylic paints in three shades of the same color family, 1 oz each
- Flat synthetic brush, size 6
- Small mixing cup and water
- Matte varnish, 4 oz
Instructions
- Paint a thin base coat in the lightest shade. Dry 20 minutes.
- Starting at one edge, lay down the medium shade and quickly feather into the base while wet.
- Add the darkest shade to the opposite edge and blend toward the center.
- Work quickly for seamless feathering; practice on paper first.
- Once dry, add a second light glaze if needed for smoother transition. Dry 30 minutes.
- Seal with matte varnish and let cure 24 hours.
How to Display or Gift It
- Line up on a mantel for a color-gradient display.
- Tie a trio with twine for a simple present.
- Store flat in stackable trays while curing.
- Pair with a matching painted sign for coordinated decor.
- Galaxy Stones — Night-Sky Pebbles
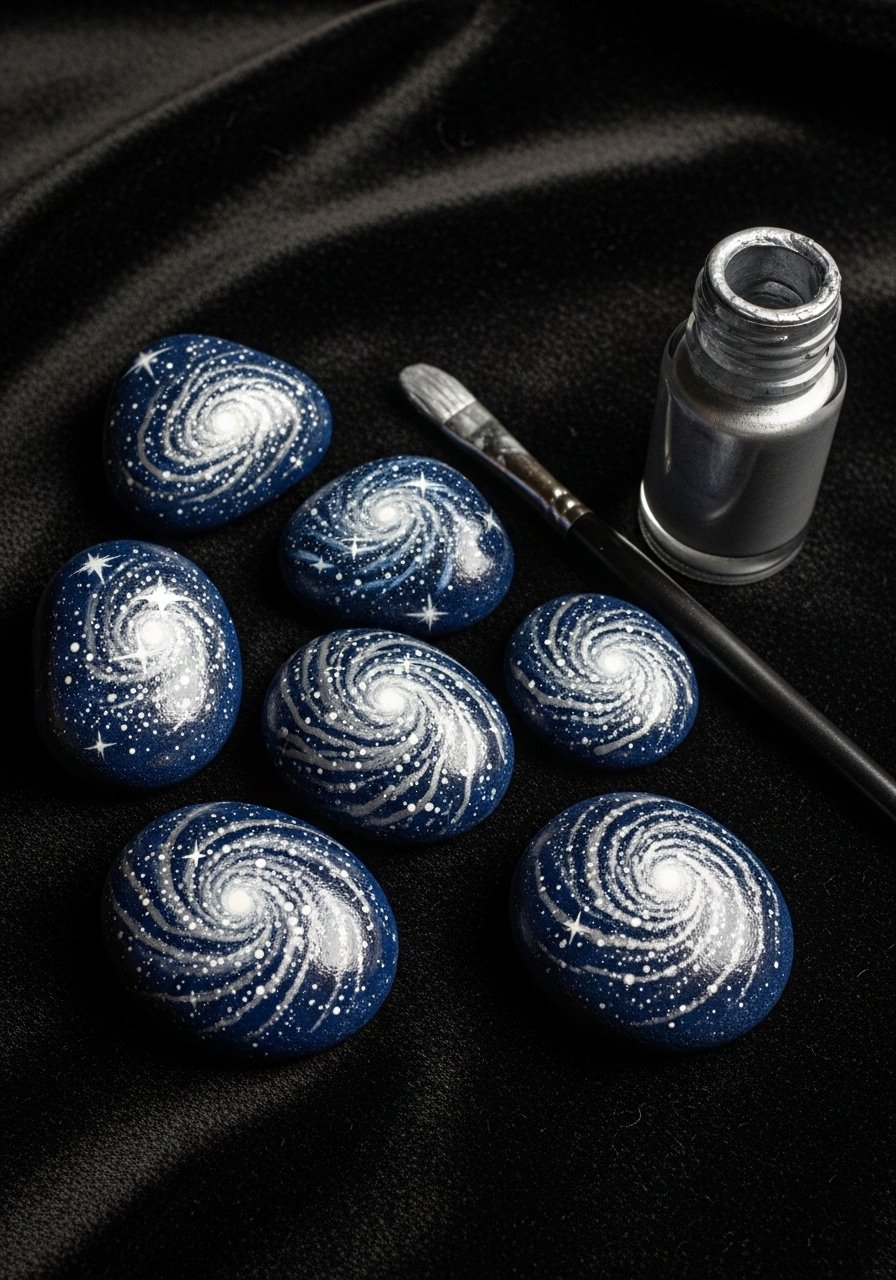
Galactic stones are fast to make using splatter techniques and metallic highlights. They’re great for kids with supervision during splatter steps.
Materials
- 8 smooth stones, 2–3 inches
- Acrylic paints: navy, black, purple — 1 oz each
- White acrylic for star splatter, 1 oz
- Toothbrush or stiff brush for splatter
- Metallic silver paint pen
- Gloss varnish, 4 oz
Instructions
- Paint base navy or black. Dry 20 minutes.
- Add dabs of purple and blend lightly for nebula effects. Dry 15 minutes.
- Dip a toothbrush in white thinned paint and flick to splatter stars. Protect surrounding area.
- Add a few star highlights with a silver paint pen.
- Seal with gloss varnish, two coats, 20 minutes apart. Cure 24 hours.
How to Display or Gift It
- Place in a decorative bowl as a night-sky centerpiece.
- Use as a paperweight pair for a celestial-themed desk.
- Wrap in tissue and place in a small tin for gifting.
- Keep extras in a zip-top craft pouch for future crafting.
- Floral Watercolor Rocks — Soft Painted Blooms (easy stone painting ideas)
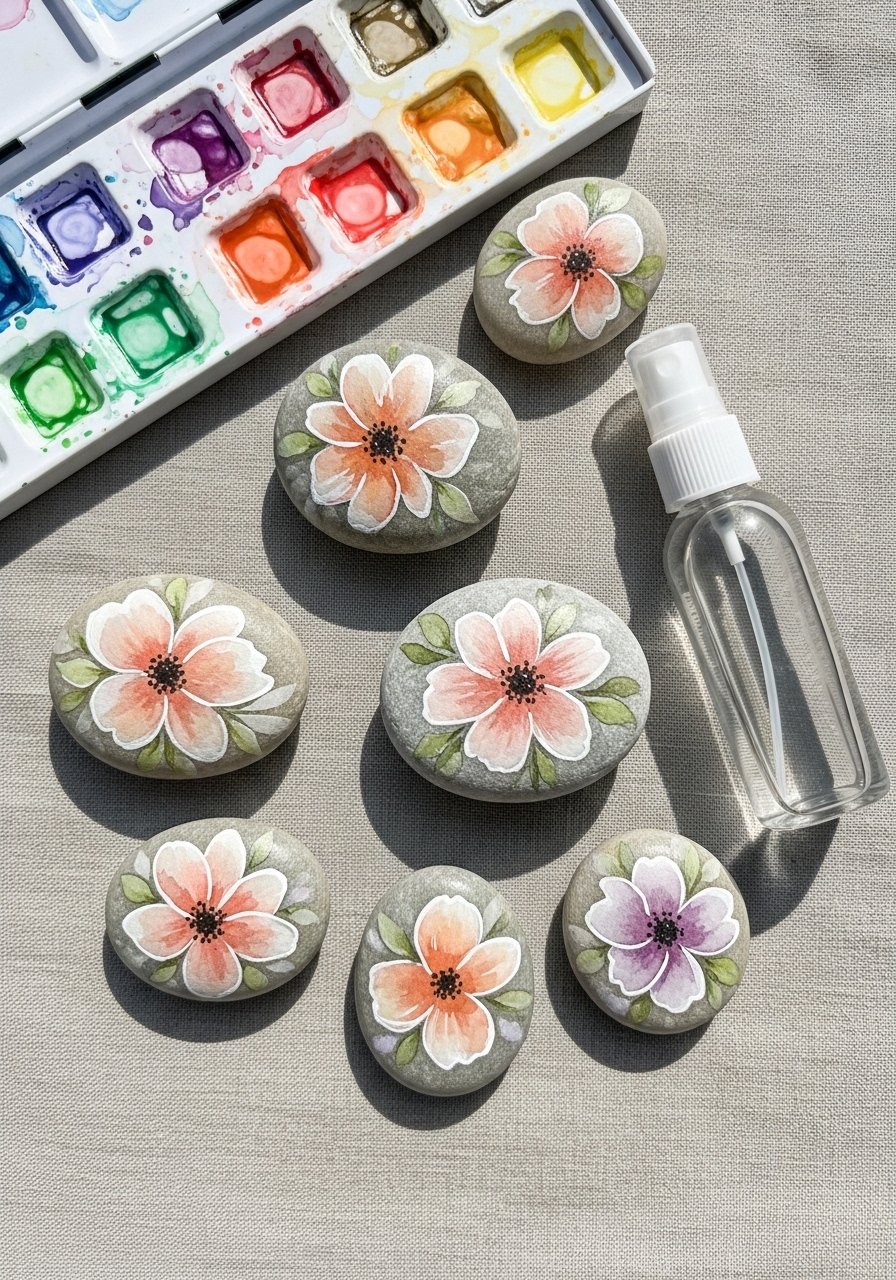
These watercolor-style blooms are airy and romantic. Thinned acrylics or fluid acrylics help achieve a translucent wash. A detail brush and a spray bottle are handy.
Materials
- 10 flat stones, 2–3 inches
- Fluid acrylics or acrylic craft paints thinned with water, 1 oz each
- Round detail brush, size 1
- Small spray mister for blending
- Matte sealer, 4 oz
Instructions
- Wet the stone surface slightly with a spray mister.
- Mix a washed color (thin with water) and lay down petal shapes loosely.
- Let pigments bleed slightly and lift pigment with a clean damp brush where desired.
- Build layers lightly, allowing 10–15 minutes between thin glazes.
- Add center dots with a fine brush.
- Seal with matte sealer once fully dry. Cure 24 hours.
How to Display or Gift It
- Arrange anchored in a shallow bowl with dried lavender.
- Pair with a small canvas painted in coordinating hues as a gift set.
- Keep stored flat in a shallow box during curing.
- Label and gift in kraft boxes for bridal shower favors.
- Chalk Pattern Stones — Geometric White-on-Black
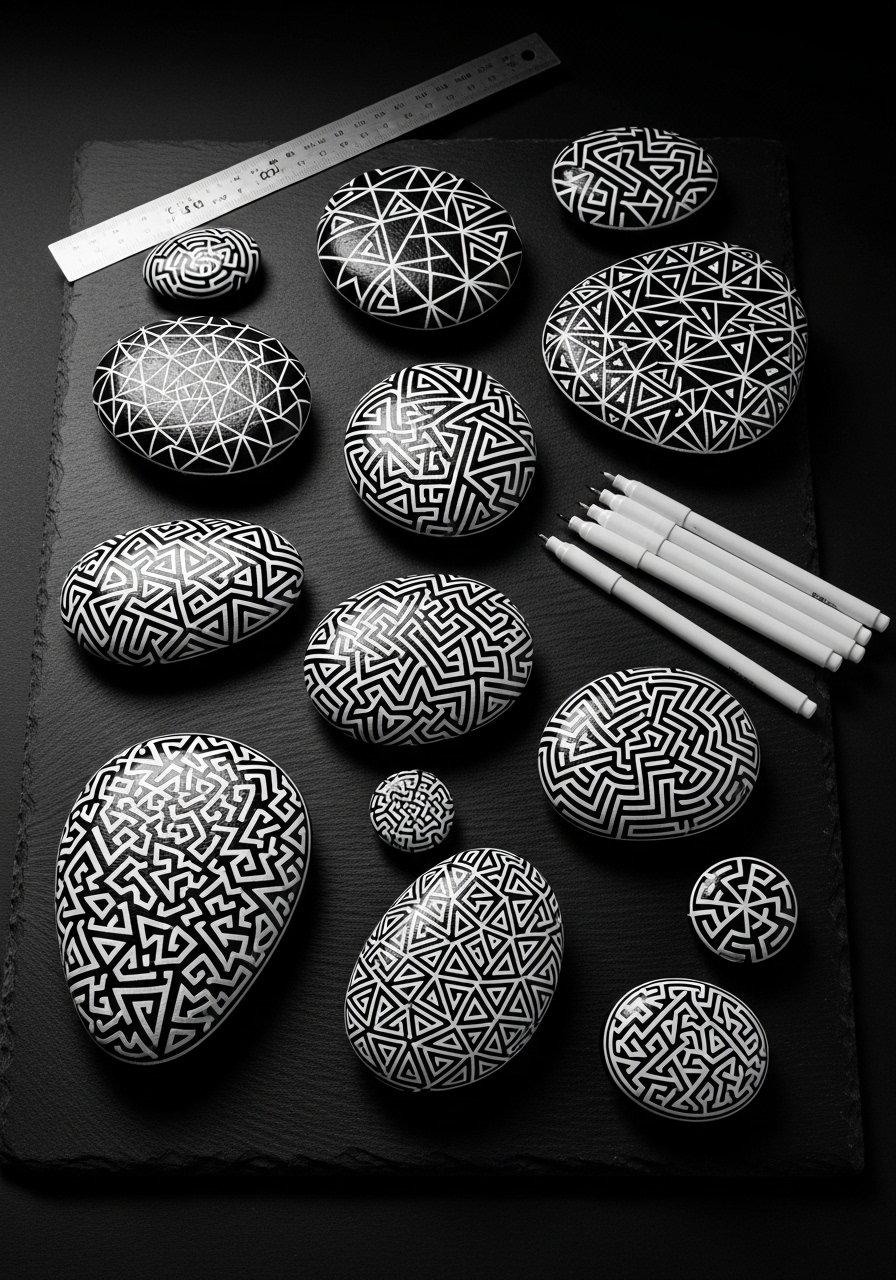
Bold monochrome stones look modern and pair well with Japandi and farmhouse styles. Use a ruler edge or painter's tape for crisp shapes and a fine white paint pen for detail.
Materials
- 9 smooth stones, 2–3 inches
- Matte black acrylic paint, 2 oz
- White paint pen, 0.7 mm
- Painter's tape, 1 roll
- Small ruler for straight lines
- Matte varnish, 4 oz
Instructions
- Paint stones matte black; allow two coats, 20 minutes apart.
- Tape off geometric shapes or sketch with pencil.
- Fill shapes with the white paint pen carefully.
- Remove tape slowly. Touch up edges with a tiny brush.
- Seal with matte varnish, two coats. Cure 24 hours.
How to Display or Gift It
- Group on a black tray for a minimalist mantel.
- Pair with black-and-white craft pillows for a cohesive look.
- Store in a small drawer organizer labeled by design.
- Wrap in tissue and tuck into a flat gift box.
- Inspirational Word Stones — Pocket Affirmations
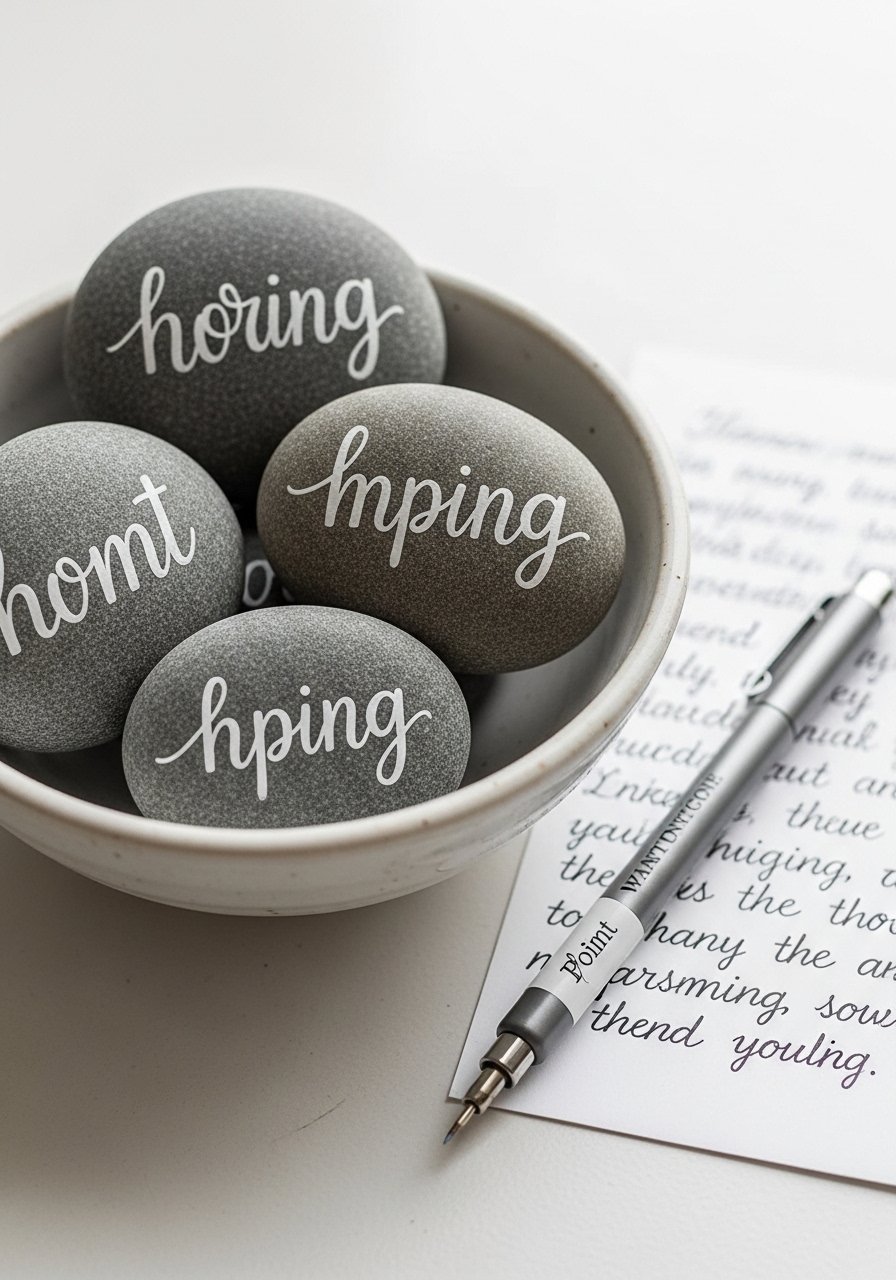
These make perfect pocket talismans or small gifts. Use a fine script paint pen and practice lettering on paper first.
Materials
- 20 pebble stones, 1–2 inches
- White script paint pen
- Pencil for layout
- Small foam brush for base coats (optional)
- Small craft gift boxes, pack of 10 (for gifting)
- Clear matte sealer, 4 oz
Instructions
- Paint a thin base if desired and let dry 20 minutes.
- Sketch the word lightly with a pencil.
- Trace with a white script paint pen in one confident stroke where possible.
- Let ink dry 10 minutes, then add a second coat if needed.
- Seal with matte sealer. Cure 24 hours.
How to Display or Gift It
- Tuck one into a card for a friend.
- Keep a stack in a bowl by the door as quick pick-me-ups.
- Store finished stones in small gift boxes with tissue paper.
- Make a set themed around gratitude or encouragement.
- Animal Silhouette Stones — Shadow Silhouettes
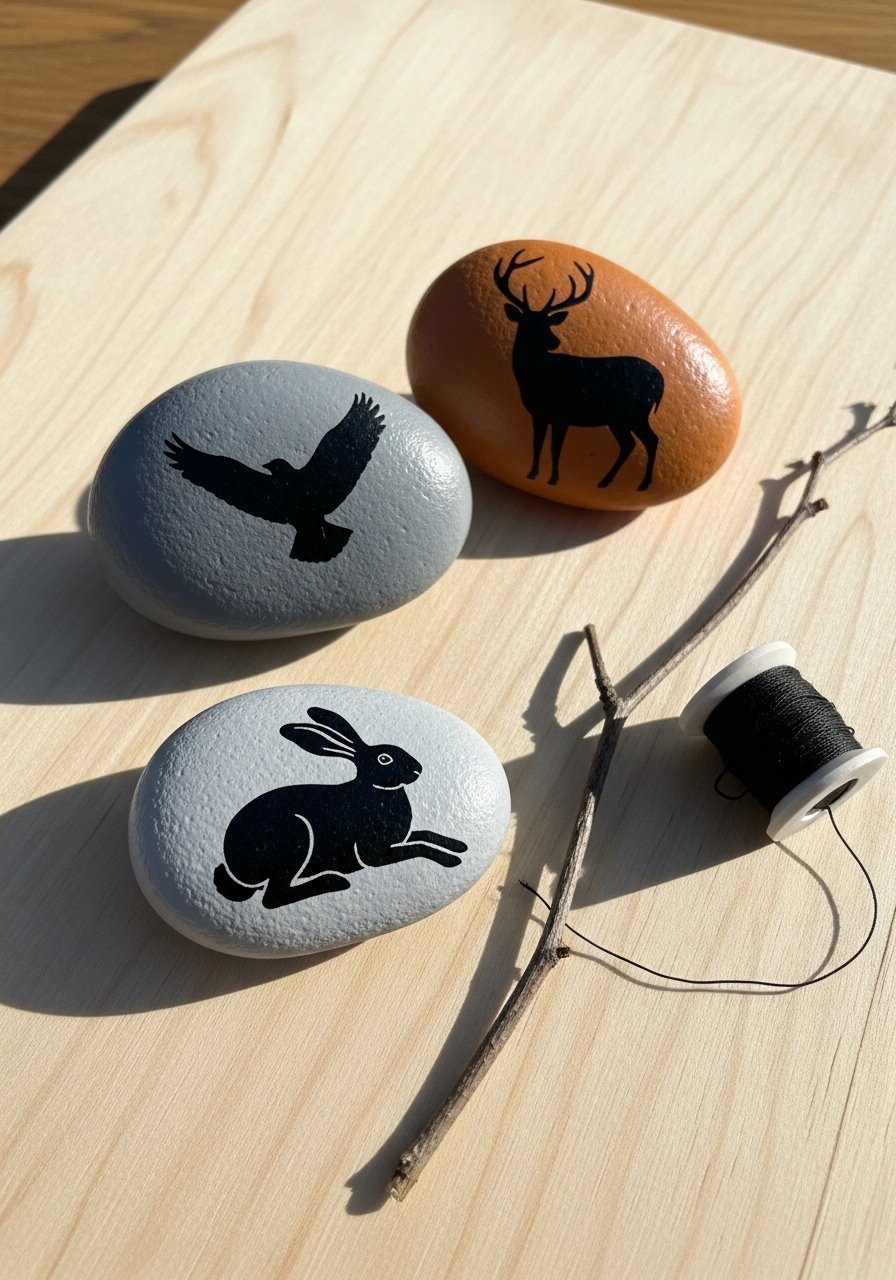
Silhouette stones are striking and simple. Use a small transfer or sketch before painting the black silhouette with a fine round brush.
Materials
- 8 flat stones, 2–3 inches
- Matte acrylic colors, 1–2 oz each
- Black acrylic paint, 1 oz
- Transfer paper or pencil for tracing outlines
- Round brush, size 0
- Matte varnish, 4 oz
Instructions
- Paint base color and dry 20–30 minutes.
- Trace silhouette from a printed template using transfer paper.
- Fill silhouette with black paint. Let dry 20 minutes.
- Touch edges for crispness with a tiny brush.
- Seal with matte varnish. Cure 24 hours.
How to Display or Gift It
- Arrange in a shadowbox with linen backing.
- Use as rustic place markers at woodland-themed events.
- Pack in clear organza for gifting.
- Store in divided craft box to protect painted surfaces.
- Acorn & Leaf Stones — Autumn Accent Rocks
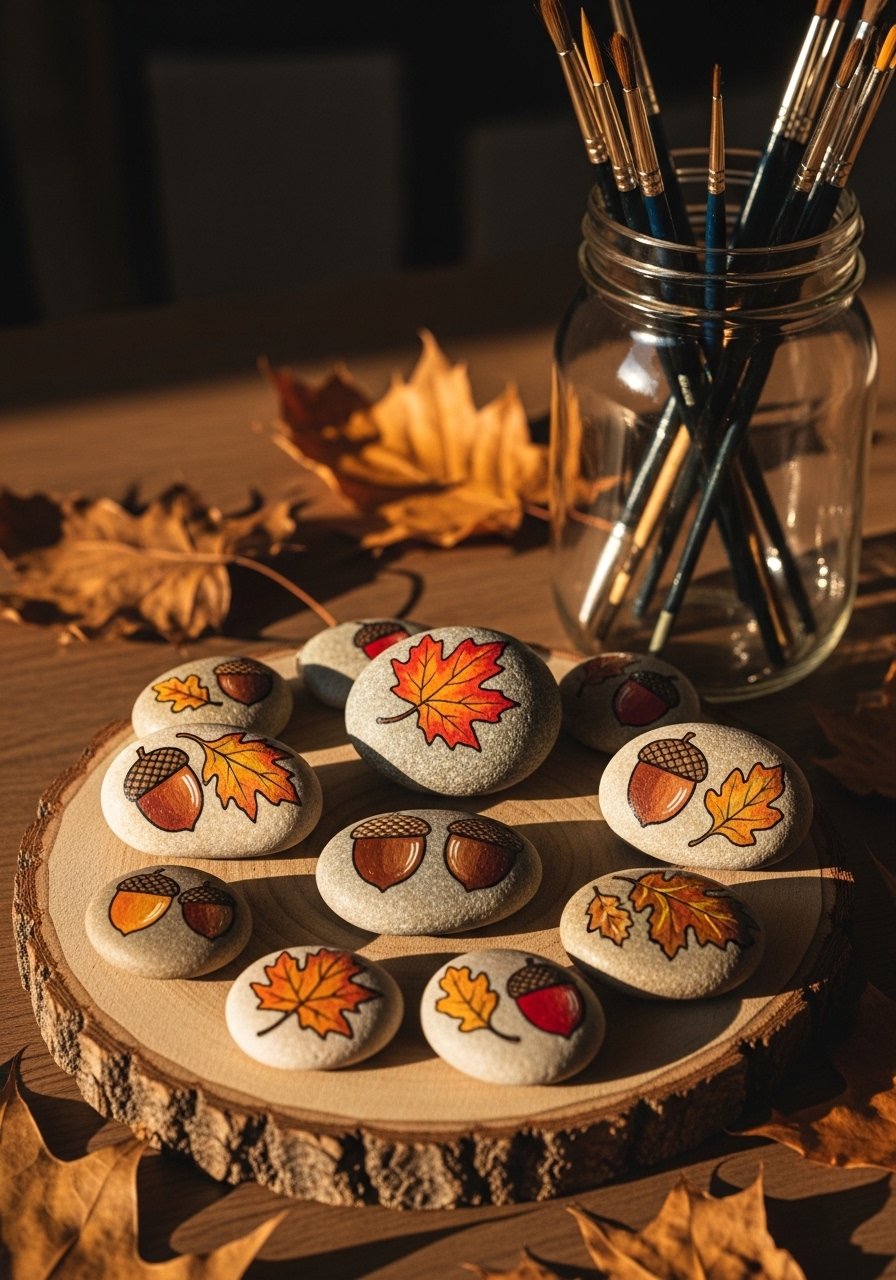
These capture cozy fall vibes with warm earth tones. A small liner brush and metallic brown paint add realism to acorns.
Materials
- 12 small stones, 1.5–2.5 inches
- Acrylic paints: burnt sienna, ochre, forest green — 1 oz each
- Liner brush, 00
- Brown metallic paint pen
- Matte varnish, 4 oz
Instructions
- Paint a light base if desired; dry 20 minutes.
- Sketch acorn and leaf shapes in pencil.
- Fill shapes with paint and add veins with a liner brush.
- Add highlights with a metallic pen.
- Seal with matte varnish. Cure 24 hours.
How to Display or Gift It
- Scatter on a fall mantel alongside candles.
- Bundle three stones and tie with jute for gifts.
- Store in a labeled craft box for seasonal swapping.
- Use as place settings for Thanksgiving.
- Marble Effect Stones — Swirled Paint Technique
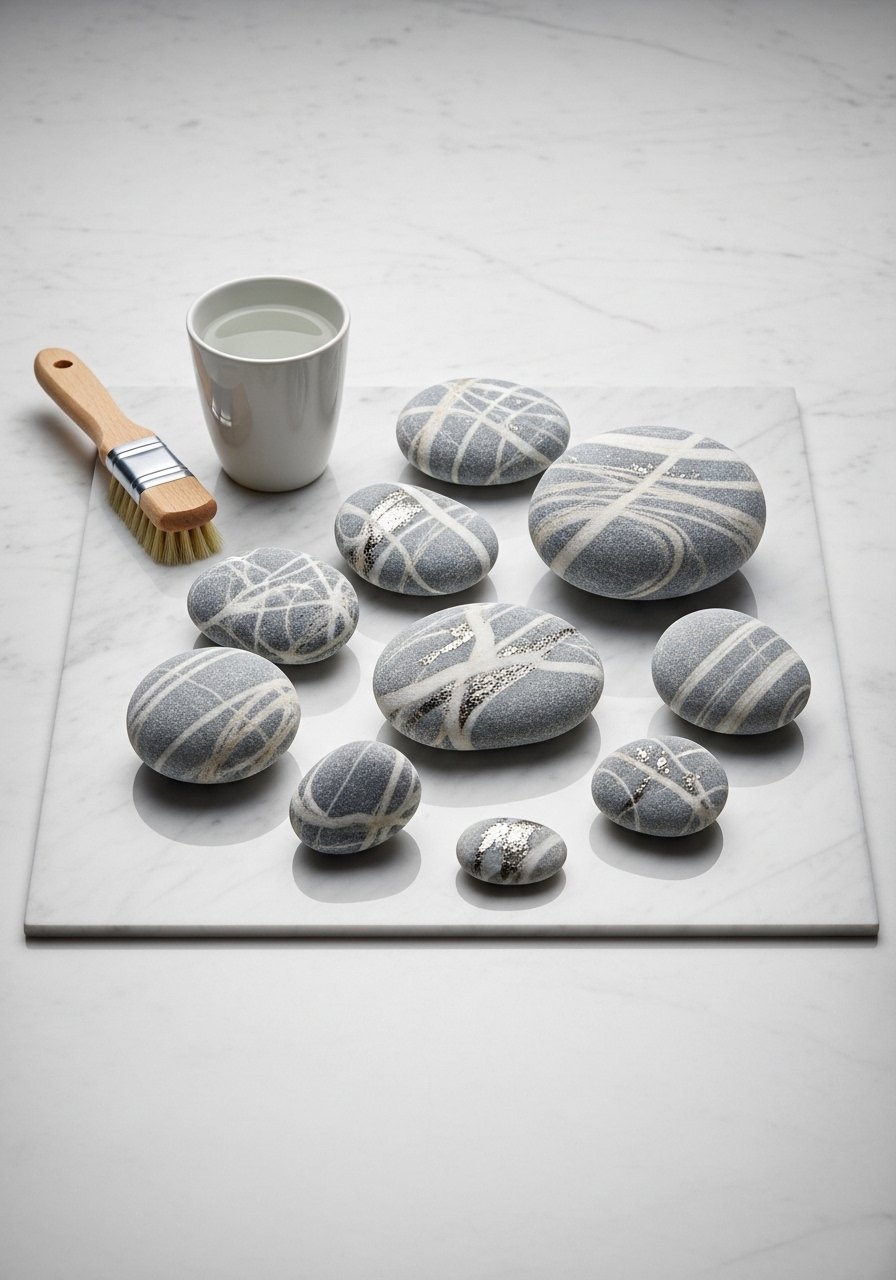
Marbling paints look sophisticated but are easy with layered wet blending. Use fluid acrylics and a toothpick for veins.
Materials
- 8 flat stones, 2–3 inches
- Fluid acrylics in gray, white, and silver, 1 oz each
- Flat brush, size 4
- Toothpick for veining
- Gloss varnish, 4 oz
Instructions
- Wet the stone surface lightly.
- Drop thin lines of gray and white and swirl with a brush.
- Pull a toothpick through wet paint to create delicate veins.
- Let dry 30 minutes, then add a second thin glaze if needed.
- Seal with gloss varnish, two coats. Cure 24–48 hours.
How to Display or Gift It
- Group on a white tray to enhance marble effect.
- Use as elegant wedding place cards when paired with calligraphy.
- Wrap individually in tissue for crisp presentation.
- Store in padded craft boxes for protection.
- Bright Fruit Stones — Mini Fruit Magnets
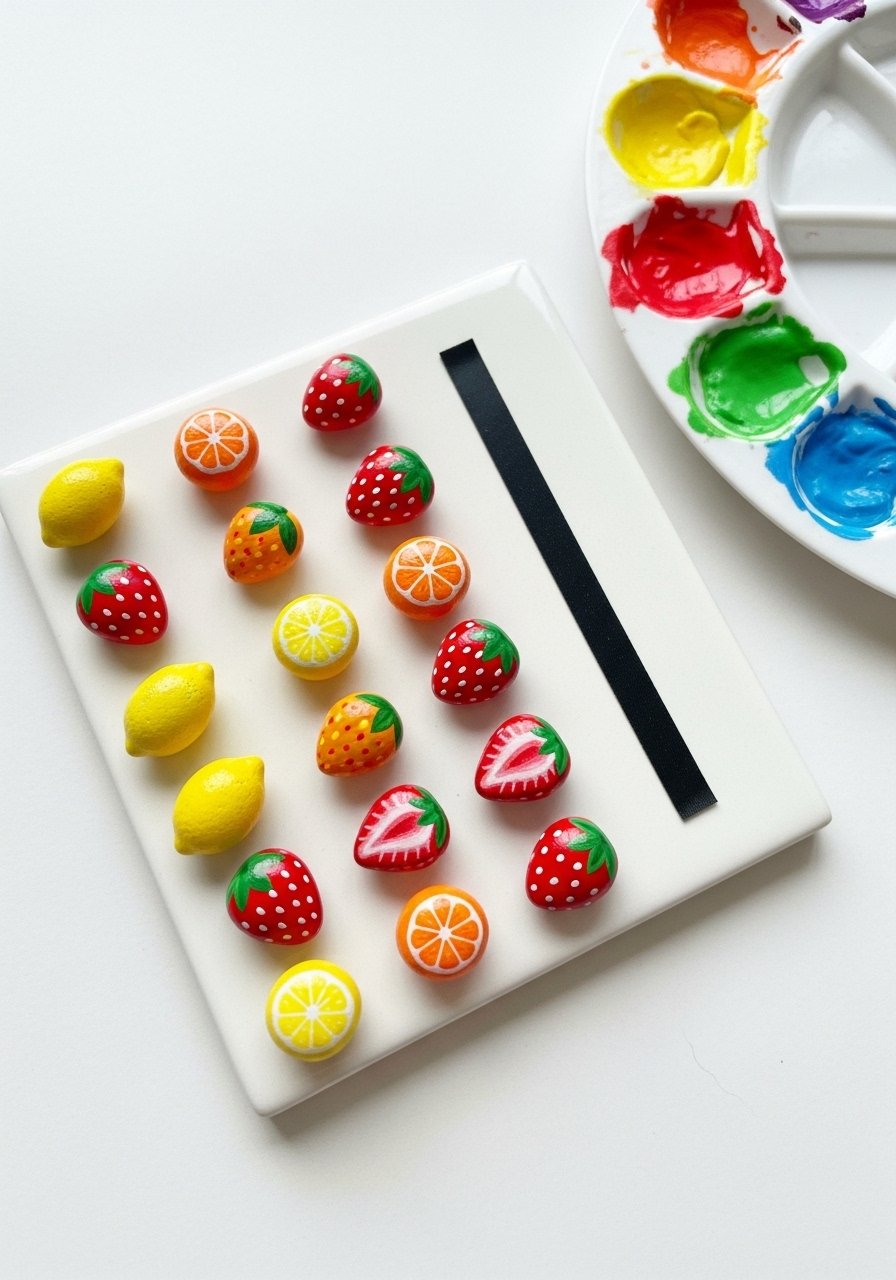
Fruit-themed stones are playful and bright. Use vibrant acrylics and round brushes; add magnet dots for fridge art.
Materials
- 15 small pebble stones, 1–1.5 inches
- Acrylic paints: lemon yellow, strawberry red, orange — 1 oz each
- Round brush, size 0–2
- Fine black paint pen for seeds
- Adhesive magnet dots, 15 pairs
- Gloss varnish, 2 oz
Instructions
- Paint base fruit shapes and let dry 20 minutes.
- Add seeds, dimples, and highlights with small brushes or pens.
- Seal with gloss varnish. Cure 24 hours.
- Attach magnet dots on the back after varnish cures.
How to Display or Gift It
- Stick on the fridge as cheerful reminders.
- Pack into small cellophane bags and tie with ribbon for party favors.
- Store in a small compartmented tray for gifting sets.
- Use as playful place cards for summer dinners.
- Zentangle Stones — Patterned Relaxation Rocks
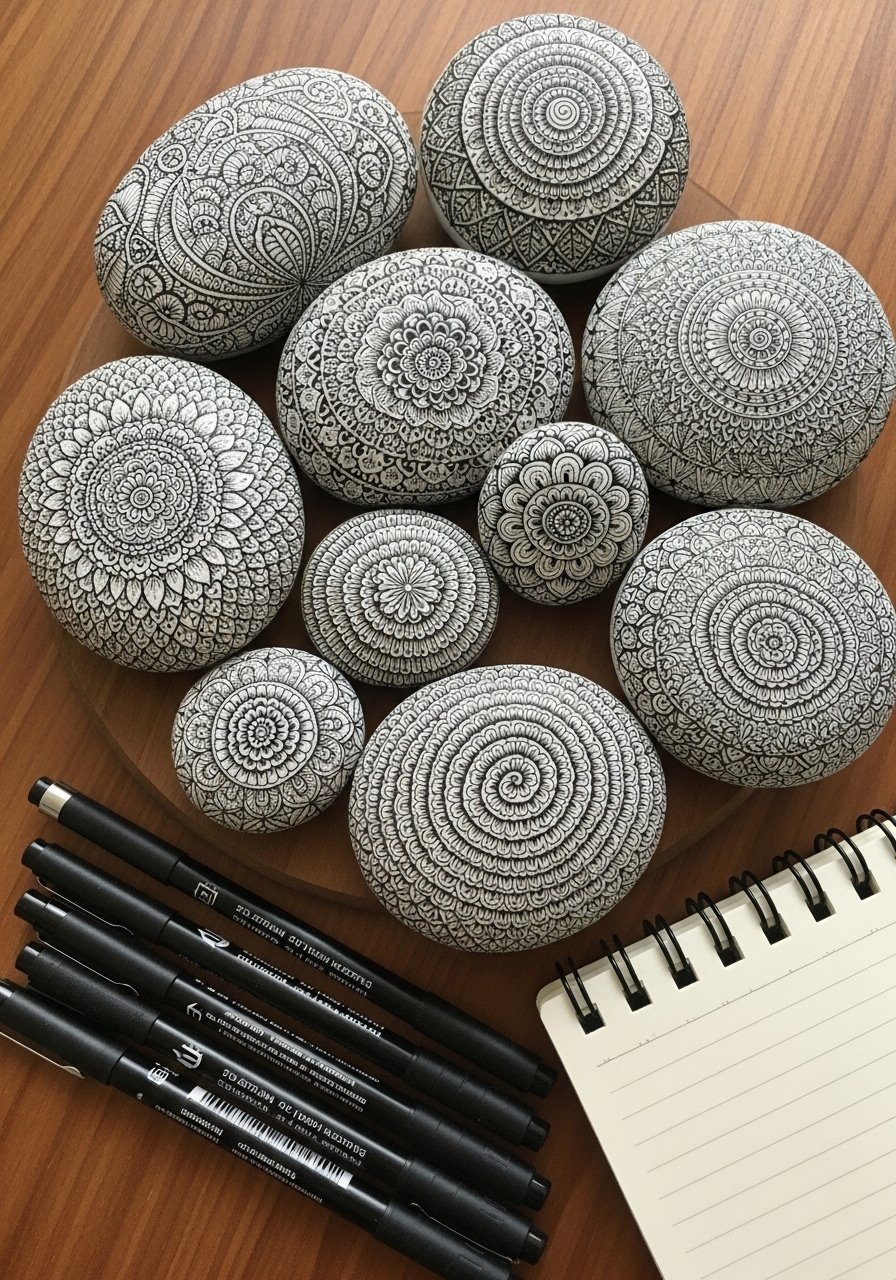
Zentangle patterns feel intricate but are meditative. Fine-tip archival pens give crisp, lasting lines.
Materials
- 10 flat stones, 2–3 inches
- Black fineliner pens, 0.3 mm and 0.5 mm
- White acrylic paint for base (optional)
- Pencil for planning
- Matte varnish, 4 oz
Instructions
- Optionally paint a white base and let dry 20 minutes.
- Sketch pattern sections lightly in pencil.
- Ink patterns with fineliners, varying thickness for interest.
- Let ink dry 10 minutes.
- Seal with matte varnish. Cure 24 hours.
How to Display or Gift It
- Arrange a set in a shallow ceramic bowl on a desk.
- Frame a single stone in a deep shadowbox for wall art.
- Package with a small sketchbook and pen as a mindful gift.
- Store in individual fabric pouches for protection.
- Petal-Pressed Polished Stones — Subtle Botanical Layers
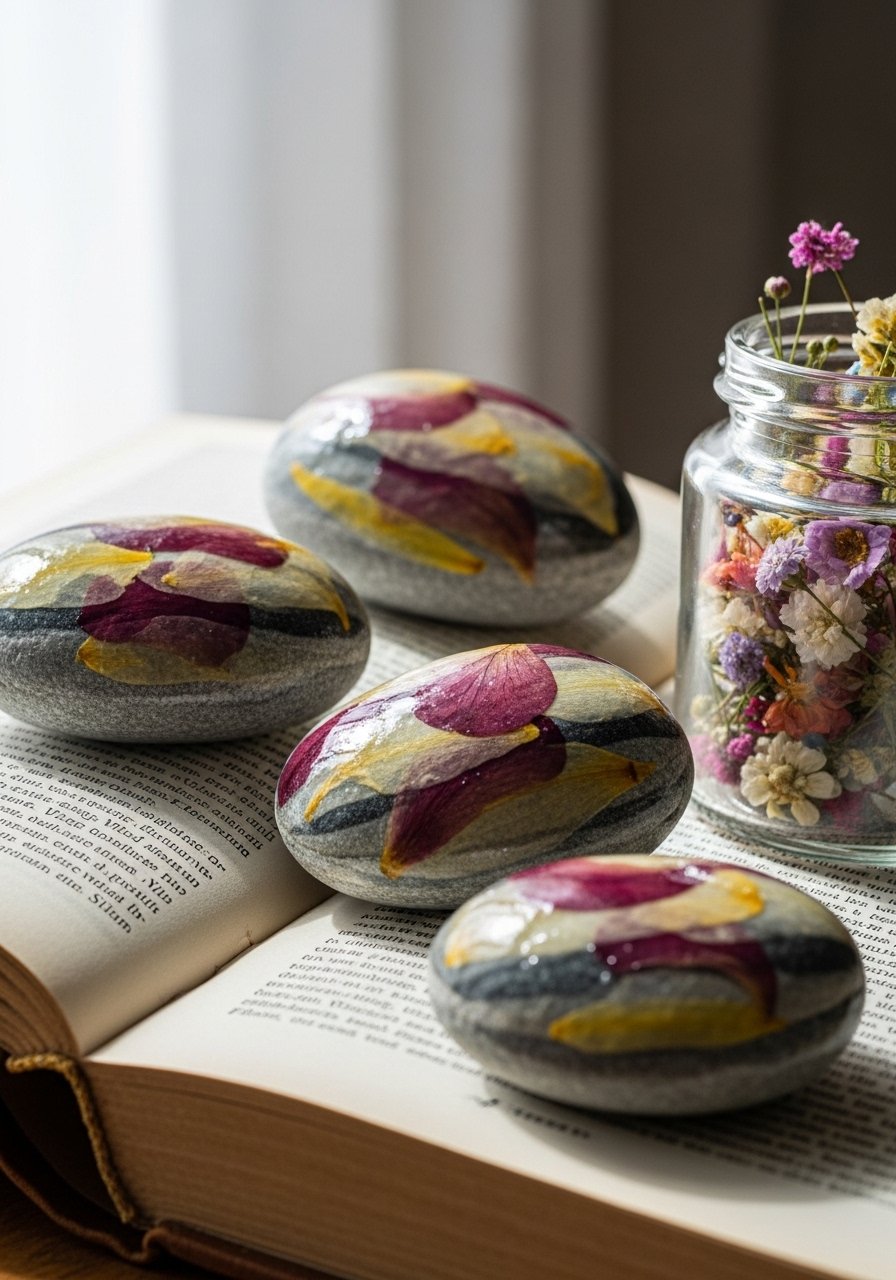
This is a delicate decoupage variant using thin petals and lots of shallow clear coats for a polished finish.
Materials
- 6 oval stones, 2–3 inches
- Assorted pressed petals, thin variety
- Clear gloss Mod Podge, 8 oz
- Small soft brush
- Fine sandpaper, 220 grit (for smoothing between coats)
Instructions
- Arrange petals and glue with a thin coat of Mod Podge. Dry 30 minutes.
- Apply 4–6 thin top coats of gloss, letting each dry 20–30 minutes and lightly sanding between coats.
- Final cure 72 hours for a smooth, glassy finish.
How to Display or Gift It
- Use as elegant desk paperweights.
- Present in a small velvet-lined box.
- Keep in a dry, cool craft drawer while curing.
- Pair with a pressed-flower card for a matched gift.
- Brush Stroke Abstracts — Modern Painterly Stones
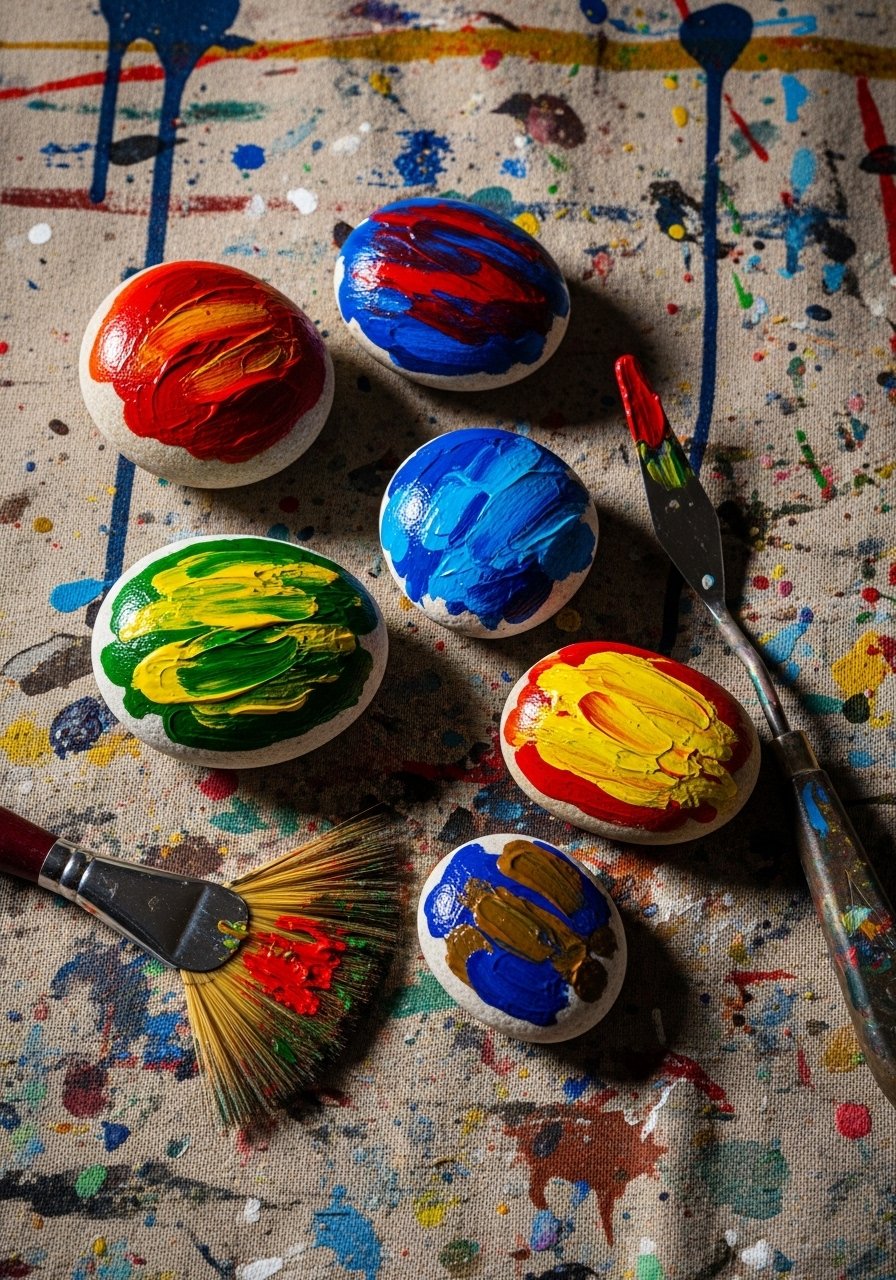
If you like painterly marks, these abstract stones let you experiment with scale and color. Use a fan brush and palette knife for texture.
Materials
- 10 medium stones, 2–3 inches
- Acrylic paint in 4 contrasting colors, 1 oz each
- Fan brush
- Palette knife
- Gloss or satin varnish, 4 oz
Instructions
- Apply broad color swaths with a fan brush.
- Add texture with a palette knife and thin glazes.
- Let layers dry 15–20 minutes between passes.
- Seal with varnish. Cure 24 hours.
How to Display or Gift It
- Group several on a mantel for an artsy display.
- Stack in a shallow bowl for an eye-catching coffee table piece.
- Wrap in tissue and tuck into a small art-themed gift box.
- Store in padded craft trays for protection.
- Stamped Pattern Rocks — Repeat Motif Pebbles
Stamping gives a crisp, repeatable pattern that’s quick for batches. Use pigment ink or paint applied to a stamp.
Materials
- 12 small stones, 1–2 inches
- Rubber stamps, small motifs set
- Pigment ink pad or acrylic ink
- Clear sealer, 4 oz
- Small block mount for stamps (if unmounted)
Instructions
- Paint a base coat if desired and dry 20 minutes.
- Press stamp into ink and then firmly onto stone.
- Repeat pattern as desired, letting ink dry 10 minutes.
- Seal with two light coats of sealer. Cure 24 hours.
How to Display or Gift It
- Place in a trinket tray with complementary decor.
- Create sets by theme (floral, leaf, geometric).
- Gift in a small wooden box with shredded paper.
- Store stamps and finished rocks in labeled craft bins.
- Glow-in-the-Dark Constellation Stones — Night Garden Markers
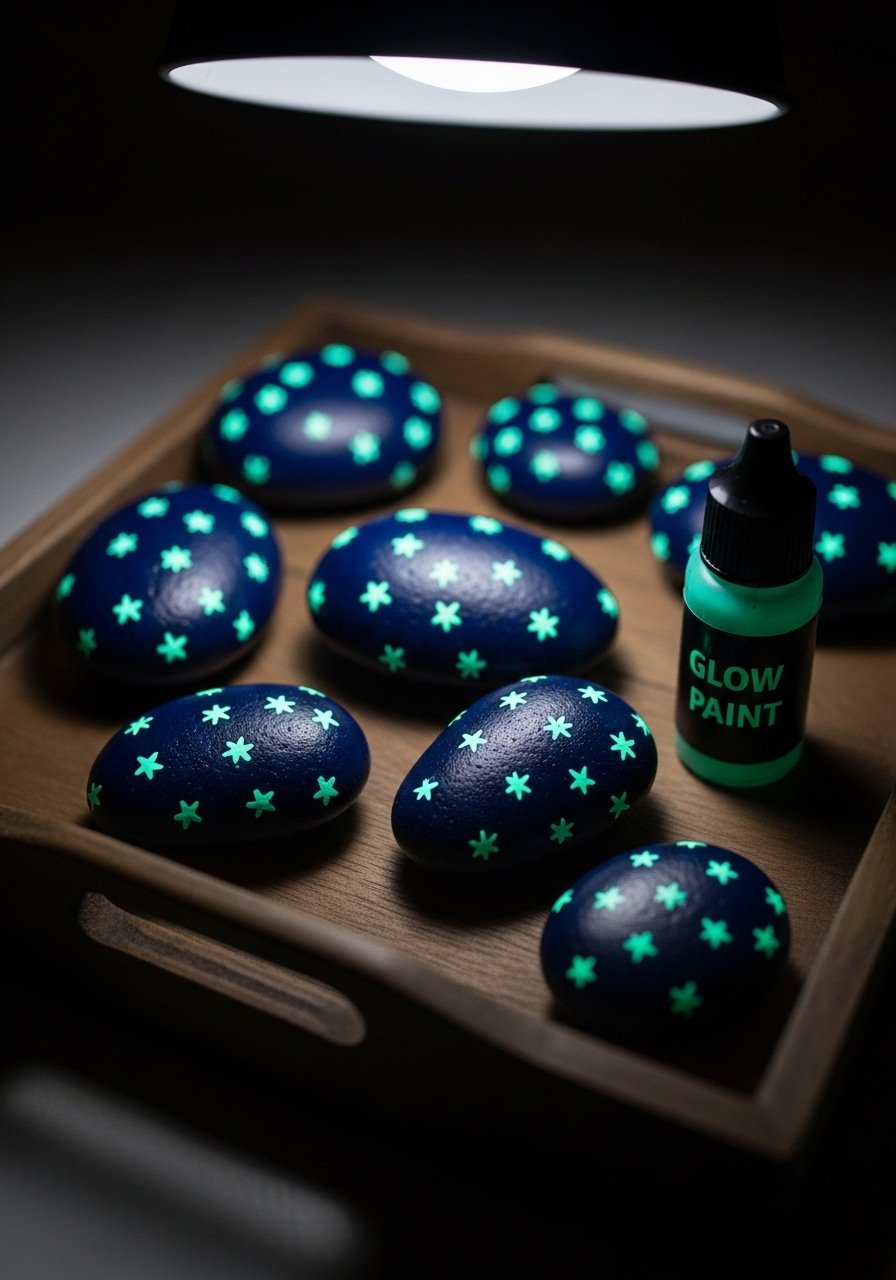
These are playful for night gardens or children's rooms. Use glow-in-the-dark paint for starry accents.
Materials
- 8 stones, 2–3 inches
- Glow-in-the-dark paint, 1 oz
- Navy acrylic base, 1 oz
- Fine detail brush
- Gloss varnish, 4 oz
Instructions
- Paint base navy and dry 30 minutes.
- Apply constellations with glow paint; build two thin coats for brightness. Dry 20 minutes between coats.
- Charge under a bright light and test glow.
- Seal with gloss varnish. Cure 24 hours.
How to Display or Gift It
- Line a garden path with them for subtle nightlight effects.
- Include with a small battery tea light for boxed gifts.
- Store in a low-light craft box when not in use.
- Recharge under a lamp before gifting for maximum glow.
- Minimal Line Art Stones — Single-Line Illustrations
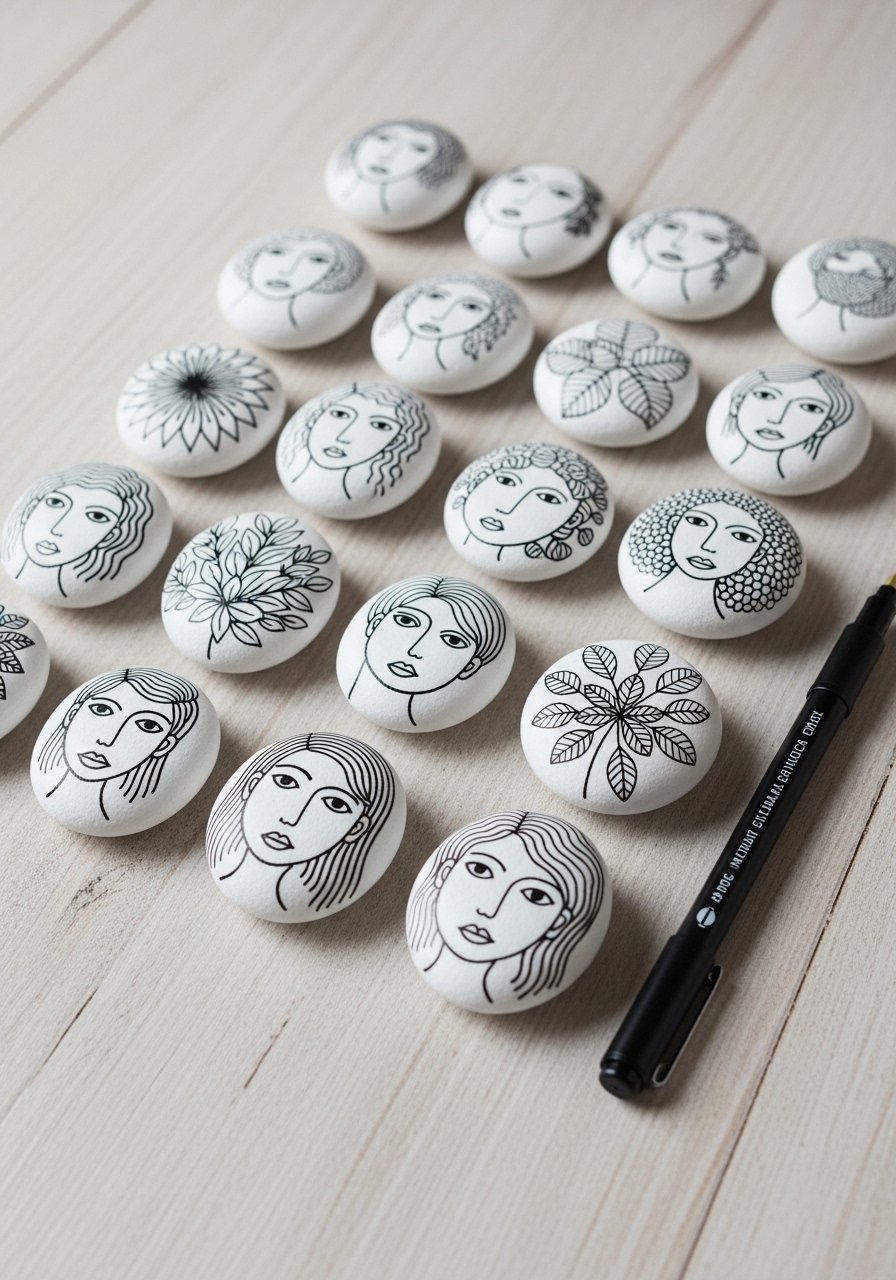
Single-line drawings feel modern and subtle. Practice on paper, then transfer with a faint pencil line before inking.
Materials
- 10 flat stones, 2–3 inches
- White base paint, 1 oz
- Black fineliner pen, 0.3 mm
- Pencil
- Matte varnish, 4 oz
Instructions
- Paint a smooth white base. Dry 20 minutes.
- Lightly sketch single-line composition in pencil.
- Ink carefully with fineliner. Let dry 10 minutes.
- Seal with matte varnish. Cure 24 hours.
How to Display or Gift It
- Frame three in a row in a shallow box frame.
- Gift as a minimalist housewarming token.
- Store in a flat compartment organizer to prevent smudging.
- Pair with a small art print for an elegant set.
- Pebble Name Markers — Personalized Garden Labels
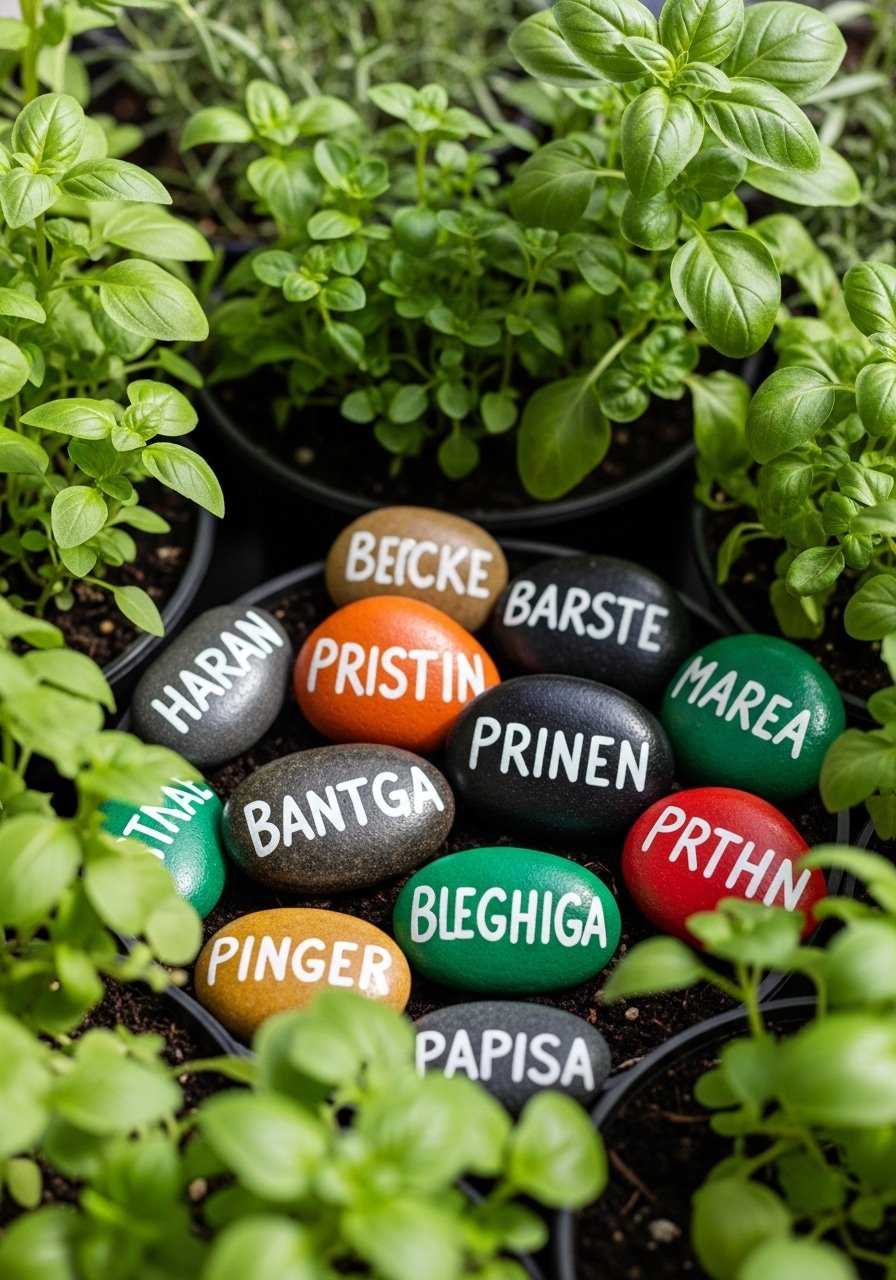
Personalized name stones make great garden labels and event place cards. Paint names with a steady script pen or small brush.
Materials
- 20 small stones, 1–2 inches
- Acrylic paints for bases, assorted, 1 oz each
- White script paint pen
- Fine round brush
- Permanent marker for touch-ups
- Outdoor sealer, 12 oz (if used outdoors)
Instructions
- Paint base colors and dry 20 minutes.
- Letter names with a script pen; let dry 10 minutes.
- Touch up edges and seal with outdoor sealer for garden use. Cure 48–72 hours.
How to Display or Gift It
- Use in potted herb planters or garden beds.
- Wrap sets in twine for garden-club gifts.
- Store extras in garden tool boxes until planting season.
- Include care notes or planting tips when gifting.
- Resin-Coated Memory Stones — Photo Keepsakes
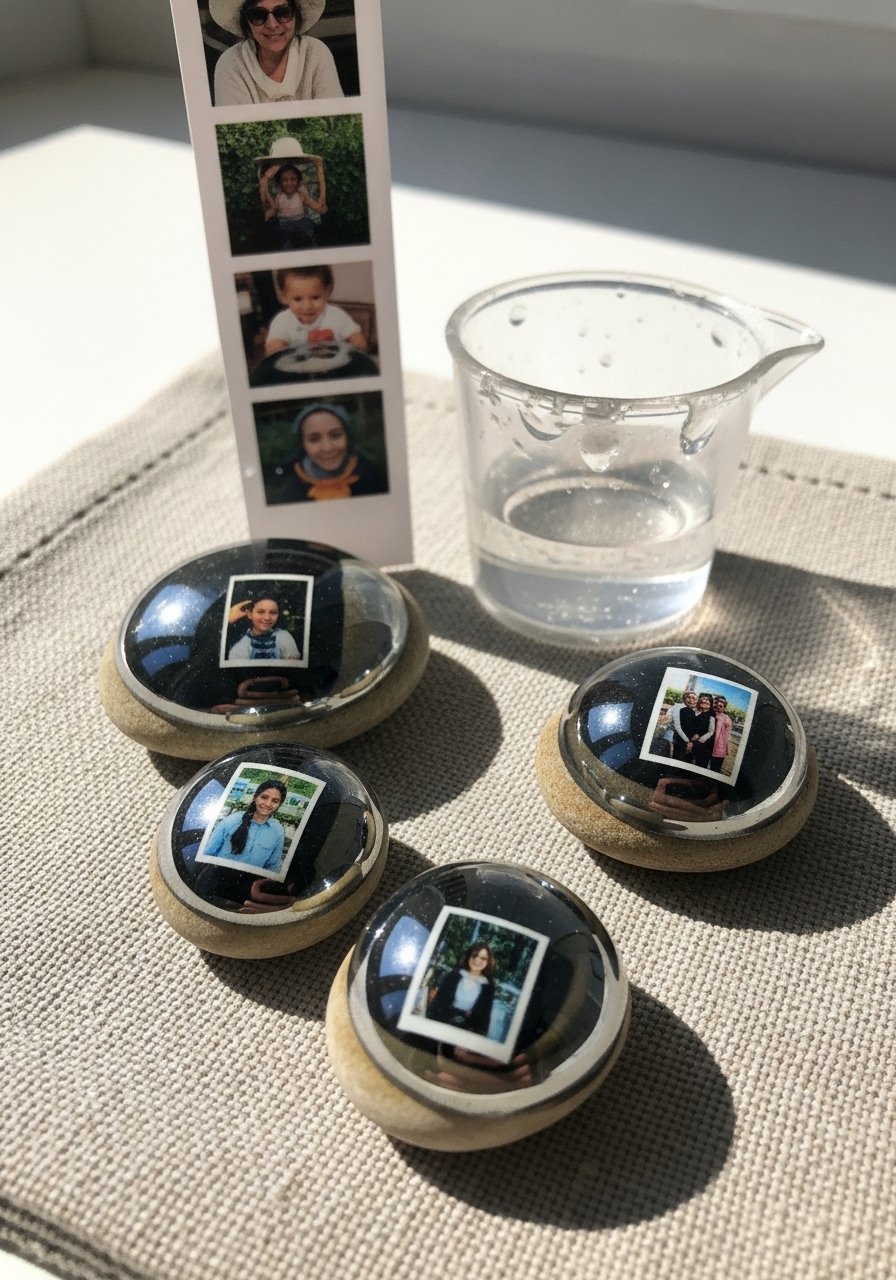
Capture photos on stones with resin domes for heirloom pieces. Use a clear epoxy resin kit and waterproof photo transfers.
Materials
- 6 flat stones, 2–3 inches
- Epoxy resin kit, 2 oz mixed per stone
- Printed photo transfers on glossy paper (reduced size)
- Small silicone cups and stirring sticks
- Gloves and disposable mixing trays
Instructions
- Prep photos to fit stone; seal photo with thin glue to waterproof.
- Position photo on stone using a bit of Mod Podge as adhesive.
- Mix resin per kit instructions and pour a thin dome over photo.
- Remove bubbles with a heat gun held briefly (5–10 seconds).
- Let resin cure 24–72 hours depending on kit. Do not move during cure.
How to Display or Gift It
- Present in a small photo box with a ribbon.
- Use as keepsake paperweights on a desk.
- Store carefully during cure in a dust-free container.
- Label with date and a short note for future memory sharing.
- Seasonal Mini Scenes — Tiny Story Pebbles
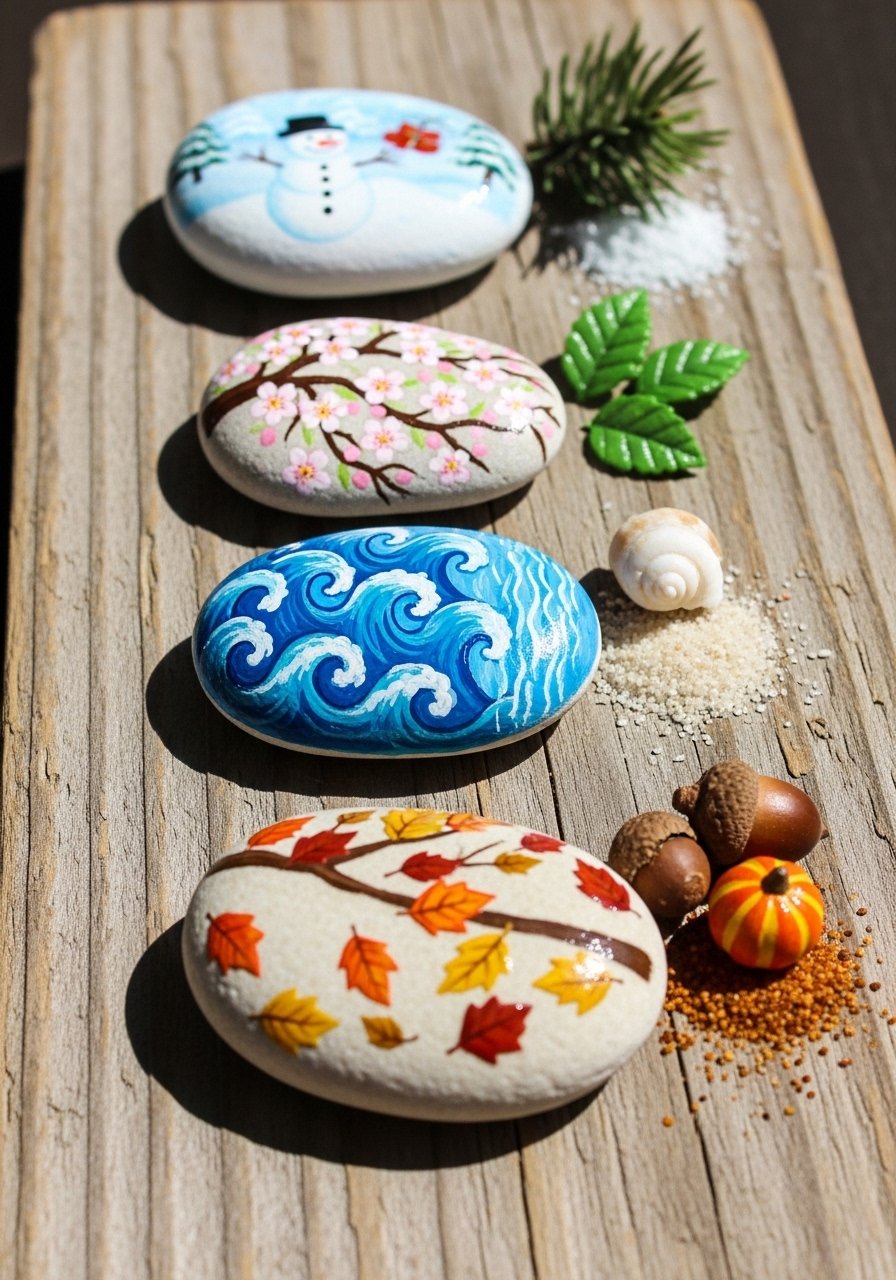
These little narrative stones let you celebrate seasons with tiny vignettes. Paint each stone as part of a set, then display in sequence.
Materials
- 16 small stones, 1–2.5 inches
- Acrylic paints assorted seasonal palette, 1 oz per color
- Small round and detail brushes
- Matte varnish, 4 oz
- Small wooden display tray (optional)
Instructions
- Plan scenes across multiple stones so they read left to right.
- Paint background washes and let dry 20 minutes.
- Add focal elements with detail brushes.
- Seal with matte varnish, two coats. Cure 24 hours.
How to Display or Gift It
- Line up on a mantel to rotate by season.
- Pack seasonal sets in small kraft boxes as thoughtful gifts.
- Store in a labeled craft organizer seasonally.
- Create a year-round rotating display on a narrow shelf.
Thanks for exploring these easy stone painting ideas with me — there really is something for every mood, skill level, and season. Try a quick project this weekend or pick a few to batch-make as gifts. Save this as a Pinterest board so you can return to the ideas, and tell a friend which style you’ll try first — are you leaning toward cottagecore mushrooms or glossy geodes?
If you plan to make a bunch, a quality hot glue gun with adjustable temperature will speed embellishments without the mess: hot glue gun with temperature control. Happy painting — and don’t forget to share a photo of your favorites.


