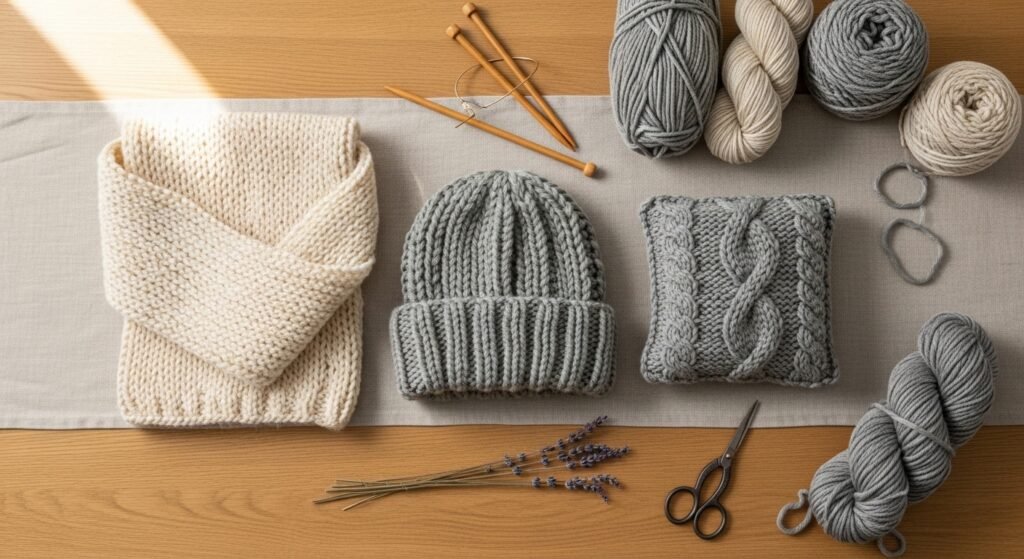
Knitting feels like magic when a simple line of yarn turns into something you can wear, gift, or display. If you've been hunting for knitting patterns for beginners that are clear, quick to learn, and actually look beautiful, you’re in the right place. This list gives you 24 foolproof projects—from tiny dishcloths to cozy throws—each with exact materials, step-by-step instructions, and tips to avoid the most common mistakes like tight cast-ons, uneven gauge, or sloppy joins.
You’ll see projects in popular styles like cottagecore, boho, and Japandi, and I mention tools that save time and frustration. I always keep a US size 8 knitting needles set in my bag for small projects and reach for a chunky yarn bundle when I want instant cozy results. Each pattern uses basic techniques—garter stitch, stockinette, ribbing—so you can build confidence and make something you love.
Ready? Grab your needles and a cup of tea. These knitting patterns for beginners are organized to teach you a new skill with every project.
- Garter-Only Cozy Scarf
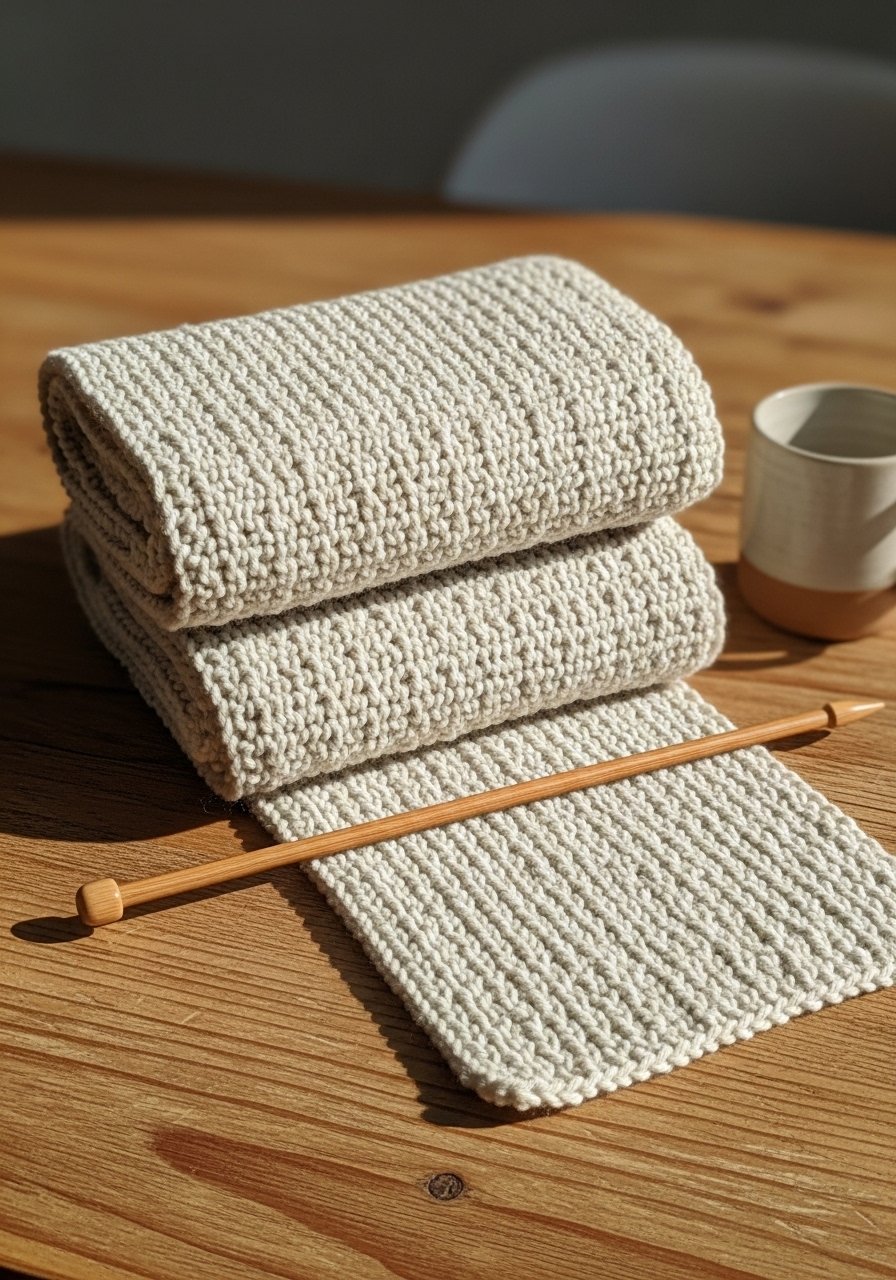
This is the simplest scarf you’ll make—just knit every row. The texture is squishy and forgiving, and the finished scarf looks hand-crafted and timeless. Perfect for beginners and great for gift-giving. Use a bulky yarn for fast results; it feels soft and warm against the neck.
Materials
- Bulky weight yarn, 250–300 yards (approx. 200g–250g) — e.g., chunky wool
- US size 11 (8mm) straight needles, 16" or longer
- Tapestry needle
- Scissors
- Measuring tape
- Stitch marker (optional)
Instructions
- Cast on 20 stitches using long-tail cast-on. For a wider scarf, cast on 28–30.
- Knit every row (garter stitch) until scarf measures 60–70 inches or desired length.
- Keep tension relaxed. If edge stitches pull tight, slip first stitch purl-wise at the start of each row.
- When you reach length, bind off loosely in knit.
- Weave in ends with the tapestry needle.
- Block flat if desired: dampen lightly and pin to shape; let dry 12–24 hours.
How to Display or Gift It
Fold the scarf and tie with twine and a dried sprig for a cottagecore gift. Store rolled in a breathable basket. For display, drape over a ladder or hook on a peg. A small wooden gift box makes this feel boutique.
- Simple Ribbed Beanie (knitting patterns for beginners)
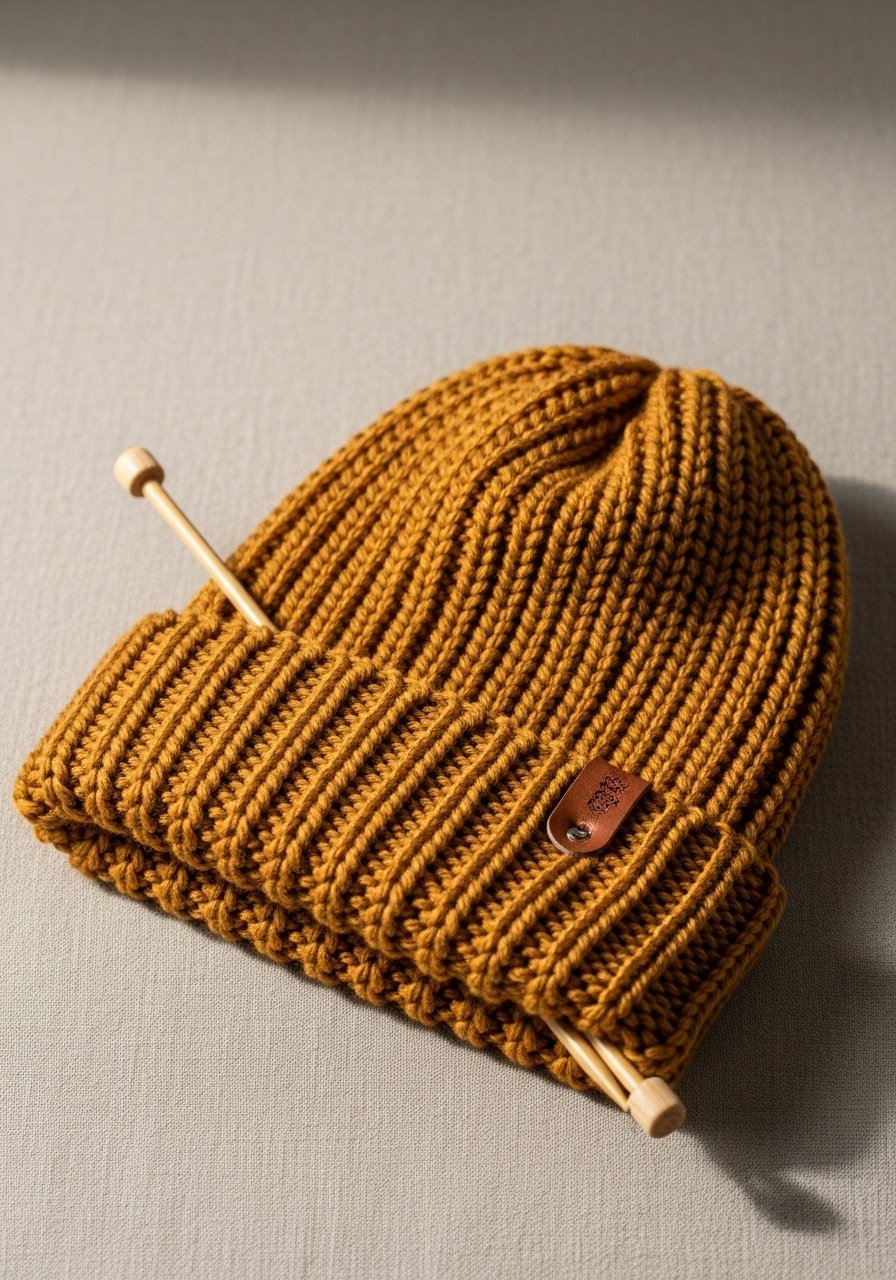
A stretchy ribbed beanie is flattering and forgiving. This hat uses a 2×2 rib, which helps beginners practice knit and purl transitions. Use circular needles or double-pointed needles for the crown decreases.
Materials
- Worsted weight yarn, 150–180 yards (approx. 100g)
- US size 8 (5mm) 16" circular needle + set of DPNs
- Stitch markers
- Tapestry needle
- Scissors
- Measuring tape
Instructions
- Cast on 80 stitches loosely onto circular needle. Join, being careful not to twist.
- Work k2, p2 rib for 6 inches (or desired brim height).
- Switch to stockinette (knit every round) for 4 inches above rib.
- Begin crown decreases: k8, k2tog repeat around; place marker between repeats.
- Continue rounds, decreasing every other round (k6, k2tog), then (k4, k2tog), (k2, k2tog), (k1, k2tog) until ~10 stitches remain.
- Cut yarn, thread through remaining stitches with tapestry needle, pull tight to close. Weave in ends.
- Block briefly by steaming or pinning flat for 2–4 hours if needed.
How to Display or Gift It
Attach a faux-leather tag or pom-pom. Store in a breathable drawer or gift in a kraft box with tissue. A small yarn storage caddy keeps hats sorted.
- Seed-Stitch Headband
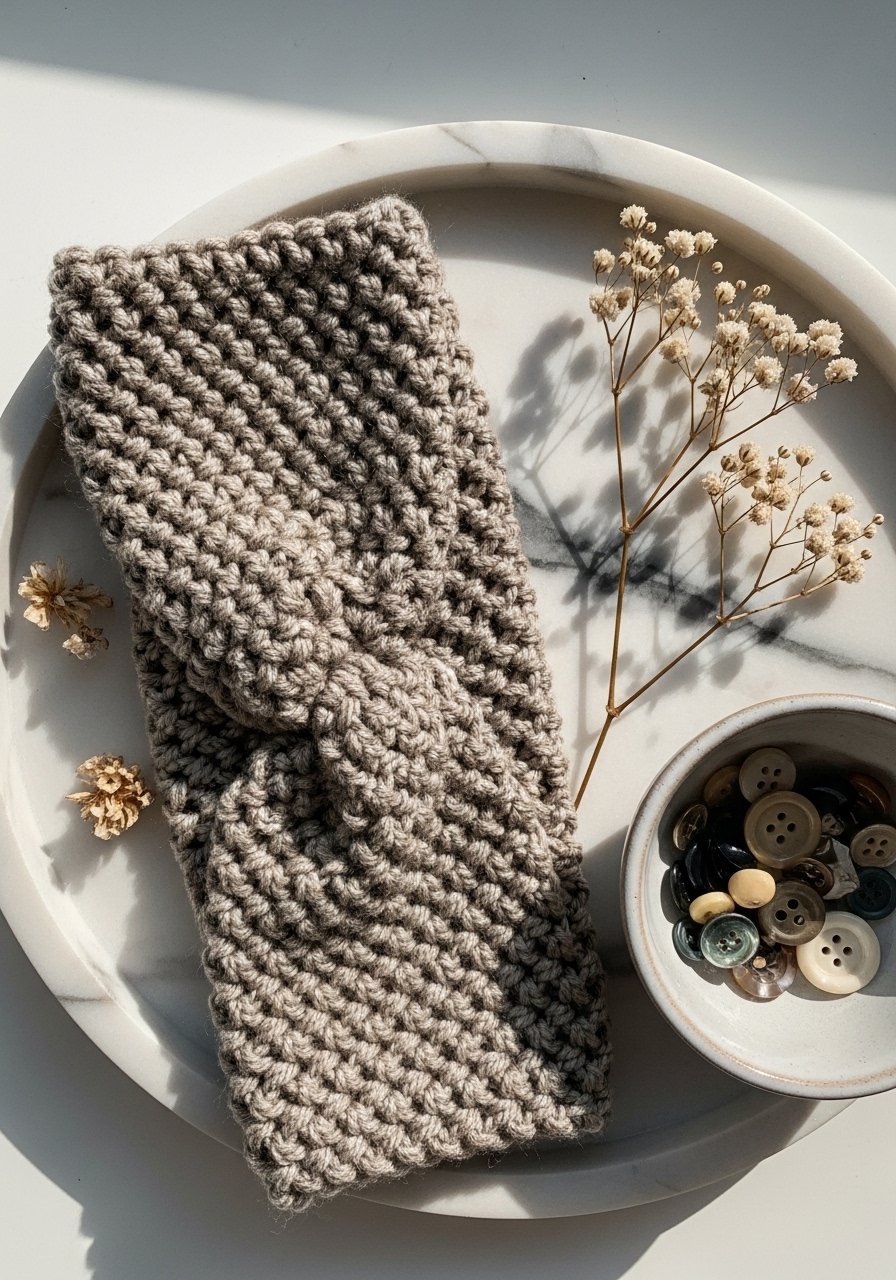
Seed stitch creates a bumpy, cozy fabric that lies flat. This headband is quick and uses reversible texture—great for beginners who want a pretty result without complicated shaping.
Materials
- Worsted weight yarn, 100 yards (50g)
- US size 7 (4.5mm) straight needles
- Tapestry needle
- Scissors
- Measuring tape
- 1 small elastic or snap (optional for hidden closure)
Instructions
- Cast on 18 stitches.
- Row 1: k1, p1 across. Row 2: p1, k1 across. Repeat these two rows until piece measures 19–21 inches.
- Bind off in pattern (maintain seed stitch).
- Seam short ends using mattress stitch for invisible join. If you prefer, sew in a small elastic for stretch.
- Weave in ends. Press gently with steam if needed.
How to Display or Gift It
Pair with a matching scarf and tie with ribbon. Display on a small hat form or headband stand for photography or store flat in a drawer.
- Beginner Dishcloths — Garter & Moss
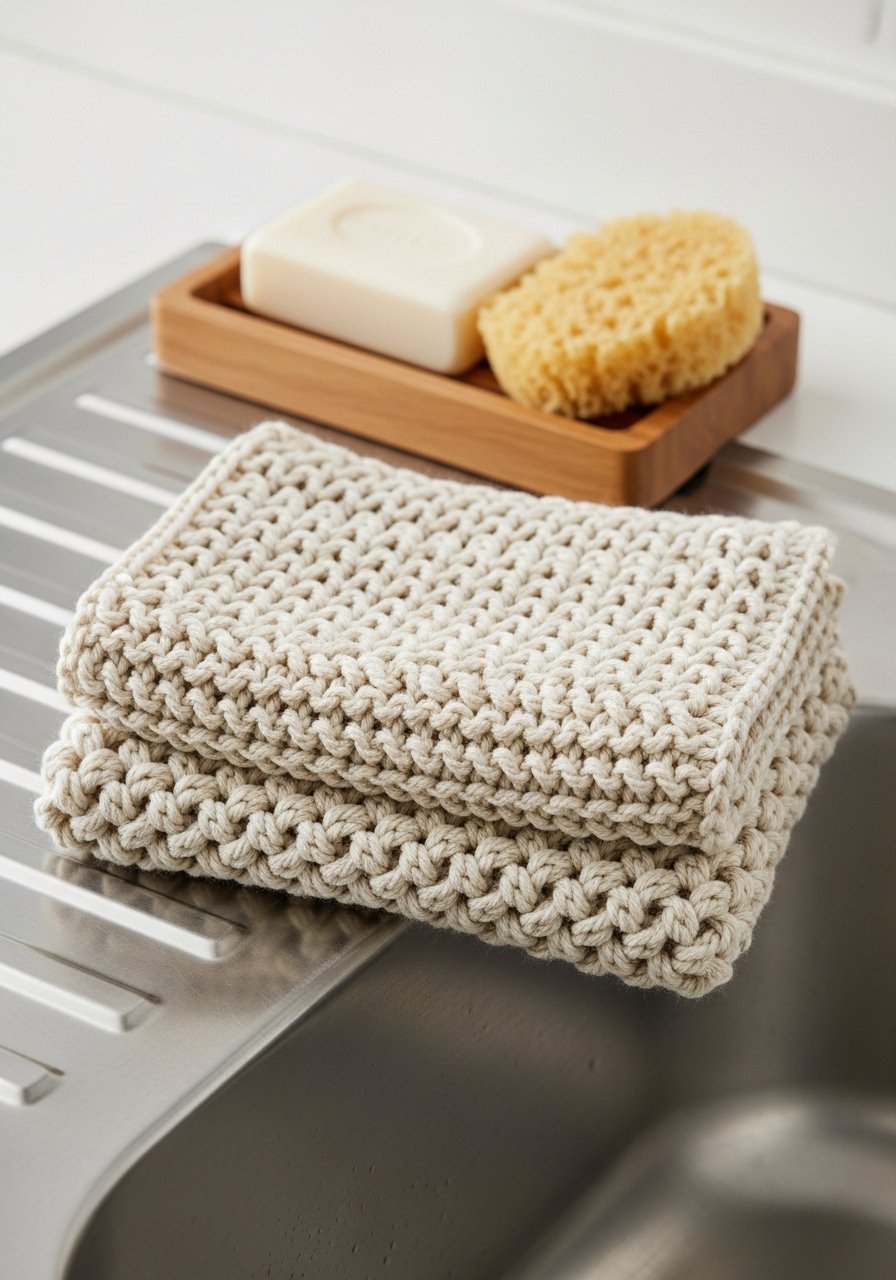
Cotton dishcloths are great practice projects: quick, useful, and washable. Try garter for absolute beginners and moss stitch for a textured variant that hides mistakes.
Materials
- Cotton worsted weight yarn, 120 yards per cloth
- US size 7 (4.5mm) straight needles
- Tapestry needle
- Scissors
- Small blocking mat (optional)
Instructions
- Garter cloth: cast on 36 stitches. Knit every row until square (~8 inches). Bind off.
- Moss cloth: cast on 39 stitches. Row 1: k1, p1 to end. Row 2: p1, k1 to end. Repeat until square. Bind off.
- Weave in ends. Block gently to square up if needed (pin and let dry 2–4 hours).
How to Display or Gift It
Roll with a bar of soap and tie with twine for hostess gifts. For storage, fold and stack in a small kitchen basket.
- Easy Fingerless Mitts
Fingerless mitts are practical and teach circular knitting basics. They use ribbing for stretch and a short row thumb opening you can sew neatly.
Materials
- Worsted weight yarn, 150 yards (one skein)
- US size 7 (4.5mm) 16" circular needle or DPNs
- Stitch marker
- Tapestry needle
- Scissors
- 1 stitch holder or scrap yarn
Instructions
- Cast on 40 stitches. Join for working in the round.
- Work k2, p2 rib for 1.5 inches for cuff.
- Knit in stockinette (knit rounds) until piece measures 4 inches from cast-on.
- Make thumb opening: place next 6 stitches on holder, cast on 2 stitches to bridge opening.
- Continue knitting for 2.5 inches, then bind off loosely.
- Pick up held thumb stitches onto needles, knit in the round for 1.25 inches, bind off. Weave in ends.
How to Display or Gift It
Pair with a matching beanie and package in kraft gift bags. Store flat to keep shape.
- Striped Baby Blanket (knitting patterns for beginners)
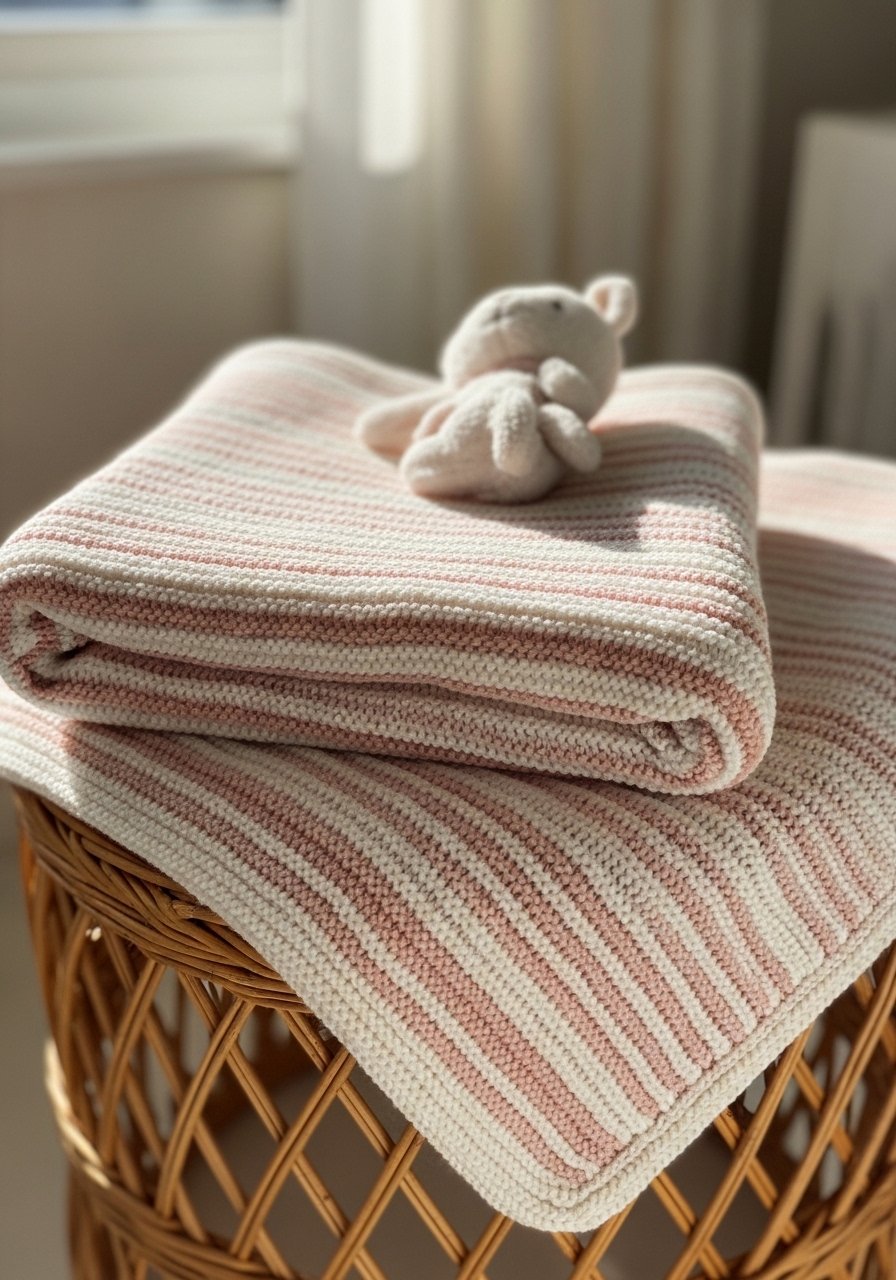
A striped baby blanket is repetitive and soothing to knit. Use worsted yarn and garter stitch for stretch and warmth. The stripes let you practice changing yarn neatly.
Materials
- Worsted weight yarn, total 600–800 yards (mix of 2–3 colors)
- US size 8 (5mm) straight needles, 32" length or longer
- Tapestry needle
- Scissors
- Blocking pins (optional)
Instructions
- Cast on 120 stitches.
- Knit every row (garter stitch). Work stripes: knit 8 rows in color A, join color B and knit 8 rows, alternate.
- Continue until blanket measures 30 x 36 inches.
- Bind off loosely. Weave in ends, trimming tails to 2–3 inches inside fabric.
- Block flat if desired: pin to shape and let dry 12–24 hours.
How to Display or Gift It
Roll with a coordinating ribbon and a small toy. Store in a breathable blanket storage bag to keep fresh.
- Compact Market Tote
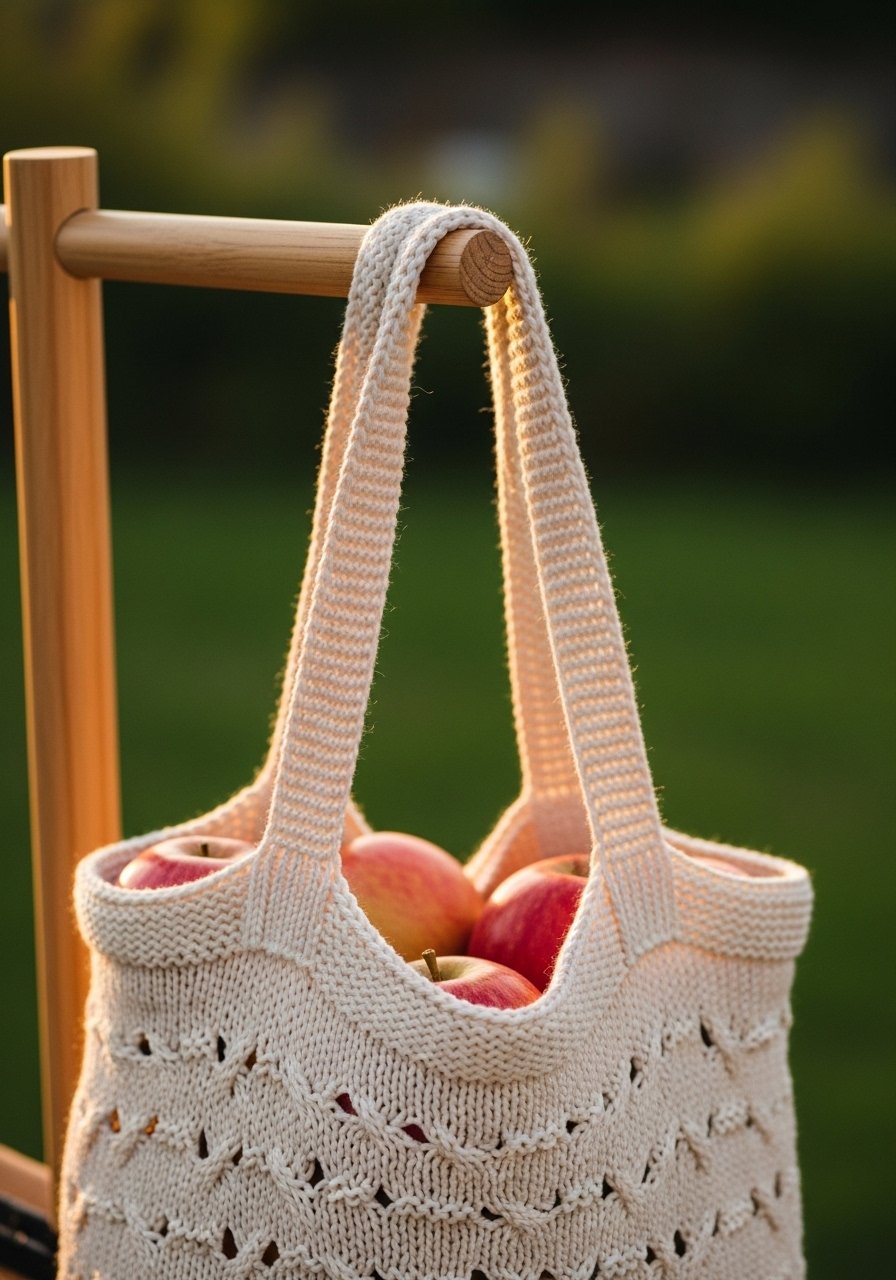
This tote teaches working a sturdy fabric and simple increases for shaping. Cotton yarn adds durability for grocery runs.
Materials
- Cotton DK or worsted weight yarn, 400–500 yards
- US size 8 (5mm) circular needle, 24" for magic loop
- Stitch markers
- Tapestry needle
- Scissors
- Darning needle
Instructions
- Cast on 60 stitches and work seed stitch (k1, p1) for 2 inches for base edge.
- Switch to stockinette and knit in the round until body measures 14 inches.
- Bind off for handles: knit 15 stitches, bind off next 30 stitches, knit remaining 15. Work each side separately for 8 rows, then rejoin and pick up bound-off stitches to create handles.
- Knit 6 inches for handles, then bind off. Weave in ends.
- Add a lining if desired (sew with sewing machine) for extra strength.
How to Display or Gift It
Line with cotton fabric and add a snap closure. Hang on a wall peg rack for grab-and-go storage.
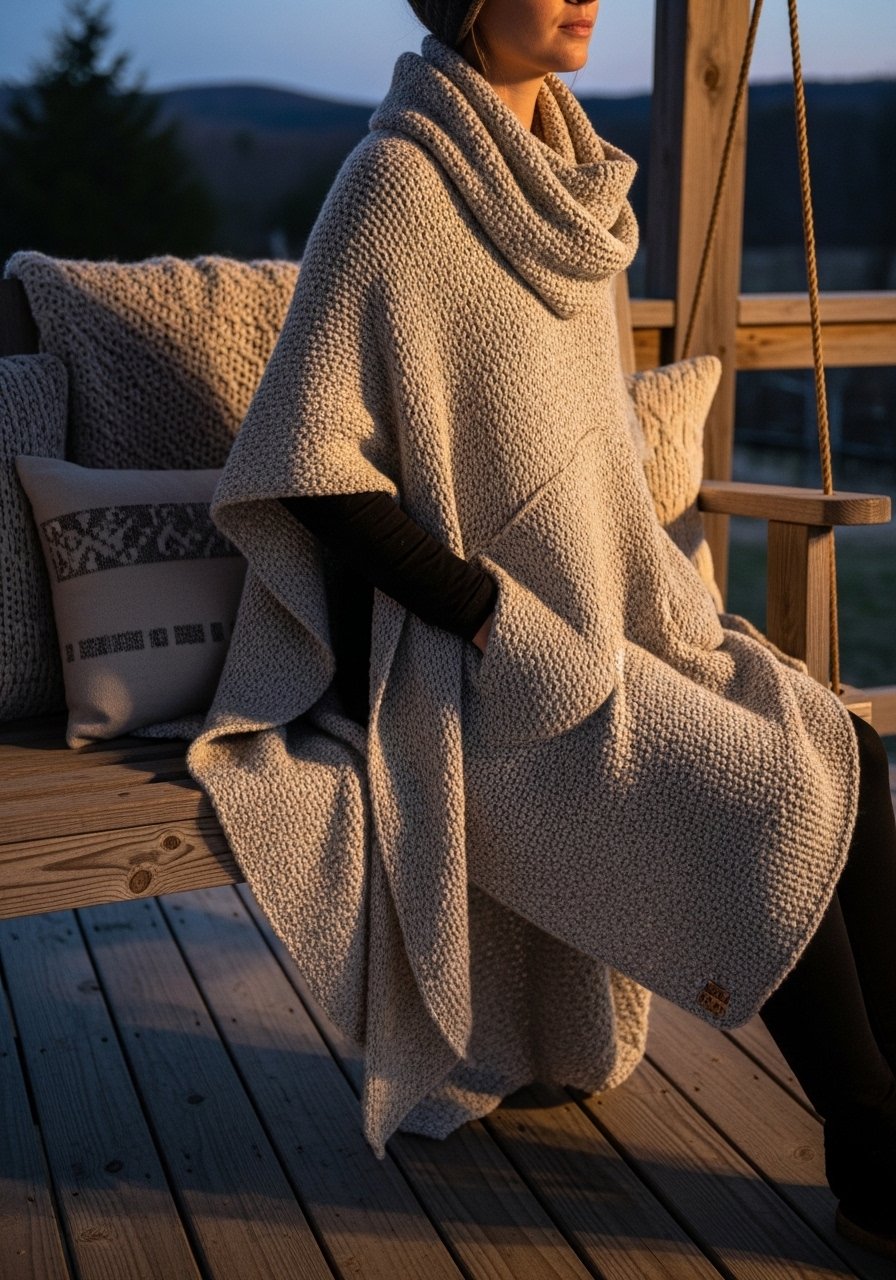
- Chunky Knit Pouf (arm-knitting adaptation)
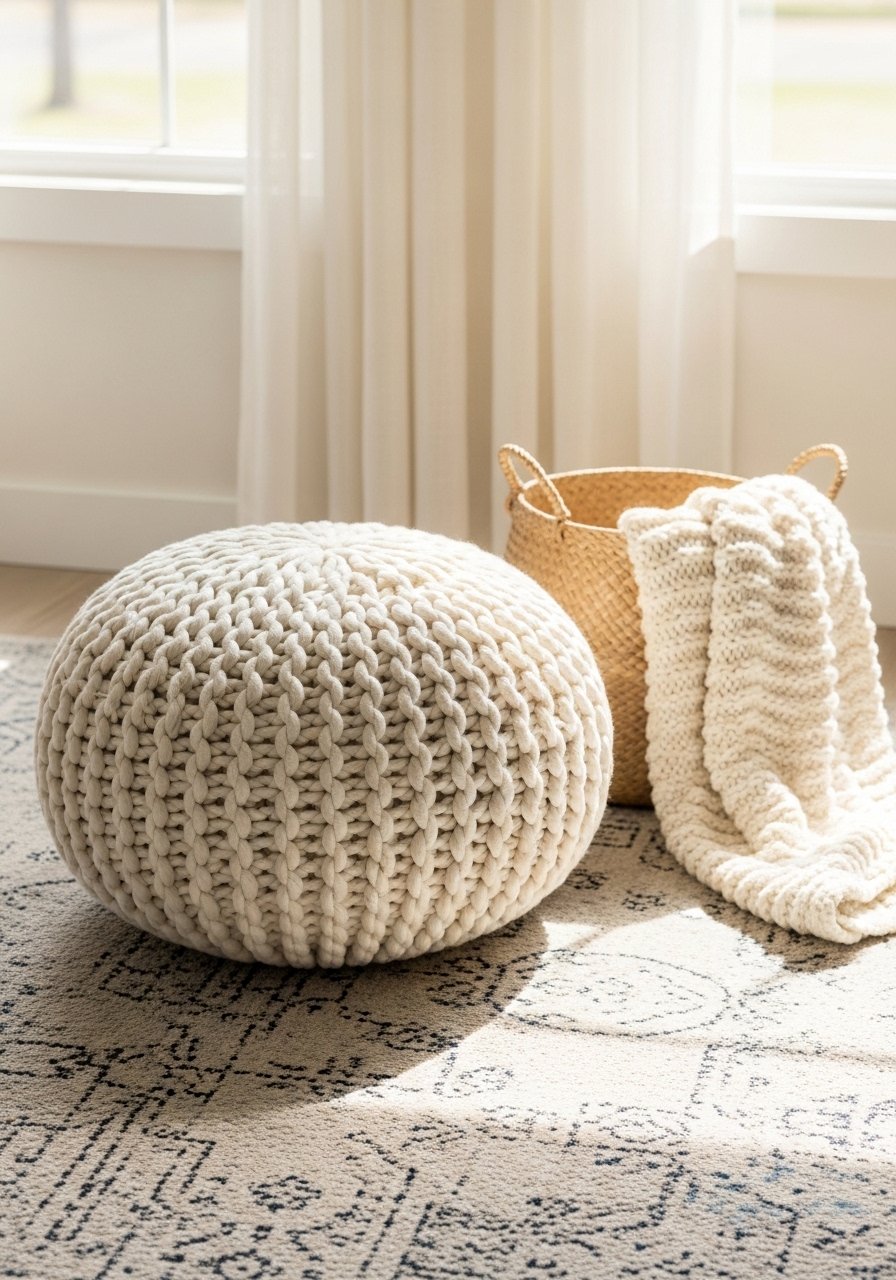
This pouf uses super bulky yarn (or arm-knitting) to finish fast. It's great for learning tension control with thick yarn and adds a cozy statement in Japandi or boho spaces.
Materials
- Super bulky yarn (100–150 yards) or two bulky skeins (300–400 yards total)
- Large circular needles US 17 (12mm) or use arm-knitting
- Pillow insert or fabric stuffing (20–30" round)
- Tapestry needle
- Scissors
Instructions
- Cast on 24 stitches with super bulky yarn on large needles.
- Work garter stitch back and forth until rectangle measures 40 x 24 inches.
- Bind off. Fold and mattress-stitch sides to form a cylinder.
- Stuff pillow insert or fiberfill firmly. Close top with mattress stitch.
- Smooth seams and trim excess yarn. Let sit for 24 hours to settle.
How to Display or Gift It
Use as a living room footrest or child’s seat. For storage, compress in a large storage bag.
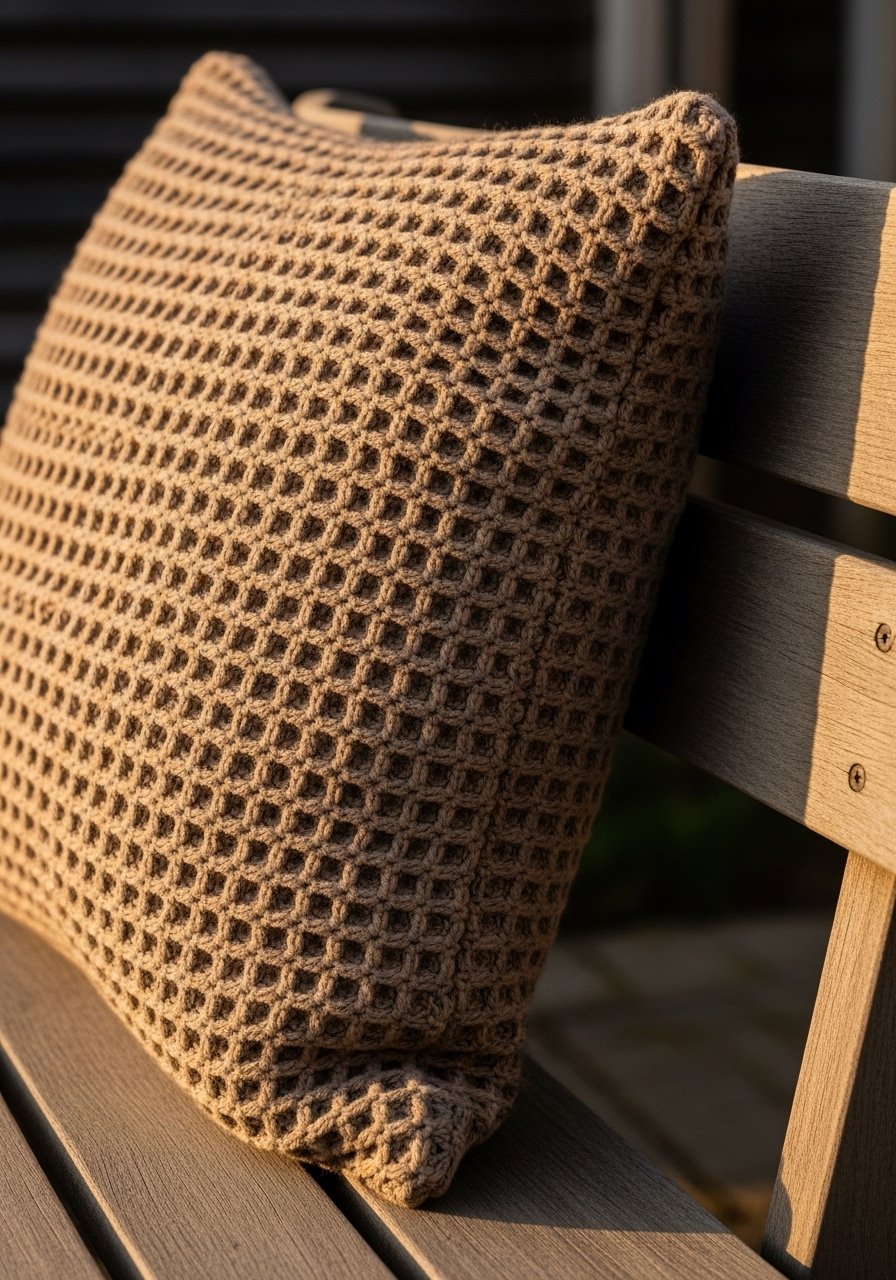
- Textured Throw Pillow Cover
A pillow cover teaches pattern repeats and seaming. Use a filler pillow and removable cover for easy washing—great for farmhouse or cottagecore living rooms.
Materials
- Worsted weight yarn, 300–400 yards
- US size 8 (5mm) straight needles
- 18" pillow insert
- Tapestry needle
- Scissors
- Measuring tape
- Small zipper or buttons (optional)
Instructions
- Cast on 60 stitches. Work pattern: Row 1: k2, p2 across. Row 2: p2, k2 across. Repeat until piece measures 18 inches.
- Bind off. Make a second identical piece for back or use a smart closure (sew a zipper to one edge).
- Seam three sides with mattress stitch, insert pillow, then close final side.
- Weave in ends and block gently.
How to Display or Gift It
Mix with patterned pillows for texture. Store spare pillows in a vacuum storage bag to save space.
- Basic Baby Booties
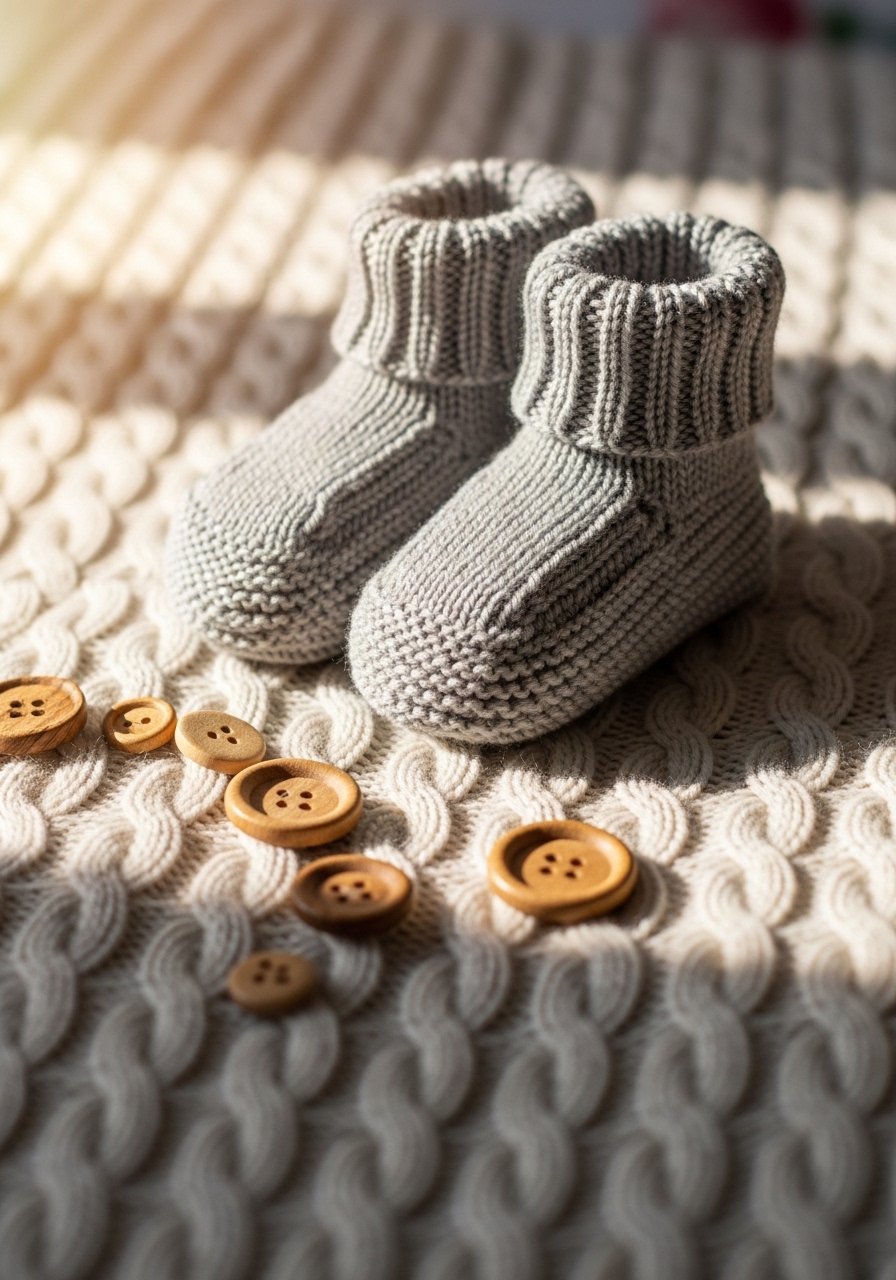
Tiny booties are fast and satisfying. They teach shaping and short rows for the heel. Use soft, washable yarn for baby-safe wear.
Materials
- DK weight yarn, 120 yards
- US size 6 (4mm) double-pointed needles (DPNs)
- Tapestry needle
- Scissors
- 2 small buttons (optional)
- Stitch marker
Instructions
- Cast on 36 stitches onto DPNs and join in the round.
- Work ribbing k1, p1 for 1 inch.
- Knit in stockinette for 1.25 inches.
- Shape heel with short rows: k18, turn, p10, turn, k14, turn, etc., until heel cup forms.
- Pick up stitches along heel edges and knit in the round until foot measures 3.5 inches from toe.
- Decrease for toe over two rounds (k2tog around), close with tapestry needle, weave in ends.
- Sew button to side if desired.
How to Display or Gift It
Tuck in a small gift box with tissue. Store newborn items in a breathable baby storage bin.
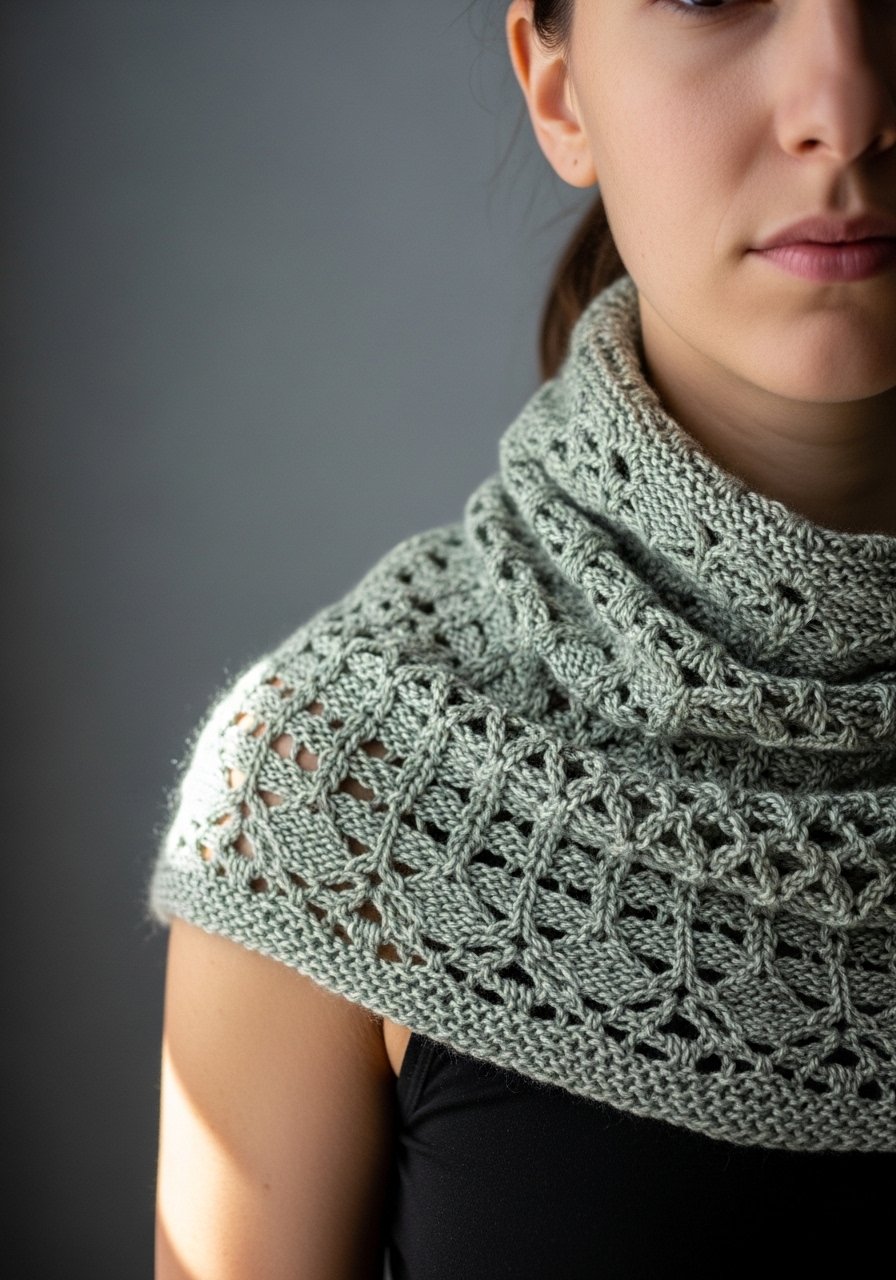
- Simple Lace Triangle Shawl
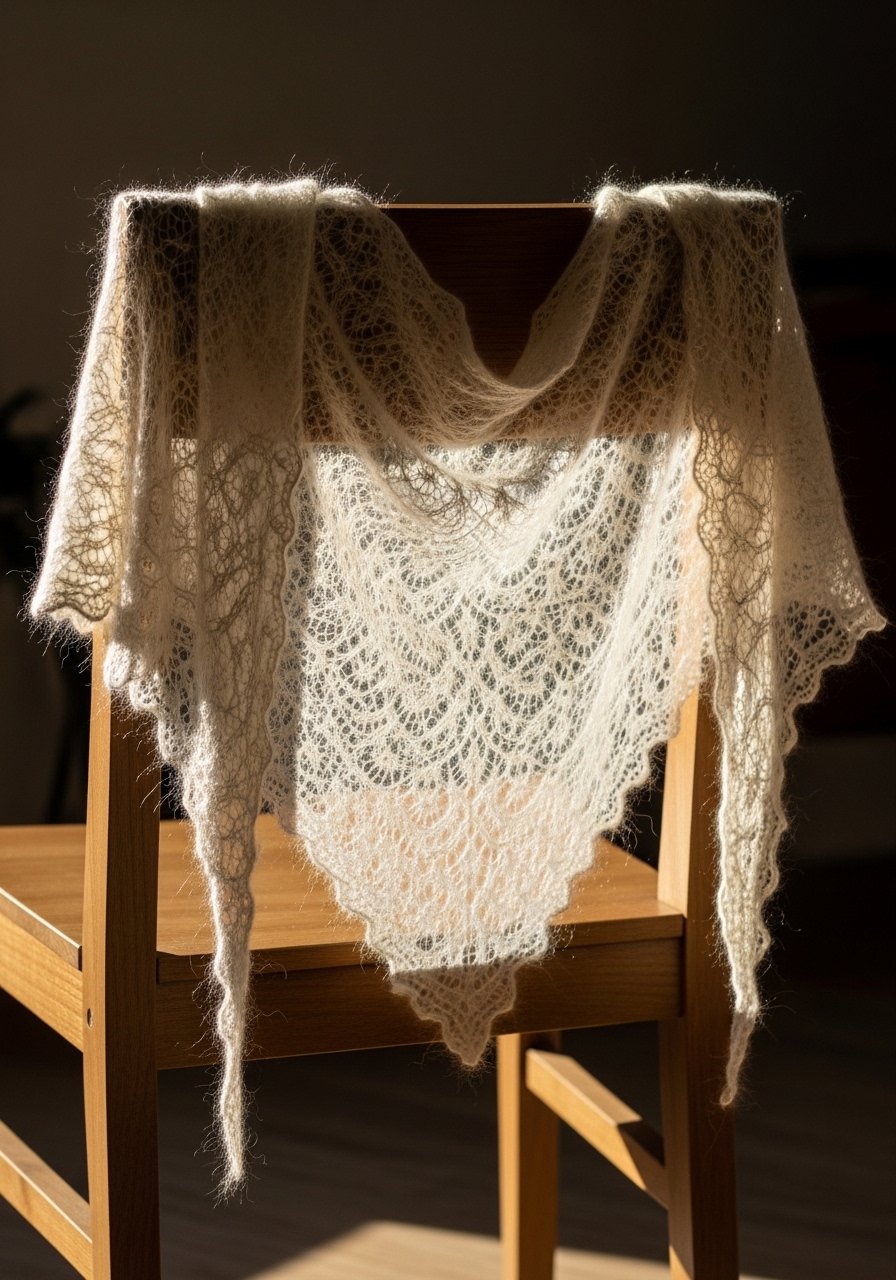
A lightweight shawl with an easy lace repeat teaches reading charted patterns and yarn overs. The result is airy and romantic—great for boho or cottagecore wardrobes.
Materials
- Fingering or light DK yarn, 400 yards (mohair blends work well)
- US size 6 (4mm) circular needle, 32"
- Stitch markers
- Tapestry needle
- Scissors
Instructions
- Cast on 3 stitches at center top.
- Row 1 (right side): k1, yarn over, knit to last stitch, yarn over, k1.
- Row 2: purl across.
- Continue increasing with yarn overs at edges every RS row and follow simple lace repeat: k2tog, yo across pattern rows to create eyelets.
- Work until shawl measures 60 inches across top or desired size.
- Bind off loosely in pattern, weave in ends.
- Block flat, pinning lace points; let dry 24 hours.
How to Display or Gift It
Drape over a dress form or fold in a gift bag with a silk scarf box.
- Striped Blanket for a Chair (knitting patterns for beginners)
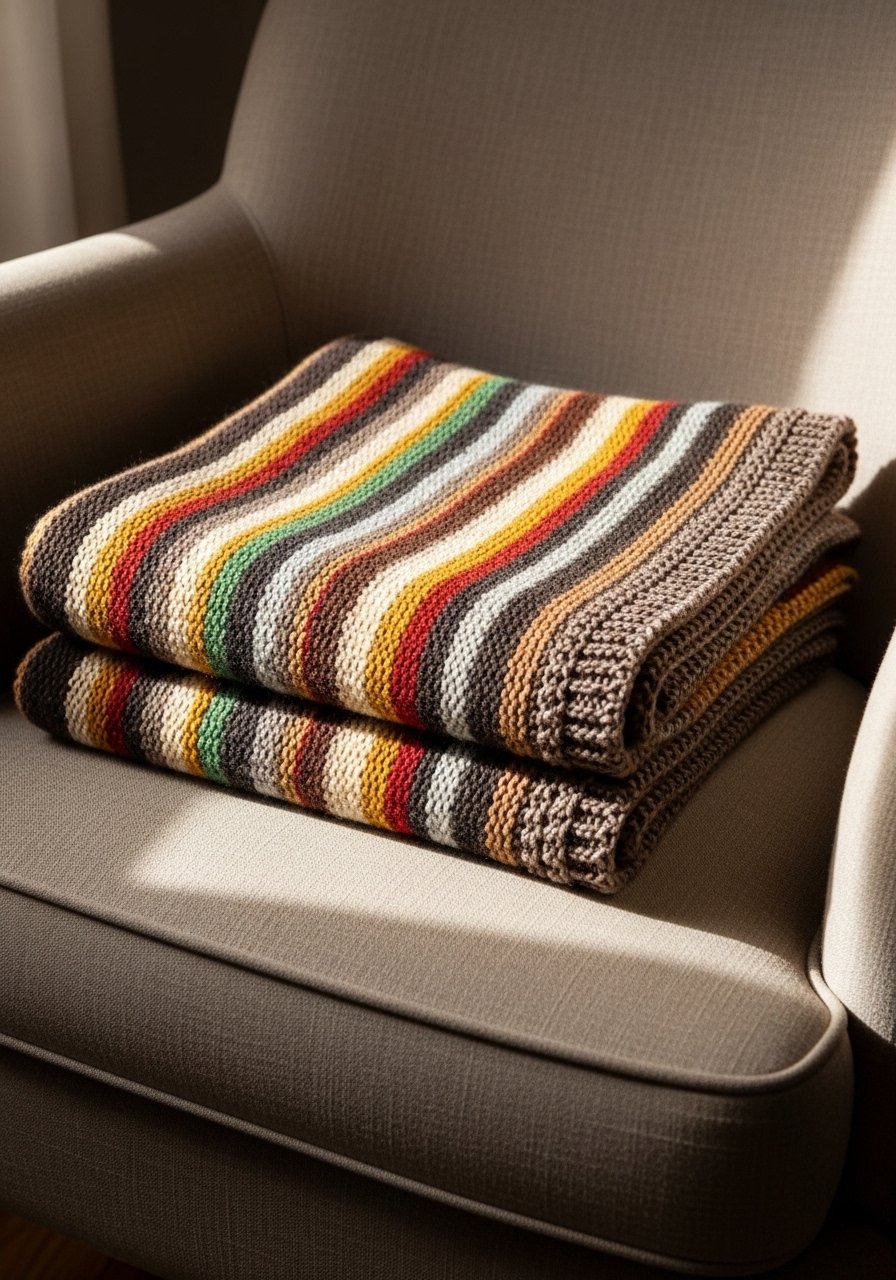
A lap blanket is small enough to finish quickly and uses stripes to add interest. Perfect for a Japandi palette—muted hues and clean lines.
Materials
- Worsted weight yarn, 500–700 yards total (3 colors)
- US size 8 (5mm) straight needles
- Tapestry needle
- Scissors
- Blocking pins (optional)
Instructions
- Cast on 80 stitches.
- Knit 6 rows garter for border.
- Work stockinette for body, alternating colors every 10 rows.
- End with 6 rows garter. Bind off loosely.
- Weave in ends. Block lightly for neat edges; dry 12–18 hours.
How to Display or Gift It
Drape over the back of a chair or fold on an ottoman. Pair with a small throw ladder for display.
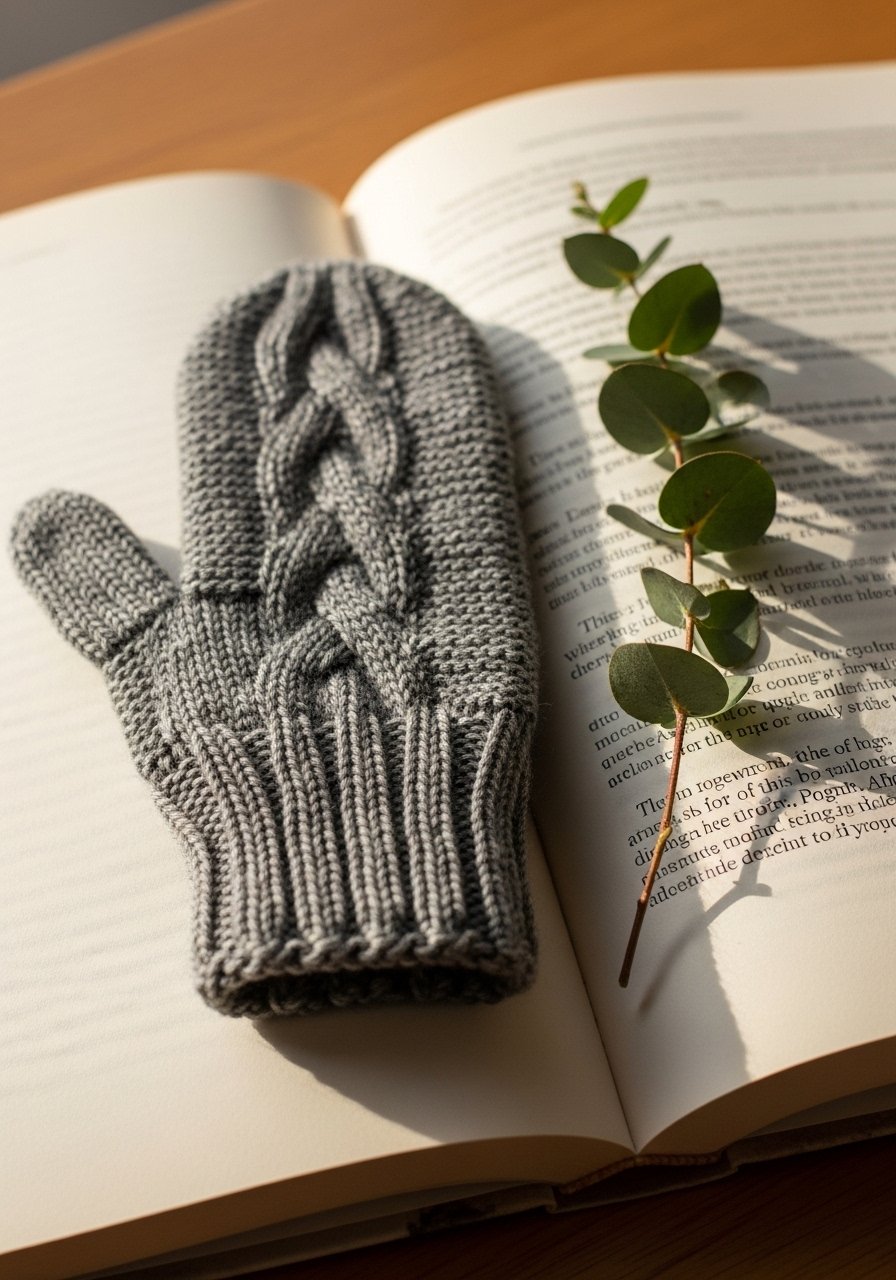
- Simple Cable Headband
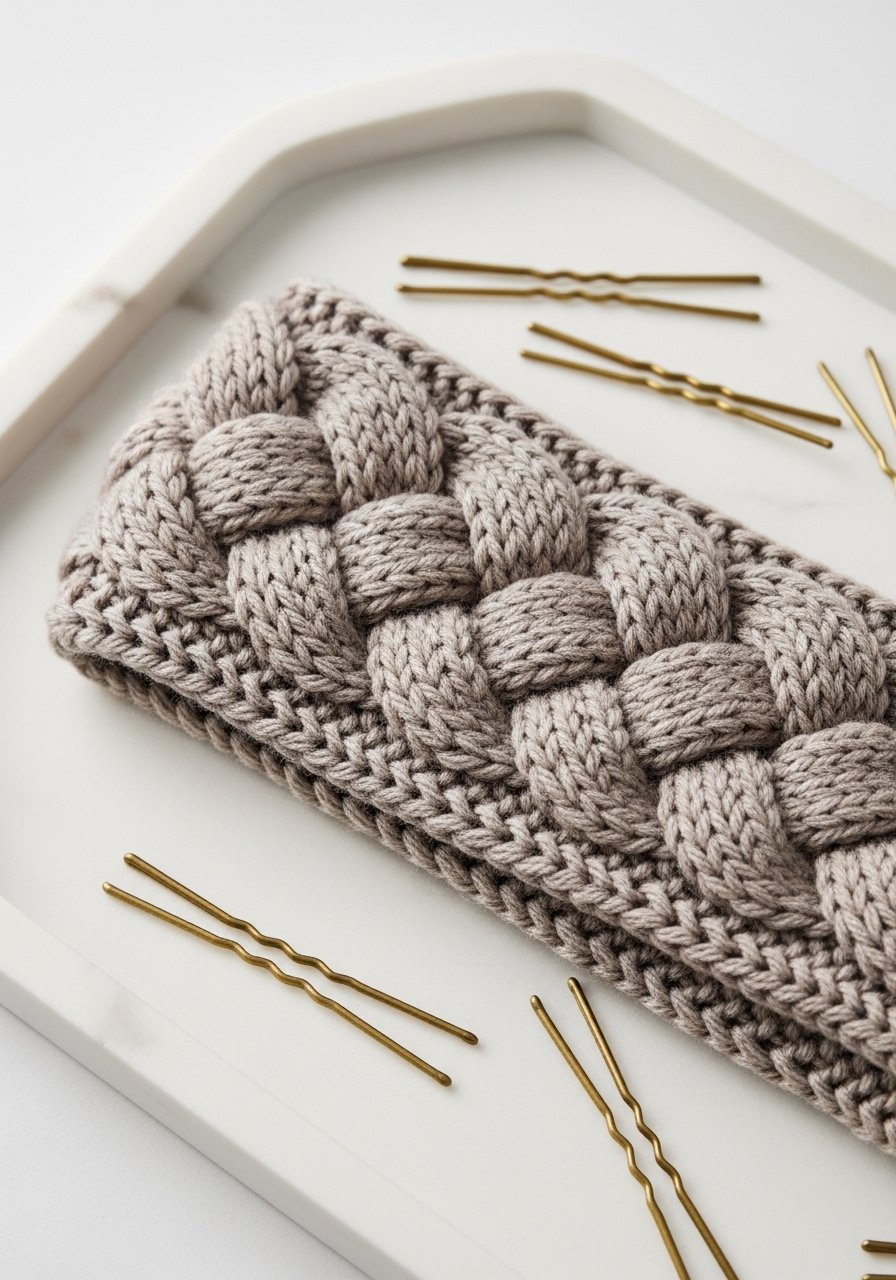
Cables look complex but a single small cable repeat is beginner-friendly. This headband gives a polished look without extensive cable knowledge.
Materials
- Worsted weight yarn, 120 yards
- US size 8 (5mm) straight needles
- Cable needle (or spare DPN)
- Tapestry needle
- Scissors
Instructions
- Cast on 32 stitches.
- Work k2, p2 edge for 1 inch.
- Set cable pattern: k3, C4F (slip 2 to cable needle, hold front, knit next 2, knit from cable needle), k3, p2 repeat.
- Continue pattern until piece measures 19 inches. End with 1 inch k2, p2 border.
- Bind off in pattern. Seam edges and weave in ends.
How to Display or Gift It
Add a small brass pin for a vintage look. Store in a small jewelry box for gifting.
- Easy Market Coasters (set of 4)
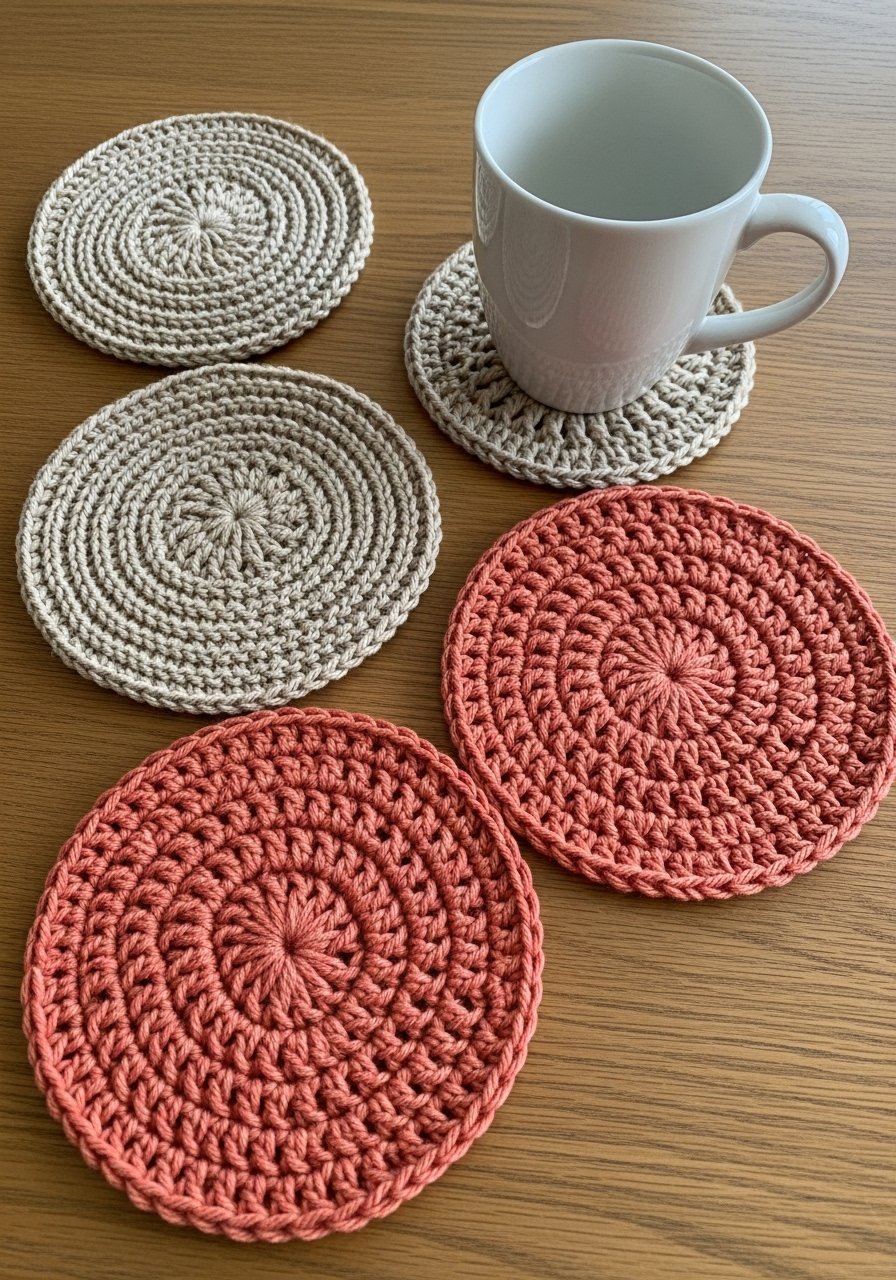
Coasters are perfect for practicing gauge and edge control. Make a set for yourself or as a quick hostess gift.
Materials
- Cotton sport or DK yarn, 150 yards total
- US size 6 (4mm) circular needles or straight
- Tapestry needle
- Scissors
- Stitch marker (optional)
Instructions
- Cast on 40 stitches.
- Work garter stitch until rectangle measures 5 inches.
- Bind off and seam short ends to create a looped coaster or knit in the round to make a circle.
- Block to shape; let dry 2–4 hours.
How to Display or Gift It
Tie sets with twine and a kraft tag. Store in a small coaster holder.
- Mock Cable Baby Sweater
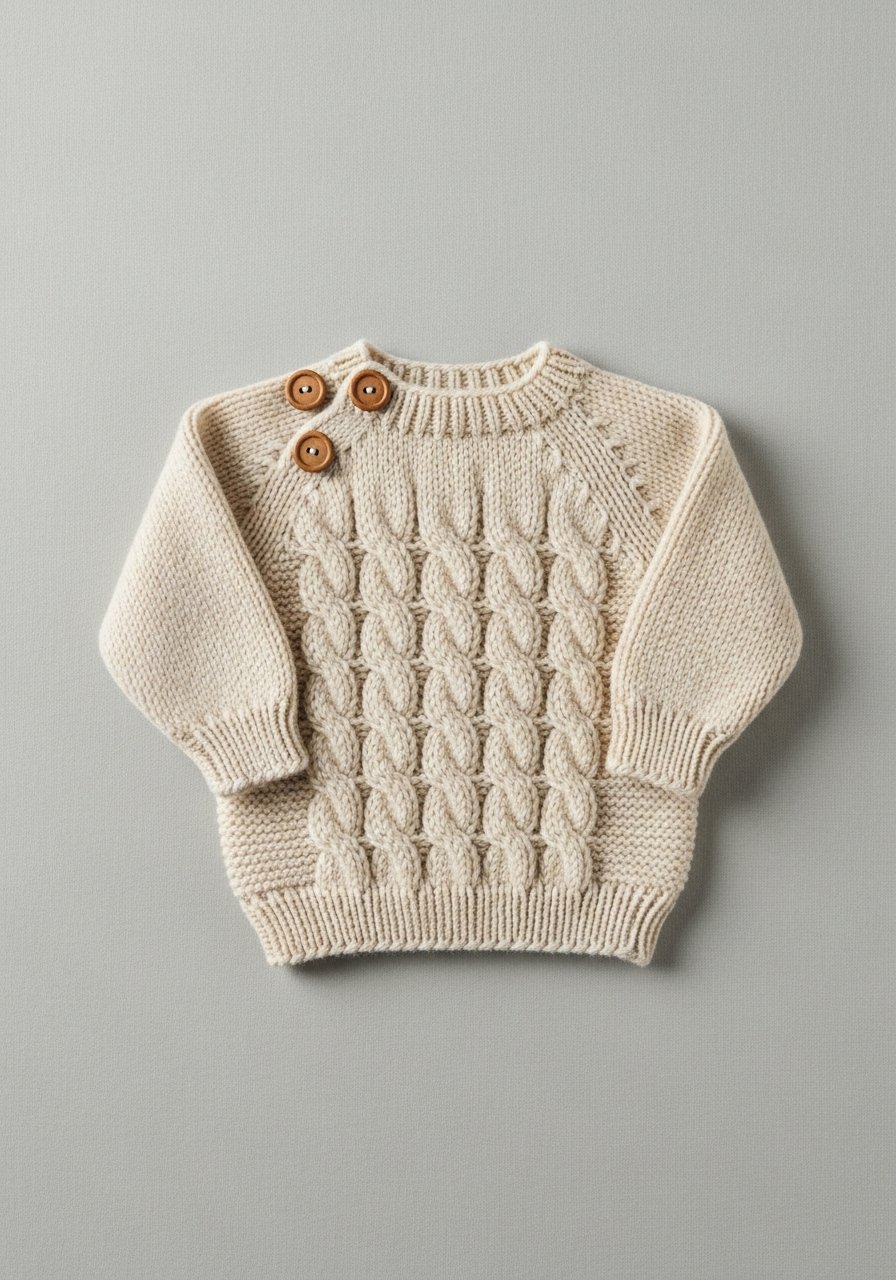
A mock cable uses slipped stitches to mimic cable texture without cable needles. This sweater introduces shaping and simple seaming.
Materials
- Worsted weight yarn, 250–350 yards
- US size 7 (4.5mm) straight needles
- Tapestry needle
- 2 small buttons
- Scissors
- Measuring tape
Instructions
- Cast on 60 stitches for back. Work garter hem 1 inch.
- Work stockinette, adding mock cable panel (slip 1 purlwise, k1) every 6 rows.
- When piece measures 8 inches, shape armholes by binding off 4 stitches each side and work straight until shoulder.
- Make two front panels similarly, including button placket (add 3 buttonholes evenly spaced).
- Seam shoulders and sides. Pick up stitches for sleeves and knit tubes for 5 inches. Bind off and sew.
How to Display or Gift It
Wrap in tissue with a wooden button card. Keep in a baby keepsake box.
- Lacy Infinity Cowl
This cowl uses a simple lace repeat and is knit flat then seamed into a loop. It’s light and elegant—perfect for transitional seasons and fits boho or minimalist wardrobes.
Materials
- Fingering or light DK yarn, 300 yards
- US size 6 (4mm) circular needle, 24"
- Stitch markers
- Tapestry needle
- Scissors
Instructions
- Cast on 200 stitches.
- Work lace pattern: k2, yo, k2tog repeat across row, purl on WS.
- Continue until piece measures 12 inches.
- Bind off in pattern. Seam ends with mattress stitch.
- Block, pin open lace points; dry 24 hours.
How to Display or Gift It
Wear doubled for more warmth, or gift in a scarf box.
- Kitchen Towel with Hanging Loop
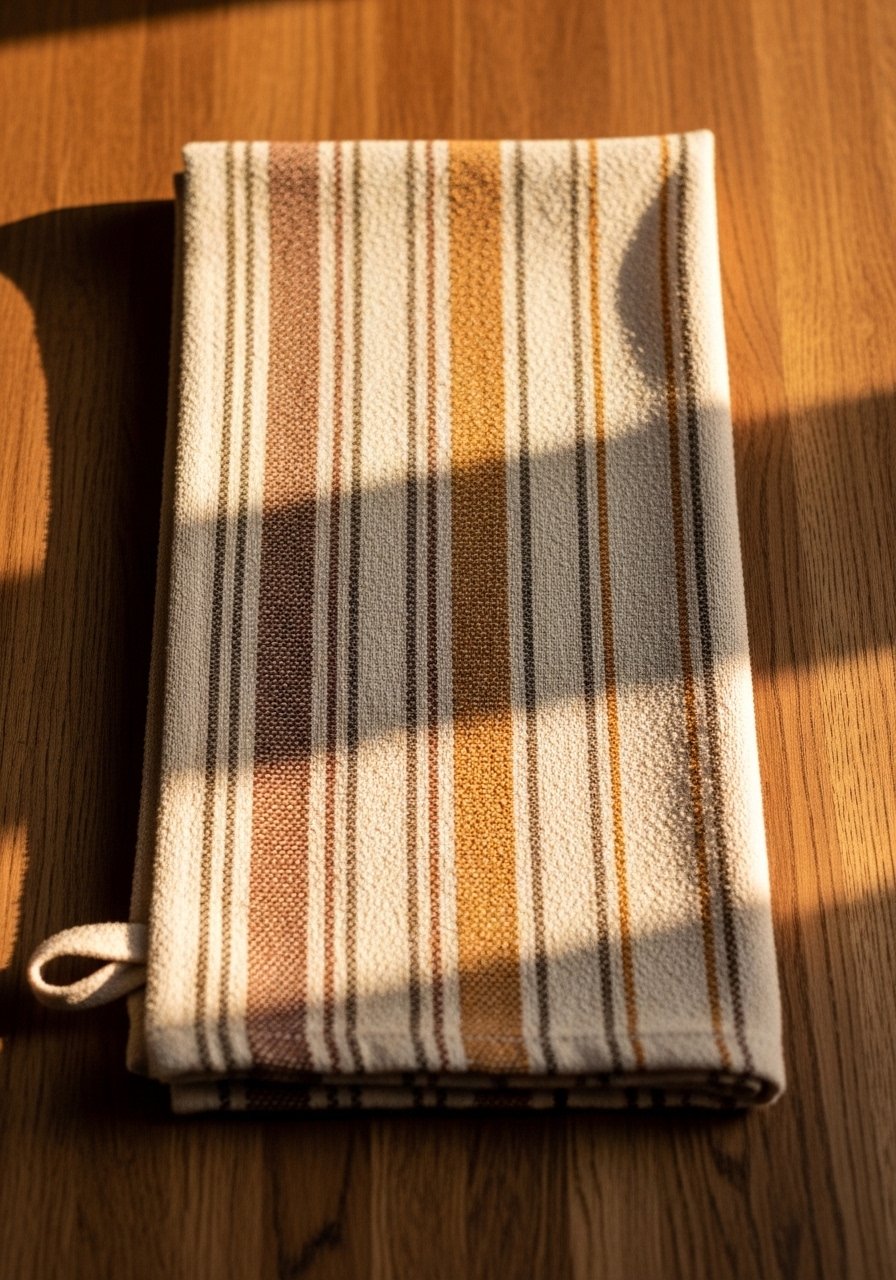
A practical towel with a loop is useful around the home. Cotton yarn is absorbent and machine washable.
Materials
- Cotton DK yarn, 300 yards
- US size 7 (4.5mm) straight needles
- Tapestry needle
- Scissors
- Sewing needle for attaching loop
Instructions
- Cast on 44 stitches.
- Work garter borders 6 rows at top and bottom.
- Knit body in stockinette or seed stitch until towel measures 20–24 inches.
- For loop, cast on 8 stitches at corner and knit 2 inches, bind off, then sew loop to towel corner securely.
- Weave in ends. Machine wash on gentle and lay flat to dry.
How to Display or Gift It
Add a wooden bead on the loop for charm. Hang on a kitchen rail for everyday use.
- Simple Slippers with Fold Cuff
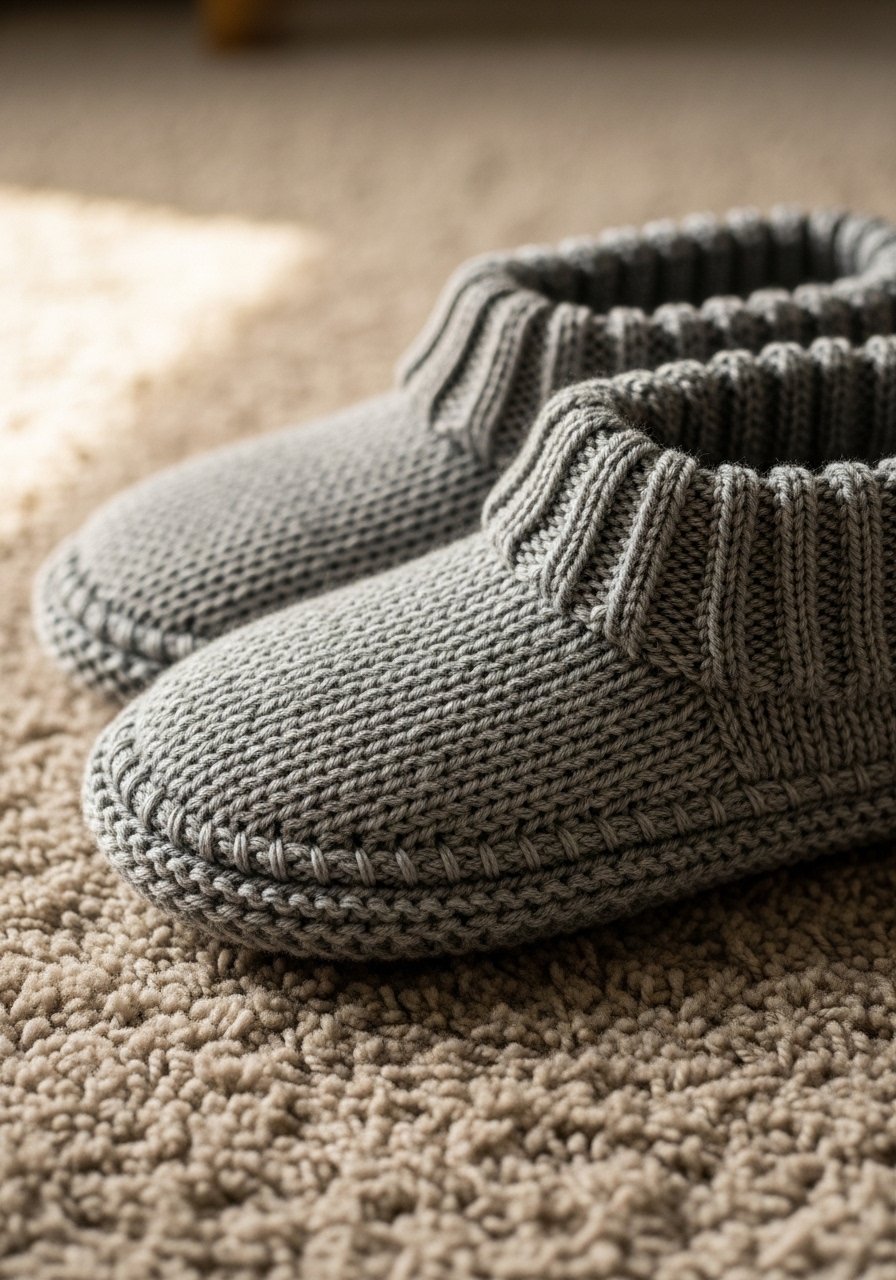
These slippers are warm and straightforward, with a folded cuff for coziness. Add a non-slip sole for safety.
Materials
- Bulky yarn, 250–300 yards
- US size 10 (6mm) circular needle or DPNs
- Tapestry needle
- Scissors
- Non-slip fabric paint or adhesive sole pads
Instructions
- Cast on 36 stitches, join in round.
- Knit in stockinette until foot length is 7.5 inches for women's small.
- Decrease for toe: k4, k2tog repeat, then continue decreasing until 8 stitches left. Pull through and close.
- Fold top down for cuff. Attach non-slip pads on sole, or use fabric paint and let cure 24 hours.
- Weave in ends.
How to Display or Gift It
Pack with a small sachet of lavender in a gift box.
- Beginner’s Pocket Shawl (with pockets)
This shawl adds functional pockets so you can keep hands warm. It’s a clever twist on a basic triangle shawl and practices shaping and seaming.
Materials
- Worsted weight yarn, 500–700 yards
- US size 8 (5mm) circular needle, 32"
- Tapestry needle
- Scissors
- Stitch markers
Instructions
- Cast on 3 stitches. Increase at each edge: yo, k on RS rows to form triangle.
- Continue until triangle measures 26 inches across.
- For pockets, knit two rectangles 6 x 8 inches separately in garter stitch. Seam pockets to the inside edges of the triangle at desired positions.
- Weave in ends. Block flat and let dry 12–24 hours.
How to Display or Gift It
Wear wrapped with pockets at the front. Store on a scarf hanger.
- Waffle Stitch Throw Pillow
Waffle stitch offers a lovely textured fabric that looks more complex than it is. Great for practicing tuck-like stitch patterns.
Materials
- Worsted weight yarn, 300–400 yards
- US size 8 (5mm) straight needles
- 16" pillow insert
- Tapestry needle
- Scissors
Instructions
- Cast on 48 stitches.
- Pattern row (multiple of 4): Row 1: k2, p2 across. Row 2: k2, p2. Row 3: k2, slip 2 purlwise with yarn in front, k2. Row 4: purl.
- Repeat these 4 rows until piece measures 16 inches.
- Make back piece or add zipper. Seam three sides, insert pillow, close final side.
- Weave in ends.
How to Display or Gift It
Mix with linen pillows and store spare covers in a fabric storage box.
- Simple Cable Blanket Border (knitting patterns for beginners)
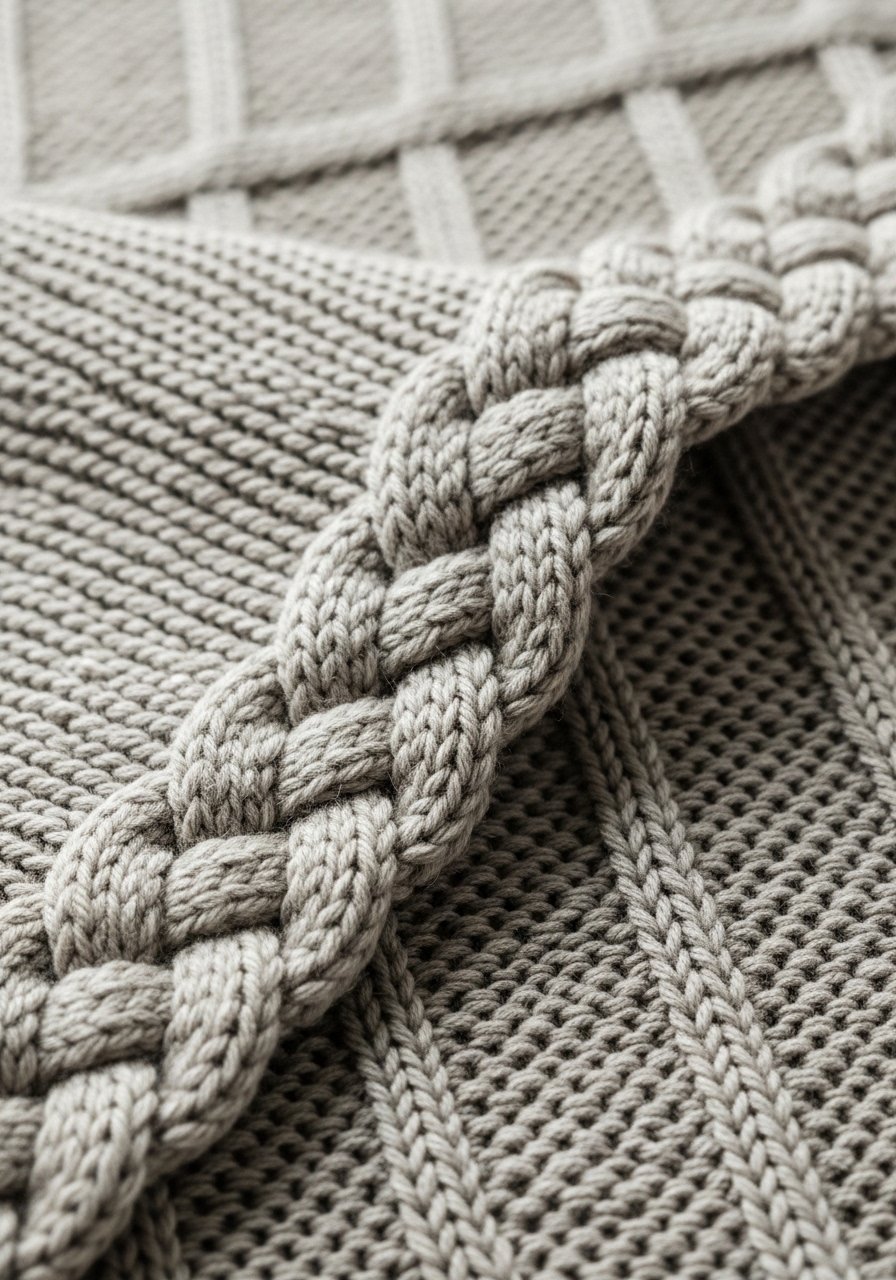
If you want to add a special border to a plain blanket, a small cable edge gives that hand-finished look. It’s a focused way to practice cables without tackling a whole cabled blanket.
Materials
- Worsted weight yarn, 200–300 yards for border
- US size 8 (5mm) straight needles
- Cable needle
- Tapestry needle
- Scissors
Instructions
- Pick up 6 stitches per inch along edge using circular needle.
- Work 6-row cable repeat: k3, C4F, k3 separating by purl columns.
- Repeat until border reaches desired width 3–4 inches.
- Bind off in pattern and weave in ends.
- Block border edges for even cable definition; dry 12–24 hours.
How to Display or Gift It
Sew border to a mass-produced throw to upcycle a thrifted find. Store in a blanket ladder for display.
- Beginner’s Crop Top (simple tank)
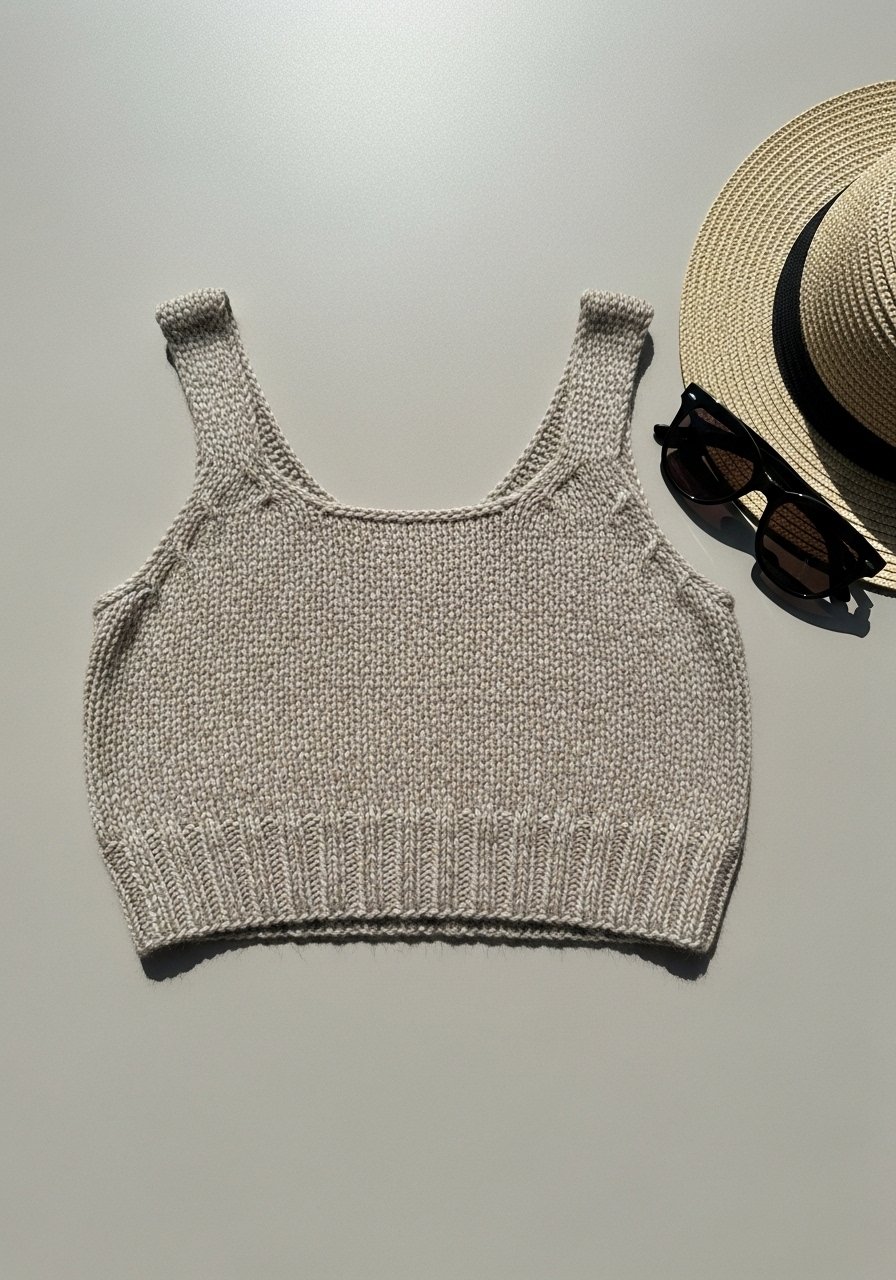
A summer crop top in linen or cotton yarn is lightweight and a good first garment. It teaches gauge, seaming, and working to measurements.
Materials
- Linen blend or cotton DK yarn, 400–500 yards
- US size 6 (4mm) straight needles
- Tapestry needle
- Scissors
- Stitch markers
- Measuring tape
Instructions
- Cast on 80 stitches for back. Work rib hem 1 inch.
- Knit stockinette until piece measures 12 inches. Bind off for armholes: bind off 4 stitches each side and work until shoulder height 2.5 inches, bind off.
- Make front to match, adding neck shallow scoop by binding off center 10 stitches and working each shoulder separately.
- Seam shoulders and sides. Pick up stitches for straps if needed.
- Weave in ends and block to measurements; dry 12 hours.
How to Display or Gift It
Pair with denim for a summer look. Store flat or folded in a drawer organizer.
- Quick Knit Plant Hanger (macramé-alternative)
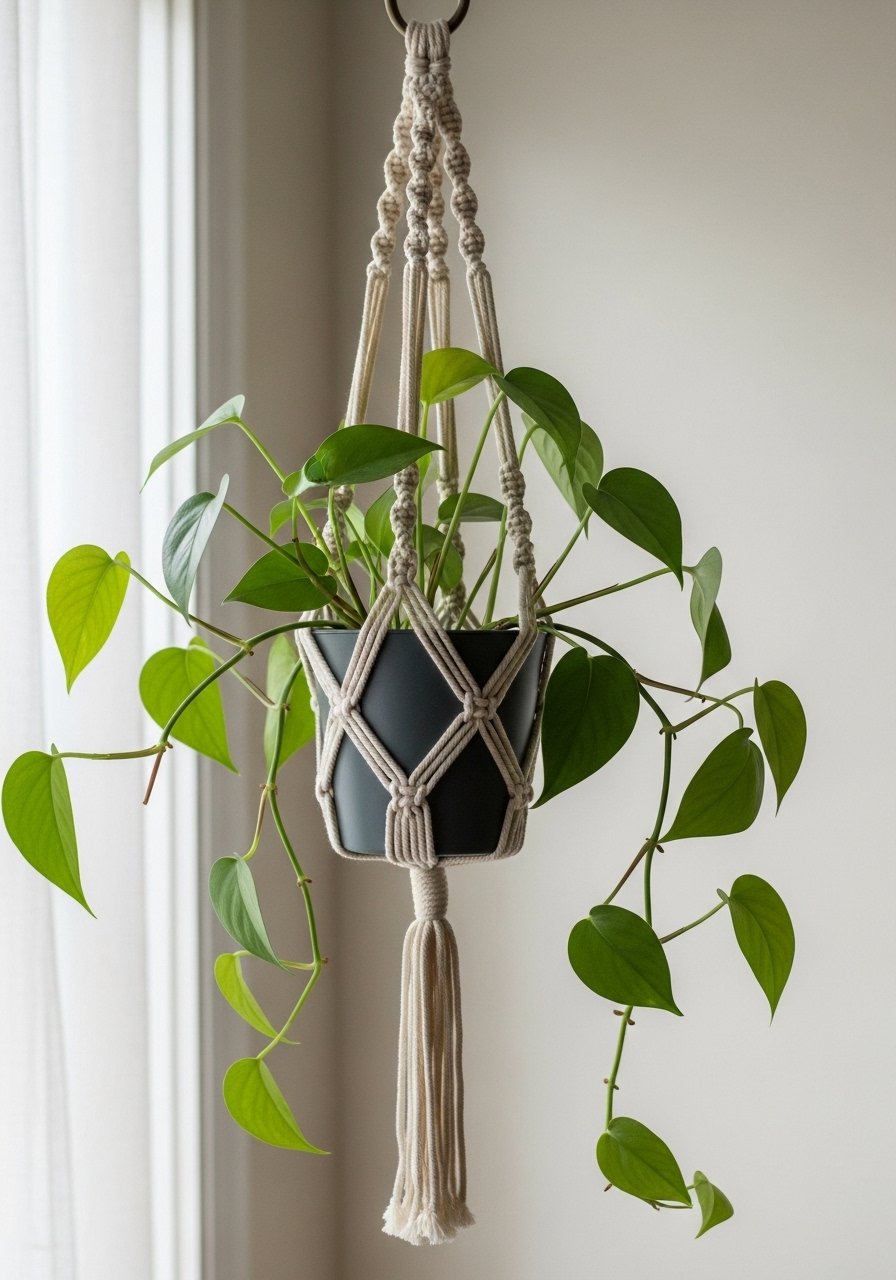
This knitted plant hanger gives a knitted take on macramé. Works best with sturdy cotton yarn and adds a soft touch to plant displays.
Materials
- Cotton worsted yarn, 150–200 yards
- US size 8 (5mm) circular needle, 16"
- Tapestry needle
- Scissors
- Small wooden ring for top
Instructions
- Cast on 48 stitches and knit in the round for 6 inches to form a cup shape.
- Bind off and seam bottom tightly.
- Make four cords by chaining or I-cord 30 inches each, attach evenly around top by sewing or tying to a wooden ring.
- Insert plant pot and adjust cord lengths.
- Trim ends if desired.
How to Display or Gift It
Hang near a bright window. Use a ceiling plant hook kit for installation.
- Cozy Neck Warmer with Button Closure
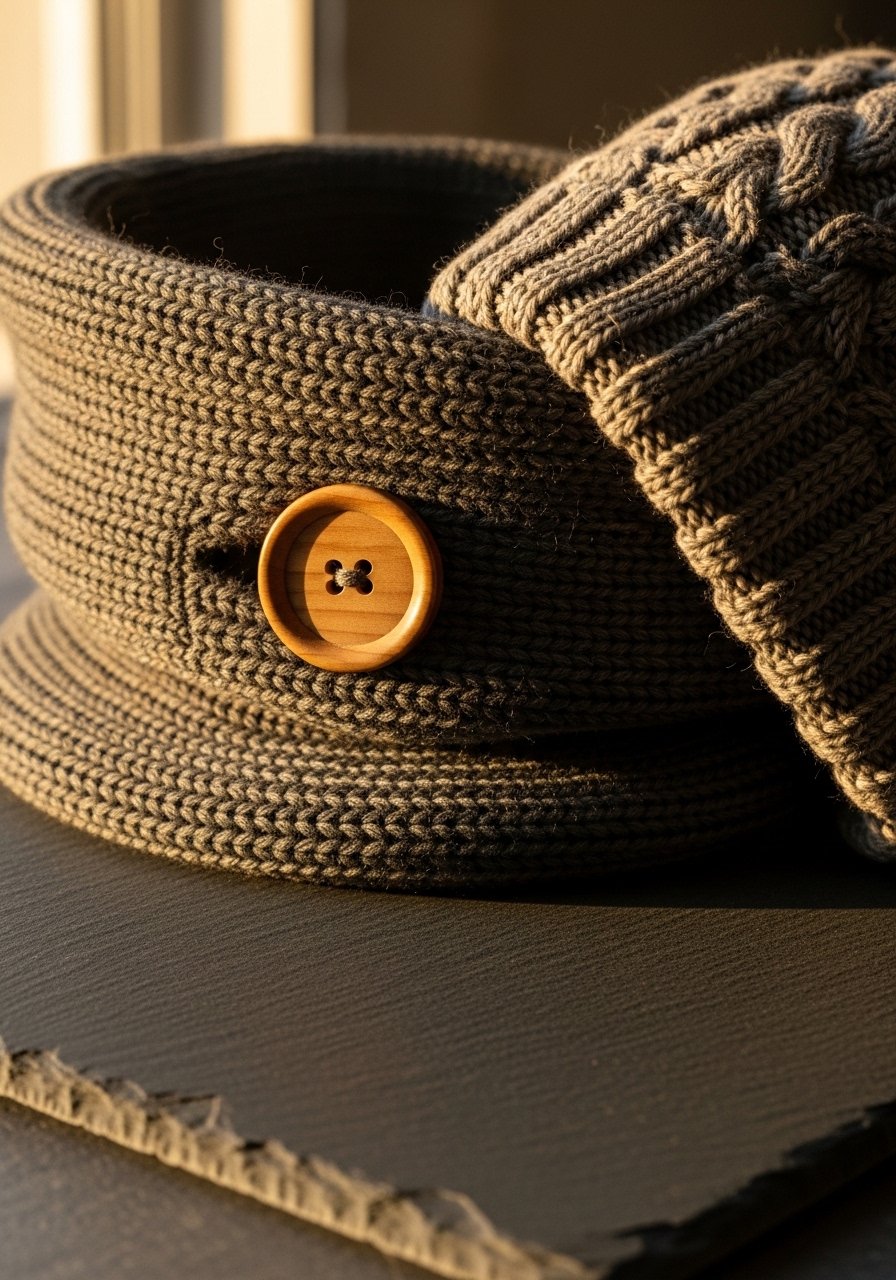
A neck warmer is faster than a scarf and perfect for layering. The button closure makes it easy on and off and gives a polished finish.
Materials
- Bulky yarn, 150–200 yards
- US size 10 (6mm) straight needles
- 1 large wooden button
- Tapestry needle
- Scissors
- Measuring tape
Instructions
- Cast on 40 stitches.
- Work k2, p2 rib for 10 inches.
- Bind off. Overlap ends and sew buttonhole or make a yarn loop. Sew button to opposite side.
- Weave in ends. Block lightly for neat edges; dry 4–6 hours.
How to Display or Gift It
Roll and tie with ribbon. Store in a scarf storage bag.
You did it — 24 projects that build skills, resist frustration, and finish beautifully. These knitting patterns for beginners range from tiny coasters to wearable garments so you can practice stitches and see real progress fast. Pin this page so you can come back when you're ready to try a new texture or size. Which project will you start with—something small to practice, or a blanket to cozy up with? Share this with a friend who knits or would love to learn.
Quiet tip: a reliable tapestry needle set and a good set of stitch markers changed how quickly I learned new techniques—no more dropped stitches, no more guesswork. Happy knitting!


