You know those afternoons when the kids ask for “something to do” and you want art time that’s cheap, fast, and actually fun? These budget drawing ideas for kids were made for exactly that. Each project here uses minimal supplies, simple steps, and a little imagination. You’ll find tracing stencils, resist painting, doodle games, textured prints, and tiny comics that keep kids engaged and proud of what they made.
I often grab a basic watercolor set and a set of colored pencils to cover most activities. Try my go-to watercolor half-pan set for easy mixing and travel, and a kid-friendly hot glue gun for the few glue-heavy steps that pop up. Both help projects finish cleaner and faster, with less mess for you.
Scroll through 24 bite-sized projects that are easy on the wallet, great for rainy days, and perfect for classrooms or party crafting. Each one includes a clear materials list, step-by-step instructions with drying times, and smart display or gifting ideas so the art doesn’t end up lost in a drawer.
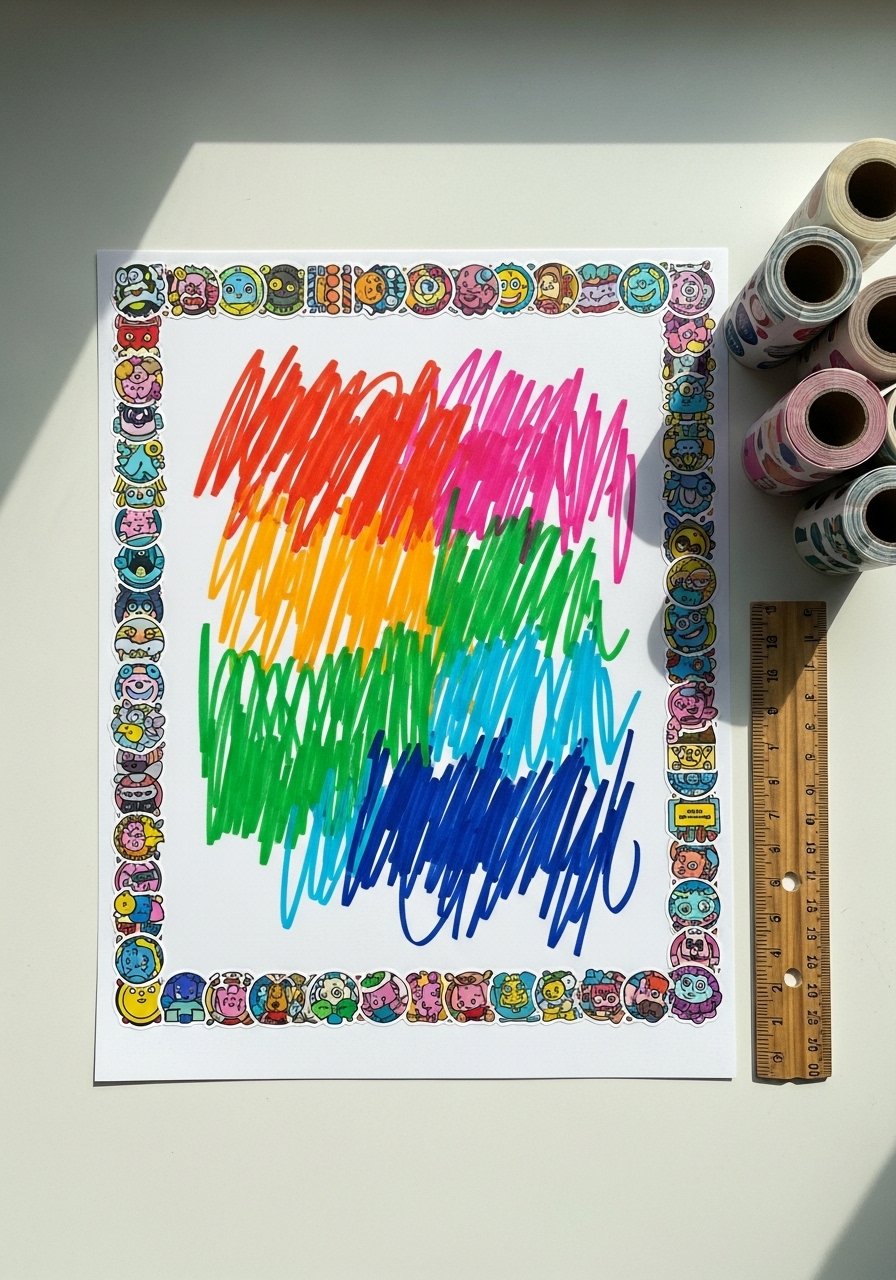
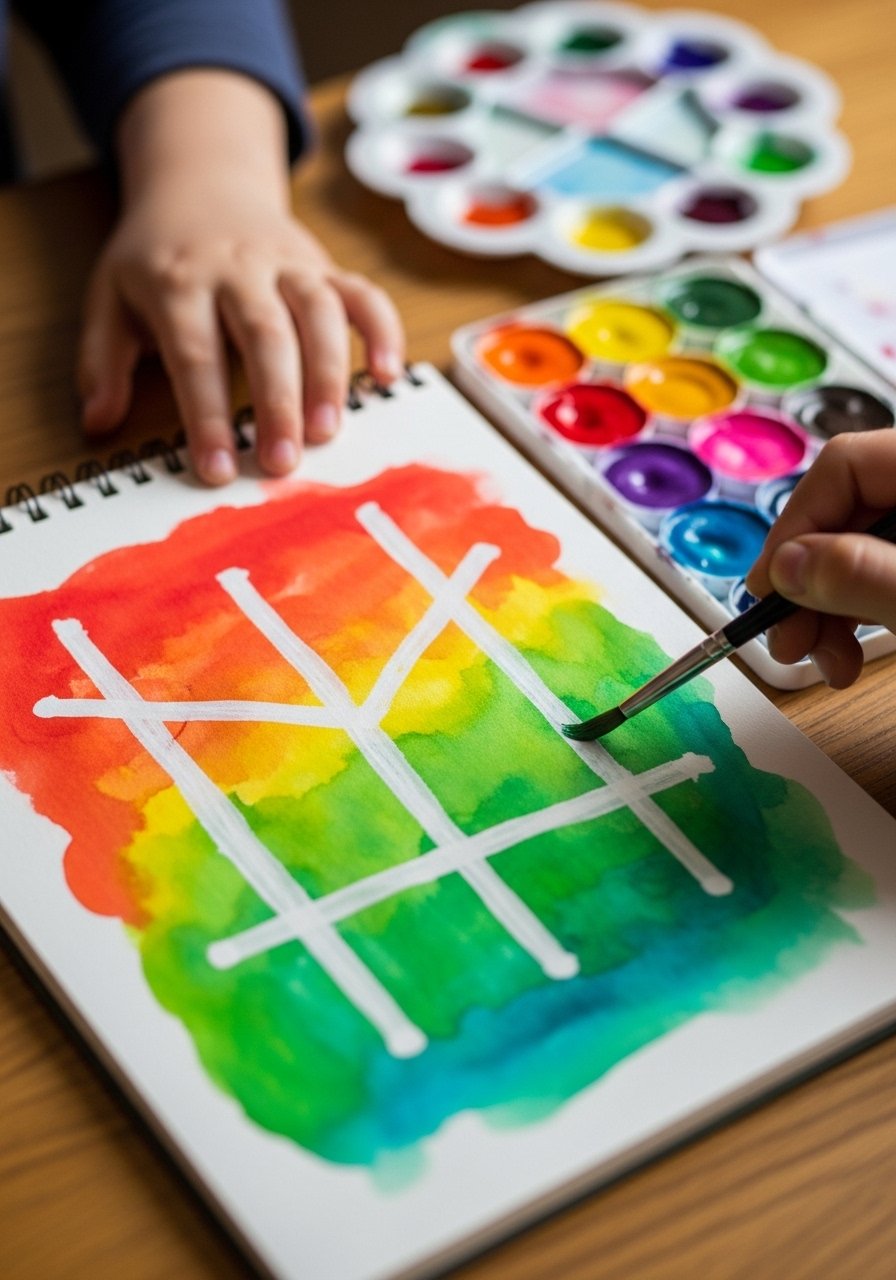
- Tape-Resist Rainbow Drawings

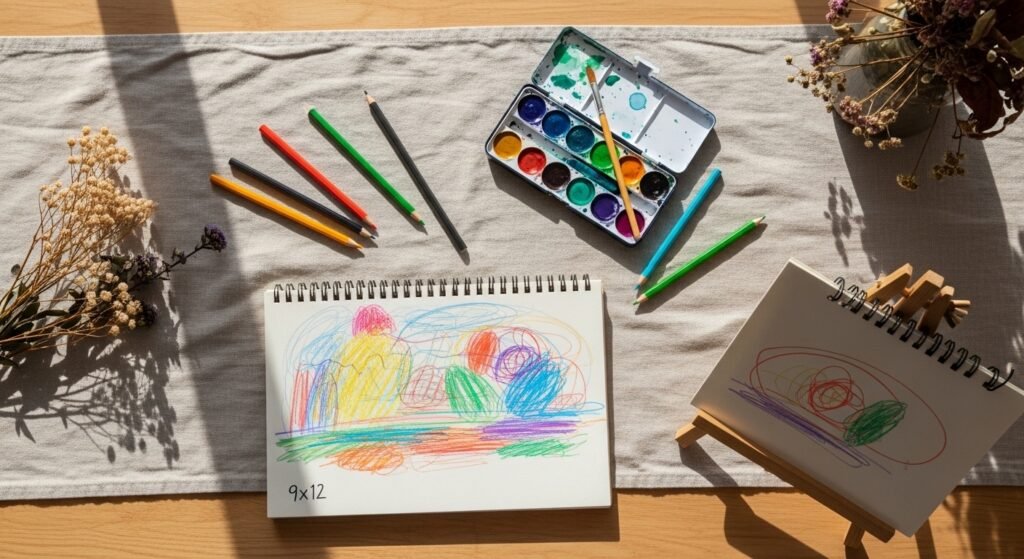
This tape-resist rainbow gives crisp lines with a satisfying peel. Kids love layering color and revealing white stripes. The finished piece has a bold, graphic look that feels modern and playful. Great for beginners and preschoolers who like instant results. It’s slightly tactile — the paper puckers a little where paint pools, which kids adore.
Materials
- 1 sheet 9" x 12" watercolor paper (140 lb)
- Painter’s tape, 1 roll (18 mm width)
- Watercolor half-pan set, 8-color set
- Round size 6 watercolor brush
- Cup of water (1 small jar)
- Paper towel, 1 sheet for blotting
- Flat foam brush, 1 (for even washes)
- Small tray or plate for mixing
Instructions
- Lay watercolor paper flat. Tear strips of painter’s tape and press across the page in parallel or curved lines.
- Mix a light wash of one color on your tray. Use the foam brush to cover one taped segment. Rinse the brush.
- Repeat with other colors, overlapping slightly. Keep washes thin to avoid buckling.
- Let paint dry 20–30 minutes to the touch.
- Gently peel tape back at a low angle. If paint lifts, press tape back and wait another 10 minutes.
- Add colored-pencil accents once fully dry for texture.
How to Display or Gift It
- Frame in a thrift-store frame with the mat removed for a gallery look.
- Clip multiple rainbows on a string with mini clothespins to make a colorful banner.
- Store flat until fully dry in a stackable craft organizer drawer.
- For gifting, slide into a clear cello bag and tie with twine and a small dried flower.
Tip: A foam brush helps lay flat, even washes without streaks. Try a compact watercolor half-pan set for vibrant but budget-friendly colors like this student watercolor set.
- Potato-Stamp Portraits
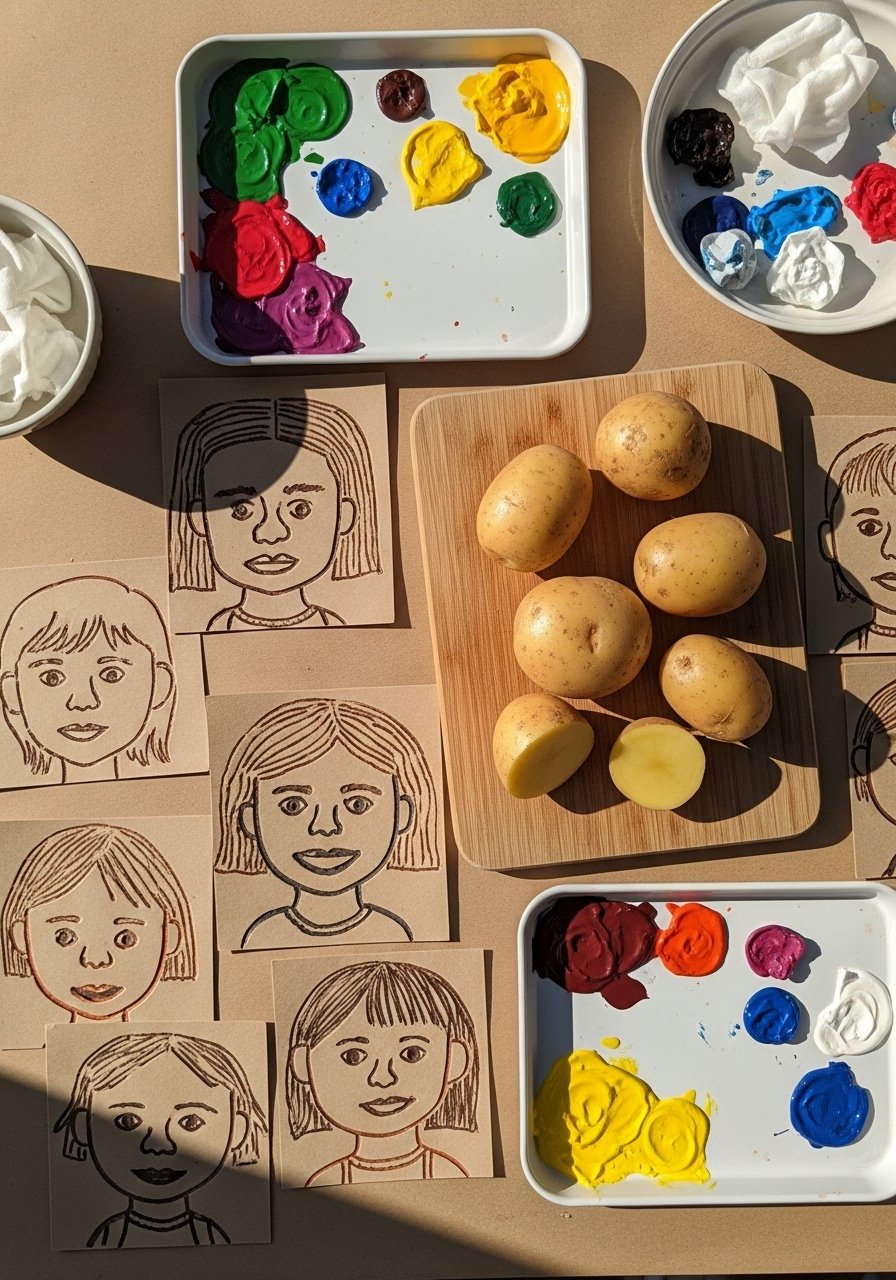
Carved potato stamps turn simple shapes into playful faces. Kids delight in stamping, then drawing features to make characters. This project is messy in the best possible way — soft paint textures and blocky prints. It's ideal for siblings or groups because stamps can be reused.
Materials
- 2 medium potatoes, halved
- Acrylic craft paint set, primary colors (6 oz each)
- Small foam paint trays, 2
- 10 sheets recycled kraft paper, 8.5" x 11"
- Plastic knife (adult use only) to carve simple shapes
- Old towel for cleanup
- Wet wipes, pack of 50
- Pencil for sketching features
- Fine-tip black marker, 1
Instructions
- Adult carves simple shapes into the potato halves: circle, crescent, triangle. Rinse and pat dry.
- Squeeze small dollops of acrylic into trays. Dab the stamp lightly; avoid overloading.
- Press stamp firmly onto kraft paper, applying even pressure. Repeat for backgrounds.
- Let prints dry 30–45 minutes (acrylic will be dry to touch).
- Kids draw eyes, mouths, hair with pencil, then outline with the black marker.
- If paint feels tacky after 45 minutes, wait another 15 minutes before outlining.
How to Display or Gift It
- Punch two holes and bind a set into a mini portrait book.
- Mount single prints on colored construction paper and frame as a set.
- Use a plastic organizer tray for storing extra stamped sheets until dry.
- Wrap in baker’s twine and label with the child’s name for gifting.
- Collage Doodle Monsters
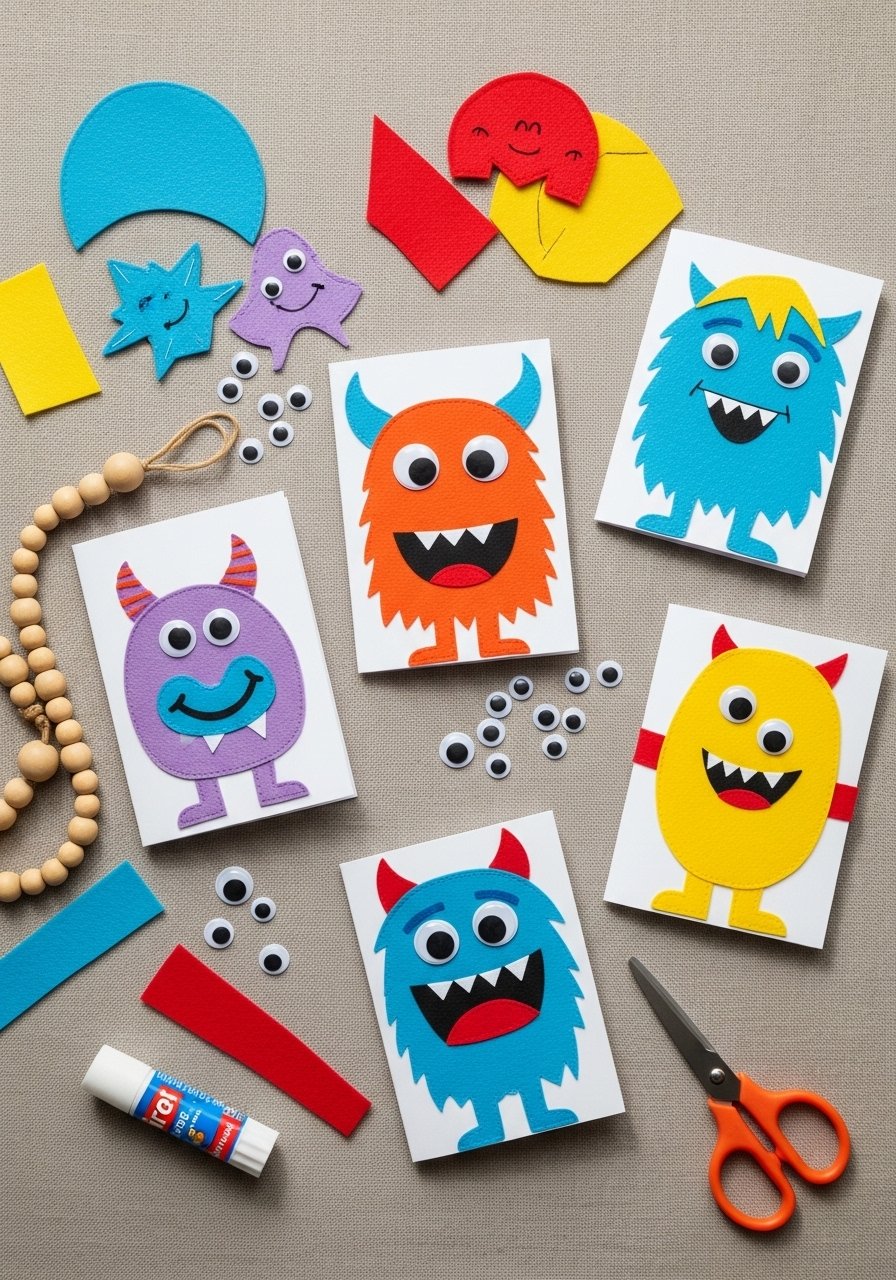
This combines cutting, gluing, and drawing into silly monsters. It mixes textures — felt, paper, and marker — for tactile results. Great for kids who like tactile play and simple scissors practice. The finished monsters are soft, whimsical, and perfect for imaginative play.
Materials
- 6 felt sheets, assorted colors (9" x 12")
- 12 sheets construction paper, assorted colors
- Glue stick, 1 (40 g)
- Googly eyes, pack of 50
- Child safety scissors, 1 pair
- Black felt-tip marker, 1
- Assorted sticker shapes, 1 small pack
- 1 small craft tray to organize pieces
Instructions
- Cut felt and paper into basic shapes: circles, squiggles, rectangles. Kids can do this.
- Arrange shapes on a construction paper base to form monster bodies.
- Glue shapes in place with glue stick; press for 30 seconds.
- Add googly eyes and adhesive stickers. Press firmly for 10–15 seconds.
- Draw mouths, teeth, and details with the black marker.
- Let glue set 15–20 minutes before stacking to avoid sticking.
How to Display or Gift It
- Tape to the fridge with washi tape for a rotating gallery.
- Slip monsters into small clear boxes for party favors.
- Store extra felt and stickers in a craft organizer drawer.
- Glue magnets to the back for instant play on any metal surface.
- Chalk Pastel Sunset Silhouettes
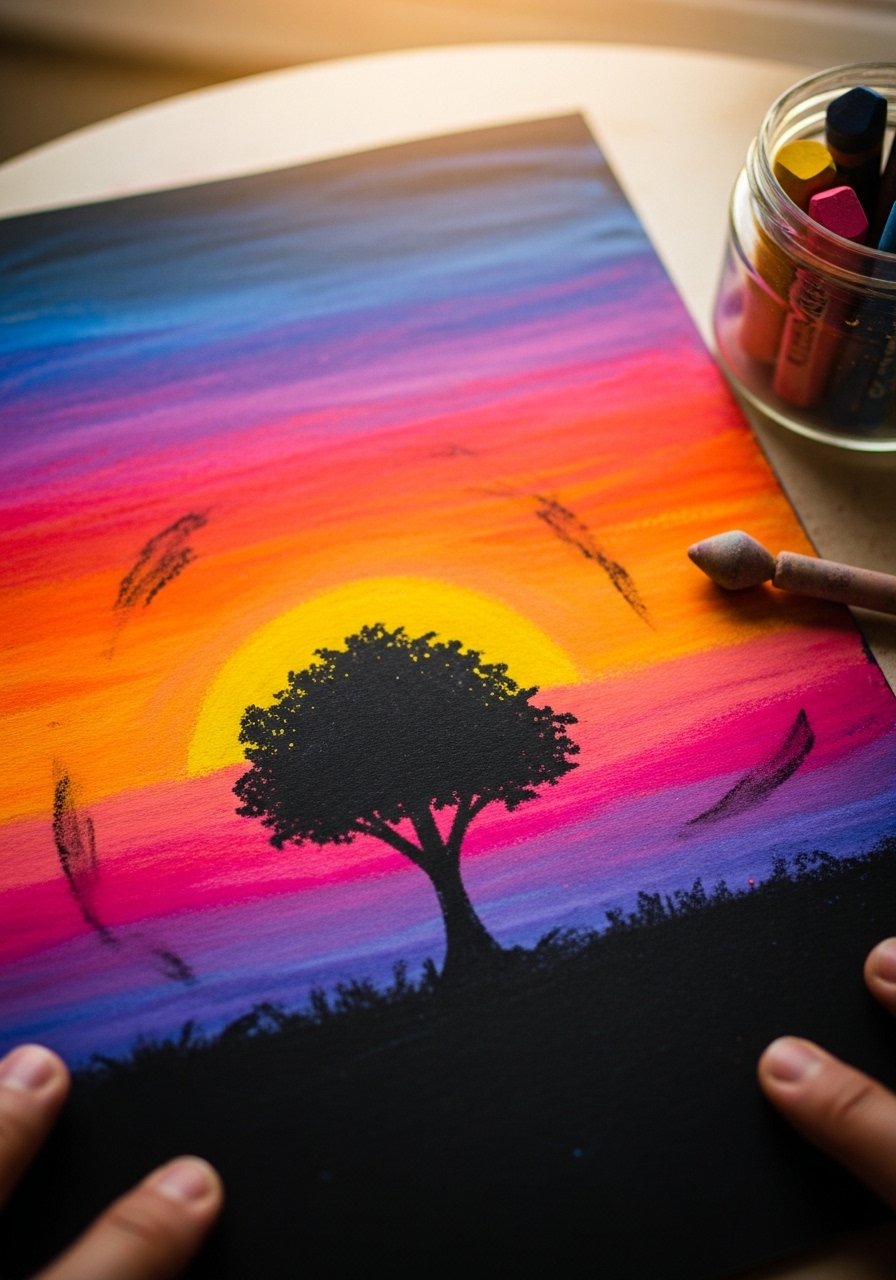
Soft chalk pastels make rich, velvety sunsets kids can blend with fingers. Layer a silhouette on top for dramatic contrast. This project is sensory and soothing — pastel dust, soft paper, vivid skies. It suits older kids and budding artists who enjoy blending.
Materials
- 1 pad black or dark blue pastel paper, 9" x 12"
- Soft chalk pastel set, 12 colors
- Blending stumps, pack of 2
- Small handheld eraser, 1
- Disposable gloves, pack of 10 (optional)
- Fixative spray, 1 small can
- Paper towel, 1 sheet
Instructions
- Lightly sketch horizon line with a pastel.
- Apply pastel colors horizontally: yellow, orange, pink, purple. Overlap for gradients.
- Use blending stump or finger to smooth transitions. Wear gloves if you prefer less dust.
- Darken the top edge with indigo for depth.
- Sketch and fill a silhouette — tree, skyline, or animals. Use black pastel or a charcoal stick.
- Hold the piece flat and mist with fixative from 8–10 inches away. Let cure 15 minutes.
How to Display or Gift It
- Frame behind glass to protect pastel dust.
- Attach to a clipboard for a simple rotating wall display.
- Pair with a mini easel for desk display.
- Keep finished work flat in a portfolio folder to avoid smudges.
- Sticker-Frame Scribble Art
Sticker frames give scribbles structure and make small drawings feel polished. Kids can draw inside a neat border, creating themed scenes. Quick and tidy, this one is perfect for short attention spans and travel.
Materials
- 8.5" x 11" white drawing paper, 5 sheets
- Sticker rolls, 2 rolls assorted shapes
- Thick black marker, 1
- 24-count colored pencil set
- Ruler, 1 (12")
- Fine-tip gel pen, 1
- Small plastic sleeve, pack of 5
Instructions
- Use the ruler to measure a 1" border. Apply stickers along the border to make a frame.
- Draw a theme inside: underwater, outer space, or pets.
- Start with pencil sketches, then trace with marker.
- Fill with colored pencils for layered color.
- Add tiny sticker accents as highlights.
- Place in a plastic sleeve for gifting or storage.
How to Display or Gift It
- Slide into a clear sleeve and clip on a corkboard.
- Bundle five as a mini sketchbook and wrap with ribbon.
- Keep spare sticker rolls in a mason jar for easy reach.
- Nature Rubbing Scenes
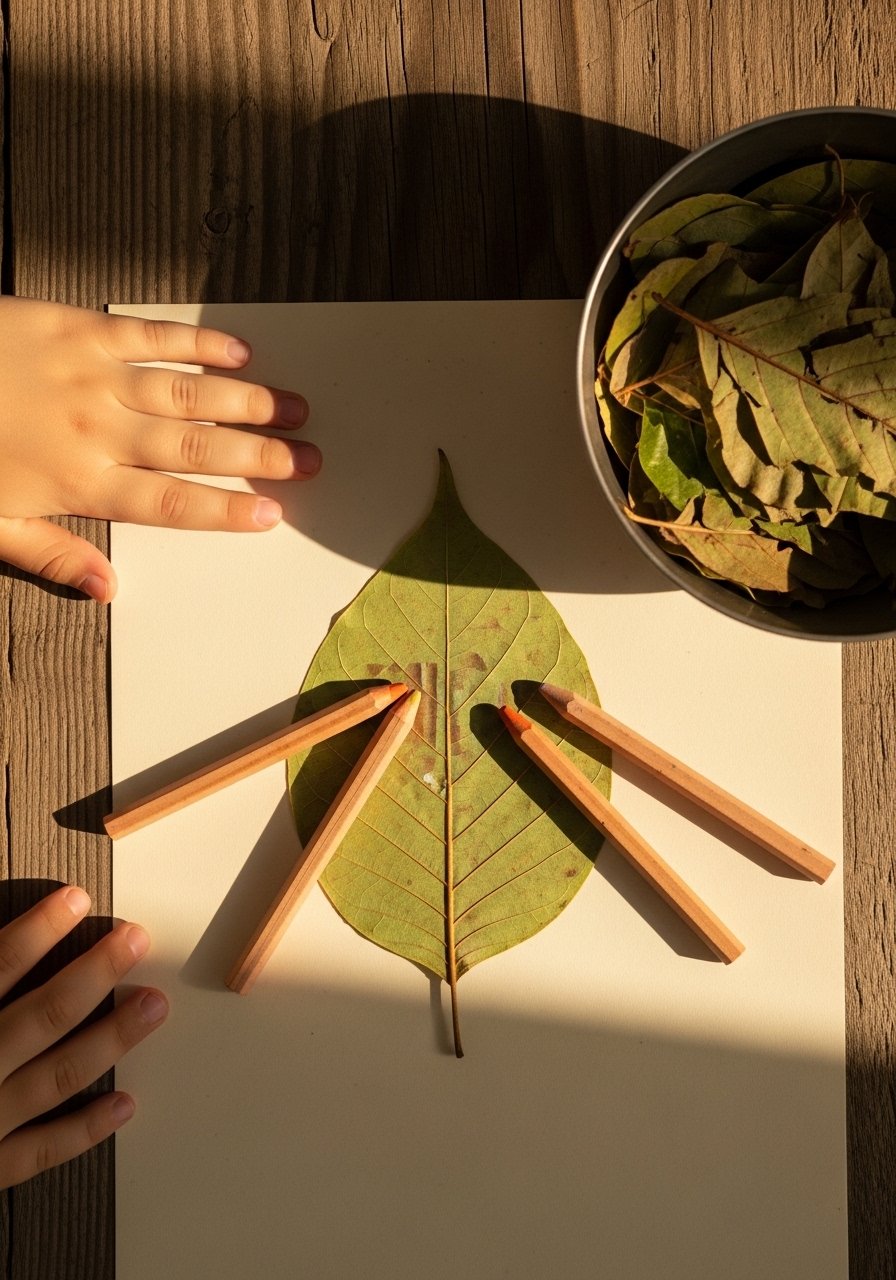
Leaf rubbings reveal hidden textures. Kids love the surprise when veins appear. This works outside or at the kitchen table. It’s low-mess and great for seasonal nature studies.
Materials
- 8.5" x 11" white paper, 6 sheets
- Assorted leaves, 10 collected leaves
- Crayon set, 24-count (remove wrappers)
- Flat tray for leaves
- Tape, 1 roll (to hold leaves in place)
- Pencil, 1 for arranging
- Small basket for collecting leaves
Instructions
- Place a leaf vein-side up on a hard surface.
- Tape paper over the leaf to keep it from shifting.
- Hold a crayon sideways and gently rub across the leaf area.
- Repeat with different leaves to build a scene.
- Add drawn details like stems, animals, and background.
- No drying time — rubbings are ready to display immediately.
How to Display or Gift It
- Collect rubbings in a binder with plastic sleeves.
- Use as handmade wrapping paper for small gifts.
- Frame a few in a grouped grid for a nature wall.
- Store flat in a stackable craft organizer.
- Paper Plate Animal Faces
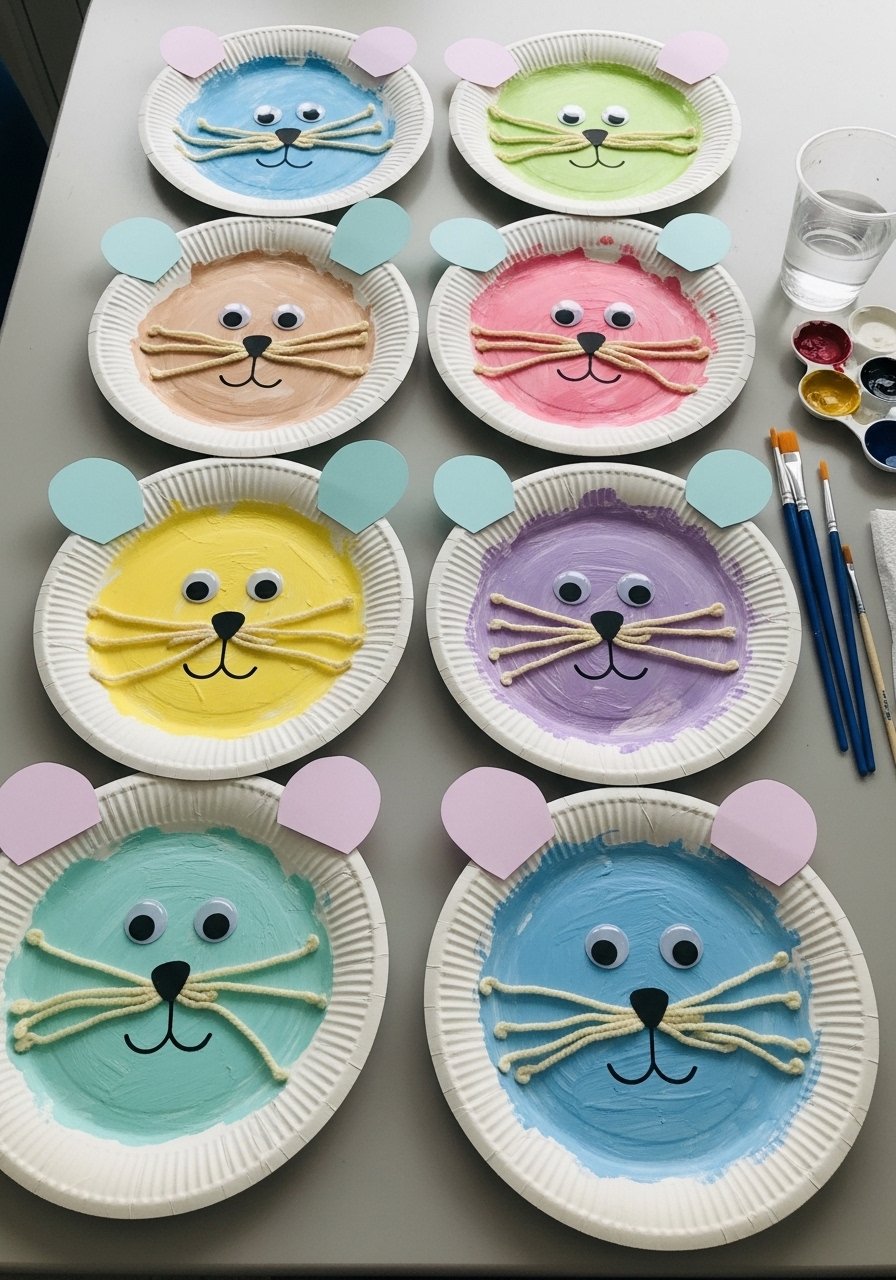
Paper plates become bold animal faces with a few marker strokes. This is budget-friendly and tactile. Kids enjoy painting and sticking, and the round format is great for stylized faces.
Materials
- Paper plates, pack of 12 (9" diameter)
- Acrylic craft paint, 3 small bottles (primary colors)
- Glue stick, 1
- Googly eyes, pack of 50
- Yarn, 1 small skein (for whiskers)
- Construction paper, 6 sheets
- Disposable paint cup, 1
Instructions
- Paint the paper plate base. Let dry 20–30 minutes.
- Cut ears from construction paper and fold a small tab for gluing.
- Glue ears and googly eyes into place. Press for 10 seconds.
- Add yarn whiskers with glue and hold until tacky.
- Draw noses and mouths with marker.
- Let glue cure 15–20 minutes before display.
How to Display or Gift It
- Staple a string loop to hang on the wall.
- Turn into party masks by adding a headband strip.
- Stack unused plates in a craft storage bin for later.
- Easy Finger-Painting Landscapes
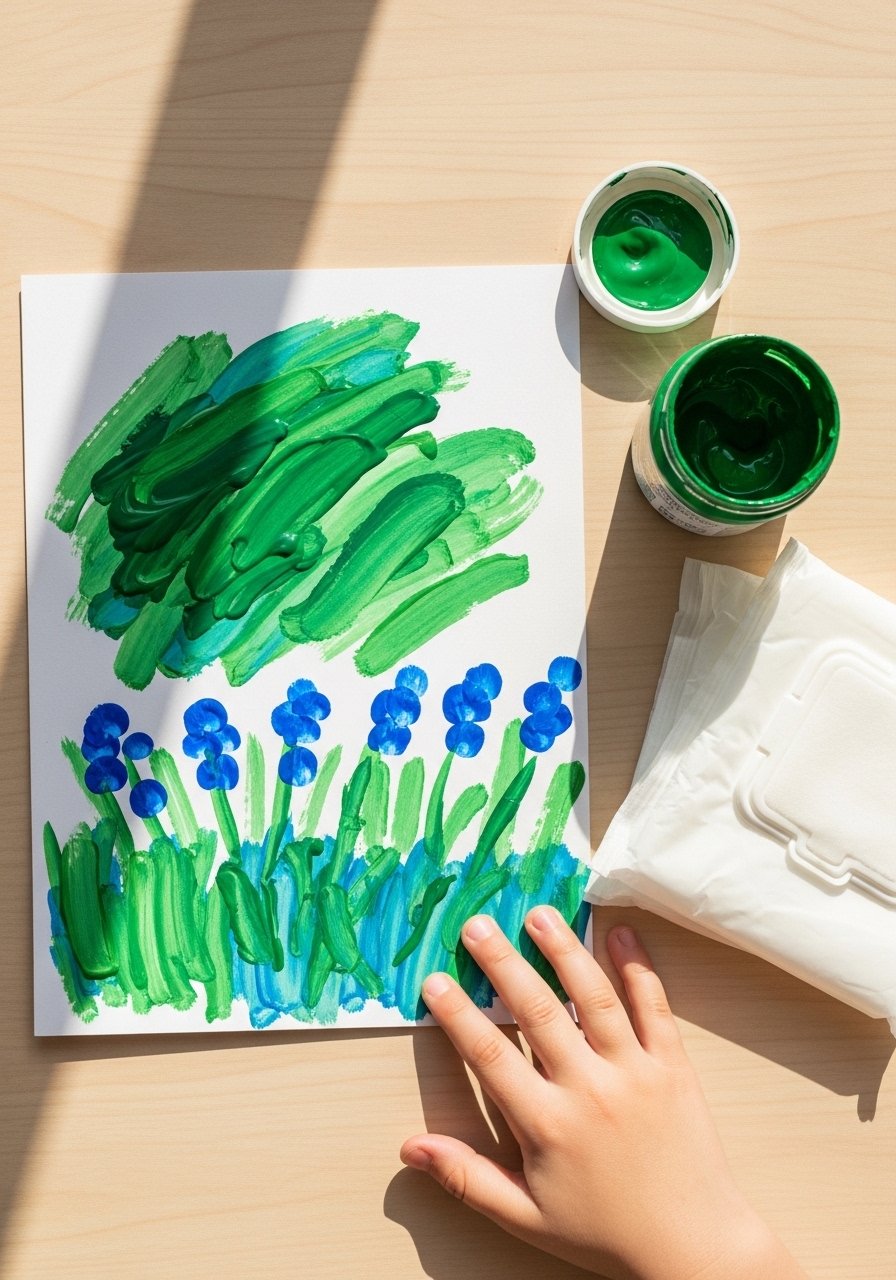
Finger painting is sensory and freeing. Landscapes let kids smear color and create bold textures with fingertips. Great for toddlers and preschoolers learning color mixing.
Materials
- White cardstock, pack of 20 (8.5" x 11")
- Washable tempera paint set, 6 colors
- Baby wipes, pack
- Small paint trays, 2
- Smock or old shirt, 1
- Paper towels, pack of 10
- Shallow tray to contain mess
Instructions
- Put smock on child and set paper in the tray.
- Squeeze small blobs of paint into trays.
- Let kids press fingers and palms to the paper to build a landscape.
- Encourage layering: sky first, then ground, then details.
- Allow paintings to dry 1–2 hours depending on thickness.
- If paint remains tacky after 2 hours, let dry overnight.
How to Display or Gift It
- Laminate small pieces to make placemats.
- Attach to a clothespin banner for a bright display.
- Store extra sheets in a flat portfolio until dry.
- Bundle three as a mini art book and tie with ribbon.
- DIY Tracing Stencils for Tracing Animals
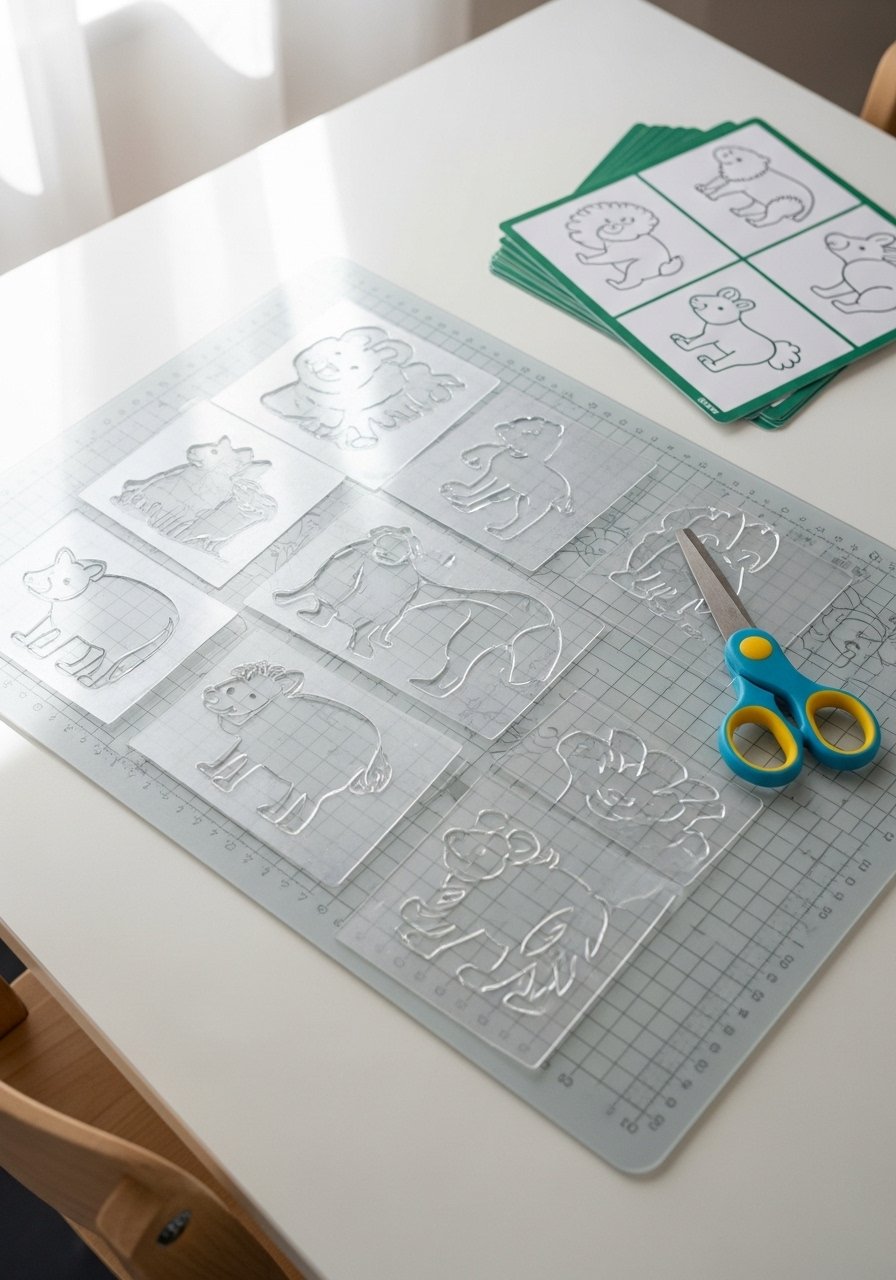
Make simple plastic stencils for tracing animals over and over. This improves fine motor control and builds confidence. Stencils are reusable and portable. Older kids can try cutting the templates themselves under supervision.
Materials
- 1 sheet mylar stencil plastic, 8.5" x 11"
- Printed animal templates, pack of 10 printed pages
- Self-healing cutting mat, 1
- Precision craft knife (adult use), 1
- Pencil, 1
- Masking tape, 1 roll
- Plastic storage envelope, 1
Instructions
- Tape printed template under the plastic sheet on the cutting mat.
- Trace animal outlines with pencil on the plastic.
- Adult uses craft knife to cut out shapes on the mat.
- Wipe off dust and test stencil by tracing onto scrap paper.
- Kids trace animals and add faces, patterns, and color.
- Clean stencils with a damp cloth and store flat.
How to Display or Gift It
- Store stencils in a labeled plastic envelope.
- Bundle a small tracing kit with pencils and a sketch pad as a gift.
- Clip traced animals into a mini gallery with binder clips.
- Use the stencils to create matching cards for family.
- Tape Maze Drawing Challenge
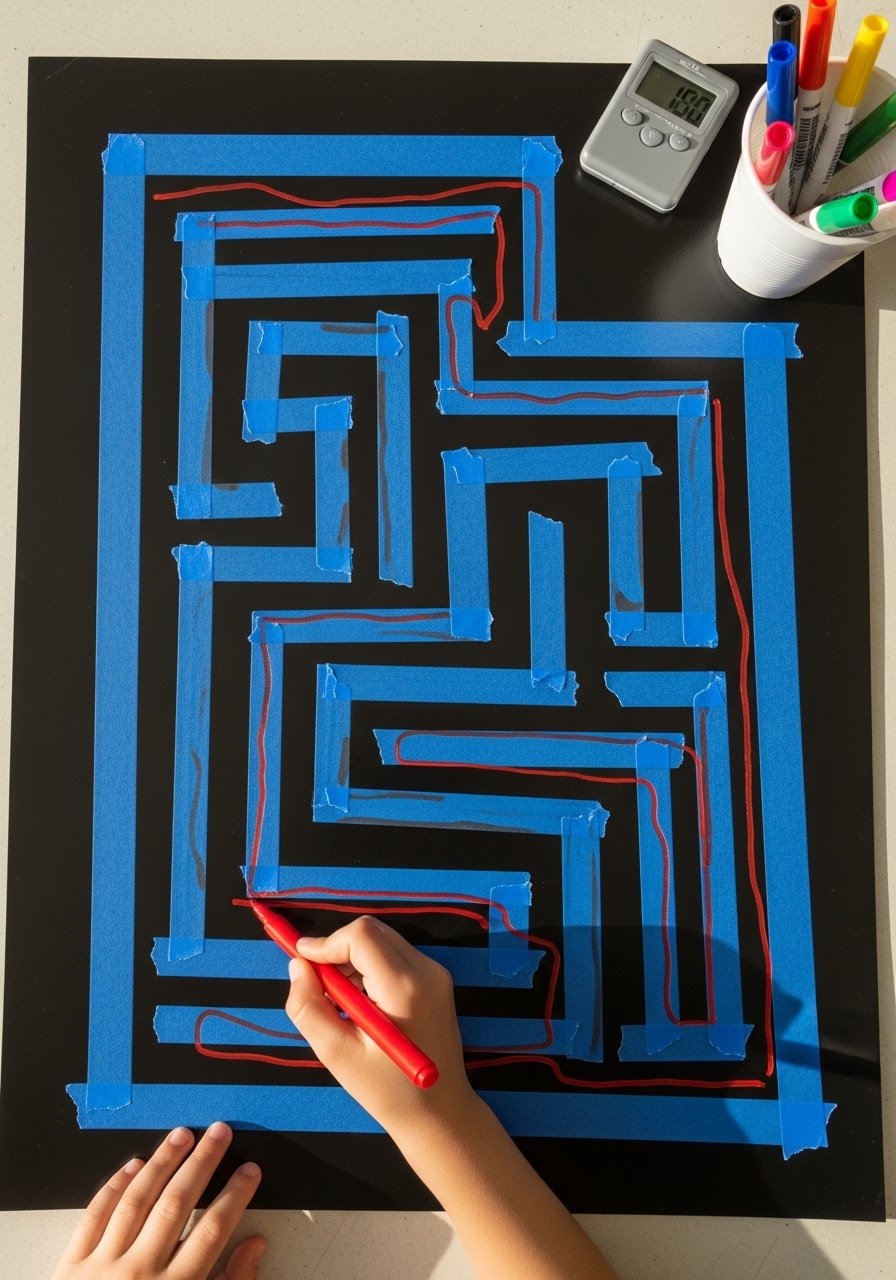
Turn tape into a maze and challenge kids to draw paths through it. This is fun for single play or races between siblings. It’s low-cost and great for practicing steady hand control.
Materials
- Poster board, 1 sheet (11" x 14")
- Painter’s tape, 1 roll
- Assorted markers, pack of 12
- Small kitchen timer, 1
- Pencil, 1 for sketching path
- Ruler, 1
- Sticker reward sheet, 1
Instructions
- Lay painter’s tape on the poster board to create walls and dead-ends.
- Mark start and finish with small sticker dots.
- Time child as they draw a continuous line from start to finish without crossing tape.
- Try variations: blindfolded with verbal direction, or with the non-dominant hand.
- If marker ink pools, blot gently with paper towel.
- Store the maze flat; remove tape and remake new mazes.
How to Display or Gift It
- Laminate finished mazes for reuse with dry-erase markers.
- Create a booklet of mazes for travel.
- Use a small craft storage box for markers and timer.
- Shape Sticker Monsters
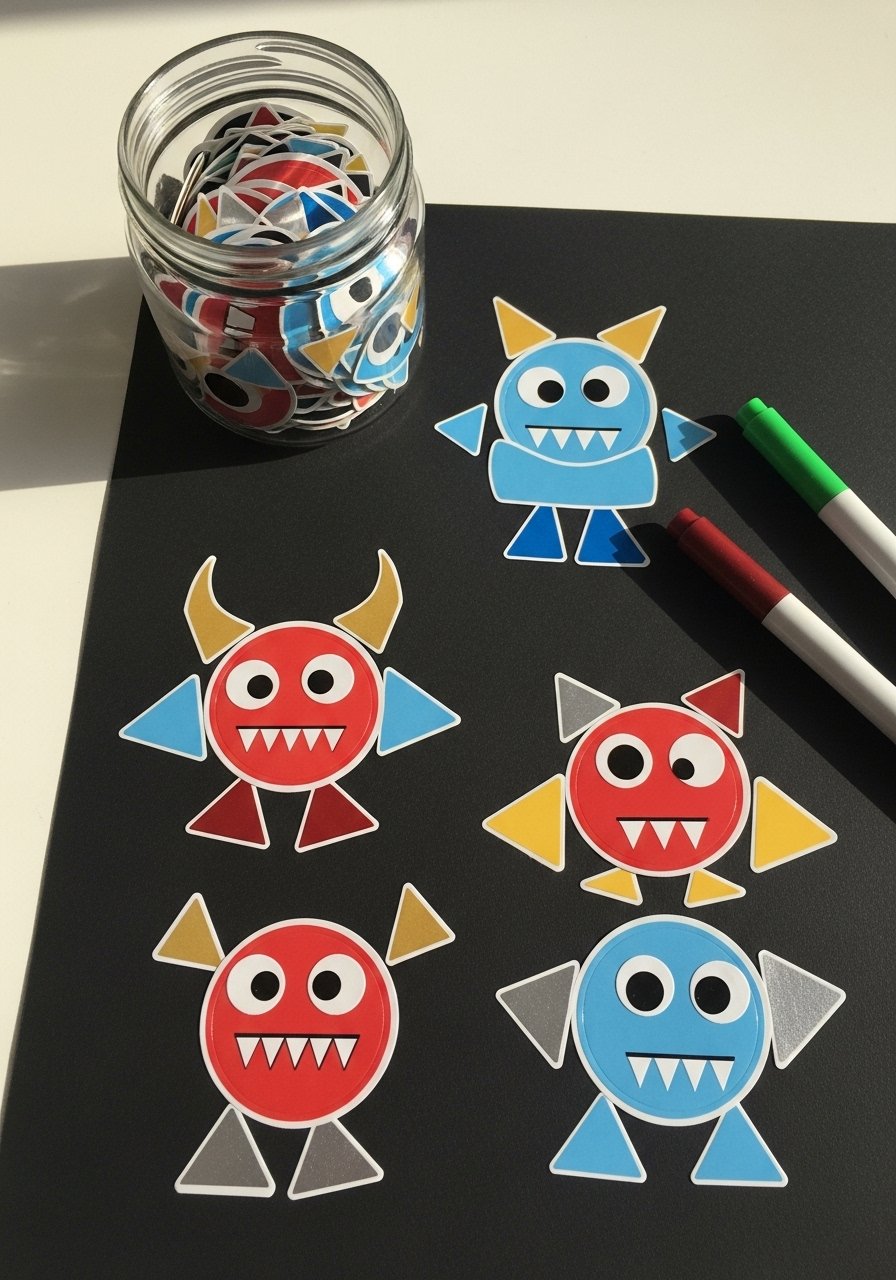
Shape stickers make design simple and satisfying. Kids can assemble geometric stickers and add doodled faces to make quirky monsters. It’s tidy and excellent for fine-motor practice.
Materials
- Shape sticker pack, 200 stickers assorted
- Black cardstock, 10 sheets (8.5" x 11")
- White gel pen, 1
- Colored pencil set, 24-count
- Small tweezers, 1 (helps place tiny stickers)
- Clear storage jar, 1
Instructions
- Arrange stickers on cardstock into bodies and features.
- Use the white gel pen to add dots, teeth, and shine.
- Color extra details with pencils for depth.
- For smaller kids, pre-place a few stickers to simplify.
- Store leftover stickers in a clear jar for next time.
- No drying time — artworks are ready instantly.
How to Display or Gift It
- Mount on a small wooden easel for a bedside table.
- Glue onto cardstock to make monster greeting cards.
- Keep sticker jars labeled in a craft organizer.
- Folded Comic Book — Budget Drawing Ideas for Kids Mini-Comics
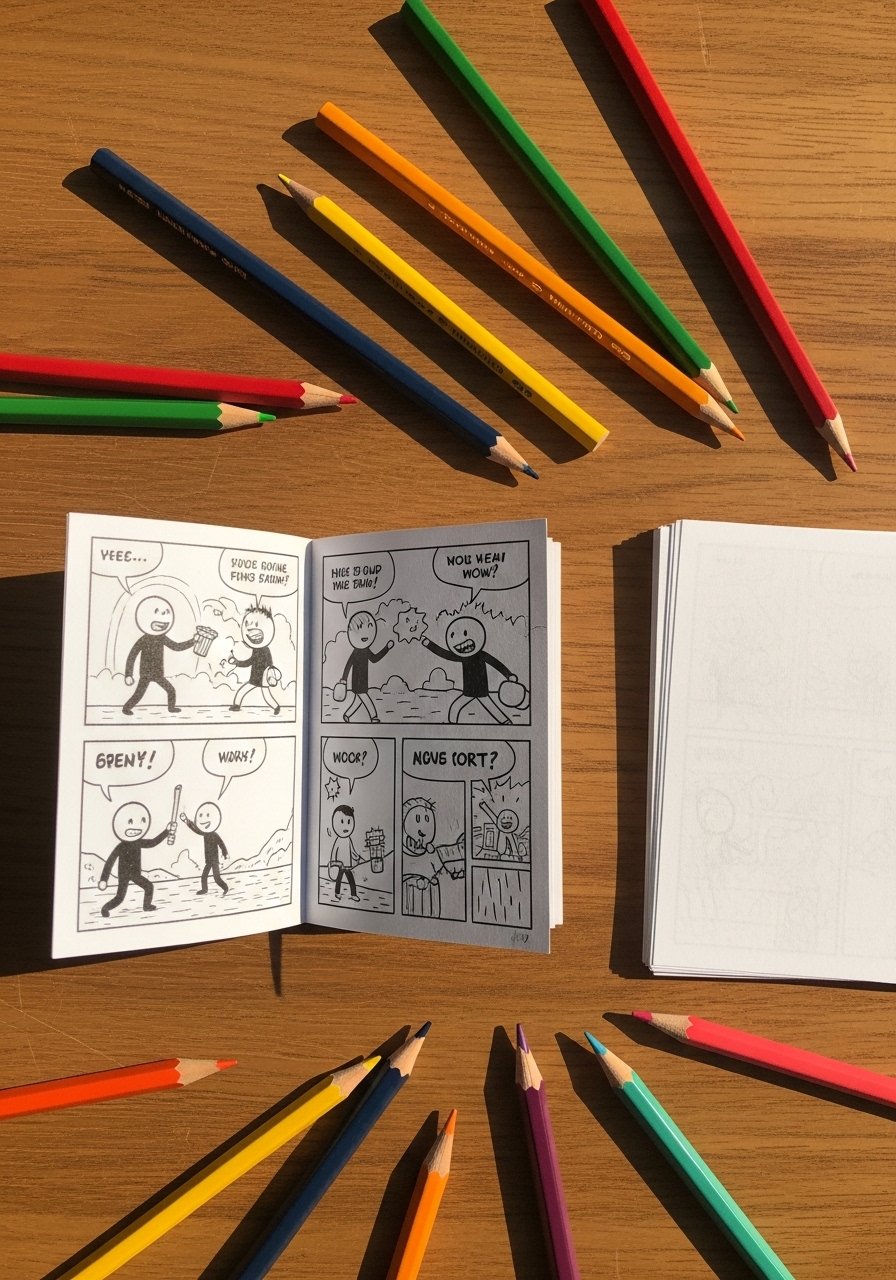
Make mini-comics with a single sheet folded into a tiny book. This is a storytelling drawing project that helps sequencing and writing. Kids feel proud of a finished booklet they can reread and share.
Materials
- 1 sheet printer paper, 1 (folded into 8 panels)
- 24-count colored pencil set
- Black fineliner pen, 1
- Pencil, 1
- Small stapler (optional), 1
- Ruler, 1
- Sticker pack, 1 small pack for embellishments
Instructions
- Fold paper in half lengthwise, then widthwise, then fold each half again to make 8 panels.
- Crease firmly and unfold; sketch thumbnails of story beats in pencil.
- Trace final art with the fineliner pen.
- Color panels with colored pencils.
- Refold into a booklet. Staple the spine if desired.
- No drying time; comics are ready to share.
How to Display or Gift It
- Bundle multiple mini-comics with a rubber band into a tiny library.
- Store in a small plastic sleeve in a binder.
- Add a clear label and tuck into a homemade zine swap with friends.
- Watercolor-Resist Crayon Art
White crayons act as secret lines that the watercolor won’t cover. Kids love drawing invisible patterns and watching them pop when painted over. This introduces basic resist techniques and surprise reveals.
Materials
- 9" x 12" mixed-media paper, 6 sheets
- White crayon, 1
- Watercolor set, 8 colors
- Round watercolor brush size 4, 1
- Cup of water, 1 jar
- Paper towel, 1
- Flat plastic tray for mixing
Instructions
- Use the white crayon to draw shapes or a scene on paper.
- Wet the brush and lay down a broad wash over the page.
- The crayon lines will resist and stay white.
- Add layers of wash for depth; let each layer dry 10–15 minutes.
- Once fully dry, outline with a fine marker for definition.
- If watercolor pools too heavily, blot gently and let dry longer.
How to Display or Gift It
- Mat and frame resist pieces to preserve the delicate texture.
- Pack several into a flat mailing envelope as a surprise art pack.
- Store in a portfolio until the watercolor fully cures.
- Symmetry Paint Butterflies
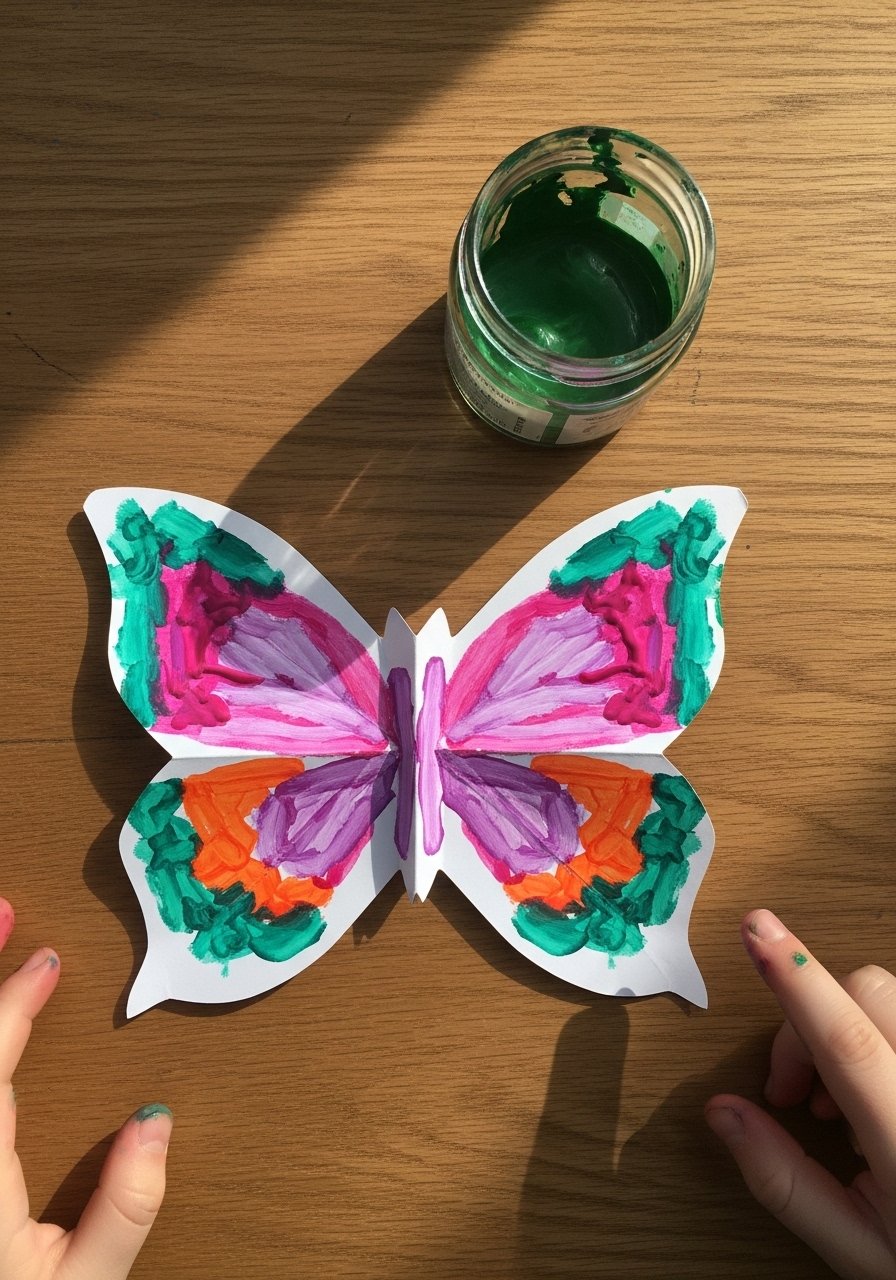
Fold-and-press painting creates perfectly symmetrical butterfly wings. Kids get immediate, dramatic color results. This project is quick and sparkly when you add glitter glue as a finishing touch.
Materials
- White printer paper, 10 sheets (foldable)
- Tempera paint set, 6 bright colors
- Small foam brush, 1
- Glitter glue, 1 tube
- Paper towels, pack
- Plastic tray for work
- Flat craft brush, 1
Instructions
- Fold paper in half and paint one side with blobs of color.
- Fold carefully and press for 5–10 seconds.
- Open to reveal mirrored wings.
- Add details with glitter glue; let glitter glue dry 30 minutes.
- Trim wings into butterfly shapes if desired.
- Let overall piece dry flat 1 hour if thick paint was used.
How to Display or Gift It
- Attach a pipe cleaner body and hang as a garland.
- Use small wooden clothespins to clip onto a string display.
- Store extras flat in a large envelope.
- Salt-Texture Paintings
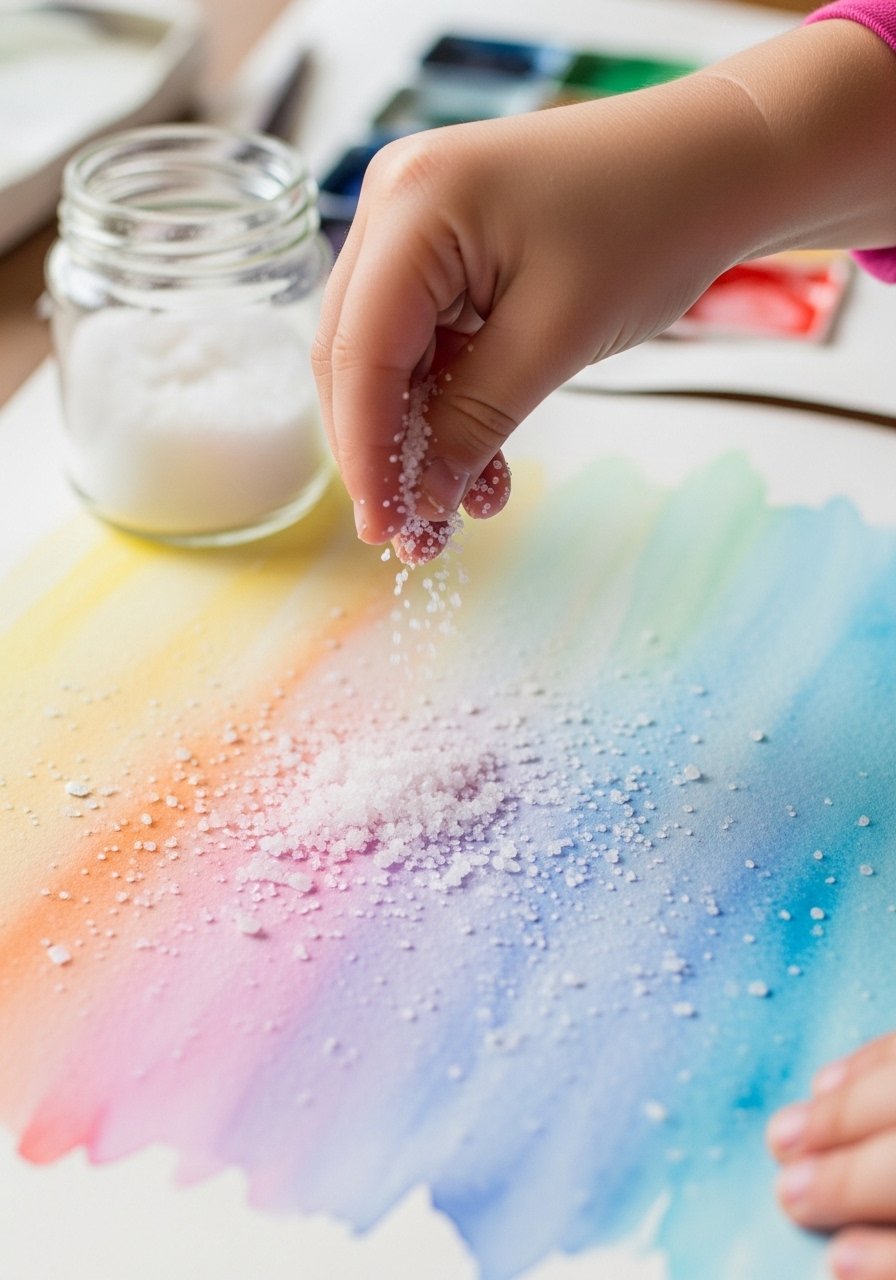
Sprinkling salt on wet watercolor makes delicate starburst textures. Kids love the magical effect. This is best for slightly older kids who can control shakers and wait for drying.
Materials
- Watercolor paper, 9" x 12" (140 lb), 6 sheets
- Watercolor set, 8 colors
- Table salt, small shaker
- Round brush size 6, 1
- Paper towels, 1 sheet
- Tray to catch excess salt, 1
Instructions
- Paint a wet wash on the paper.
- While still wet, sprinkle salt lightly over the paint.
- Let the salt create texture as it absorbs pigment.
- Wait 30–60 minutes for paint to dry.
- Brush off salt over a tray. If paint is still damp, wait longer.
- Add ink or marker accents after salt is removed.
How to Display or Gift It
- Frame with museum glass to protect the delicate texture.
- Attach to a postcard backing and send as a textured greeting.
- Store in a shallow box until fully dry to prevent smudging.
- Scribble-to-Scene Transformations
Turn random scribbles into structured scenes. This teaches kids to find shapes and create narratives. It’s fast, forgiving, and builds creative problem-solving.
Materials
- Sketch pad, 9" x 12"
- Assorted permanent markers, pack of 8
- Colored pencil set, 24-count
- Pencil and eraser, 1 each
- Small sharpener, 1
- Flat cloth to protect the workspace
Instructions
- Have kids scribble freely across a page with marker.
- Pause and look for recognizable shapes within the scribble.
- Use pencil to outline chosen shapes into a scene.
- Trace with marker and color with pencils.
- Add details and background to tell a story.
- No drying time; ready to display instantly.
How to Display or Gift It
- Create a storybook by combining multiple transformed pages.
- Clip pages to a spiral binder for a portable sketchbook.
- Use a small wooden easel to showcase a favorite scene.
- Puffy Paint Planets
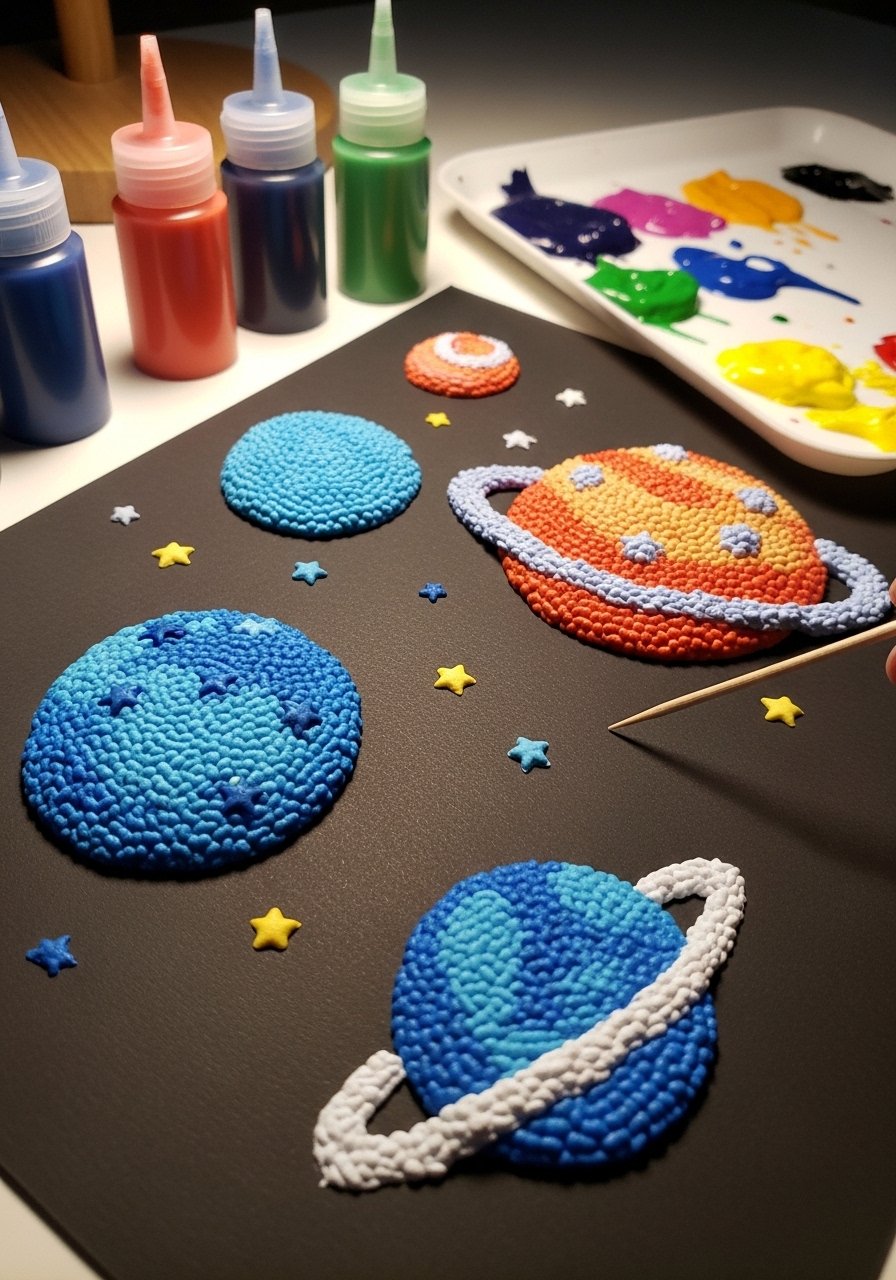
Make tactile planet paintings with a puffy paint mix of glue and shaving cream. The result is squishy, raised texture that’s fun to touch and photograph. Great for sensory exploration and space themes.
Materials
- Black cardstock, 10 sheets (8.5" x 11")
- White school glue, 1 cup
- Shaving cream, 1 can (not gel)
- Food coloring or tempera paint, small drops
- Small plastic cups, 4
- Toothpicks, pack of 50
- Disposable spoons, pack
Instructions
- Mix 1 part glue with 2 parts shaving cream in a cup for puffy paint.
- Stir in food coloring or tempera to make colors.
- Use spoons to dollop circular planets onto black cardstock.
- Smooth edges with a toothpick for details.
- Let puffy paint dry 8–12 hours (overnight) — it will firm to the touch.
- Once dry, add small star highlights with a white gel pen.
How to Display or Gift It
- Laminate or frame to keep raised textures safe.
- Store on a flat surface while drying, away from drafts.
- Pack into a flat mailing envelope for gifting after fully dry.
- Bubble-Wrap Print Art
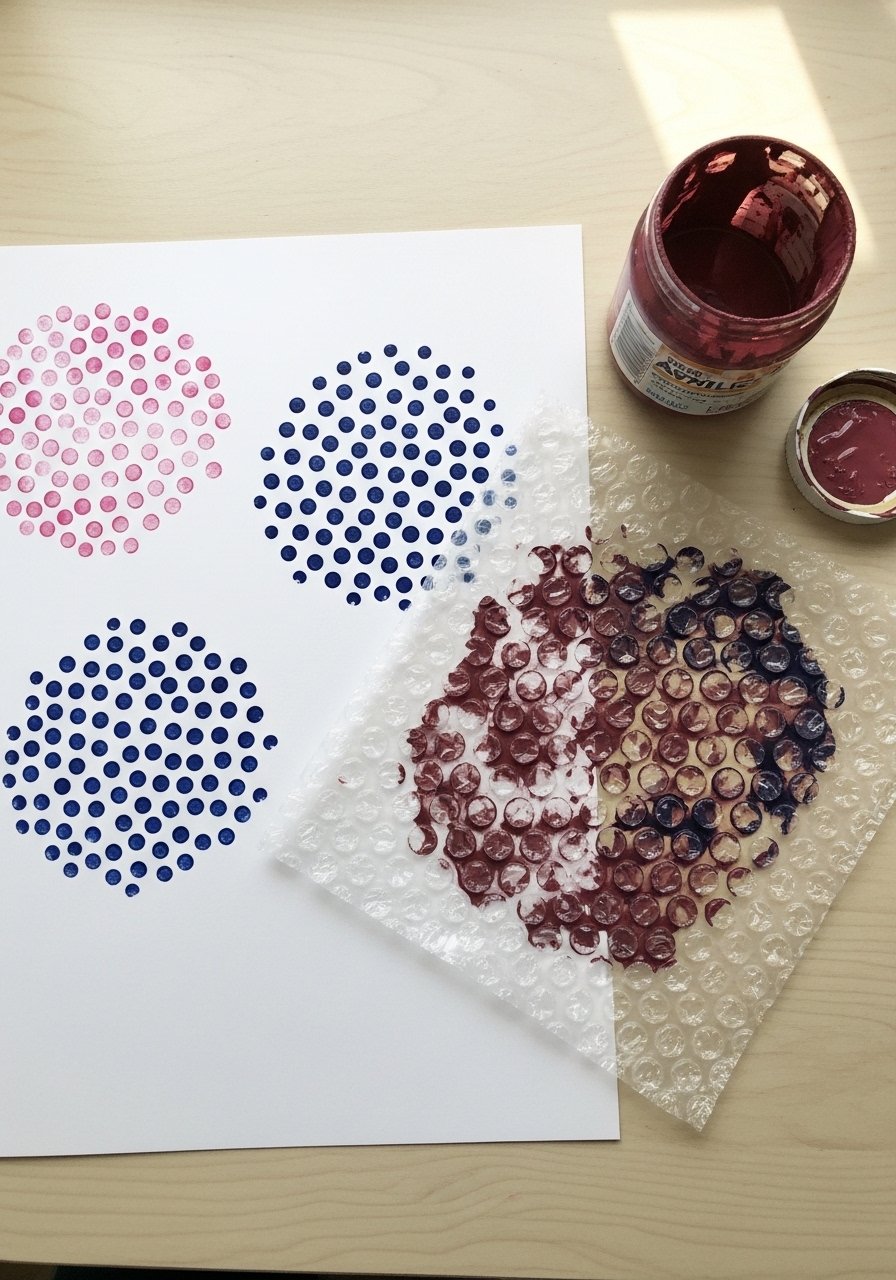
Bubble-wrap prints create playful dotted textures. Kids love the sensory step of pressing and popping. Use for backgrounds, animal skins, or abstract patterns.
Materials
- Bubble-wrap panel, 12" x 12"
- Acrylic paint set, primary colors small bottles
- Roller or brayer, 1 small brayer
- Printer paper or cardstock, 10 sheets
- Scissors, 1 pair
- Tray for paint, 1
- Paper towel, 1 sheet
Instructions
- Cut bubble-wrap to desired size and lay paint onto it with the brayer.
- Press painted bubble-wrap onto paper and smooth with palms.
- Lift gently to reveal dotted print.
- Repeat with different colors for layered effects.
- Let acrylic prints dry 30–45 minutes.
- Clean bubble-wrap immediately with soap and water for reuse.
How to Display or Gift It
- Use prints as unique wrapping paper for small gifts.
- Punch holes and make a garland of dots.
- Store bubble-wrap in a labeled craft drawer for future use.
- DIY Scratch Art Cards
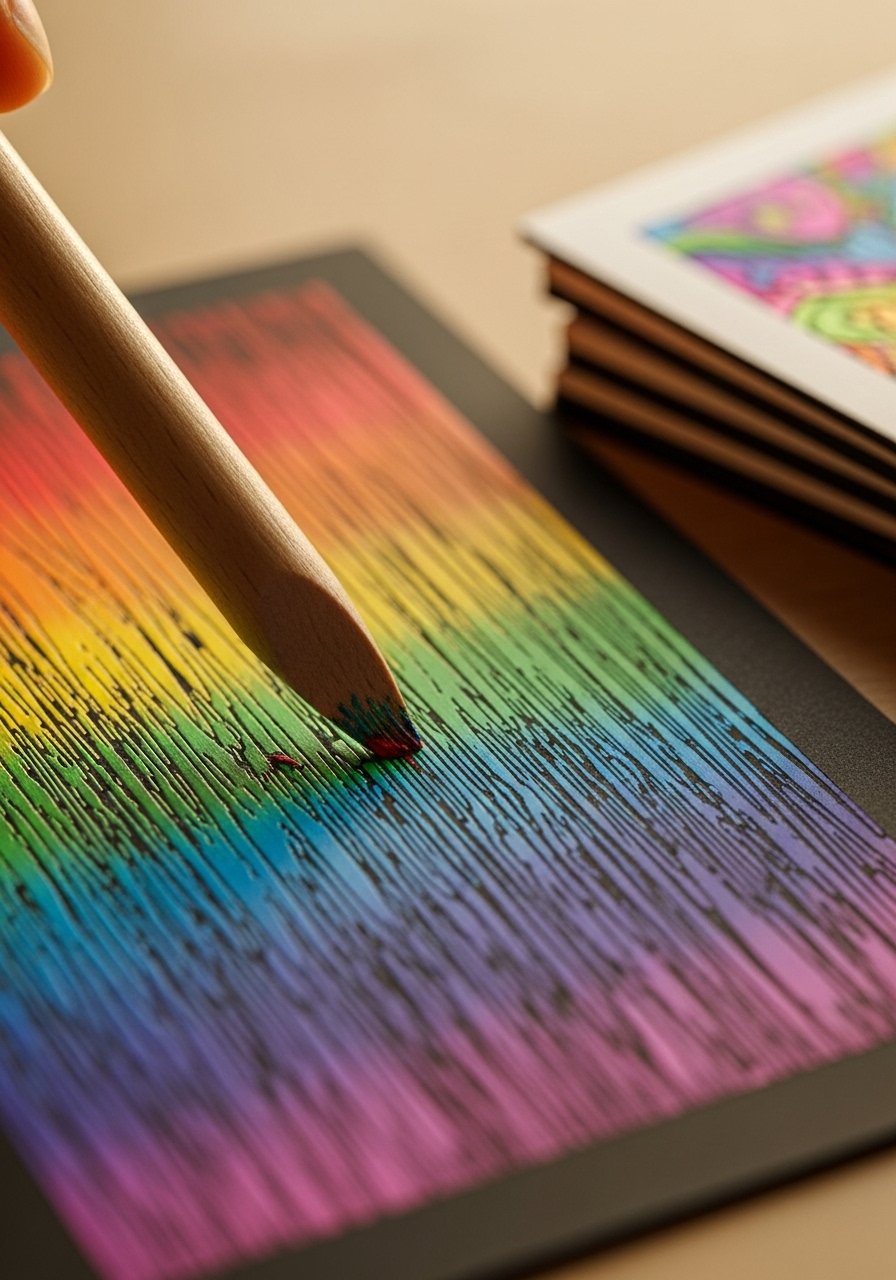
Create scratch art by painting a crayon under-layer, coating it with black tempera, and scratching designs. Kids love the reveal. It improves control and offers dramatic, high-contrast results.
Materials
- White cardstock, 10 sheets (8.5" x 11")
- Crayon set, 24-count (to color under-layer)
- Black tempera paint, 8 oz
- Dish soap, 1 tsp (for smooth black paint)
- Small foam brush, 1
- Wooden stylus or toothpicks, pack of 20
- Paper towels, 2
Instructions
- Color a full page with heavy crayon strokes in bright colors.
- Mix black tempera with one teaspoon dish soap and paint evenly over the crayon.
- Let black layer dry 30–40 minutes.
- Use a wooden stylus to scratch designs and reveal colors beneath.
- If black paint flakes, gently smooth and let dry more.
- No further drying once scratched — ready to display.
How to Display or Gift It
- Mount on black backing and frame for contrast.
- Make into cards for special notes.
- Keep scratch tools in a small jar with cards for gifting.
- Collage Postcard Drawings
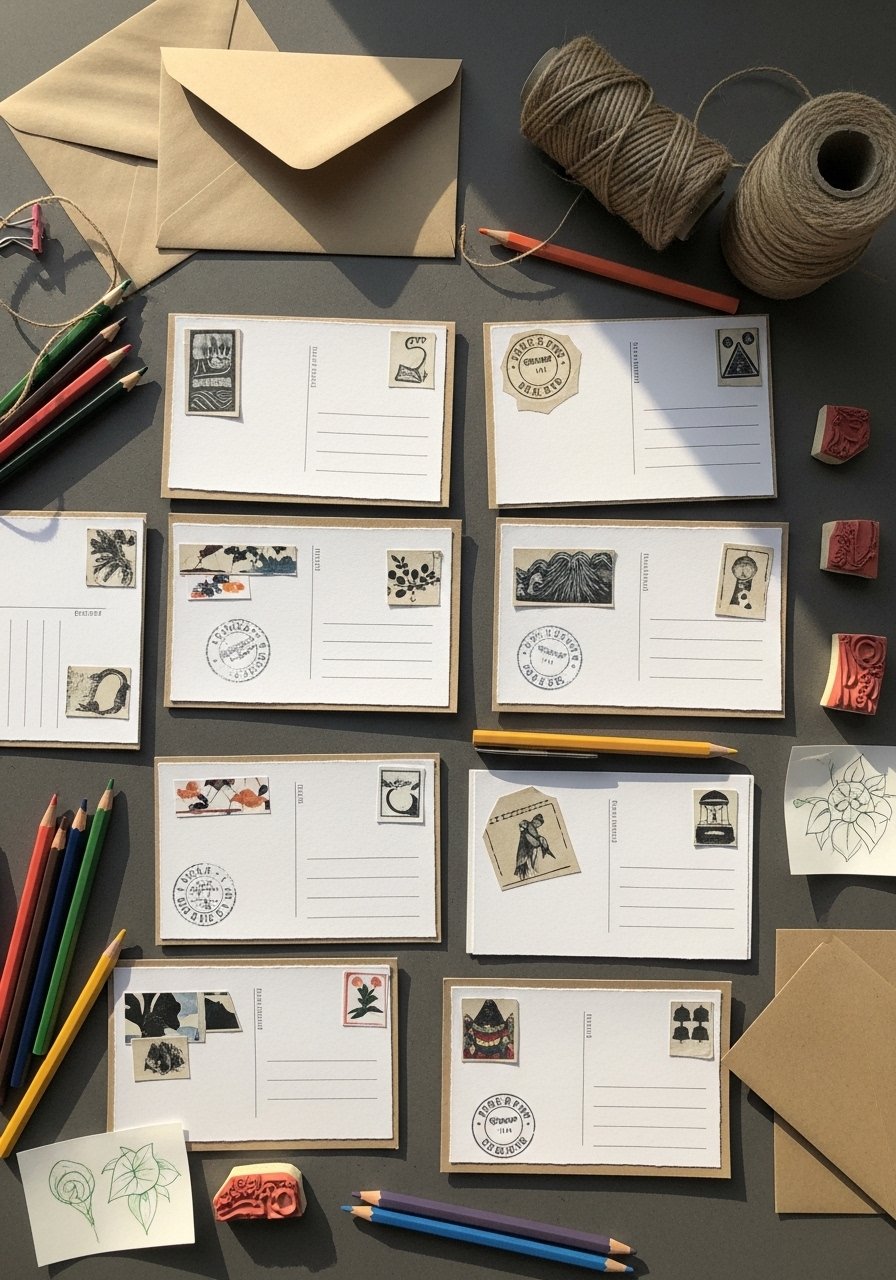
Make mini postcards by mixing collage and drawing. Kids can send artwork to relatives. It’s a tiny creative project that kids finish in one sitting.
Materials
- Index cards, pack of 50 (4" x 6")
- Glue stick, 1
- Assorted scrap paper, 12 pieces
- Colored pencil set, 24-count
- Rubber stamp and ink pad, 1
- Fine-tip pen, 1
- Kraft envelopes, pack of 10
Instructions
- Cut scrap paper into small shapes and arrange on an index card.
- Glue in place and add drawn elements with pencil and pen.
- Stamp a small motif for interest.
- Allow glue to set 10–15 minutes.
- Address and add a short note on the back for mailing.
- Seal in a kraft envelope and add a stamp.
How to Display or Gift It
- Mail to grandparents as a surprise.
- Bundle a set with twine as a pocket-sized gift.
- Store leftover supplies in a small craft organizer.
- Stick-Figure Storyboards

Simple stick figures tell big stories. Create short storyboards to practice sequencing and expression. This helps kids plan and then draw scenes quickly.
Materials
- Grid paper pad, 8.5" x 11"
- Pencil, 2
- Eraser, 1
- Black fineliner, 1
- Colored pencils, 12-count
- Small clipboard, 1
Instructions
- Divide a page into 6–8 panels with a pencil.
- Brainstorm a short action: beginning, middle, end.
- Sketch stick-figure poses in pencil for each panel.
- Ink with fineliner and erase pencil lines.
- Add color and captions with colored pencils.
- No drying time; ready to show.
How to Display or Gift It
- Staple multiple pages into a mini comic book.
- Present storyboards on a small easel for show-and-tell.
- Store on a clipboard ready for the next idea.
- Yarn-Outline Mixed Media Drawings
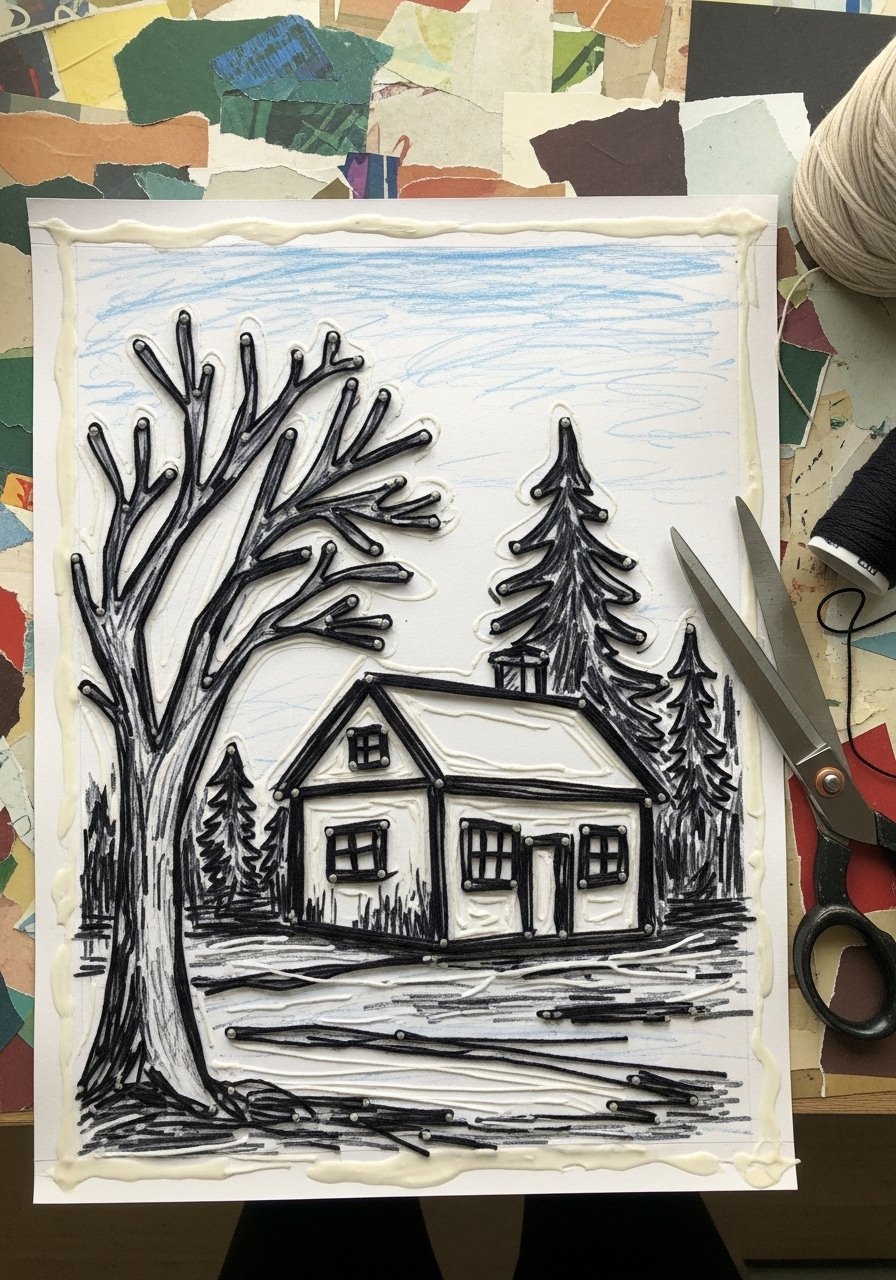
Glue yarn onto paper to outline shapes and add a tactile element. Kids enjoy the raised lines and filling areas with color or collage. This blends drawing and simple sewing skills.
Materials
- Heavyweight cardstock, 8.5" x 11", 6 sheets
- Yarn skein, 1 small (approx. 20 yards)
- White craft glue, 1 bottle (4 oz)
- Scissors, 1 pair
- Colored-paper scraps, assorted
- Colored pencils, 12-count
- Small brush to spread glue
Instructions
- Sketch a simple scene in pencil.
- Apply a thin line of glue along the sketch and press yarn into place.
- Trim yarn ends and secure glue for 10–15 minutes.
- Fill enclosed areas with colored-paper collage or colored pencil.
- Let glue cure 1 hour for best adhesion.
- If yarn lifts, add a dab of glue underneath and press for 30 seconds.
How to Display or Gift It
- Frame in shallow frames to protect the yarn.
- Make a set of textile cards for tactile gifts.
- Store yarn in a small clear storage jar between uses.
- Glow-in-the-Dark Night Sky Drawings
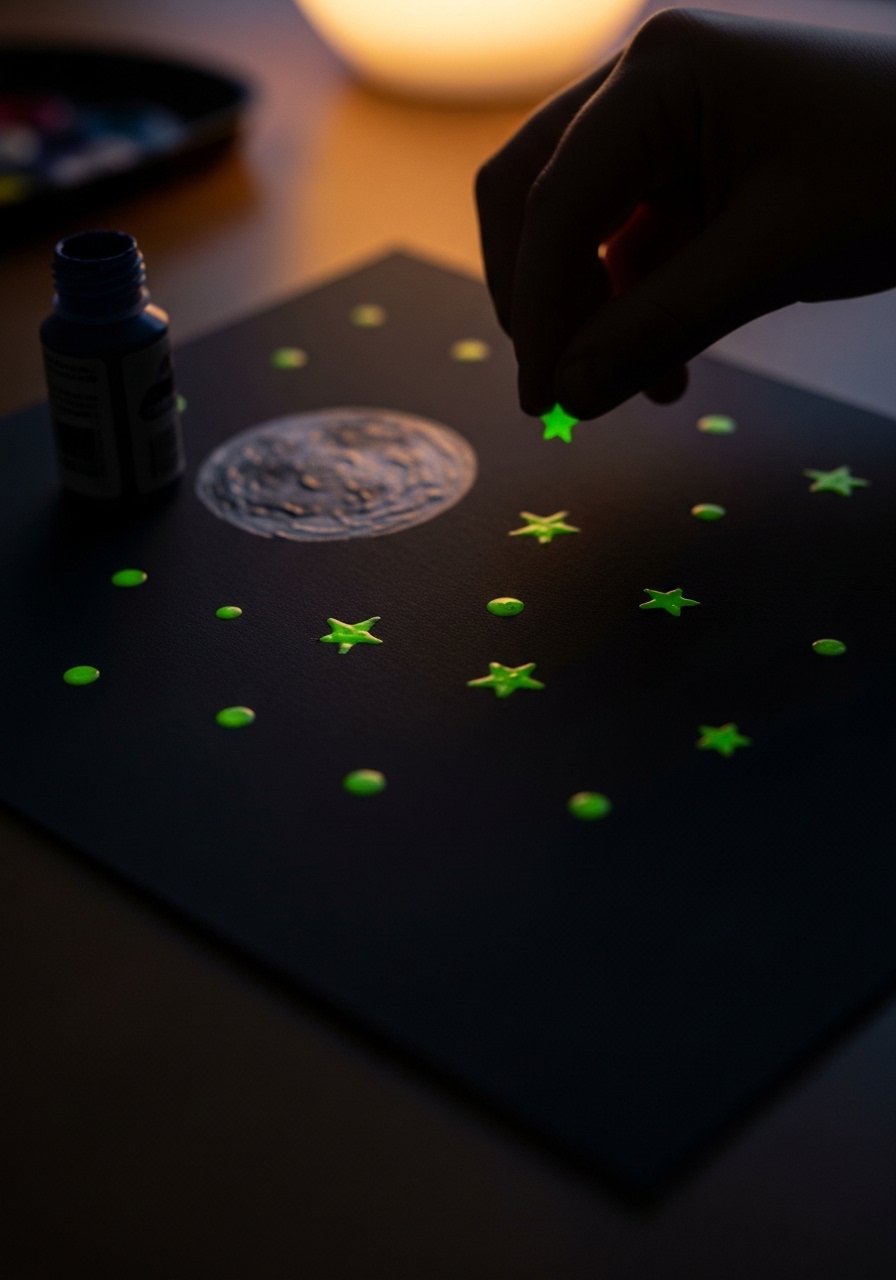
Create stars with glow-in-the-dark paint for a magical night-sky effect. These look great under lights-off conditions and are perfect for bedtime-room art.
Materials
- Black cardstock, 8.5" x 11" (10 sheets)
- Glow-in-the-dark paint, 2 oz bottle
- Small round brush, size 2
- White gel pen, 1
- Reusable palette, 1
- Paper towels, 1 sheet
Instructions
- Paint a moon and large stars with glow paint and let dry 30 minutes.
- Dot small stars with the brush for a speckled sky.
- Charge paint under a lamp for 5–10 minutes for better glow.
- Add white gel pen highlights for contrast.
- Let pieces sit for 30 minutes before turning lights off to test glow.
- If glow is faint, add a second coat and let dry another 30 minutes.
How to Display or Gift It
- Hang near a child’s bed so the glow reads as a nightlight.
- Pack in a gift box with a small LED keychain to “charge” the paint.
- Store flat in a portfolio when not glowing.
- Budget Drawing Ideas for Kids: Mini Gallery Clips
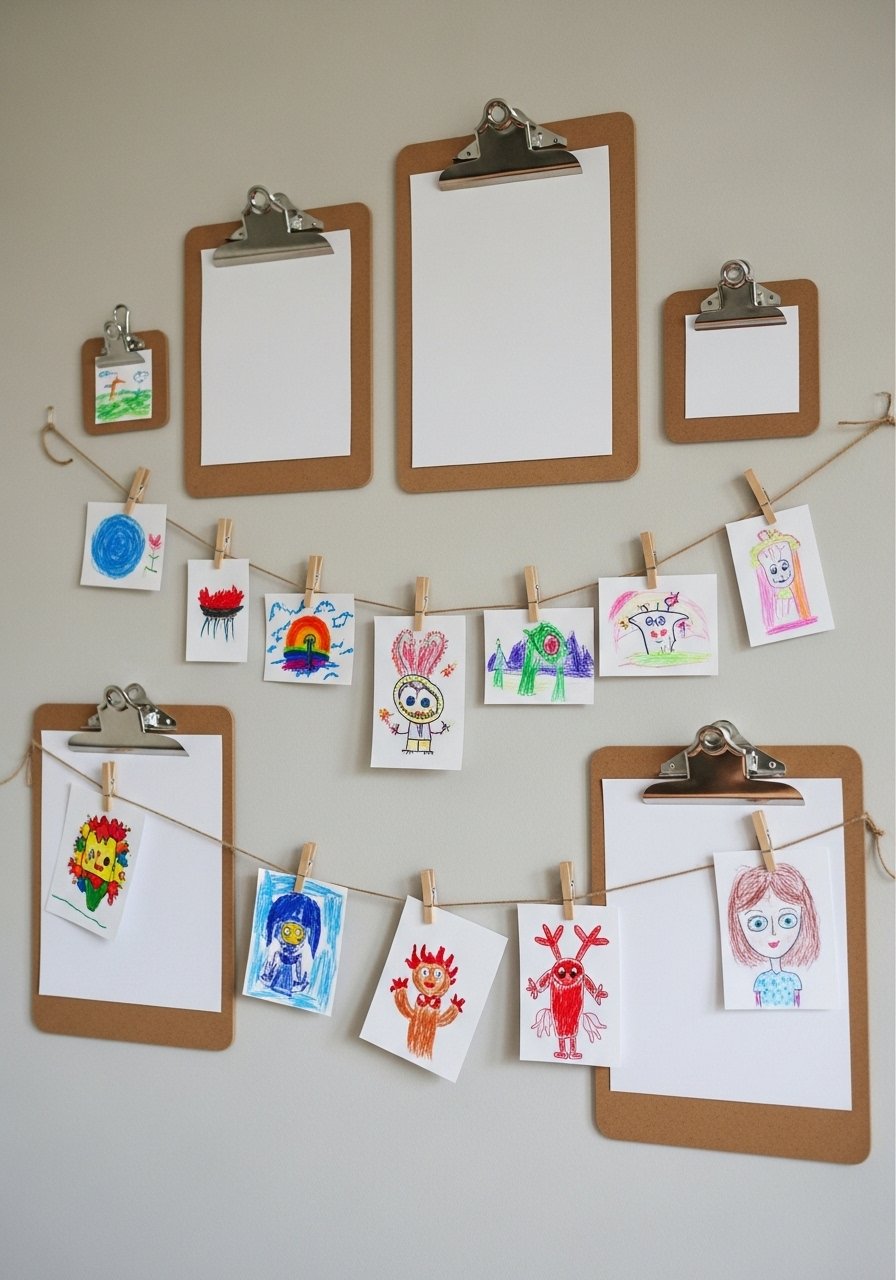
Make a mini gallery with simple clips to showcase rotating artwork. This gives kids ownership and keeps the art visible. It’s cheap and customizable for any room style.
Materials
- Mini wooden clothespins, pack of 24
- Natural twine, 25 ft
- Small wooden dowels or curtain rod, 1
- Command picture hanging strips, pack of 4
- Assorted kid drawings (from previous projects)
- Small wooden easel, 1 (optional)
- Label tags, pack of 20
Instructions
- Attach the dowel to the wall with picture hanging strips.
- Tie twine across the dowel in 2–3 rows.
- Clip artwork with clothespins and arrange by size and color.
- Replace pieces as new work is created.
- Use label tags to add titles or artist names.
- Keep extra clothespins in a small jar nearby.
How to Display or Gift It
- Create seasonal gallery swaps: summer art, holiday themes.
- Use a small wooden easel to spotlight a featured piece.
- Store clothespins and twine together in a craft organizer for easy updates.
- Gift a framed clip display with a starter set of drawings.
Trust the process and have fun with these thrifty, kid-tested projects. You’ve got options for sensory painting, stencil tracing, resist techniques, and sticker-driven designs. Try a compact watercolor set or a soft chalk pastel kit as reliable, low-cost tools that work across many projects. A small hot glue gun with temperature control also speeds up assembly for multi-step crafts without stringy messes.
Which project will you try first? Pin this list so it’s easy to pull up on a rainy afternoon, and share your favorites with a friend who crafts with kids. I’d love to see what your little artists make — tag me when you post their masterpieces!
Final product suggestions: a student watercolor half-pan set and a low-temp hot glue gun both make multiple projects neater and faster. Consider this watercolor travel set for simple mixing and cleanup: student watercolor set.


