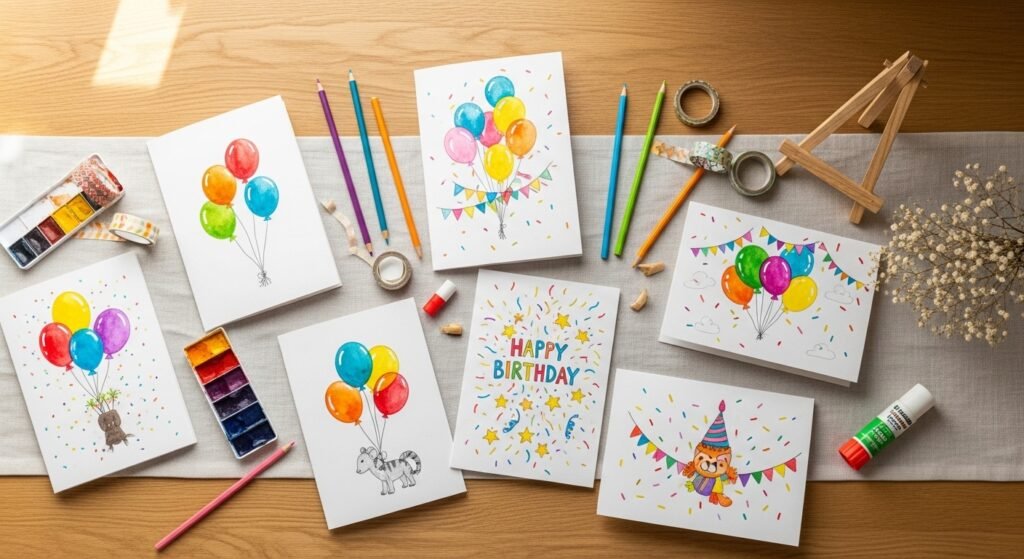
You know that moment when you want a birthday card that actually feels personal, but mass-produced options feel flat? These drawing ideas for kids birthday cards are all about big smiles, bright color, and simple steps so kids and grown-ups can make something heartfelt together. Whether you like watercolor washes, marker doodles, or a little collage texture, you'll find playful projects that finish in under an hour or so.
I mention a few helpful tools along the way—like running a small design through a Cricut Joy cutting machine for perfect sticker shapes or sealing delicate paint with a thin coat of Mod Podge Matte. Each idea below includes a full materials list, step-by-step instructions, drying times, and display or gifting tips so you can batch-make favorites for a whole party.
Ready to make cards that feel like hugs on paper? Let’s draw, color, and craft a stack of birthday cheer.
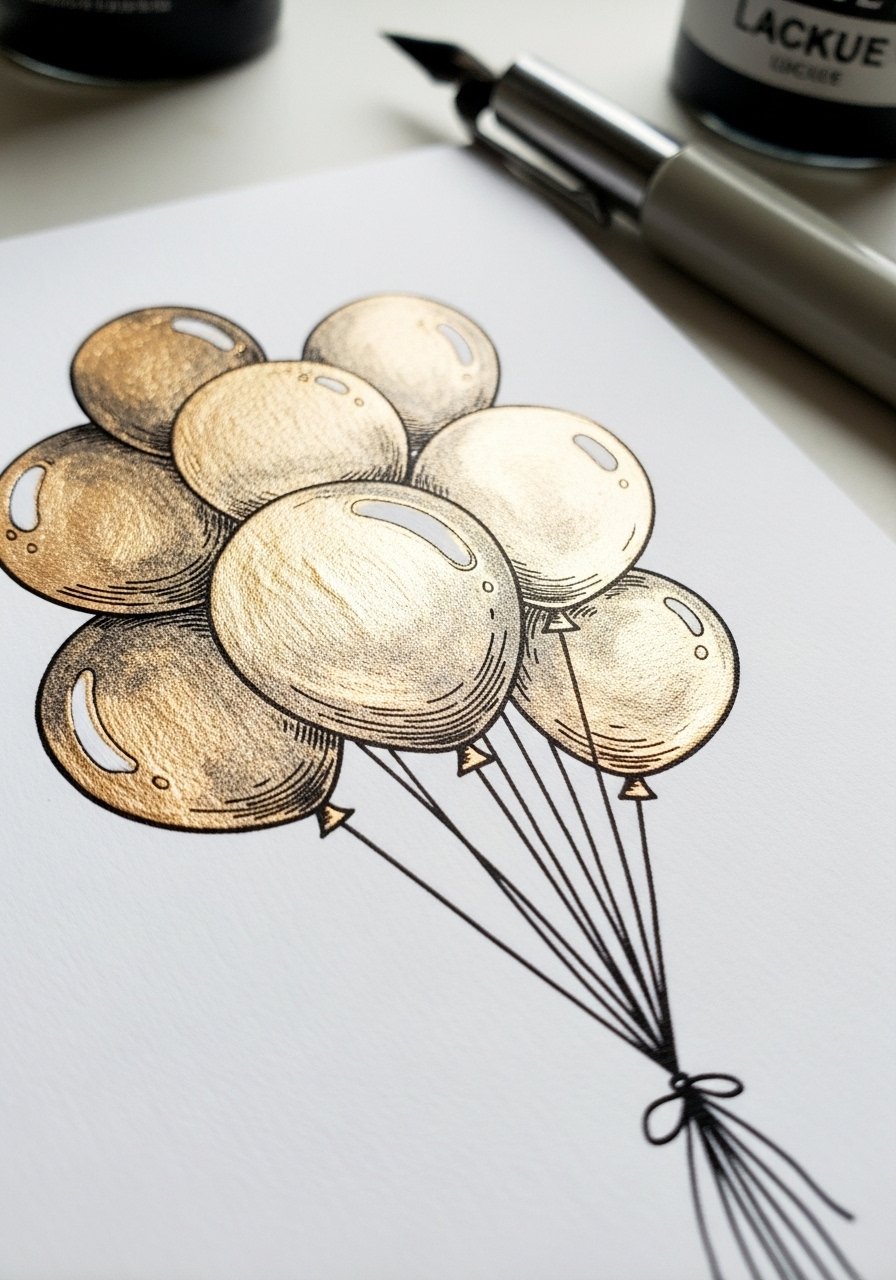
1. Rainbow Balloon Doodle Card
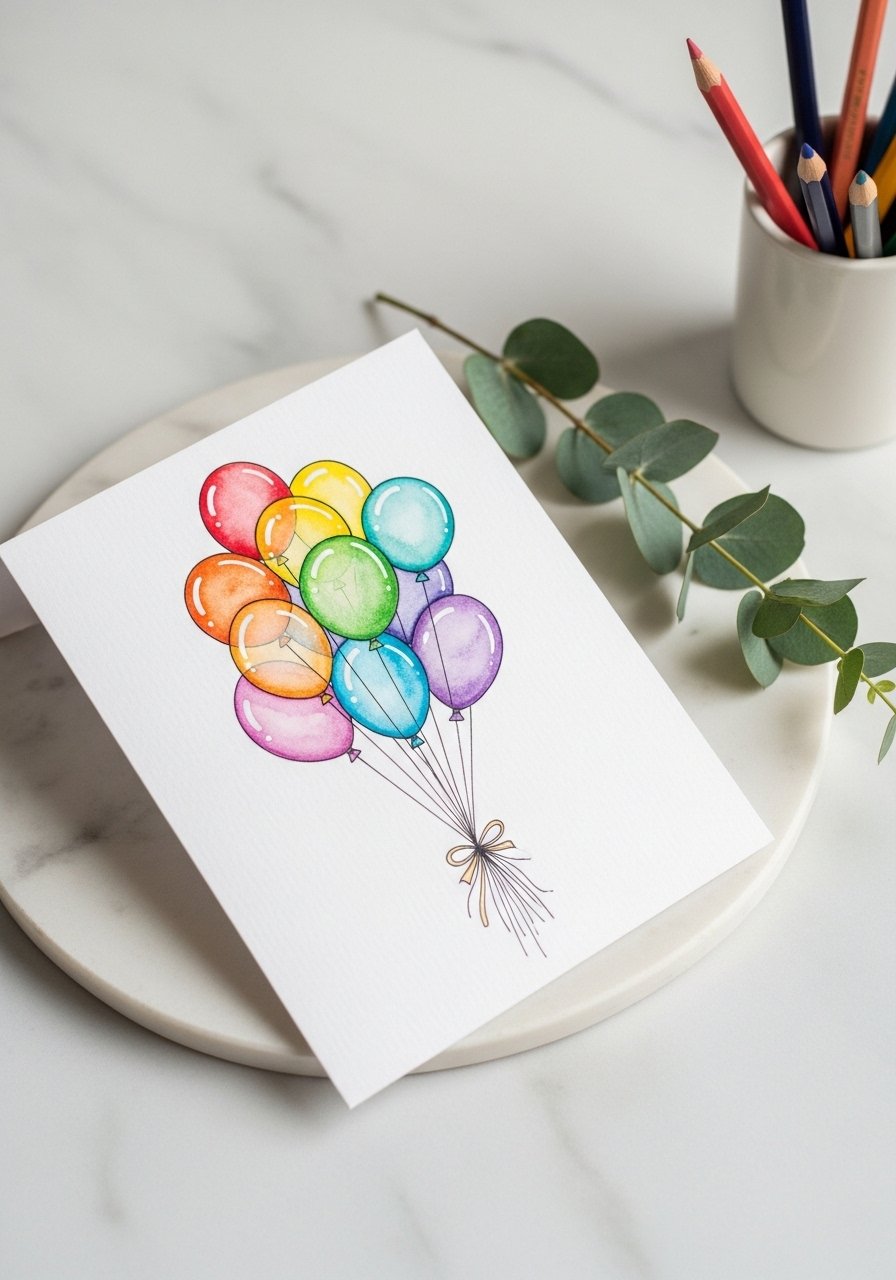
A playful cluster of rainbow balloons always reads joyful. This card mixes a soft watercolor wash with sharp black-ink outlines for a grown-up/kid balance. Kids love painting the colors; adults do the finishing doodle.
Materials
- 1 A6 folded blank card (4.5 x 6.25 in) or cut from 8.5 x 11 in cardstock
- 1 sheet 140 lb watercolor paper, cut to 4 x 6 in
- 6 watercolor pan set (small travel set)
- 1 round size 6 watercolor brush
- 1 black fine-tip waterproof pen (0.3 mm)
- 1 pencil and eraser
- 1 foam brush for glue
- 1 bottle of glue stick
- 1 sealing coat: Mod Podge Matte (optional) — light coat
Instructions
- Lightly sketch three to five balloon shapes on watercolor paper with pencil.
- Wet the brush and lay a light wash inside each balloon, letting colors blend. Dry 10–15 minutes.
- Once dry, trace outlines with a black fine-tip pen. Let ink dry 2 minutes.
- Cut around the painted panel to 3.75 x 5.75 in and mount to the folded card with glue stick.
- Add drawn strings down to the message area and write a bubbly "Happy Birthday!"
- Optional: Seal with one thin coat of Mod Podge Matte. Let cure 24 hours.
How to Display or Gift It
- Slip into a clear cello sleeve and tuck into a kraft envelope.
- Pair with a little balloon bouquet or a tiny wooden easel for display (small wooden easel).
- Make a set of 6 in different palettes and tie together with twine.
- Store flat in a craft organizer until sending (craft storage organizer).
2. Animal Face Peek-a-Boo Card
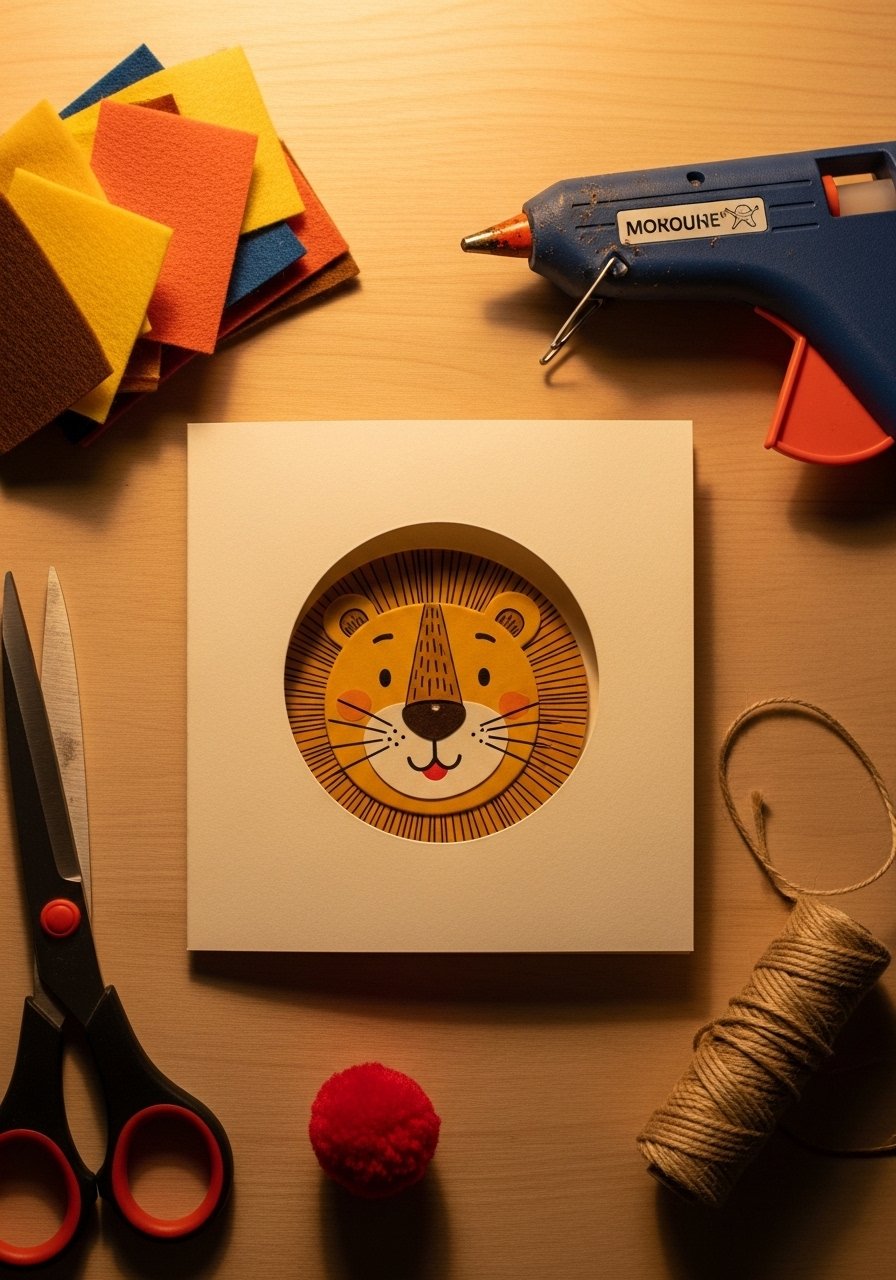
Kids adore cards that act like a little game. This peek-a-boo animal uses a simple circle cutout so the creature "pops." Perfect for beginners and animal lovers.
Materials
- 1 square blank card 5 x 5 in
- 1 sheet of cardstock for insert (same size)
- 1 circle punch, 1.5 in diameter or Fiskars circle punch set
- 1 set of felt sheets (assorted)
- 1 set of colored pencils
- 1 glue stick or hot glue gun
- 1 black marker for facial details
- 2 small pompoms or googly eyes
Instructions
- Use the circle punch to cut a window in the front card.
- On the insert cardstock, sketch an animal face (lion, rabbit, bear) using colored pencils.
- Glue small felt ears or mane pieces around the circle on the insert for texture. Let glue set 5 minutes.
- Attach googly eyes or pompom nose with glue gun. Cool 2 minutes.
- Slip the illustrated insert behind the front card so the face peeks through the window.
- Add a handwritten message below the window.
How to Display or Gift It
- Stand on a tabletop in a child’s room or mantle.
- Pop into a playful envelope and add confetti.
- Make matching envelopes with stamped paw prints.
- Store in a flat keeper box with separators (kraft gift boxes).
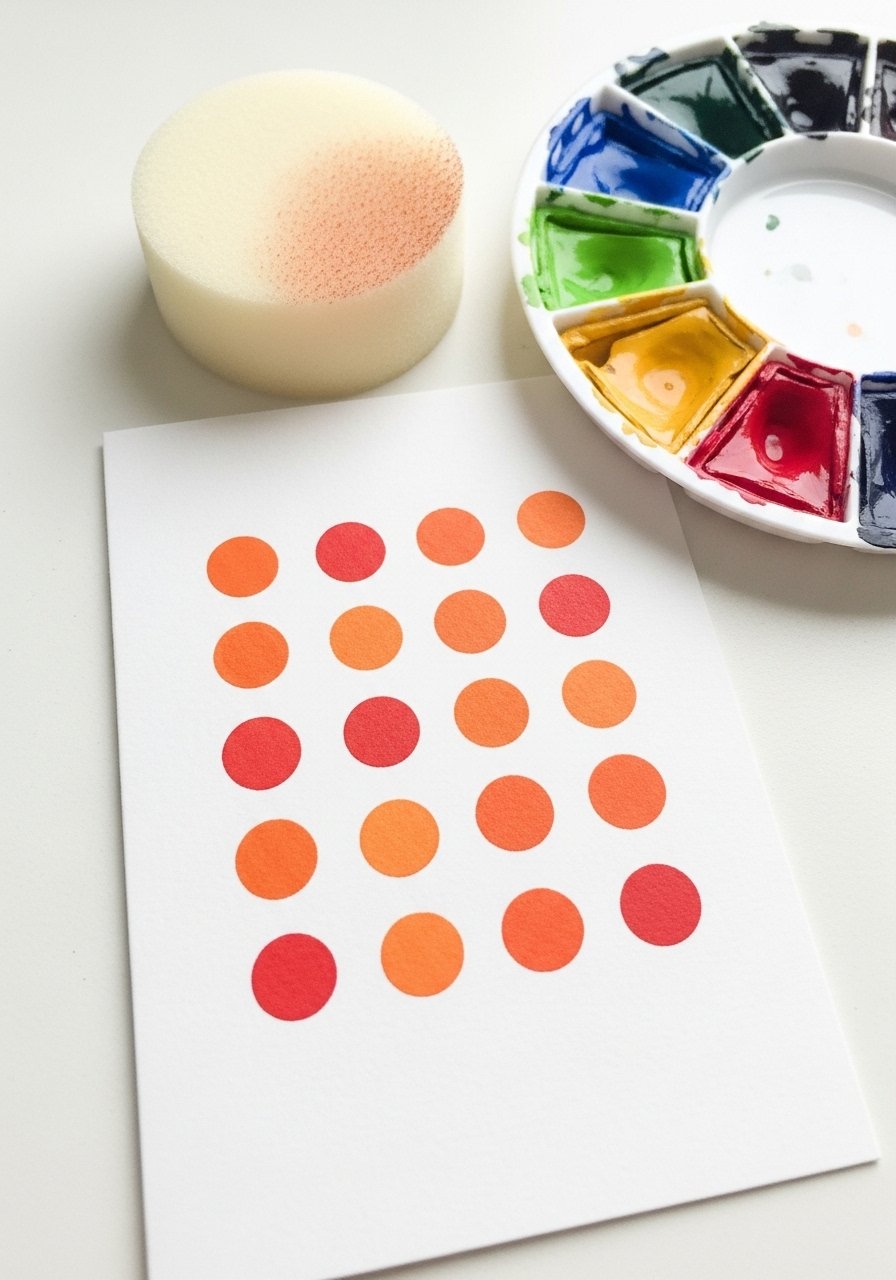
3. Confetti Finger-Print Party Card
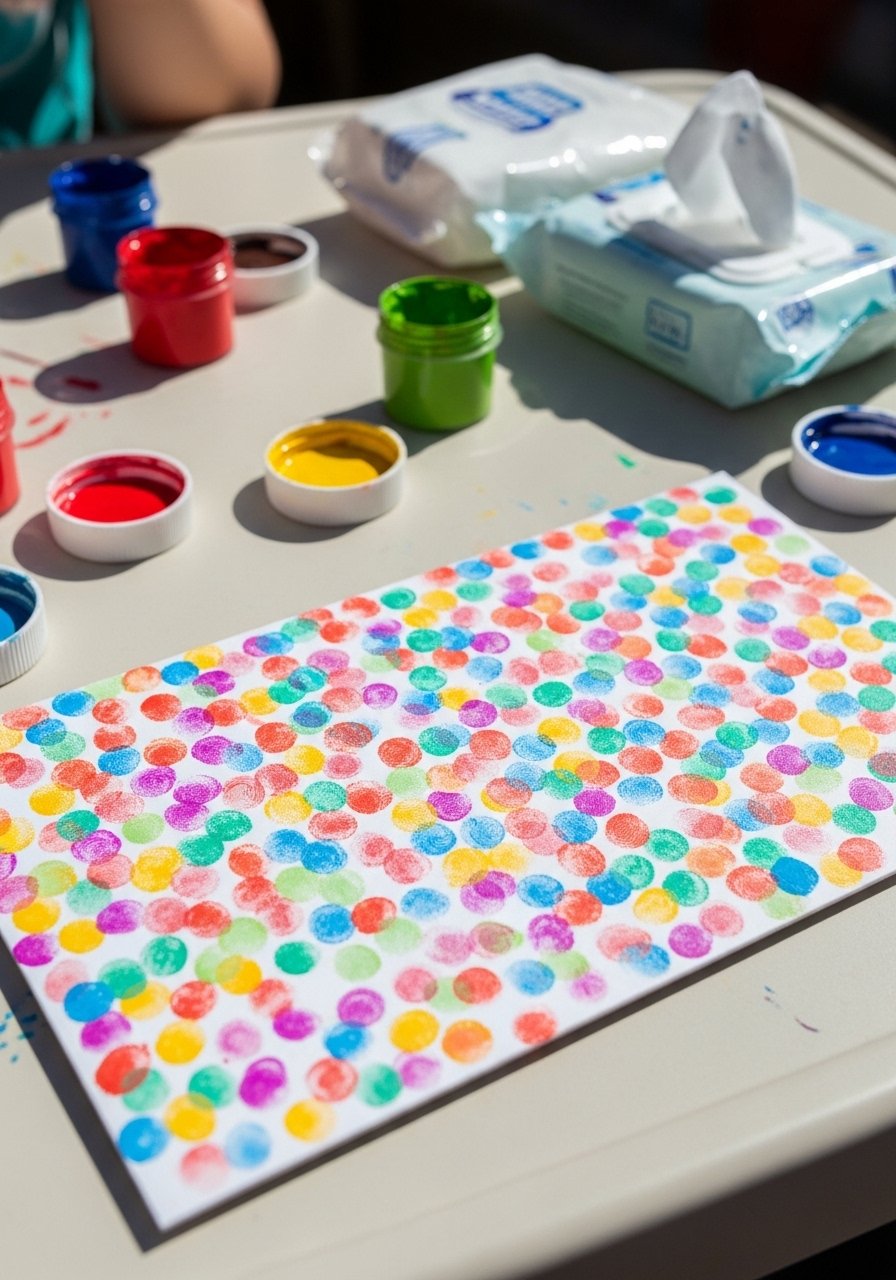
This hands-on card is perfect for toddlers. Fingerprints create a confetti effect that's delightfully imperfect and personal.
Materials
- 1 blank A6 card
- 6–8 washable craft paints (small pots)
- 1 palette or paper plate
- 1 pack of baby wipes
- 1 pencil for note-writing
- 1 thin black marker
- 1 paper towel
Instructions
- Pour small blobs of paint onto a palette.
- Parents press child’s fingertip lightly into paint, then onto card to create confetti dots.
- Let paint dry 20–30 minutes.
- Once dry, use a fine black pen to add tiny stars or smiling faces on a few dots.
- Write a short birthday note inside.
- Wipe child’s fingers clean; let the card sit flat for another 10 minutes before packaging.
How to Display or Gift It
- Pop into a colorful envelope and seal with washi tape.
- Bundle a set of fingerprint cards with an art smock as a gift.
- Store flat until delivering; layers of cards separated by tissue avoid smudges.
4. Popsicle Stick Rocket Card
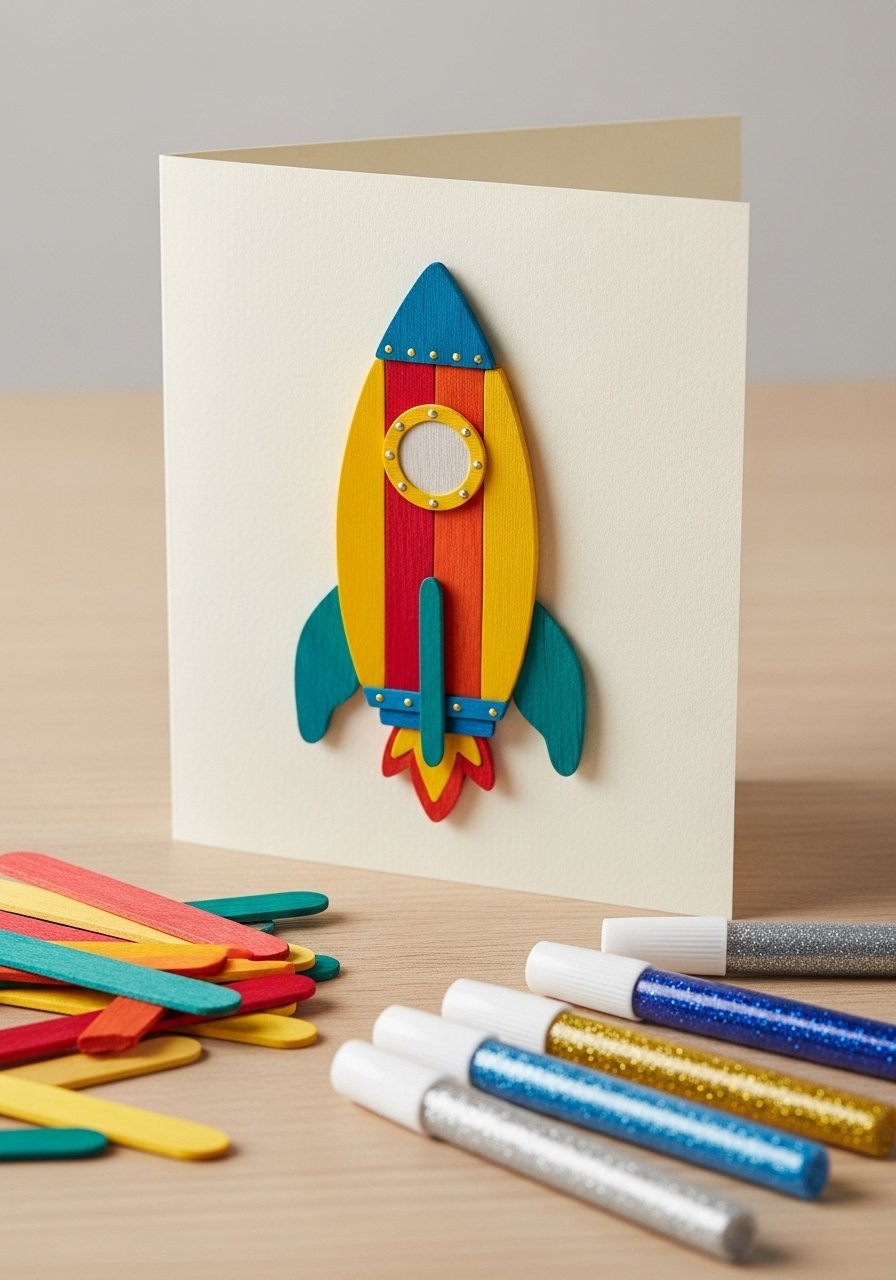
This mixed-media card adds a tactile element using craft sticks. Kids can paint and glue—the result feels like a mini sculpture.
Materials
- 1 folded A6 card
- 4 colored popsicle sticks
- 1 bottle of craft glue (white PVA)
- 1 glitter glue pen set
- 1 fine-tip black marker
- 1 small foam brush
- 1 sheet of metallic cardstock (for window)
- 1 scissors
Instructions
- Trim popsicle sticks to form a rocket body and fins. Sand any rough edges.
- Paint a background on the card with watered-down acrylics; dry 15 minutes.
- Glue sticks onto the card to form the rocket; press firmly for 30 seconds. Let dry 30 minutes.
- Add metallic cardstock window; trim and glue.
- Use glitter glue pens to add flame and star accents; dry 20 minutes.
- Draw a tiny face or message with marker.
How to Display or Gift It
- Tie a trio of cards with ribbon and a little wooden skewer for a rocket-themed present.
- Display on a shelf with toy rockets for a birthday vignette.
- Keep in a flat bin to prevent bending.
5. Handprint Dinosaur Pop Card
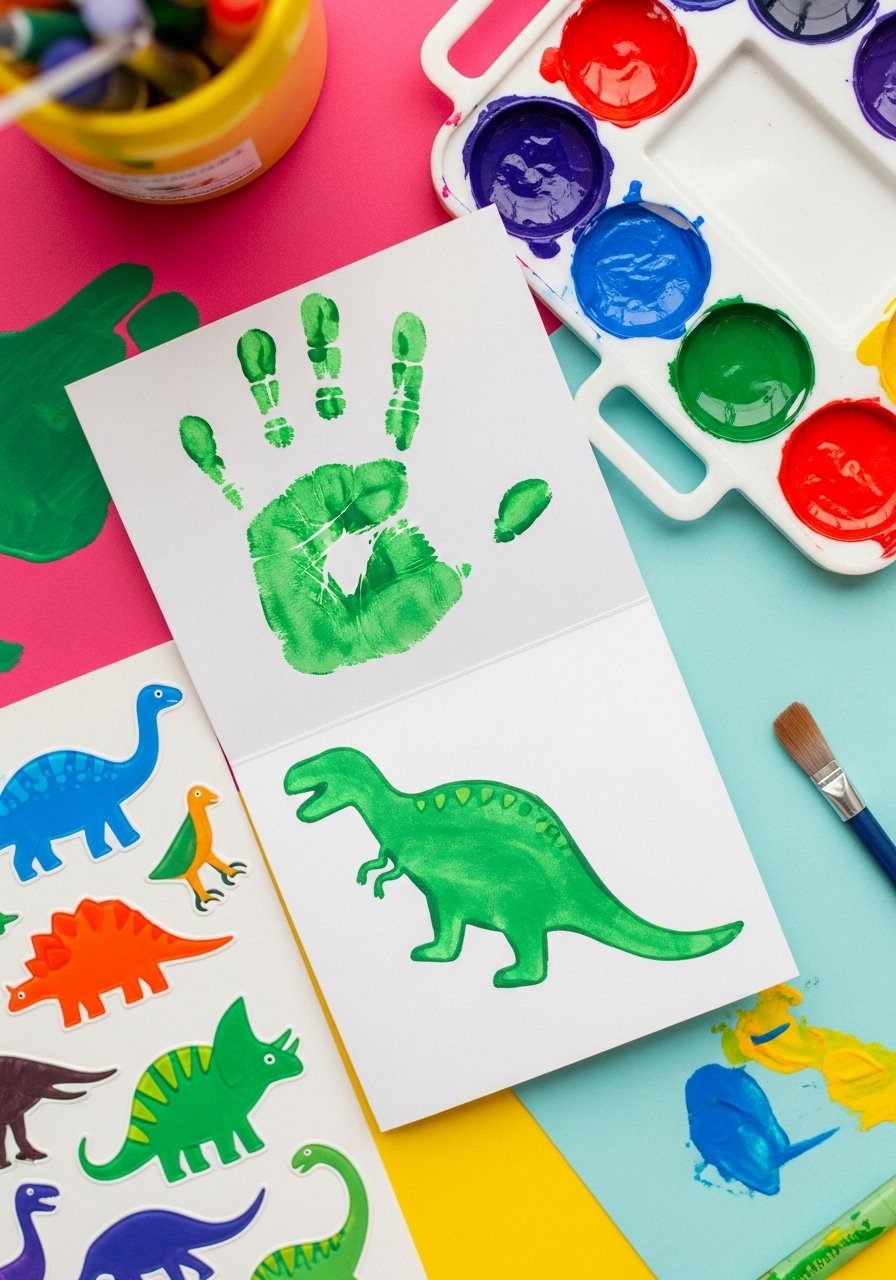
Turn a tiny hand into a roaring dino. This sentimental keepsake is perfect for younger kids and grandparents alike.
Materials
- 1 A6 folded card
- 1 washable green paint (3 oz)
- 1 foam brush
- 1 black fine-tip pen
- 1 set of paint-safe baby wipes
- 1 sheet of cardstock to protect work surface
- 1 Mod Podge Matte small bottle (optional)
Instructions
- Pour a thin layer of green paint on a palette.
- Press the child’s hand gently into paint, then onto the front of the card. Clean hand with wipes immediately.
- Let paint dry 20–30 minutes.
- Once dry, outline the handprint into dinosaur features with the black pen (eye, teeth, spikes).
- Optionally brush a light coat of Mod Podge (one thin coat). Dry 15 minutes; cure 24 hours.
- Write a large "Stomp! Happy Birthday!" inside.
How to Display or Gift It
- Frame the card in a small frame as a keepsake.
- Pair with a small dinosaur toy and kraft box.
- Keep flat and avoid stacking until Mod Podge fully cures.
6. Simple Stamp and Wash Card

Stamps make repeated motifs easy for little hands. This combines a dreamy wash with crisp stamped shapes.
Materials
- 1 watercolor paper panel, 4 x 6 in
- 1 A6 folded card
- 1 watercolor set
- 1 rubber stamp (star or balloon)
- 1 dye ink pad (waterproof)
- 1 brayer roller (small)
- 1 glue tape roller
Instructions
- Paint a pale watercolor wash on the panel; dry 10–15 minutes.
- Ink the rubber stamp with the dye ink pad and stamp evenly across the panel.
- Repeat for a pattern; allow ink to dry 5 minutes.
- Mount panel to card using glue tape.
- Add a hand-lettered sentiment on the front.
- Let everything sit flat for 30 minutes before inserting into envelope.
How to Display or Gift It
- Create a matching set using the same stamp in different ink colors.
- Wrap in tissue and place in a kraft box for gifting.
- Store panels flat in a watercolor pad between projects.
7. Balloon Pop-Up Surprise Card
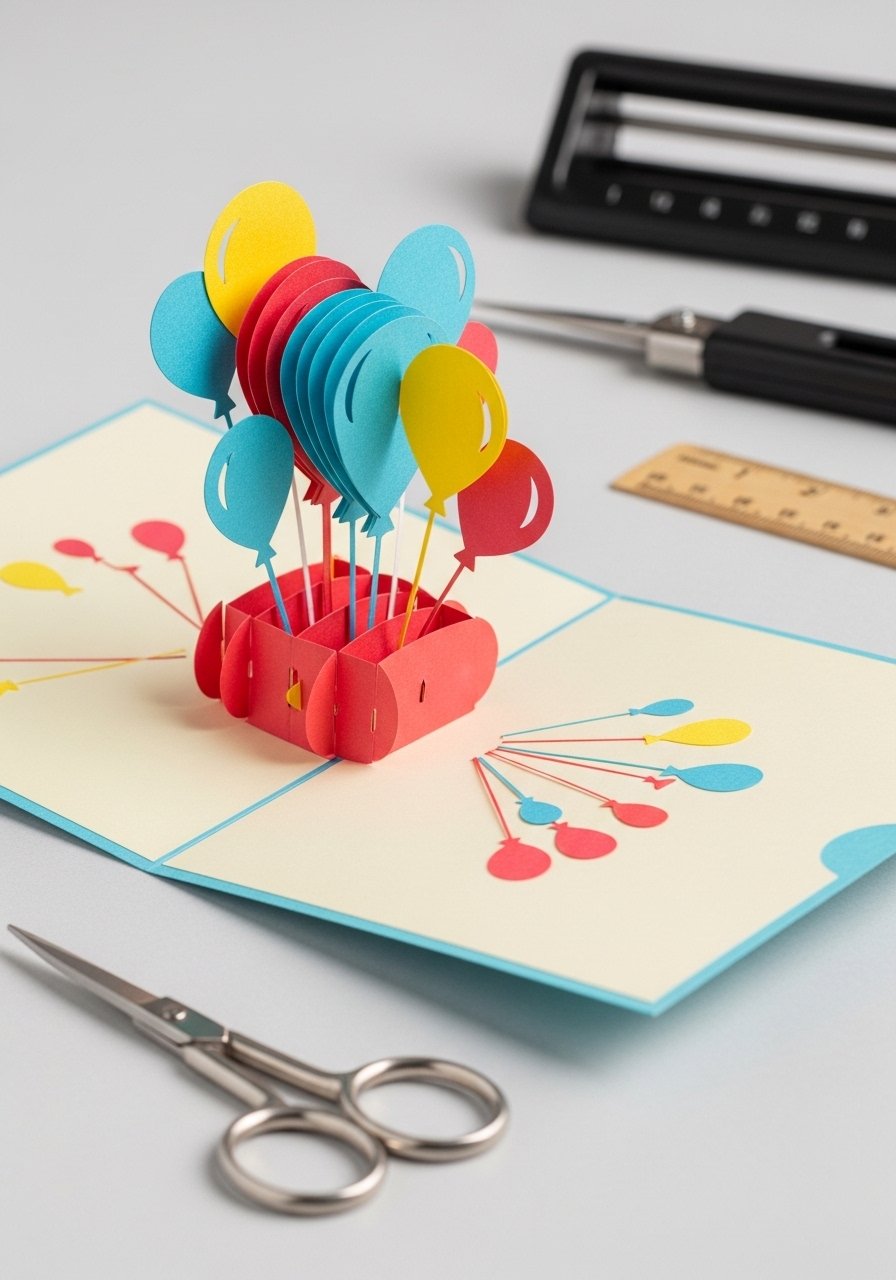
A pop-up adds theatrical flair to a simple drawing. This design uses scored tabs to lift tiny balloons off the page.
Materials
- 1 A6 folded card base
- 1 additional cardstock for pop-ups
- 1 scoring bone folder or scoring tool (scoring bone folder)
- 1 fine-tip pen
- 1 ruler (6 in)
- 1 glue stick
- 1 colored pencil set
Instructions
- Measure and cut small balloon shapes from extra cardstock.
- Score two small tabs (0.5 in x 0.5 in) on each tab cardstock.
- Fold tabs and glue to balloon backs; press onto inside of card so balloons pop up when opened.
- Draw strings down to the base with pen.
- Decorate balloon faces with colored pencils.
- Close and open card a few times to ensure tabs are secured.
How to Display or Gift It
- Present in a clear sleeve so the pop-up doesn’t get squashed.
- Use as a table place card at a birthday party.
- Store flat until ready to send.
8. Cut-and-Paste Monster Collage Card
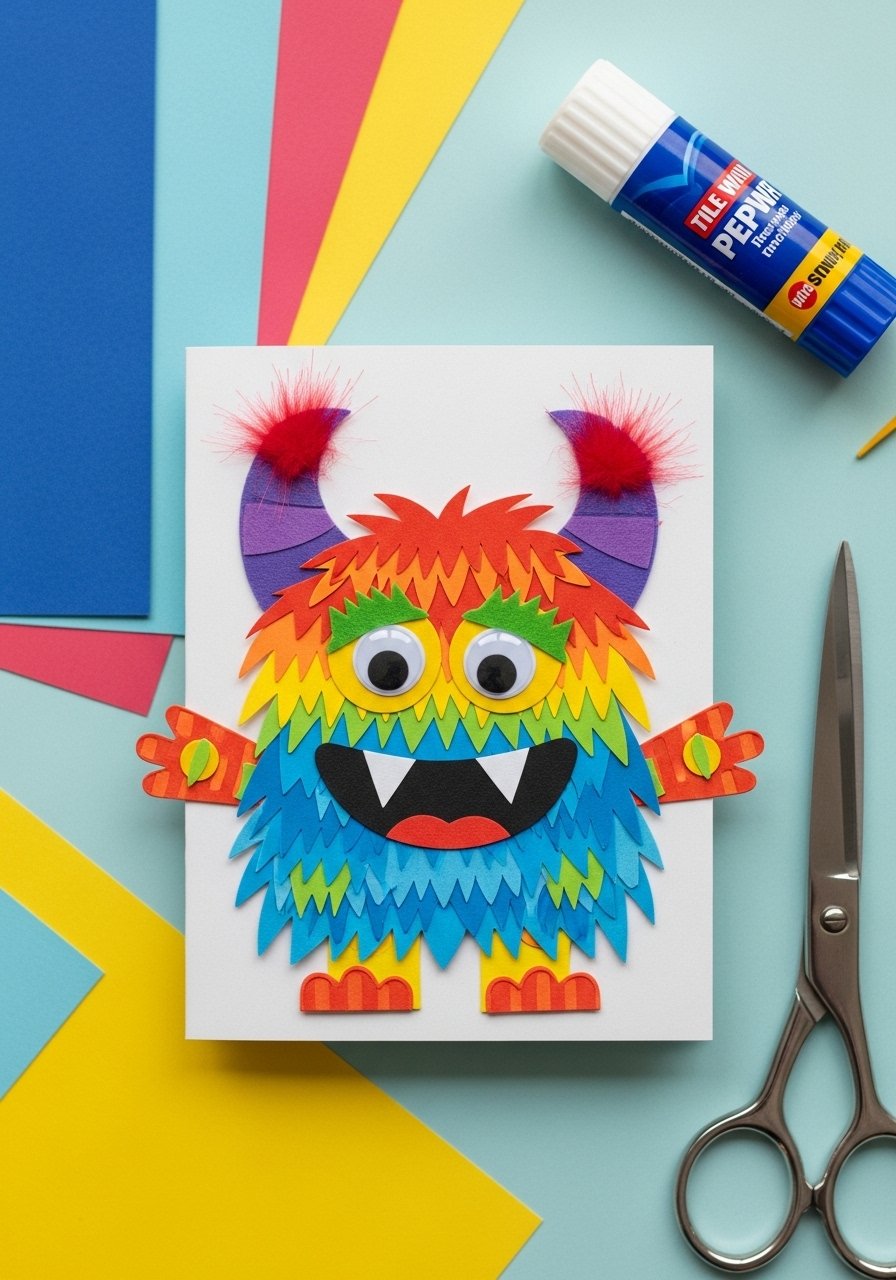
Collage invites texture and imagination. Kids can mix shapes into funny monsters with expressive faces.
Materials
- 1 blank A6 card
- 6–8 colored cardstock scraps (assorted)
- 2 googly eyes
- 1 felt sheet for horns
- 1 glue stick
- 1 detail scissors (detail scissors)
- 1 black marker
Instructions
- Cut body shapes from cardstock scraps.
- Assemble and glue pieces onto the card to form a monster.
- Add googly eyes and felt horns with glue.
- Use marker to add mouth and freckles.
- Let glue dry 10–15 minutes.
- Write a silly birthday pun inside.
How to Display or Gift It
- Attach a little felt pouch with candy.
- Display on a child’s bookshelf with a wooden easel.
- Keep extras in a labeled craft drawer.
9. Watercolor Galaxy Card
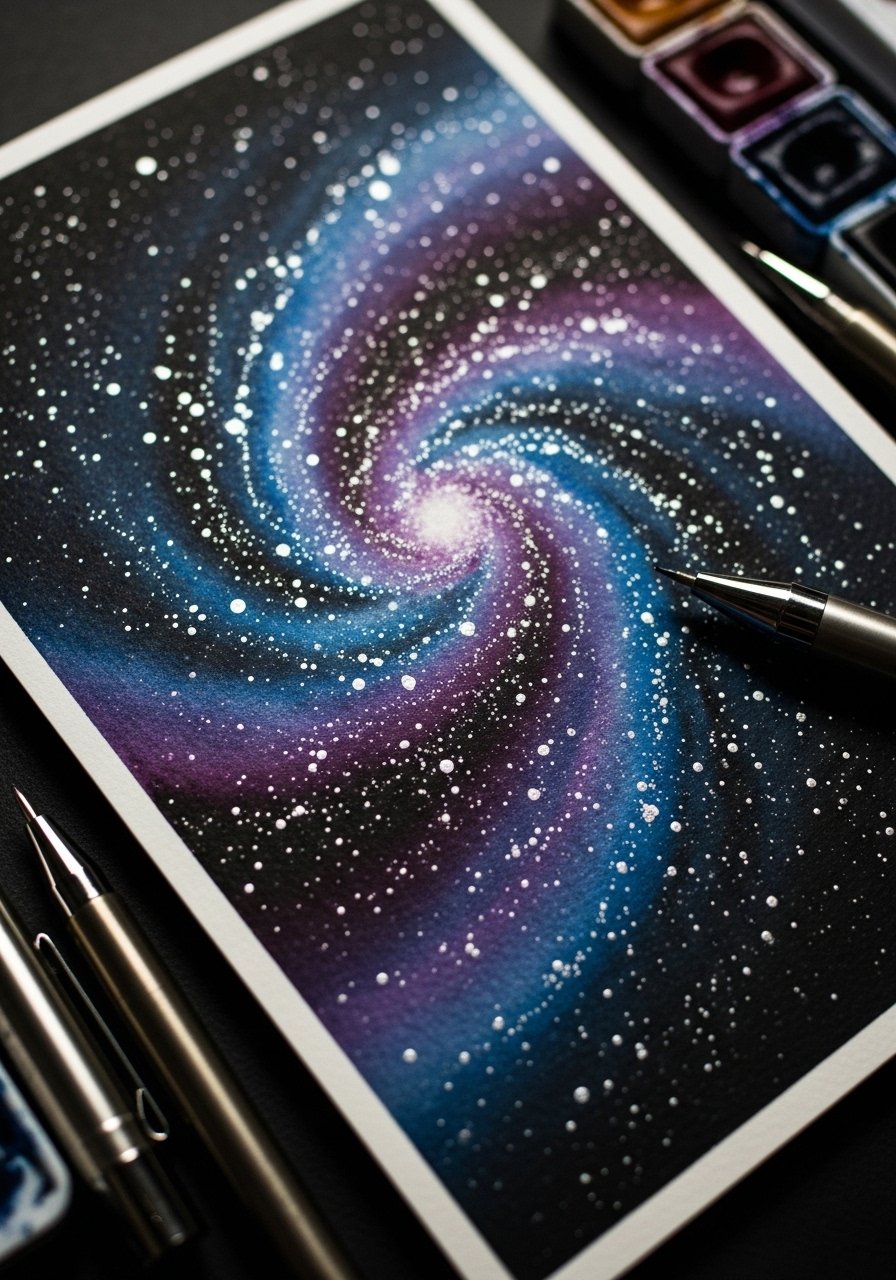
For older kids who like dramatic color, a galaxy wash looks impressive but is easy to do.
Materials
- 1 140 lb watercolor paper panel 5 x 7 in
- 1 watercolor pan set with deep blues and indigos
- 1 round brush size 8
- 1 white gouache or opaque paint for stars
- 1 small toothbrush for splattering
- 1 gold metallic paint pen
- 1 foam brush
Instructions
- Wet the panel and lay down washes of indigo, cobalt, and black. Blend while wet.
- Add darker accents; let dry 15 minutes.
- Dip toothbrush in diluted white gouache and flick across for stars; dry 5 minutes.
- Add a few gold star bursts with metallic pen.
- Mount to card base with glue.
- Let whole card sit flat 30 minutes before handling.
How to Display or Gift It
- Frame as art with a small wooden easel for a birthday display.
- Make a set of galaxy cards in different colorways.
- Store flat and avoid humidity.
10. Sticker Silhouette Scene Card
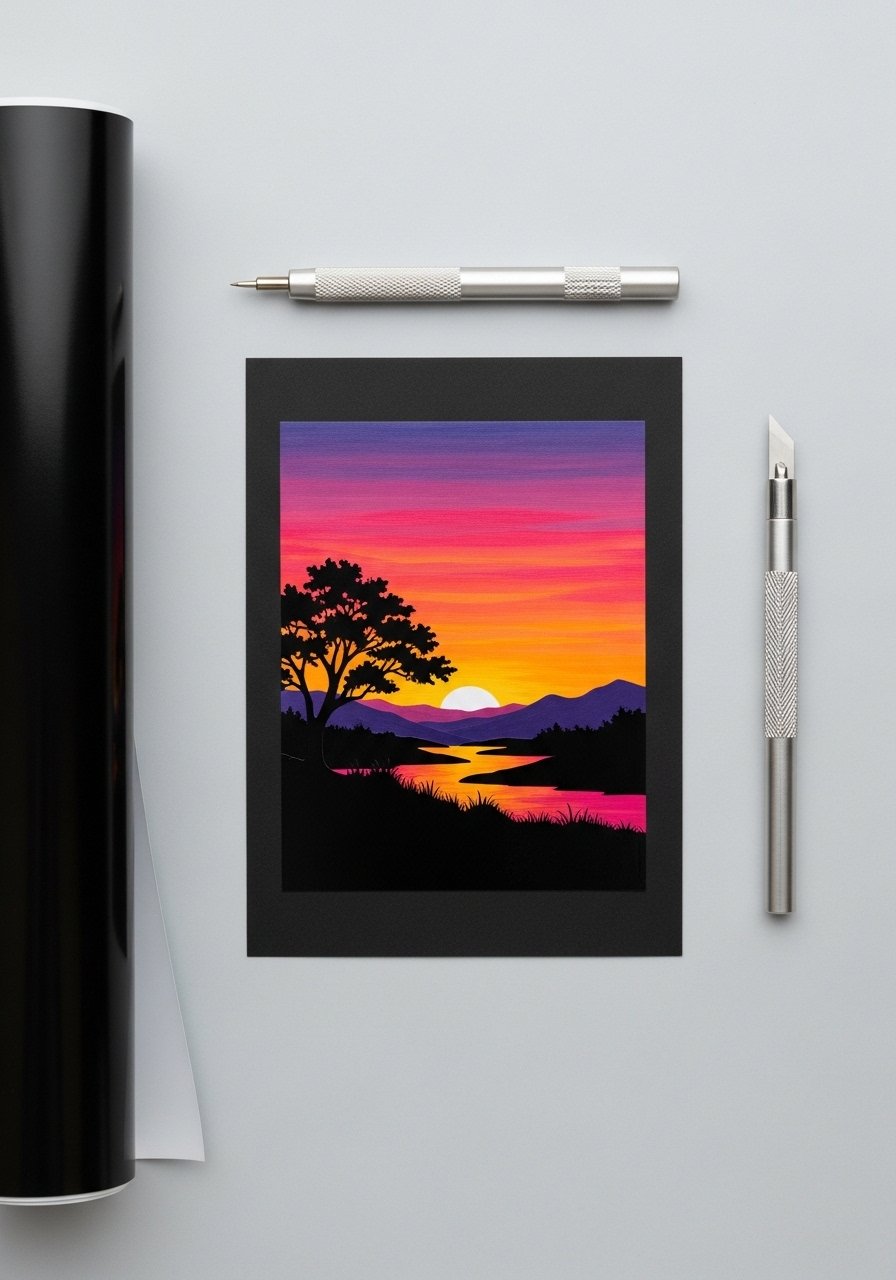
Using sticker shapes makes a crisp scene without tricky cutting. Great if you use a cutting machine or pre-made stickers.
Materials
- 1 A6 card
- 1 sheet of sticker paper or vinyl
- 1 watercolor paper panel 4 x 6 in
- 1 set of acrylic paints
- 1 craft knife (precision craft knife)
- 1 weeding tool
- 1 ruler
Instructions
- Paint a sunset on the watercolor panel; dry 10–15 minutes.
- Cut silhouette shapes from sticker vinyl or peel ready-made stickers.
- Apply silhouettes over the sunset.
- Mount panel to card base.
- Add a white gel pen sentiment on the top edge.
- Let adhesive set 12 hours for best stick.
How to Display or Gift It
- Tuck into a clear sleeve to protect the vinyl.
- Pair with matching sticker sheets as a mini gift.
- Keep unused vinyl in a resealable pouch.
11. Chalkboard Paint Message Card
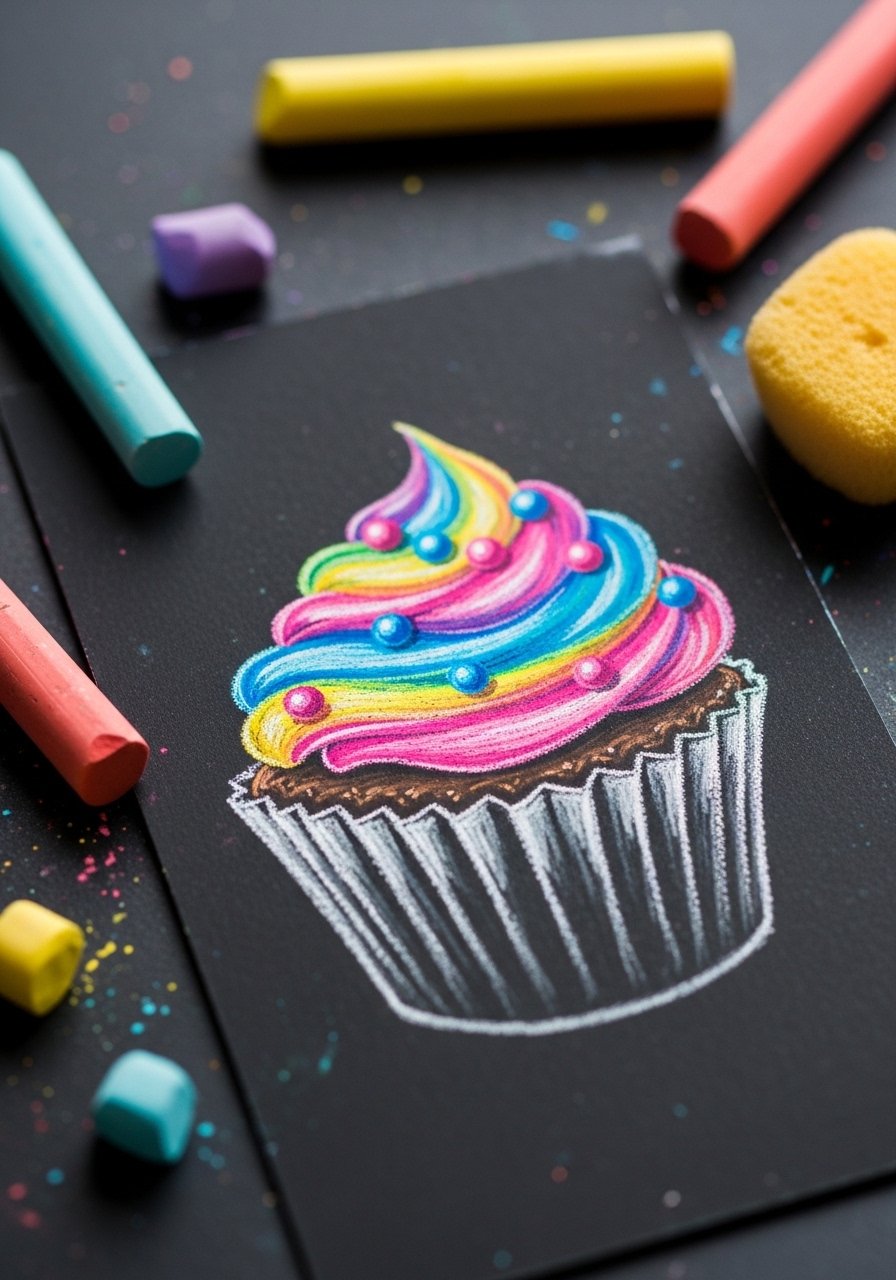
Chalkboard paint creates a reusable surface kids can doodle on. Use chalk for a rustic, tactile birthday greeting.
Materials
- 1 small card (4 x 6 in)
- 1 black chalkboard paint (sample size)
- 1 foam brush
- 1 colored chalk set
- 1 sandpaper (220 grit) for smoothing
- 1 small sealer spray (optional)
Instructions
- Lightly sand the card surface.
- Apply one thin coat of chalkboard paint with a foam brush; dry 30 minutes.
- Apply a second coat; dry 1 hour.
- Condition with chalk rubbed across and erased.
- Draw a birthday cupcake with chalk.
- Optional: Light spray of sealer for a permanent finish; cure 24 hours.
How to Display or Gift It
- Include a mini chalk stick as a set.
- Pack in a small kraft box with ribbon.
- Store flat and avoid heat.
12. Rainbow Scratch-Off Card
Scratch-off cards add a surprise element. Kids reveal hidden messages under metallic paint.
Materials
- 1 card base
- 1 rainbow-striped printed paper panel
- 1 sticker sheet for secret message
- 1 acrylic metallic scratch-off mix (2 tbsp) or scratch-off sticker kit
- 1 dish for mixing
- 1 paintbrush
- 1 wooden craft stick for scratching
Instructions
- Print or paint a rainbow panel and glue to the card.
- Add sticker with secret message where you want the reveal.
- Mix 2 tbsp metallic medium with 1 tbsp liquid dish soap (per kit instructions) and paint over the message. Dry 30–60 minutes.
- Use the craft stick to scratch and reveal at the party.
- Test one small area first to ensure proper adhesion.
- Keep extras in a small zipper pouch.
How to Display or Gift It
- Pair with a tiny coin for scratching.
- Make a batch for party favors.
- Keep sealed until gifting.
13. Simple Stamp Alphabet Birthday Card
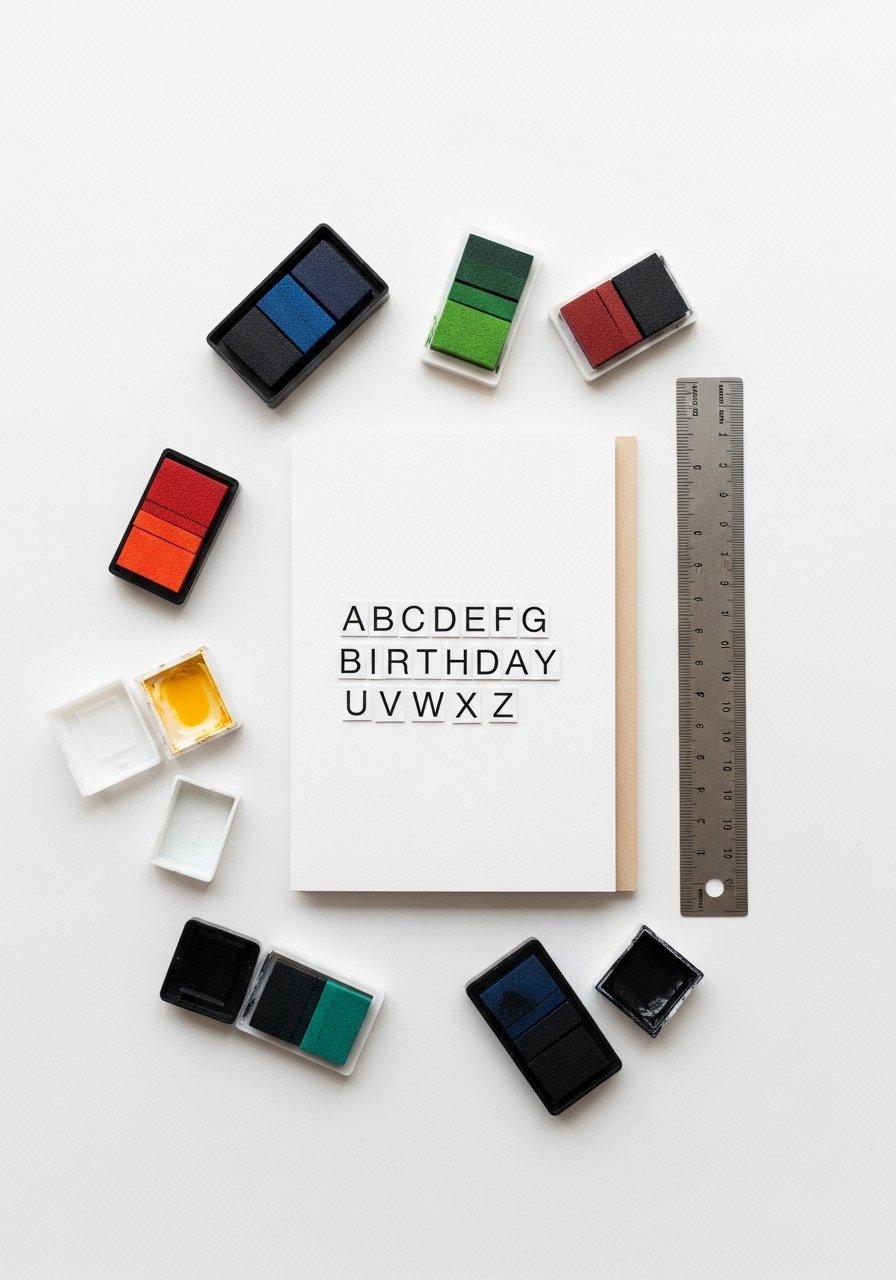
Alphabet stamps help kids create neat, graphic sentiments even without steady handwriting.
Materials
- 1 A6 card
- 1 alphabet stamp set
- 1 dye ink pad (black)
- 1 acrylic block for clear stamps
- 1 ruler
- 1 foam tape for dimension
Instructions
- Position and stamp letters to spell the birthday message.
- Use ruler to keep lines straight.
- Add a small stamped icon (star or heart).
- Mount a stamped panel on foam tape for dimension.
- Let ink settle 5 minutes before handling.
- Write a personalized note inside.
How to Display or Gift It
- Pair with a small ink pad as a crafty gift.
- Store stamps on an acrylic block in a drawer.
14. Felt Fringe Party Hat Card
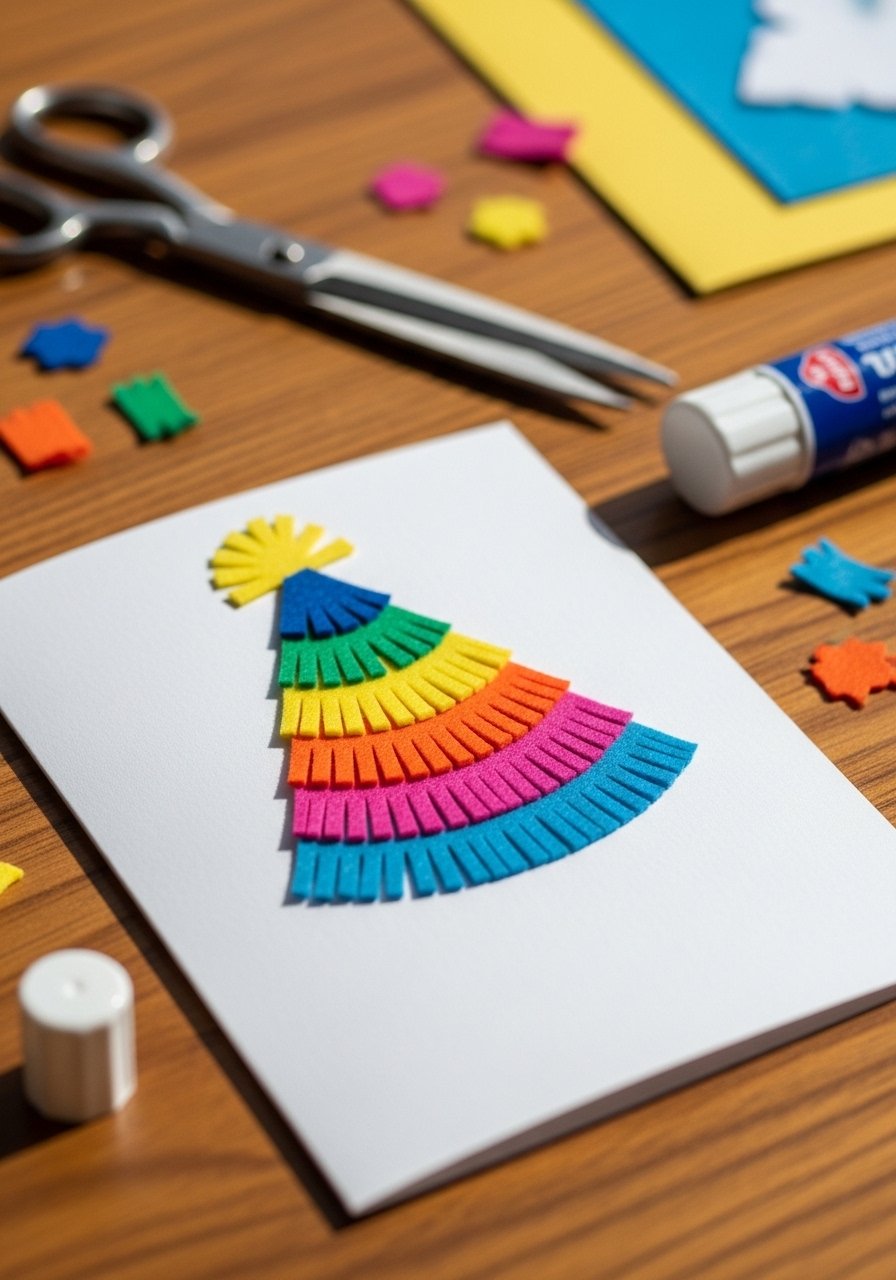
Felt fringe adds texture and playful movement. This is great for sensory play and tactile interest.
Materials
- 1 A6 card
- 1 felt sheet (8 x 11 in)
- 1 craft glue
- 1 scissors
- 1 mini pompom
- 1 toothpick for applying glue
- 1 ruler
Instructions
- Cut 1-inch strips of felt and fringe the edge.
- Trim into a cone hat shape and glue onto card.
- Layer two or three fringes for fullness.
- Add a pompom at the tip with glue.
- Let dry 30 minutes.
- Write "Hats Off!" inside.
How to Display or Gift It
- Include a felt hat kit for kids.
- Store cards flat with tissue between them.
15. Doodle Cake Layered Card
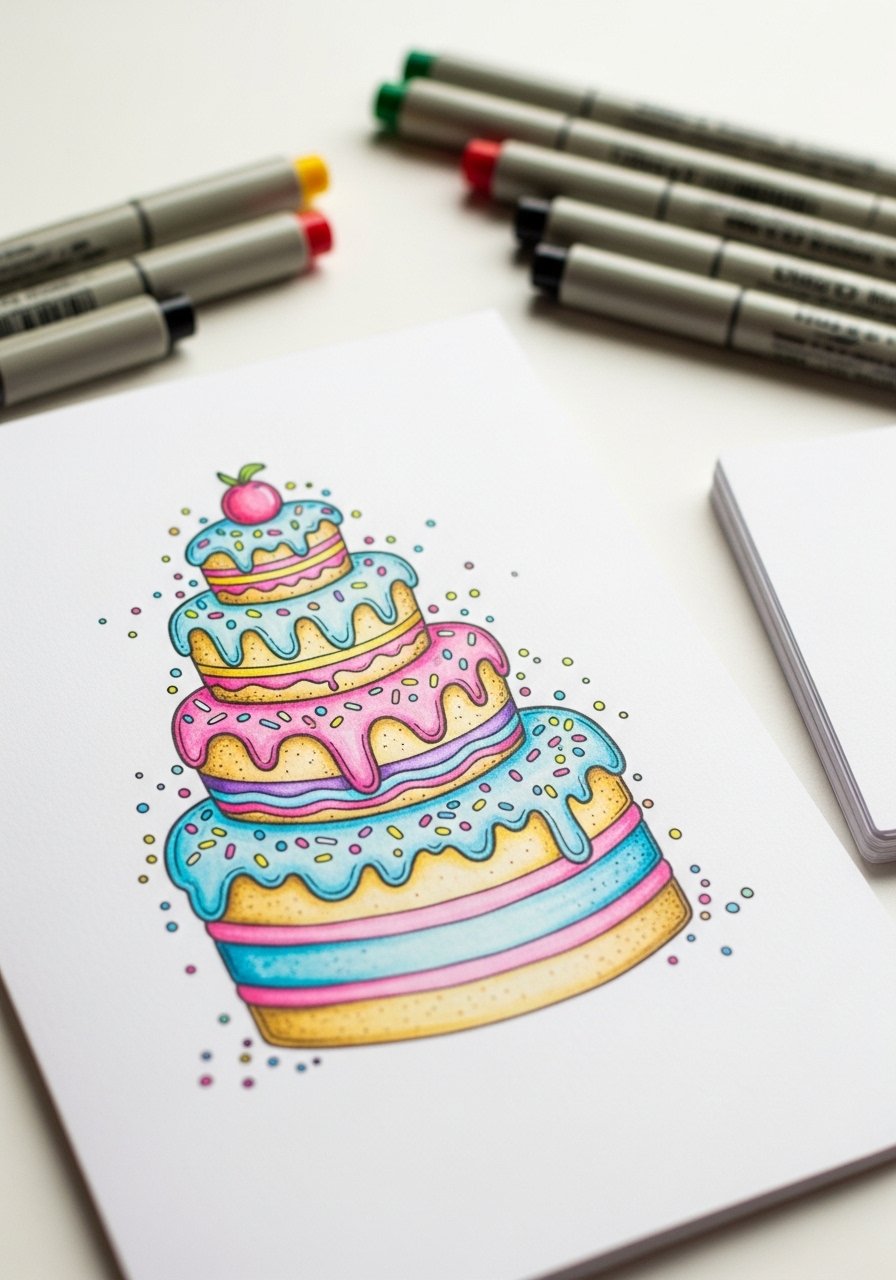
A cake drawn in stacked layers feels celebratory. Kids can color each tier differently for a custom look.
Materials
- 1 A6 card
- 1 pencil and eraser
- 1 set of fineliner pens (0.3–0.5mm)
- 1 set of coloring markers
- 1 ruler
- 1 white gel pen for highlights
Instructions
- Sketch three stacked cake tiers lightly in pencil.
- Ink outlines with fineliner; erase pencil when dry.
- Color each layer with markers.
- Add sprinkles and glaze highlights with gel pen.
- Let ink set 5 minutes.
- Mount a small glitter paper banner on top for extra fun.
How to Display or Gift It
- Wrap with a tiny wooden spoon as a cute tag.
- Bundle with a mini cupcake for gifting.
16. Patterned Washi Tape Candle Card
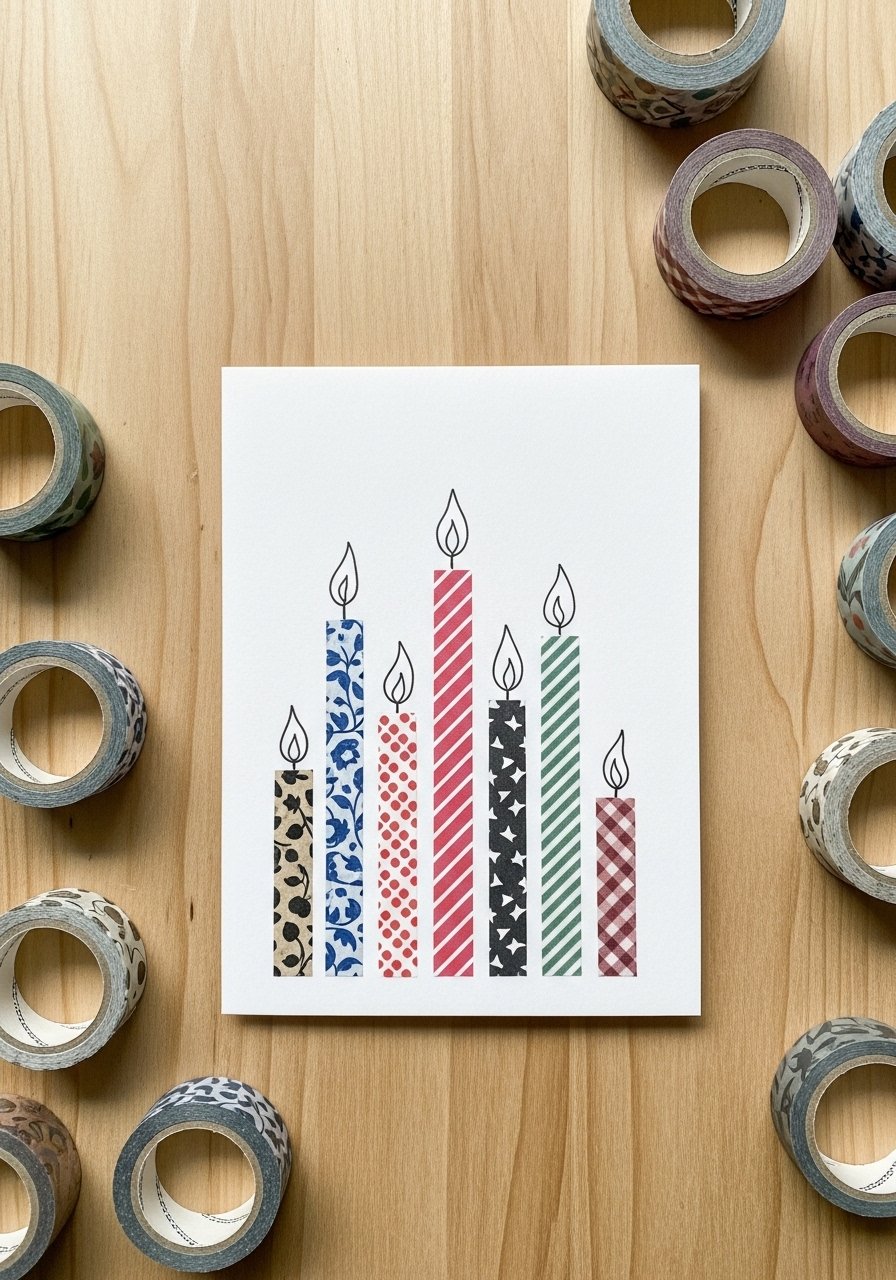
Washi tape makes clean patterns instantly. Kids can mix patterns for vibrant candle rows.
Materials
- 1 A6 card
- 6–8 washi tape variety pack rolls (washi tape variety pack)
- 1 scissors
- 1 thin black pen
- 1 gold metallic pen for flame accents
Instructions
- Cut short strips of washi tape and stick vertically for candles.
- Draw flame shapes at the top with a gold pen.
- Add candle holders with a fine black pen.
- Trim tape edges flush with card.
- Press down edges firmly; the adhesive sets immediately.
- Write message below candles.
How to Display or Gift It
- Pair with matching washi tape rolls as a small gift.
- Store extra card sets in a washi tape drawer organizer.
17. Tiny Watercolor Animal Parade
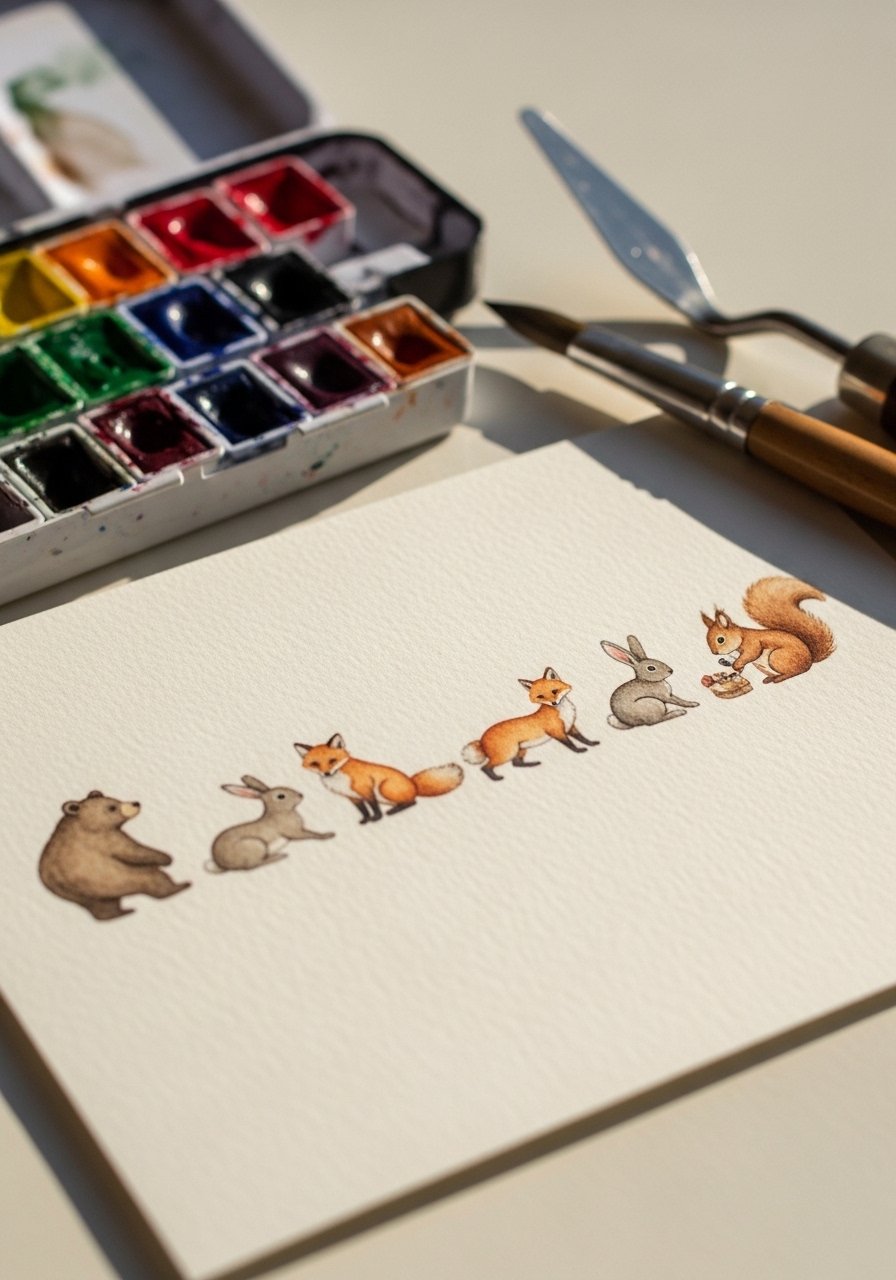
Small, simple animal silhouettes are fast to paint and sweetly whimsical.
Materials
- 1 watercolor paper strip 4 x 6 in
- 1 round brush size 2–4
- 1 watercolor mini set
- 1 pencil and eraser
- 1 black micron pen
- 1 glue stick
Instructions
- Lightly sketch small animal shapes in a row.
- Paint each with a small wash of color; dry 10 minutes.
- Once dry, outline features with a micron pen.
- Mount strip onto card.
- Add a tiny greeting above the parade.
- Let sit flat for 30 minutes before packaging.
How to Display or Gift It
- Make a series and tie with ribbon.
- Frame as a birthday keepsake for a nursery.
18. Balloon Bouquet Finger-Tied Card
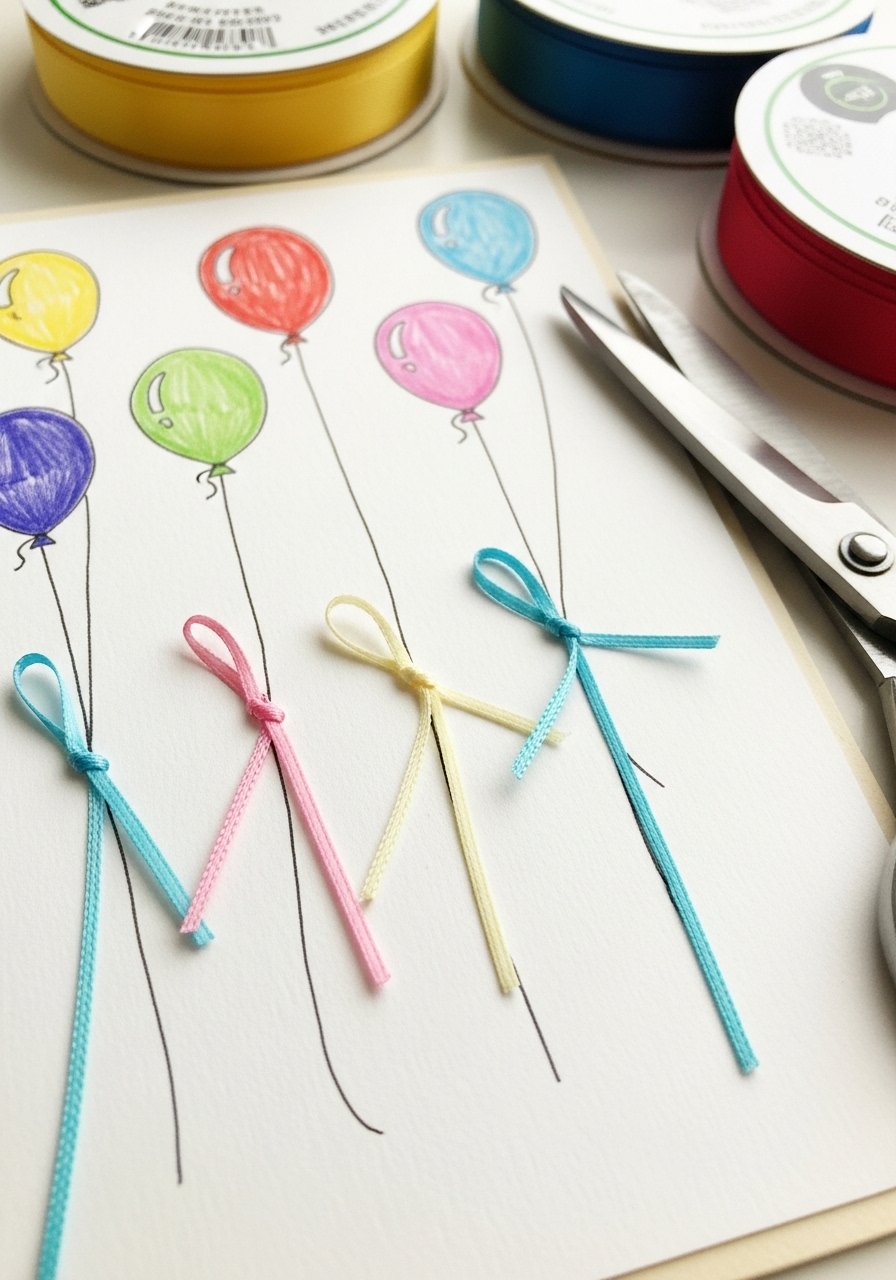
Adding a tied ribbon brings real texture and the motion of a bouquet to a drawn card.
Materials
- 1 A6 card
- 3 lengths of ribbon, each 8 in
- 1 fine-tip pen
- 1 glue dot dispenser
- 1 scissors
- 1 pencil
Instructions
- Draw balloons on the card with pencil, then ink them.
- Cut ribbon lengths; knot at one end for a tiny bow.
- Glue ribbon ends beneath the balloon drawing with glue dots.
- Tie the three ribbons together at the base for a bouquet look.
- Trim excess ribbon; curl lightly with scissors.
- Let glue set 10 minutes.
How to Display or Gift It
- Tie to a helium balloon as a matching tag.
- Store cards flat to keep ribbons from creasing.
19. Scribble Monster Card (Great for Little Ones)
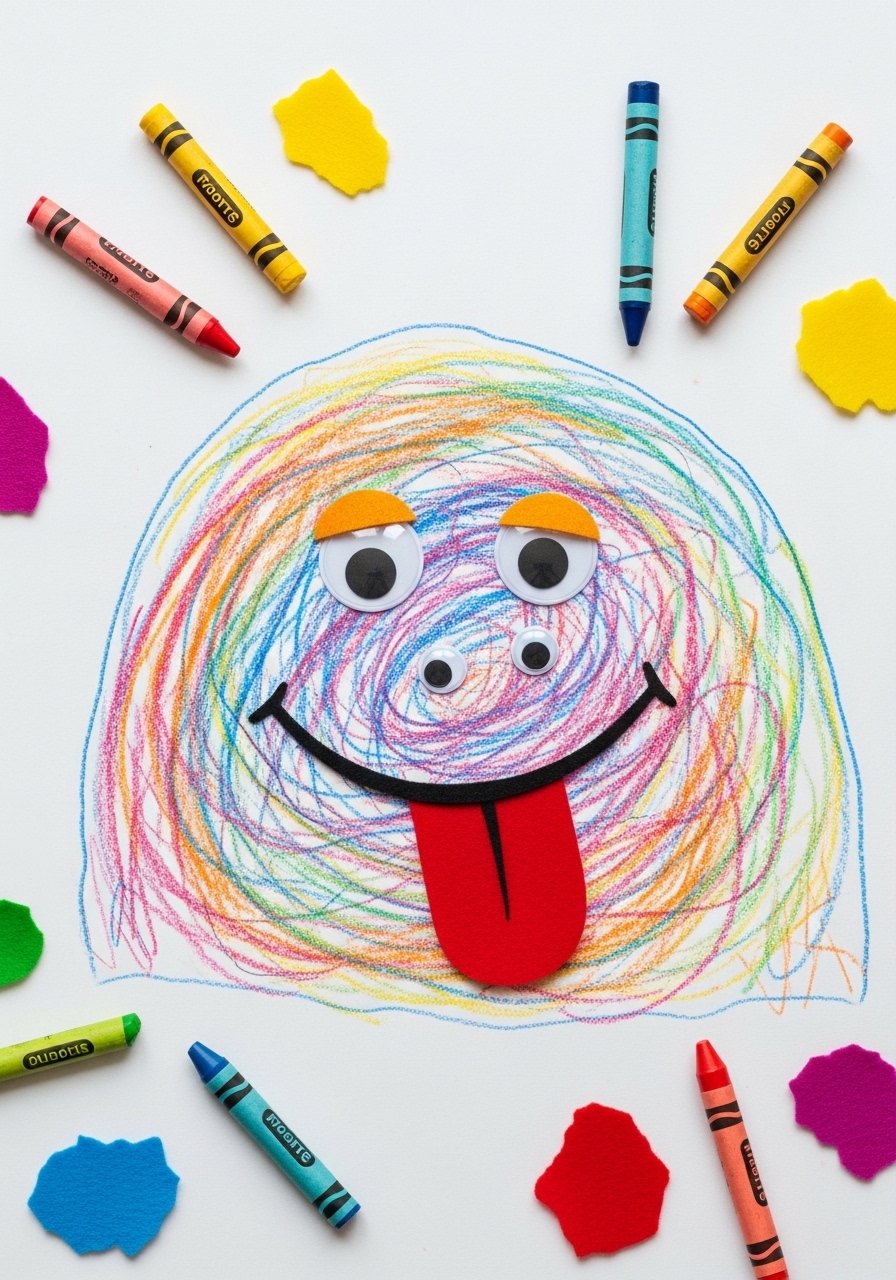
Let kids scribble freely, then turn the scribble into a friendly monster with added eyes and felt tongue.
Materials
- 1 card
- 1 crayon box
- 2 googly eyes
- 1 felt scrap
- 1 glue stick
- 1 black marker
Instructions
- Let the child scribble a big shape on the front.
- Add googly eyes and a felt tongue with glue.
- Outline the scribble into a monster with marker.
- Add teeth or spots.
- Let glue dry 10 minutes.
- Write inside: "You’re monstrously loved!"
How to Display or Gift It
- Add to a homemade storybook of monster drawings.
- Keep in a child’s memory box.
20. Painted Patterned Edge Card
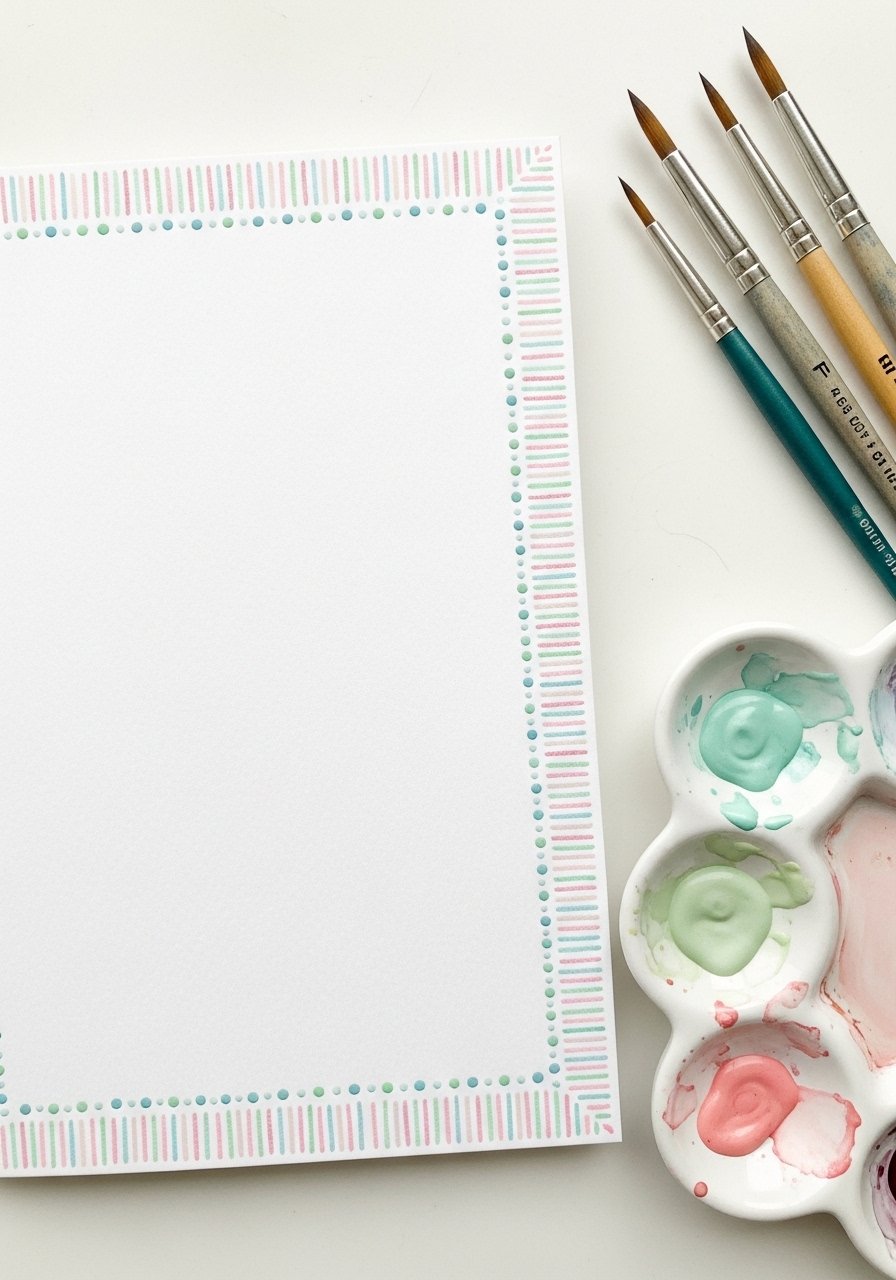
Borders are a quick way to decorate. A repeated hand-painted motif looks professional and kid-friendly.
Materials
- 1 A6 card
- 1 acrylic craft paint set
- 1 fine detail brush
- 1 ruler
- 1 pencil
- 1 paint-friendly palette
Instructions
- Measure and lightly pencil a 1 cm border on the card.
- Paint small repeating patterns (dots, dashes) around the border.
- Let paint dry 10 minutes.
- Erase any visible pencil.
- Add a centered hand-lettered message.
- Allow to dry another 15 minutes.
How to Display or Gift It
- Pair a set of bordered cards with a matching envelope liner.
- Store flat in a labeled sleeve.
21. Balloon Cluster with Metallic Accents
Metallic accents add party sparkle. Use a metallic paint pen for small shimmer details kids can handle.
Materials
- 1 A6 card
- 1 metallic paint pen
- 1 watercolor or marker set
- 1 pencil and eraser
- 1 white gel pen for highlights
- 1 foam brush
Instructions
- Draw balloons in clusters with pencil.
- Color with marker or watercolor; dry 10 minutes.
- Add metallic details on balloons with metallic pen.
- Use gel pen for highlights.
- Mount to card base if painted on separate panel.
- Let metallic ink set 15 minutes.
How to Display or Gift It
- Tuck into a metallic-lined envelope for shimmer peek.
- Keep in low-humidity storage to prevent metallic tarnish.
22. Origami Cake Pop Card
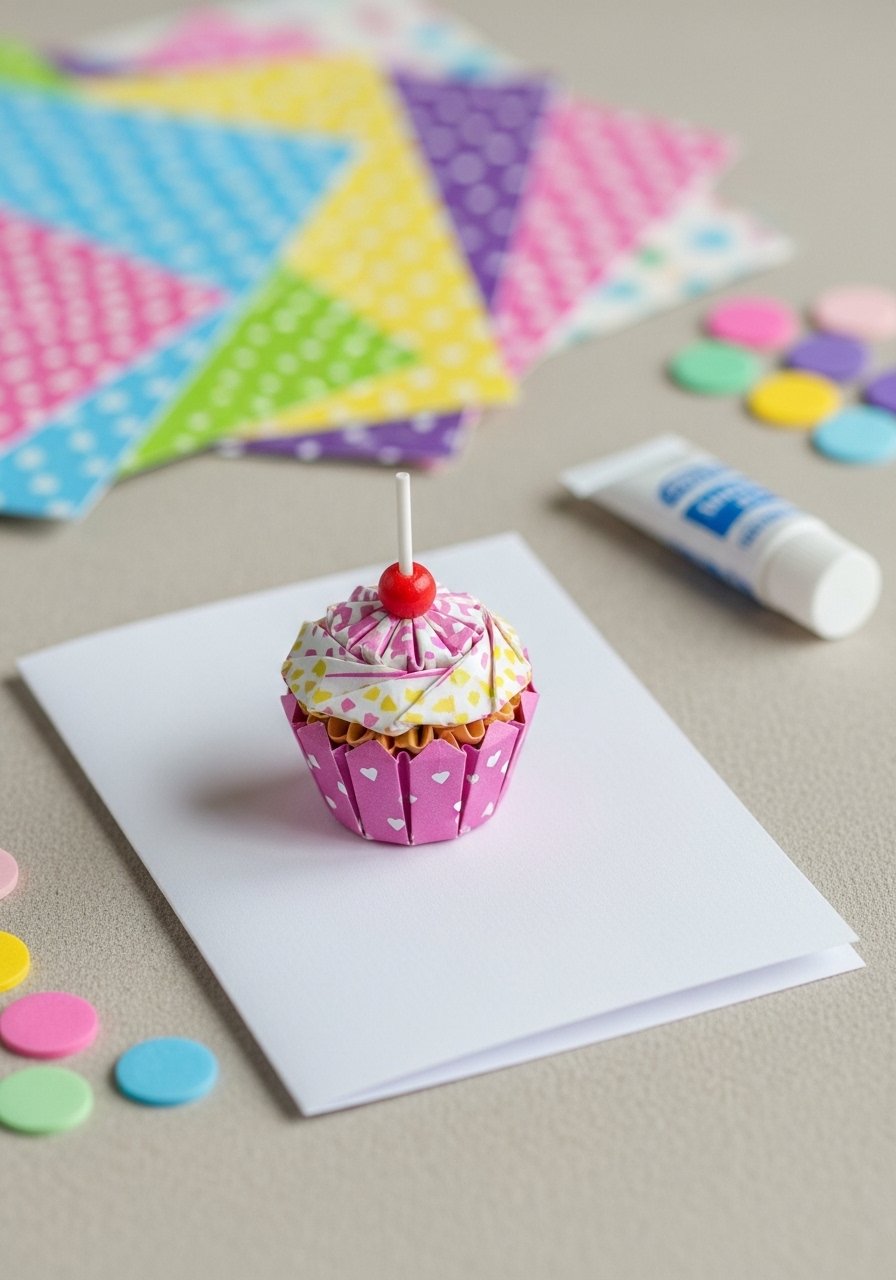
Origami cake pops add a three-dimensional surprise with just folded paper and a glue dot.
Materials
- 1 A6 card
- 2 origami paper squares 3 x 3 in
- 1 glue dot dispenser
- 1 wooden toothpick (trimmed)
- 1 fine pen for decoration
Instructions
- Fold origami paper into a simple sphere or heart (one per cake pop).
- Attach with glue dots to the front of the card.
- Glue trimmed toothpick as the pop stick.
- Draw sprinkles or a stick label.
- Let adhesive set 5 minutes.
- Add a little message under the pop.
How to Display or Gift It
- Pack carefully so protrusions don't bend.
- Make a set as party invitations.
23. Hand-Lettered Big Number Card
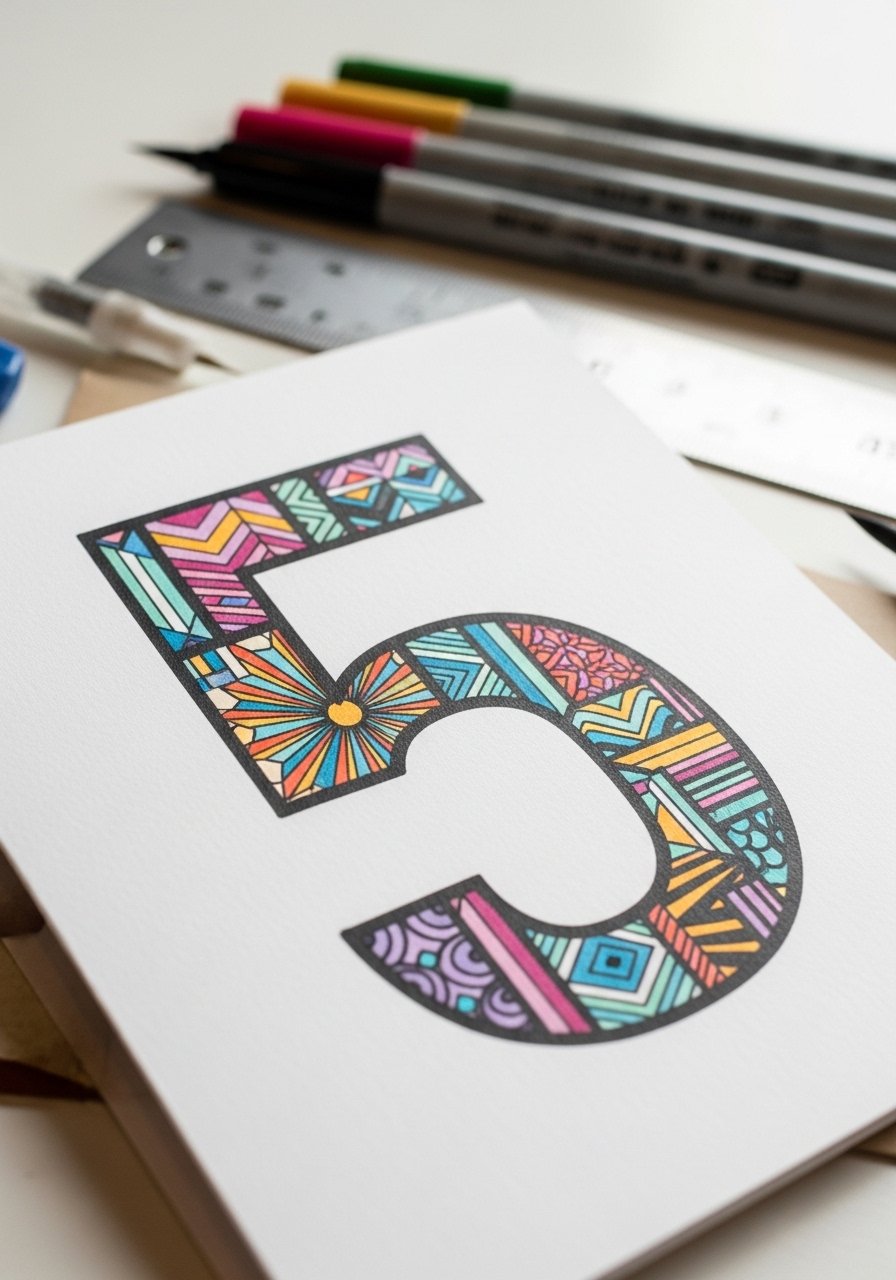
A bold birthday number is perfect for milestone ages. Kids can decorate the numeral with patterns.
Materials
- 1 A6 card
- 1 large stencil or pencil to sketch number
- 1 brush pen set (calligraphy pen set)
- 1 ruler
- 1 pencil and eraser
- 1 metallic pen for accents
Instructions
- Lightly sketch the large number centered on the card.
- Fill or pattern the number with brush pens.
- Add shadowing or metallic accents.
- Erase pencil when ink is dry 2–3 minutes.
- Write the name or age in smaller script.
- Let ink set 10 minutes.
How to Display or Gift It
- Frame for a birthday party table centerpiece.
- Pair with a matching cupcake topper.
24. Stenciled Fireworks Card
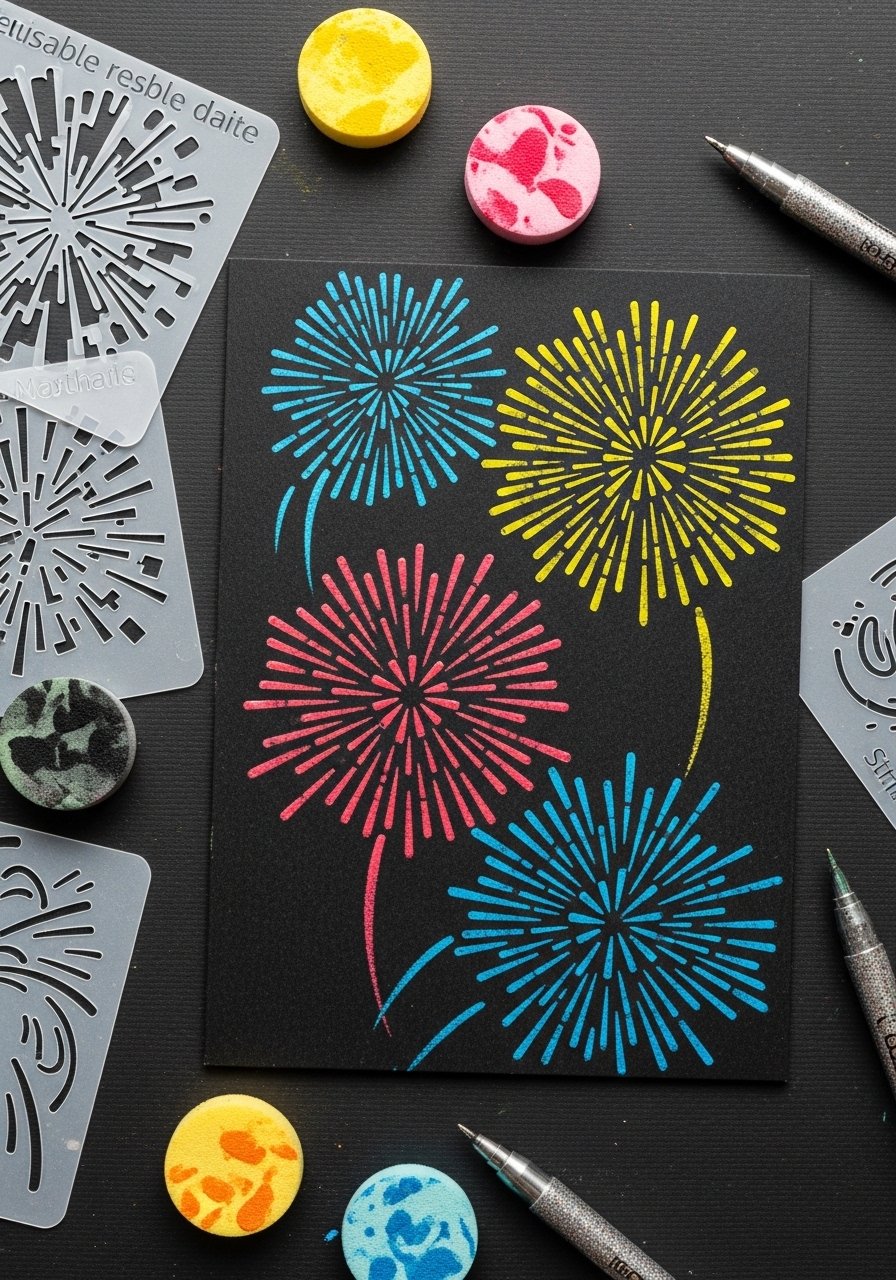
Stenciled fireworks create a celebratory burst without freehand drawing skills.
Materials
- 1 dark cardstock A6 card
- 1 fireworks stencil set
- 1 metallic paint pens or pigment ink pads
- 1 sponge daubers
- 1 glitter glue pen
- 1 scrap paper for testing
Instructions
- Secure stencil on card with low-tack tape.
- Dab metallic ink with daubers through stencil.
- Layer colors for depth; dry 5 minutes between layers.
- Add glitter glue accents for extra sparkle; dry 20 minutes.
- Remove stencil and touch up edges with marker if needed.
- Let card sit flat 30 minutes before packaging.
How to Display or Gift It
- Pair with sparklers or confetti for a party kit.
- Store cards flat in a drawer to avoid bending.
25. Painted Polka Dot Friend Card
Polka dots are timeless and calming. Use a sponge or pencil eraser for consistent dots.
Materials
- 1 A6 card
- 1 acrylic craft paint set
- 1 pencil eraser or round sponge tool
- 1 palette
- 1 ruler and pencil for spacing
Instructions
- Lightly mark dot grid with a pencil.
- Dip eraser into paint and press onto card to create dots.
- Let paint dry 15 minutes.
- Add a small hand-lettered message.
- Erase any visible pencil marks.
- Allow full cure 24 hours for acrylic.
How to Display or Gift It
- Stack several cards with alternating polka colors.
- Tie with ribbon and tuck in a notecard box.
26. Rainbow Paper Tassel Card
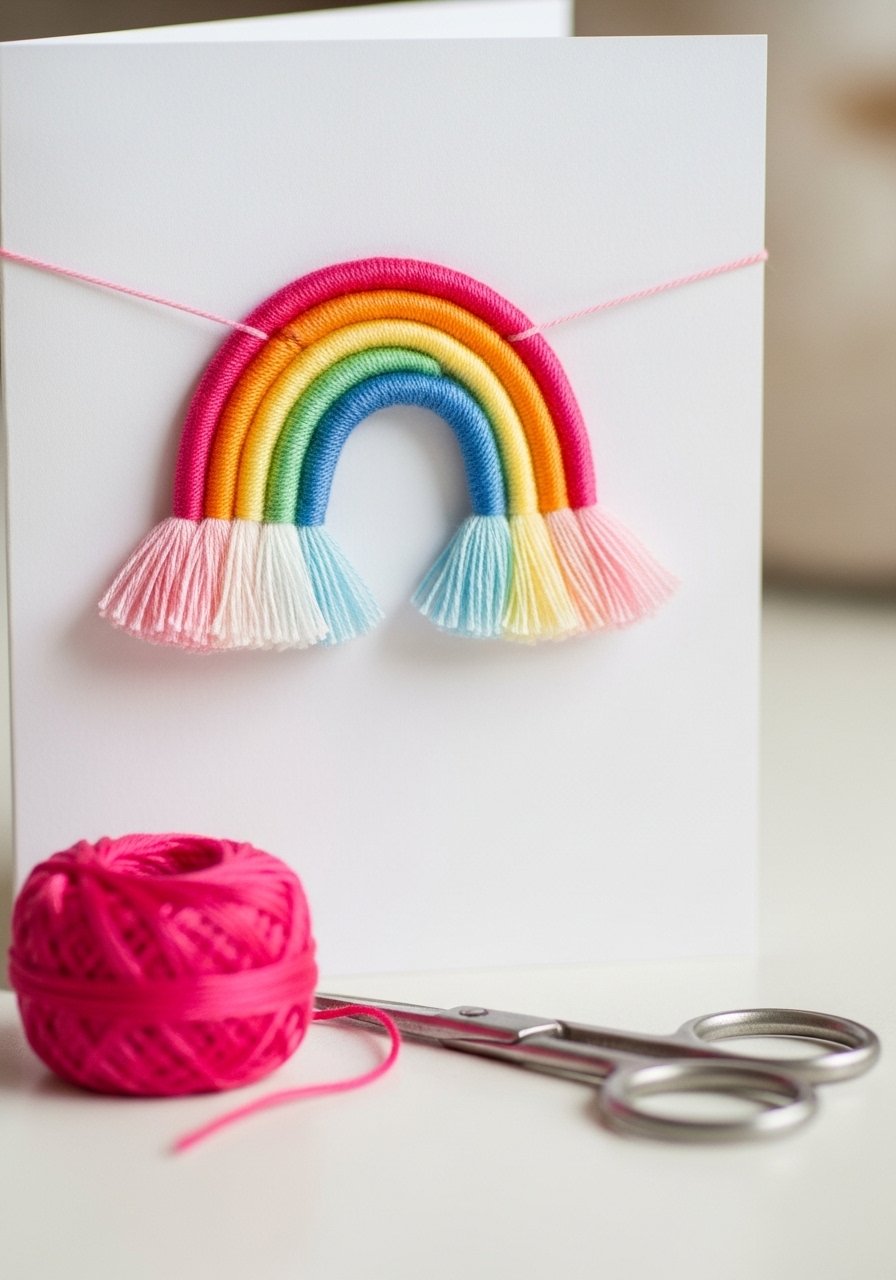
Mini tassels add festive movement. Use embroidery floss to make tiny tassels and glue them into a rainbow.
Materials
- 1 A6 card
- 6 colors embroidery floss (10–12 yards each)
- 1 small scissors
- 1 glue dots
- 1 cardboard scrap for winding
Instructions
- Wrap floss around cardboard to create small tassels.
- Tie tops and trim bottoms to uniform length.
- Glue tassels in an arc across the card front.
- Add painted cloud or sun details.
- Let glue set 10 minutes.
- Write your message beneath.
How to Display or Gift It
- Present with a mini embroidery kit for crafty friends.
- Store finished cards flat to protect tassels.
27. Stamped Handprint Flower Card
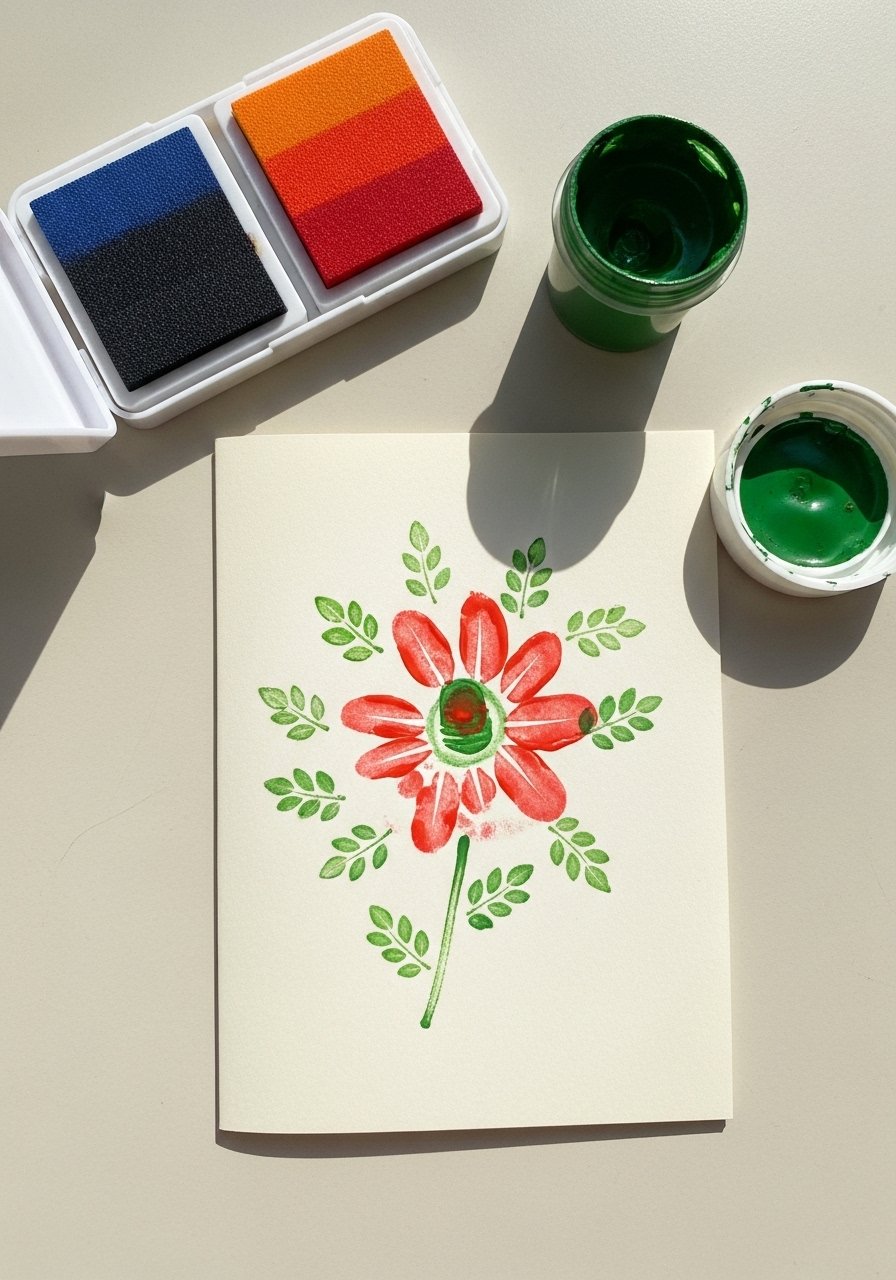
This combines stamping and fingerprints into a floral motif—quick and sentimental.
Materials
- 1 A6 card
- 1 green ink pad
- 1 washable paint for fingerprint
- 1 foam brush
- 1 fine-tip pen
- 1 baby wipes
Instructions
- Stamp leaf shapes around a central spot with green ink; let dry 2 minutes.
- Use a thumbprint for the flower center; dry 10 minutes.
- Draw stems and add small dots for detail.
- Sign and date the back to preserve the memory.
- Let sit flat 30 minutes before packaging.
- Clean hands with baby wipes.
How to Display or Gift It
- Frame with a small matte for a keepsake.
- Make a series for a garden-themed birthday.
28. Glitter Drip Candle Card
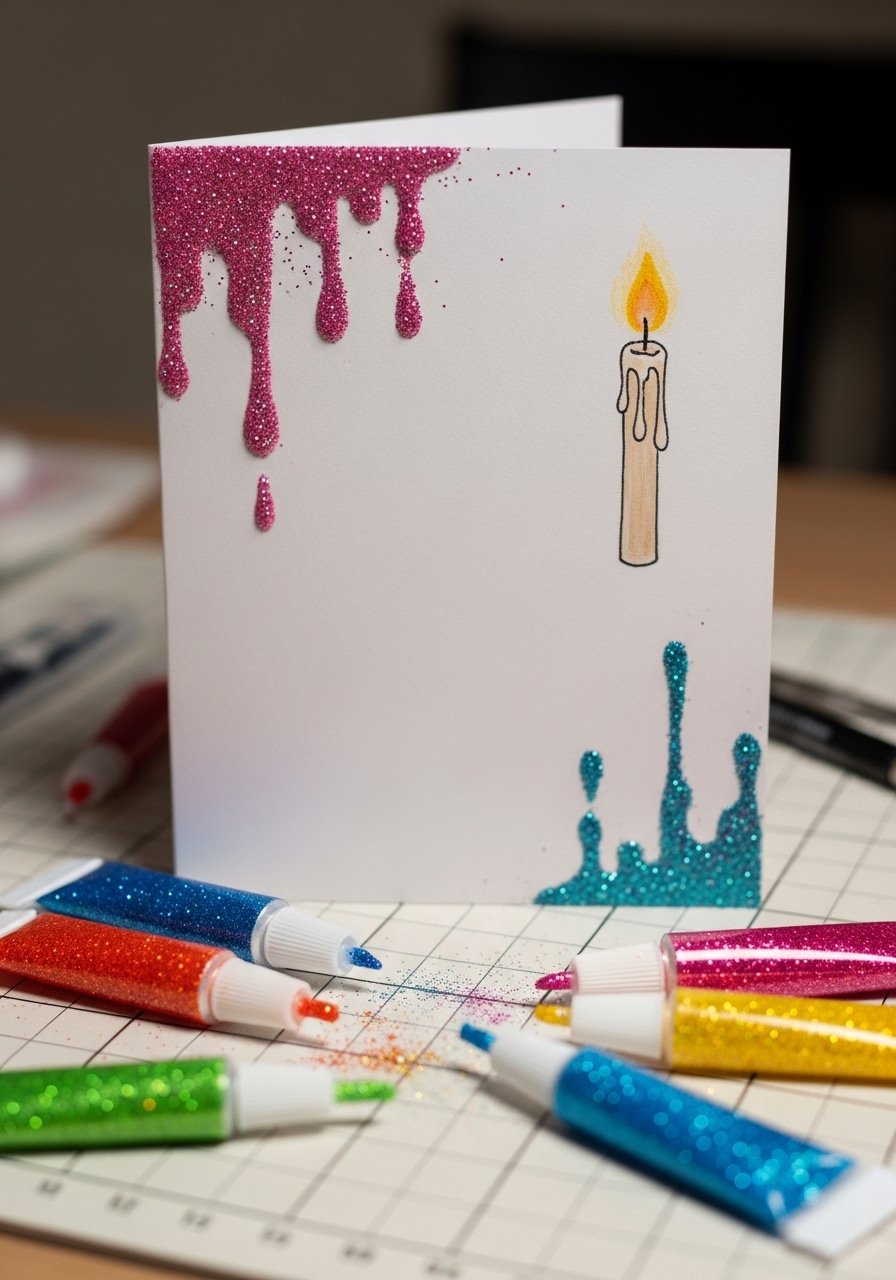
A little controlled glitter adds big party energy without creating a mess.
Materials
- 1 A6 card
- 1 acrylic paint set
- 1 glitter glue pens pack (glitter glue pens)
- 1 fine brush
- 1 scrap paper for testing
- 1 hair dryer (low) optional for faster drying
Instructions
- Paint candle shapes or a cake on the card.
- Apply thin lines of glitter glue along the candle tops to create drips.
- Let glitter glue dry 30–60 minutes (use low hair dryer for 10–20 seconds to speed).
- Add highlights with white gel pen.
- Write message inside.
- Allow full cure 24 hours before stacking.
How to Display or Gift It
- Keep glitter-side up in a single layer until cured.
- Add a tiny jar of glitter glue as a matching gift.
29. Custom Photo Polaroid Frame Card
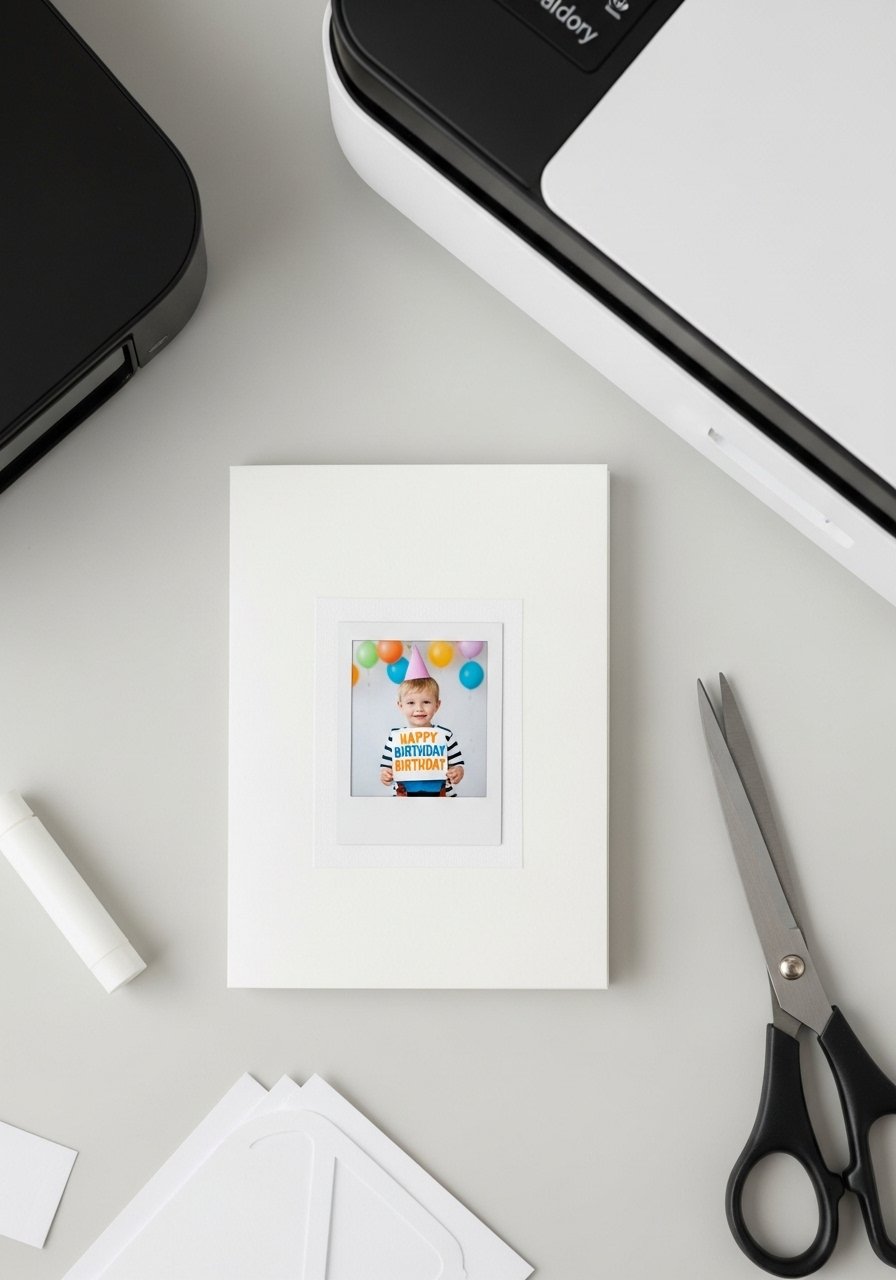
Combine drawing with a personal photo for a keepsake card that doubles as a mini frame.
Materials
- 1 A6 card
- 1 small printed photo (3 x 3 in)
- 1 white cardstock for frame
- 1 precision craft knife and ruler
- 1 glue dots
- 1 black fine-tip pen
Instructions
- Cut a Polaroid-style frame from white cardstock, outer 3.5 x 3.5 in, inner window 2.5 x 2.5 in.
- Decorate the frame edge with doodles or tiny stars.
- Mount the photo behind the window using glue dots.
- Attach frame to card front.
- Write a birthday note on the photo backing area.
- Let glue set 5 minutes before handling.
How to Display or Gift It
- Recipient can remove and display the mini Polaroid on a magnetic board.
- Slip into a clear sleeve and pair with a small photo album.
Thanks for crafting through all 29 of these drawing ideas for kids birthday cards — from scribbly monsters to layered pop-ups, there’s something for every age and skill level. Try a few quick designs to find a favorite and save this post to your Pinterest board so you can find these ideas when party season rolls around. Which idea are you most excited to try with your kids or at a craft table? Share with a friend who loves handmade notes, or gift a stack and watch faces light up.
Trust me, picking up a quality hot glue gun with temperature control changed how every single one of these projects turned out — less mess, faster hold, and fewer stressed fingers.


