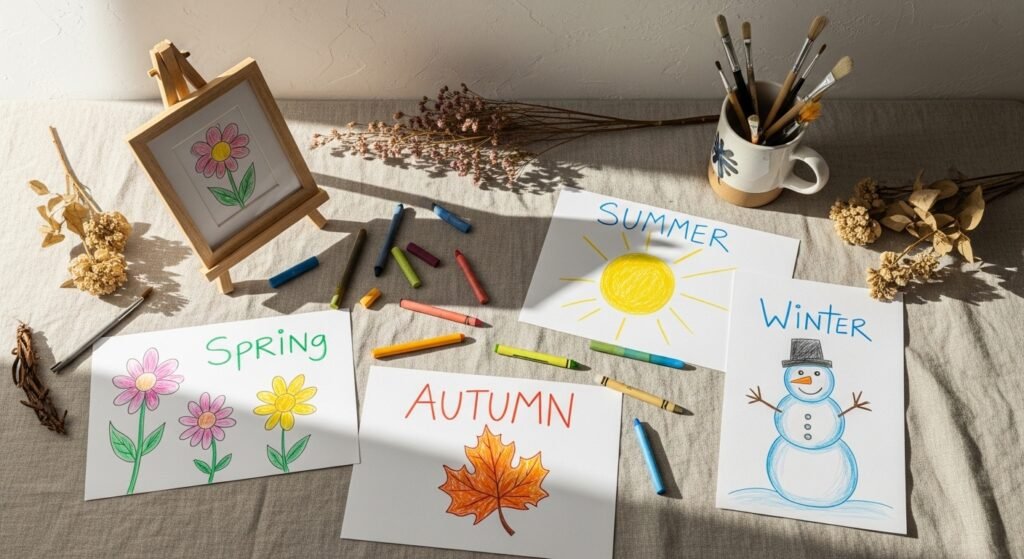
Spring has you doodling flowers, summer sparks seaside sketches, fall brings crunchy leaf scribbles, and winter invites cozy snowmen — but how do you keep drawing time fresh all year? These 20 simple seasonal drawing ideas for kids are crafted to be quick, festive, and perfect for every age and skill level. You’ll find projects that fit rainy days, backyard afternoons, classroom crafts, and gift-ready keepsakes.
I like to keep a small cutting station and a Cricut Joy cutting machine nearby for uniform shapes, but a pair of sharp scissors works fine too. Grab a pack of sturdy drawing paper and a set of washable markers and you’re ready — each idea below includes a materials list with exact quantities, step-by-step instructions, drying times when needed, and display or gifting tips so your little ones’ art looks proud on the fridge or under the tree.
- Spring Flower Pressed-Style Drawings
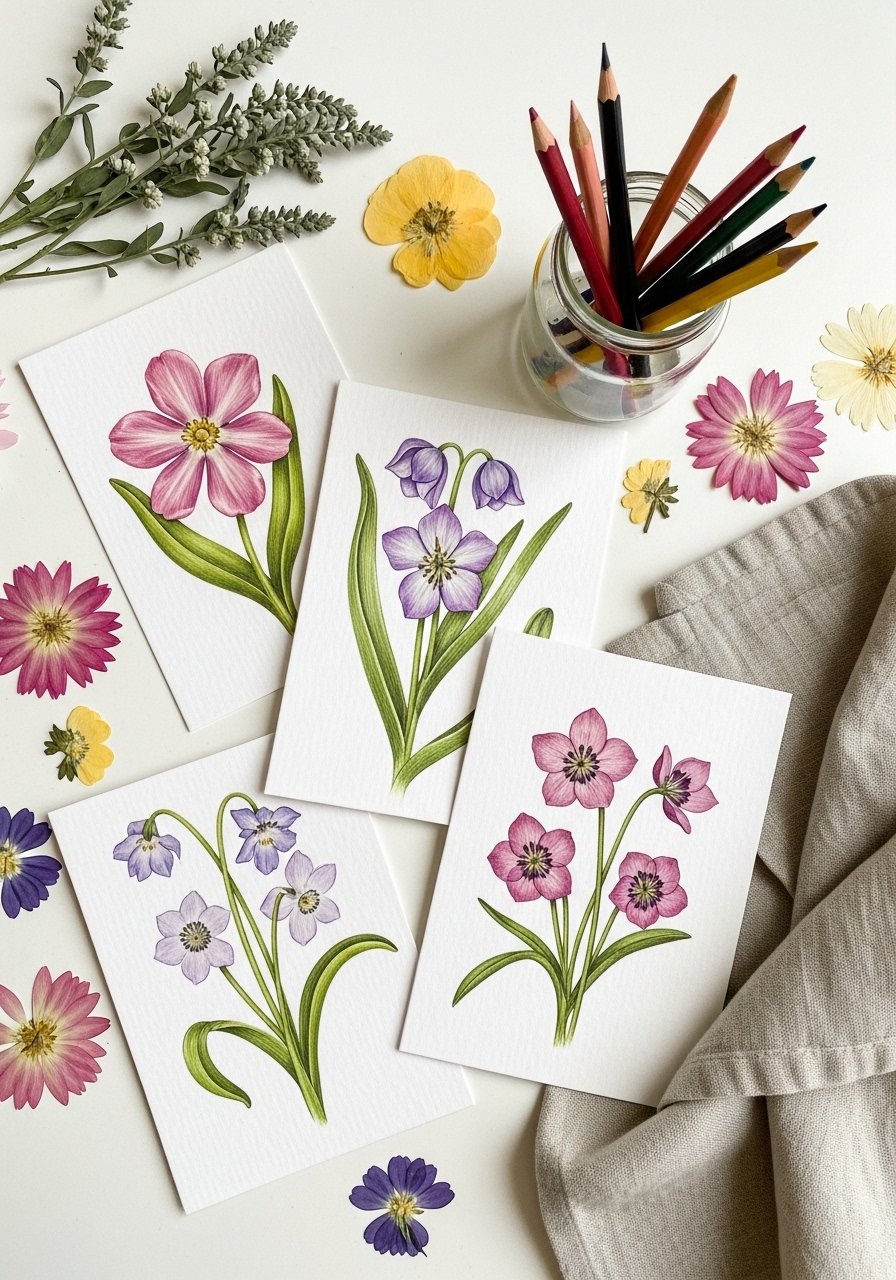
This project mimics pressed-flower art with simple line work and color blocking — perfect for little hands who love petals and patterns. The finished pages have a soft matte look, lots of layered color, and feel charming in a nature-themed frame. Kids who like mixing pen and wash will adore this; beginners can stick to crayons. Use a set of fine-tip colored pencils for crisp lines.
Materials
- 8 sheets 8.5" x **11" white textured cardstock
- 1 pack of 12 fine-tip colored pencils
- 6 washable markers (assorted colors)
- 1 pack of small pressed dried flowers (or freshly pressed leaves)
- 1 pencil and eraser
- 1 clear matte spray sealer (optional) — 1 light coat
- 1 small flat foam brush
Instructions
- Fold a sheet in half to create a simple card base (optional). Sketch a central flower shape with pencil.
- Trace lines with a fine-tip colored pencil for delicate detail.
- Fill petals with soft marker strokes; overlap pencil shading for depth.
- Gently press a dried flower or leaf onto the drawing and trace its edge lightly to echo the shape.
- Add dots or tiny veins with a darker colored pencil for texture.
- If using sealer, work in a ventilated area and apply 1 light coat from 10–12 inches, allow 15 minutes to dry to touch.
- Let the sheet sit flat for 30 minutes before stacking.
How to Display or Gift It
- Frame in a small wooden frame or place on a mini easel for shelf display.
- Stack up several seasonal cards and tie with jute twine for a handmade gift set.
- Store extras flat in a rigid craft organizer box to prevent bending.
- Pair with a set of small wooden frames for instant gifting.
- Rainy-Day Window Scene with Oil Pastels
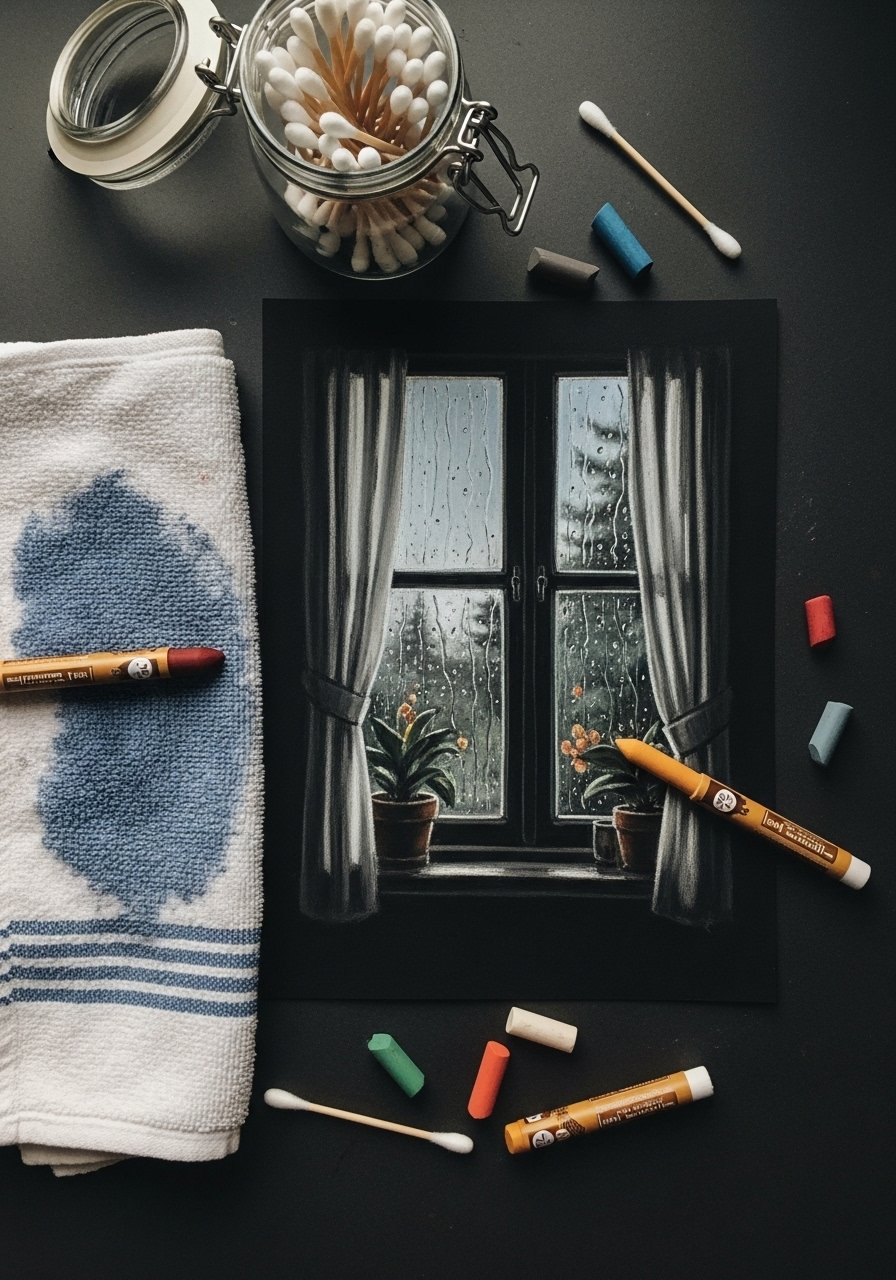
Oil pastels add buttery color and blend so well they mimic rain streaks. This is a hands-on lesson in texture and layering for kids who love tactile media. The finished piece feels velvety and bright against darker paper. Keep a pack of cotton swabs nearby for blending.
Materials
- 4 sheets 9" x **12" black construction paper
- 1 12-count oil pastel set
- 1 small pack of cotton swabs (for blending)
- 1 pencil for initial sketching
- 1 soft cloth for wiping hands
- 1 fixative spray (work in ventilated area; 1 coat)
Instructions
- Lightly sketch a simple house and window widths with pencil.
- Block in sky and ground with broad pastel strokes.
- Use white and light blue for raindrop streaks across the window pane.
- Soften lines with a cotton swab to create wet smears.
- Layer darker tones behind the house to create contrast.
- Spray fixative from 12–14 inches and let dry 20 minutes.
- Check for dusty residue; repeat light spray only if necessary.
How to Display or Gift It
- Mat and frame against a light-colored mat to make colors pop.
- Bundle several rainy scenes into an art journal.
- Store flat in a portfolio sleeve or an archival-backed craft organizer.
- Gift with a set of fixative sprays for pastel work.
- Sunny Beach Scene Thumbprint Art
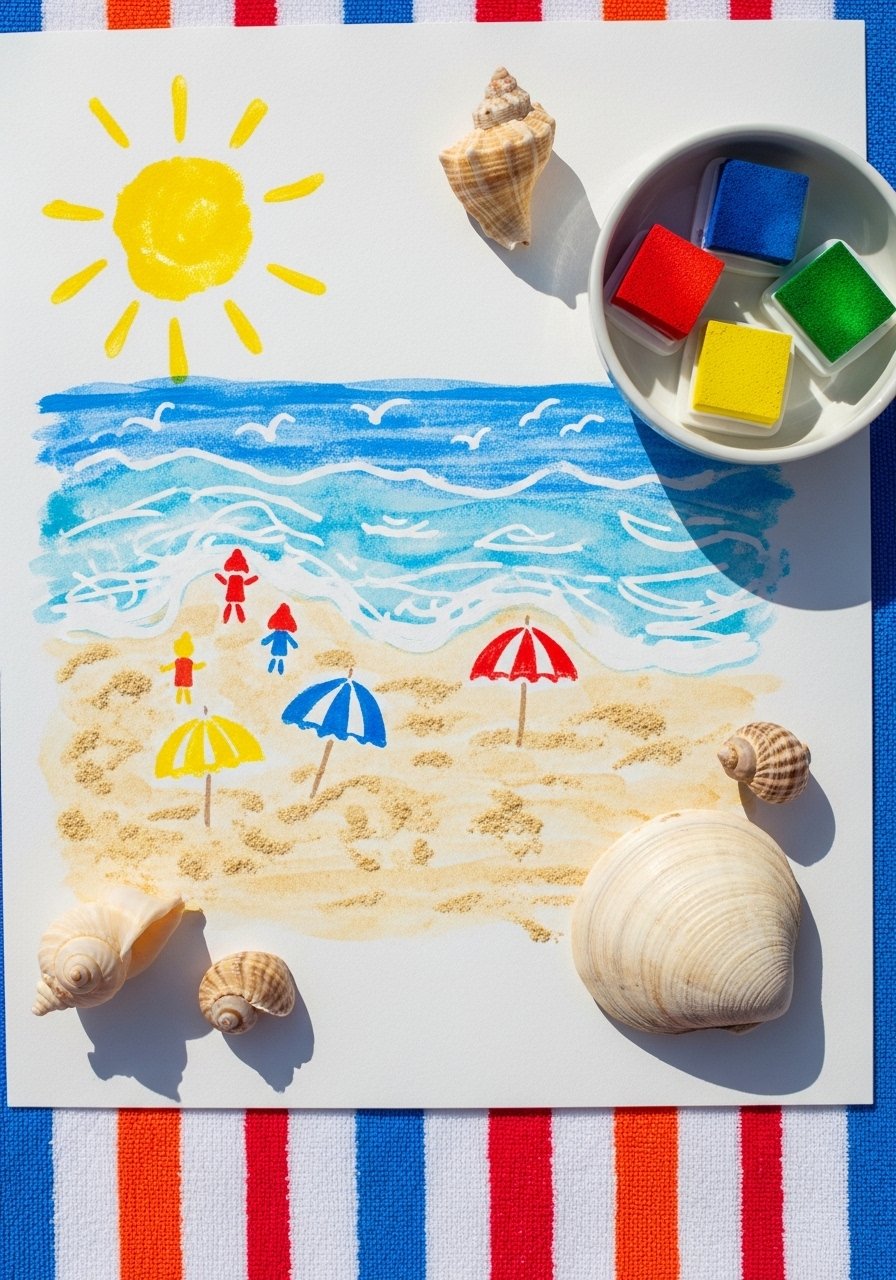
Thumbprinting turns little fingers into suns, waves, and shell shapes — quick, sensory, and perfect for toddlers. The final texture is tactile and vibrant when using washable ink pads. Keep a damp cloth nearby for cleanup.
Materials
- 6 sheets 9" x **12" heavyweight drawing paper
- 1 washable ink pad set (6 colors)
- 1 black fine-tip marker (waterproof)
- 1 small bowl of water and cloth for cleanup
- 1 pencil
- 1 clear craft sealer (optional, 1 light coat)
Instructions
- Sketch a horizon line and simple palm silhouette with pencil.
- Press thumb into yellow ink and stamp a sun; add rays with a marker.
- Use blue ink to thumbprint waves along the horizon; create overlapping prints for depth.
- Add seashells and footprints with smaller finger pads.
- Outline key shapes with the waterproof marker once ink is dry (~5–10 minutes).
- Optional: spray a thin coat of sealer from 12 inches, dry 15 minutes.
How to Display or Gift It
- Make a stack of prints and stitch them into a small seaside-themed booklet.
- Mount into a lightweight frame and hang in a bathroom or kid’s room.
- Store flat in a craft organizer tray to prevent smudging.
- Include a small pack of washable ink pads when gifting.
- Fourth of July Firework Scribble Cards
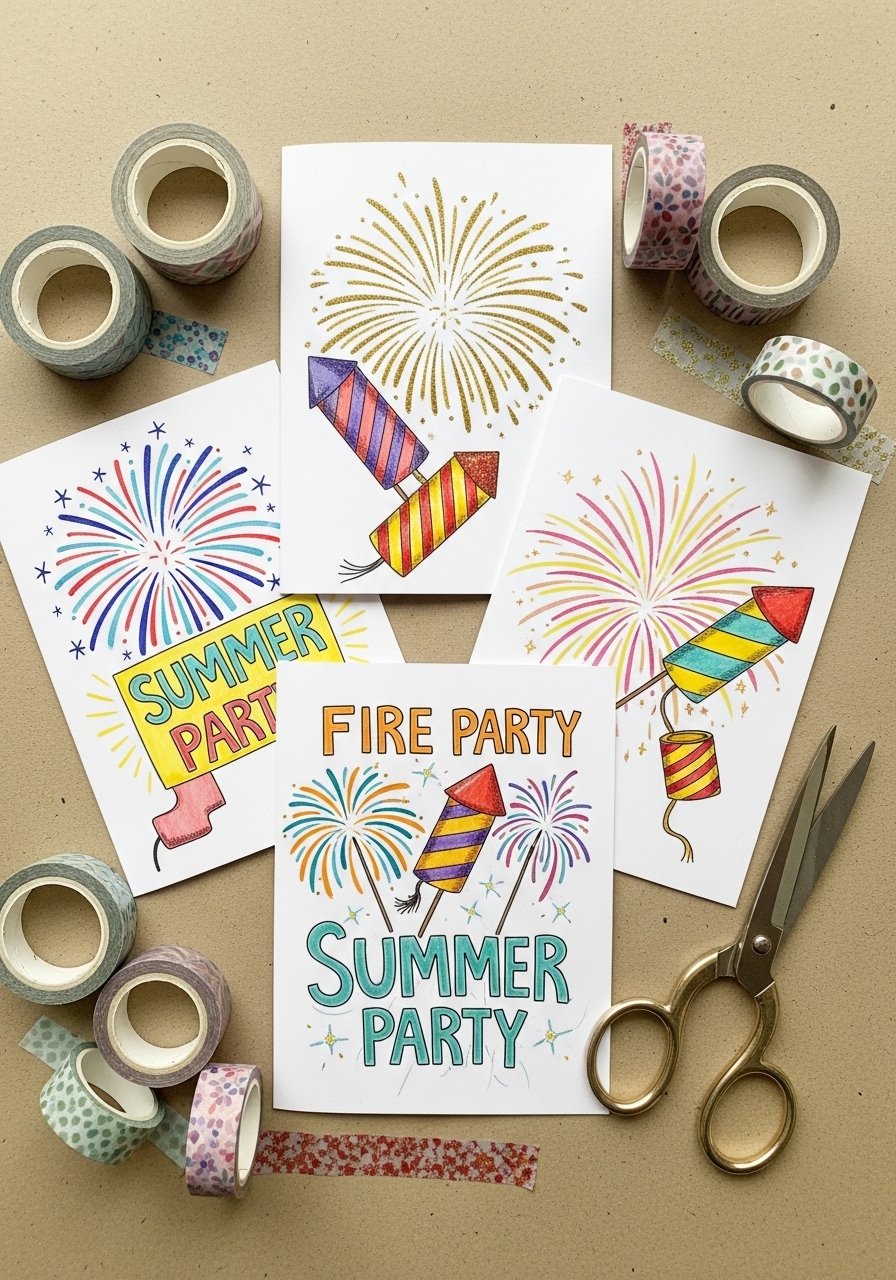
Energetic scribbles become starburst fireworks with a spritz of glitter glue — great for older kids who like bold color and moving lines. The finish is sparkly and celebratory, perfect for party invites.
Materials
- 10 5" x **7" white cardstock cards
- 1 set of 12 metallic gel pens
- 1 bottle fine-tip glitter glue (clear with silver glitter) — 1–2 thin lines per card
- 1 ruler for symmetrical bursts
- 1 foam brush
- 1 pencil and eraser
Instructions
- Lightly mark a center point for each firework with a pencil.
- Draw rays outward using multiple metallic gel pens.
- Add concentric rings and tiny star dots.
- Trace key lines with a thin bead of glitter glue; let glitter glue dry 20–30 minutes.
- Use a foam brush to remove any loose glitter.
- Allow cards to set flat for 1 hour before stacking.
How to Display or Gift It
- Use washi tape to hang cards along a mantle.
- Bundle in kraft envelopes and tie with ribbon for party favors.
- Store in a rigid box to avoid flattened glitter.
- Toss a pack of metallic gel pens into the craft drawer for next projects.
- Leaf Rubbing Harvest Pictures (Autumn)
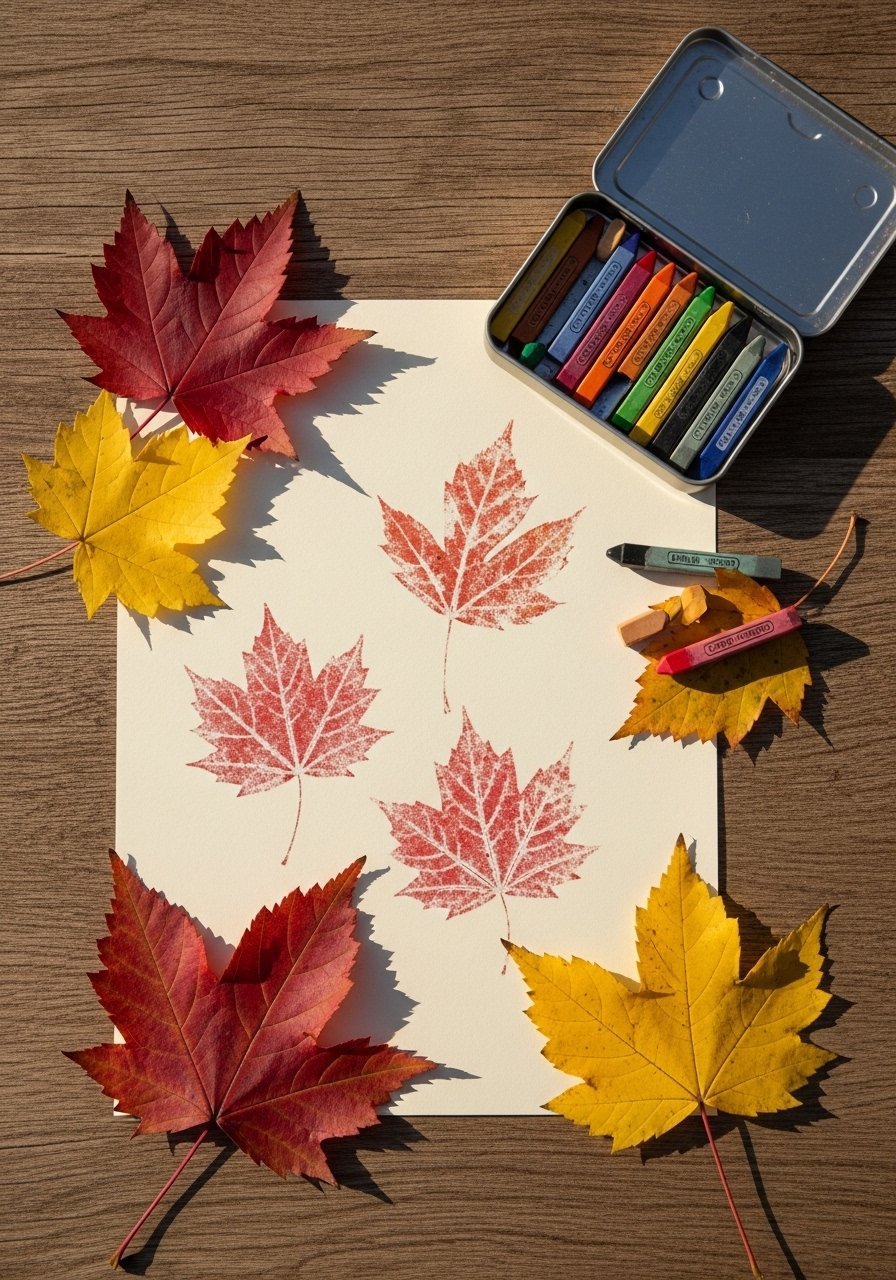
Leaf rubbings showcase real textures kids discover on nature walks. Finished pieces feel tactile and earthy, fitting perfectly into fall décor. This project teaches observation and layering techniques.
Materials
- 8 sheets 8.5" x **11" cream drawing paper
- 1 set of 24 wax crayons (wrap removed)
- 1 collection bag of fall leaves (10–15 leaves)
- 1 pencil for arrangement sketches
- 1 clear matte Mod Podge (1 thin coat optional)
- 1 soft cloth
Instructions
- Place a leaf vein-side up under a sheet of paper.
- Hold leaf flat and rub side of crayon across the paper until veins appear.
- Repeat with layered leaves for overlapping textures.
- Add background color with wider crayon strokes.
- Optional: seal with 1 thin coat of matte Mod Podge; dry 30 minutes.
- Store flat for 1 hour after sealer.
How to Display or Gift It
- Mount onto a wooden clipboard or frame with a warm wood tone.
- Make a garland by folding each rubbing into a small accordion and stringing on twine.
- Store rubbings flat in a stackable craft organizer.
- Add a small craft organizer tray for neat storage.
- Pumpkin Outline Doodling (Halloween)
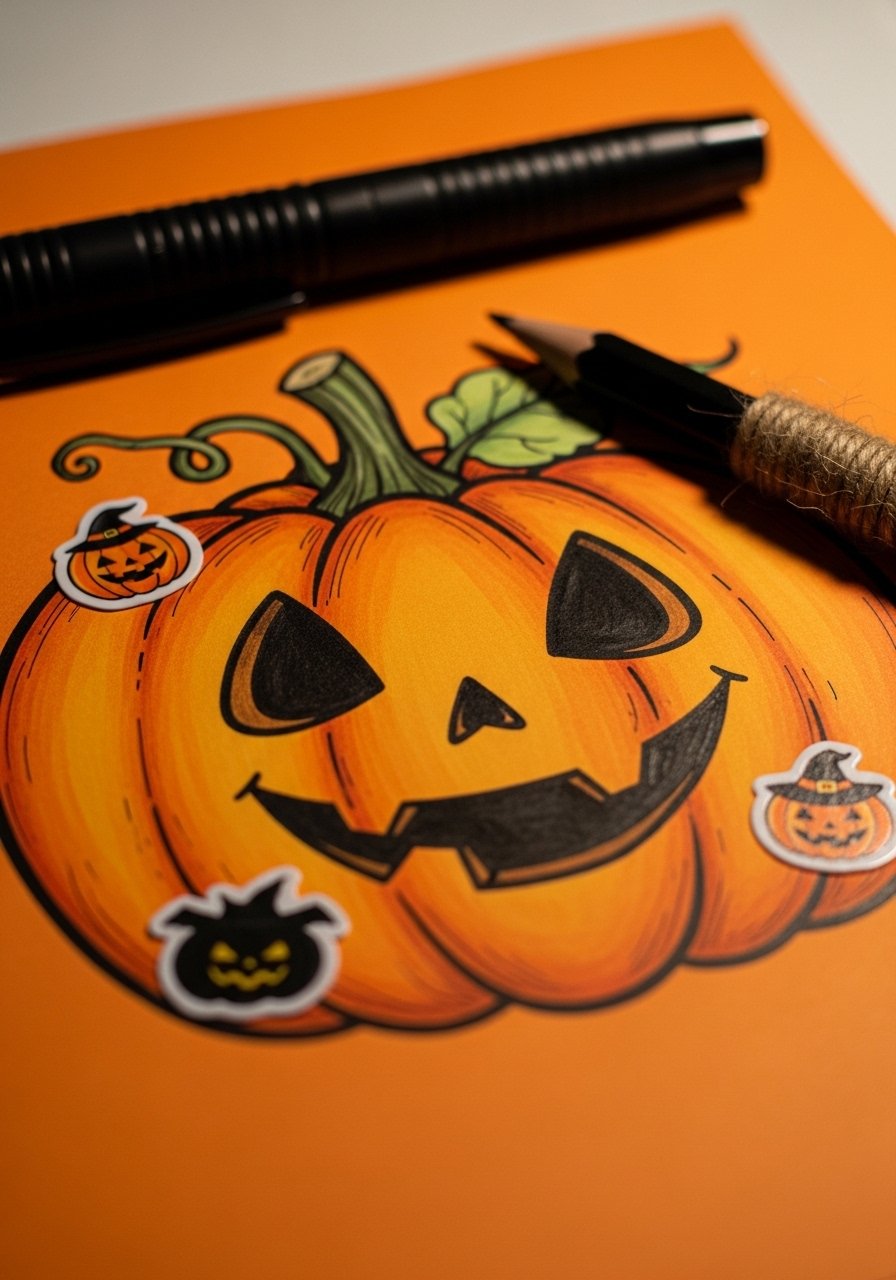
Turn a simple pumpkin outline into intricate doodle patterns — a calm, mindful activity for school-age kids. The finished piece looks graphic and modern, ideal for seasonal displays.
Materials
- 6 sheets 9" x **12" orange cardstock
- 1 black fine-point permanent marker
- 1 set of 6 metallic paint pens
- 1 pencil and eraser
- 1 white gel pen for highlights
- 1 mini clipboard for display
Instructions
- Draw a simple pumpkin outline with pencil, including a stem.
- Fill pumpkin sections with repeated doodle patterns (waves, dots, stripes).
- Trace outlines with the black permanent marker for crisp edges.
- Add metallic highlights sparingly to avoid heavy shine.
- Use white gel pen to add tiny reflective dots.
- Let ink set 10–15 minutes before handling.
How to Display or Gift It
- Clip onto a mini clipboard and prop on a mantel.
- Create a spooky gallery by stringing multiple pieces on twine with clothespins.
- Stack unused cards in a flat organizer to keep inks from smudging.
- Gift paired with a set of fine-tip permanent markers.
- Seasonal Drawing Ideas for Kids: Winter Snow Globe Scenes
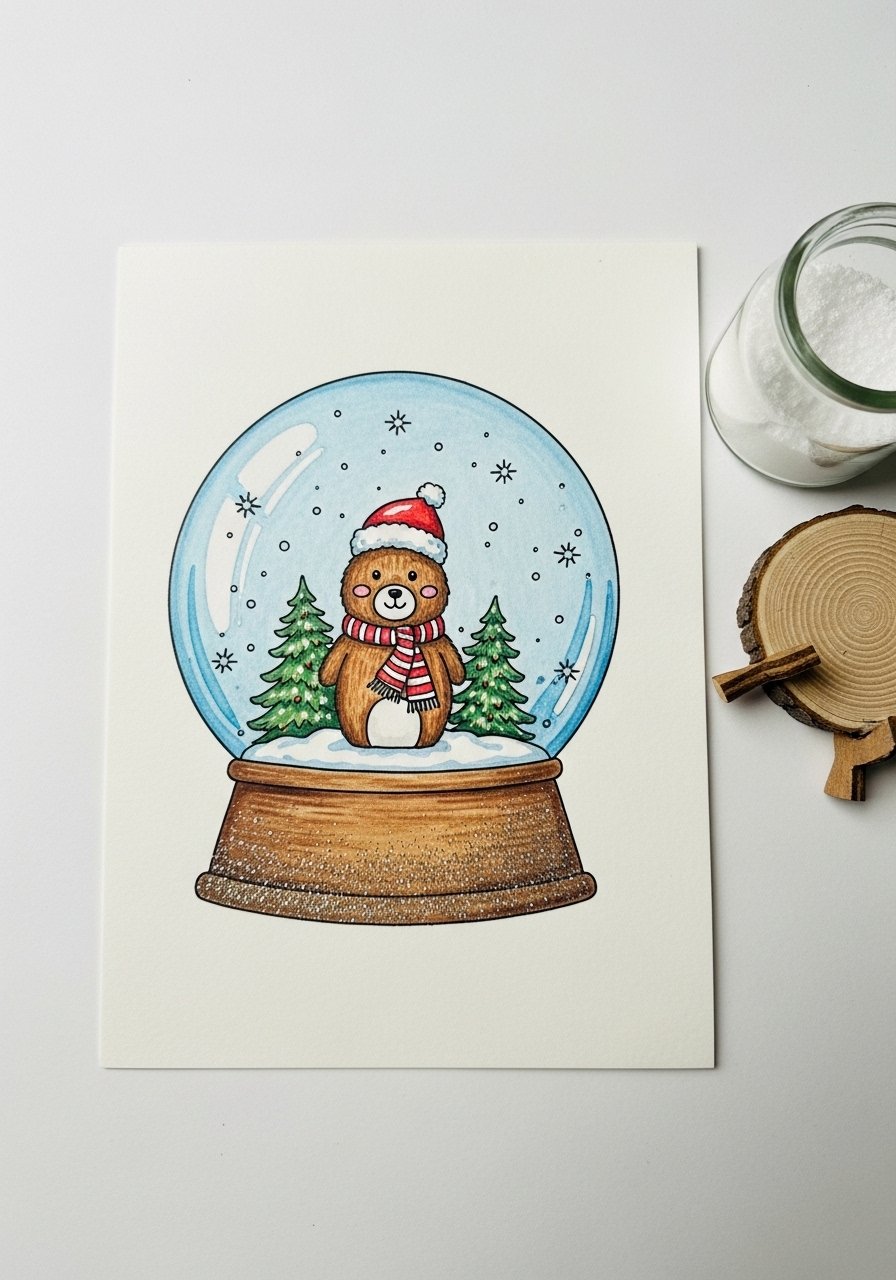
Kids draw cozy scenes inside snow globes — perfect for winter craft swaps. The finished art sparkles with a light dusting of faux snow and feels like a miniature magical world. A small bottle of craft glitter adds subtle shimmer.
Materials
- 6 sheets 8.5" x **11" heavyweight drawing paper
- 1 pack of colored markers (12-count)
- 1 fine glitter jar (white/silver) — use sparingly
- 1 glue stick and a small bottle of craft glue
- 1 white gel pen
- 1 paintbrush for glue
Instructions
- Sketch a large globe circle and simple winter scene inside with pencil.
- Color sky and base with markers.
- Add tiny white dots for snow with gel pen.
- Brush thin glue dots where you want glitter; sprinkle and tap excess off.
- Allow glue to dry 30 minutes.
- Gently shake off loose glitter and let rest flat 1 hour.
How to Display or Gift It
- Mount on cardstock and tie in a small cello bag for gifting.
- Place on a small tabletop easel for seasonal desk decor.
- Store flat in a sealable craft folder to protect glitter.
- Include a small wooden easel when presenting as a gift.
- Picnic Scene Collage Drawing (Summer)
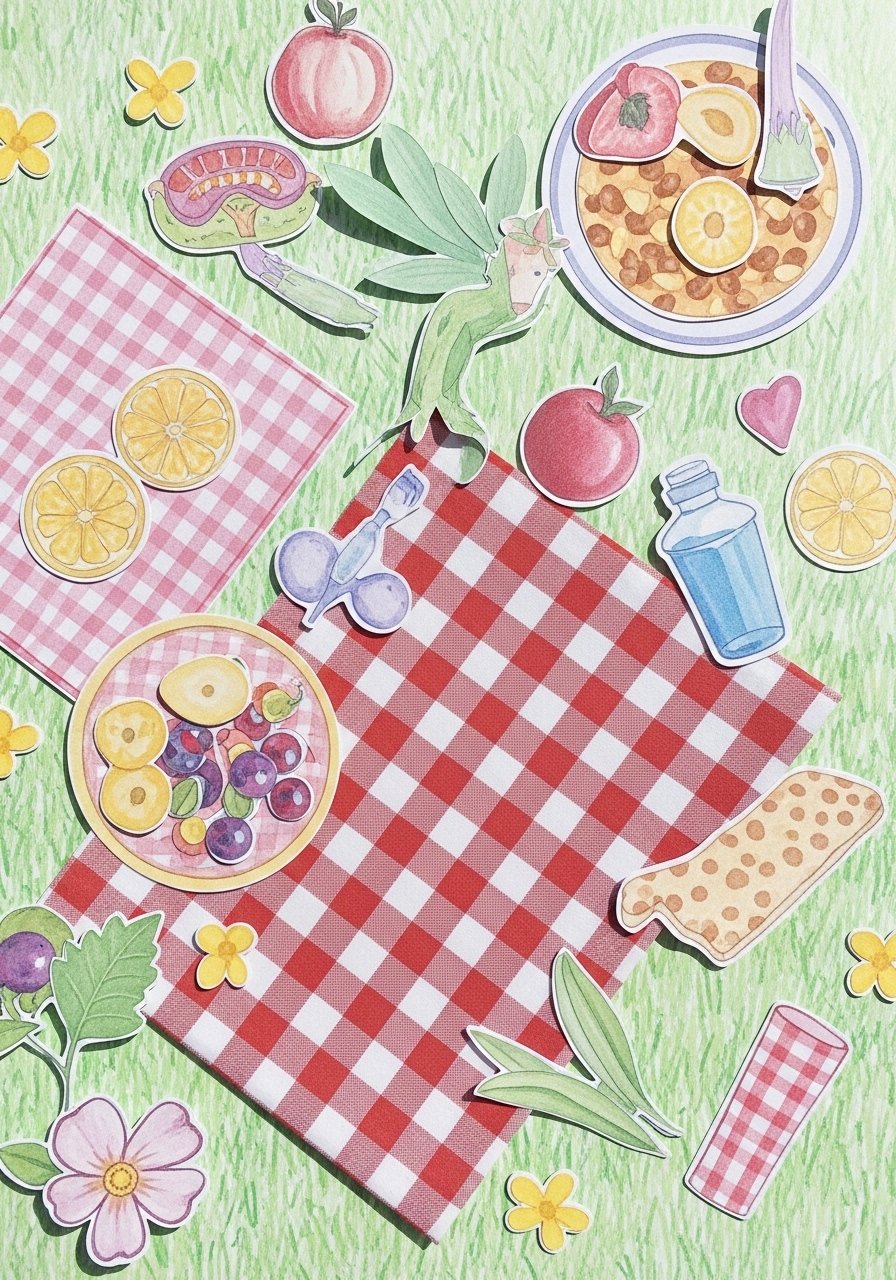
Combine drawing with paper collage to make a picnic scene full of pattern and texture. Kids learn composition and layering while creating a sunny tableau that’s tactile and bright.
Materials
- 1 sheet 12" x **18" mixed-media paper
- 6 patterned scrapbooking paper 6" x **6"
- 1 set of watercolor brush markers (8-count)
- 1 glue stick and foam adhesive dots (20)
- 1 pair of child-safe scissors
- 1 ruler and pencil
Instructions
- Lightly sketch a picnic blanket and background objects.
- Cut patterned paper into blanket pieces and glue onto base.
- Use watercolor brush markers to paint background sky and grass; dry 20 minutes.
- Glue foam dots for sandwich layers and folded napkins for dimension.
- Add pen details for utensils and rings with a fine pen.
- Let collage set flat 30 minutes before framing.
How to Display or Gift It
- Frame in a floating frame to show layers.
- Make multiple picnic scenes and bind into a seasonal art book.
- Store cut paper in a labeled craft organizer to reuse for collage.
- Gift with a set of watercolor brush markers.
- Apple Orchard Stamping and Drawing (Fall)
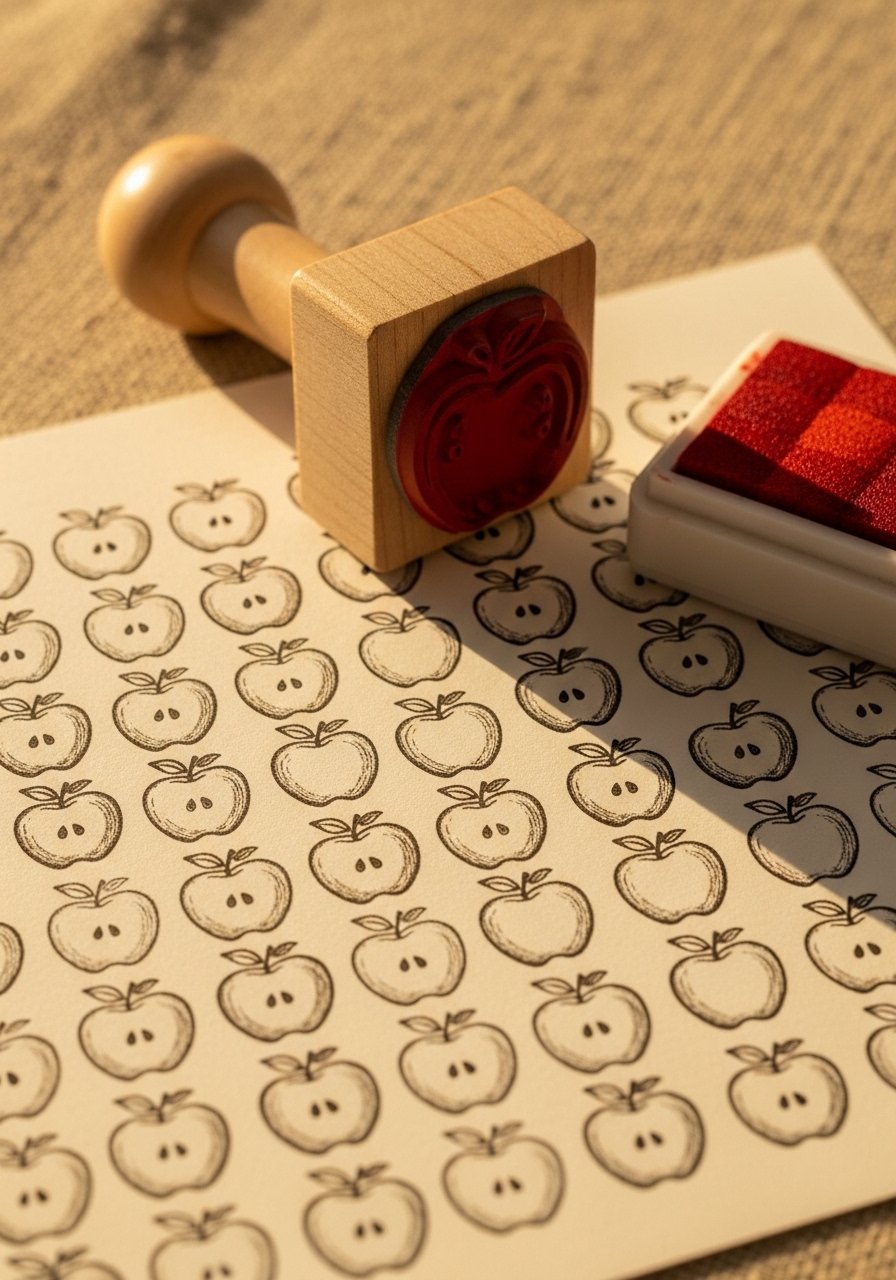
Combine stamping and freehand drawing to make a repeating apple orchard design. The final sheet has playful rhythm and works well for gift wrap or handmade tags.
Materials
- 10 sheets 8.5" x **11" cream paper
- 1 wooden apple stamp
- 1 red ink pad (waterproof)
- 1 brown fine-tip marker for stems
- 1 green watercolor pencil for leaves
- 1 ruler and pencil
Instructions
- Use the ruler to lightly mark rows for alignment.
- Stamp apples evenly across the sheet; let ink dry 5–10 minutes.
- Add stems and leaves by hand with markers and pencils.
- Create shadow under apples with a tiny touch of gray.
- Allow artwork to sit flat 20 minutes before handling.
How to Display or Gift It
- Cut into rectangles for gift tags; punch a hole and thread twine.
- Wrap small presents with multiple sheets for rustic wrapping paper.
- Store stamps in a labeled box with the ink pad to prevent drying.
- Pack with a red waterproof ink pad for gift sets.
- Thanksgiving Tableplace Drawing Cards

Kids create decorative place cards that double as holiday name tags. The finished cards add a personal, handmade touch to the dinner table and are a great way to involve children in holiday prep.
Materials
- 12 3.5" x **2.5" folded place cards (pre-cut)
- 1 set of brown and gold paint pens
- 1 fine-tip black pen for names
- 1 small wooden name stamp (optional)
- 1 twine spool for tying
- 1 hole punch
Instructions
- Practice names on scrap paper to ensure spacing.
- Draw a small leaf or pumpkin motif in the corner with paint pens.
- Write names in neat, dark ink and let dry 5 minutes.
- Punch a hole and thread twine for a tied accent.
- Allow cards to rest flat 10 minutes before setting on table.
How to Display or Gift It
- Slip each card into a napkin fold as a table accent.
- Tie small cinnamon sticks or dried orange slice to the twine.
- Store unused cards flat in a labeled box.
- Pair with a set of paint pens for more decorating.
- Hanukkah Menorah Doodle Sheet
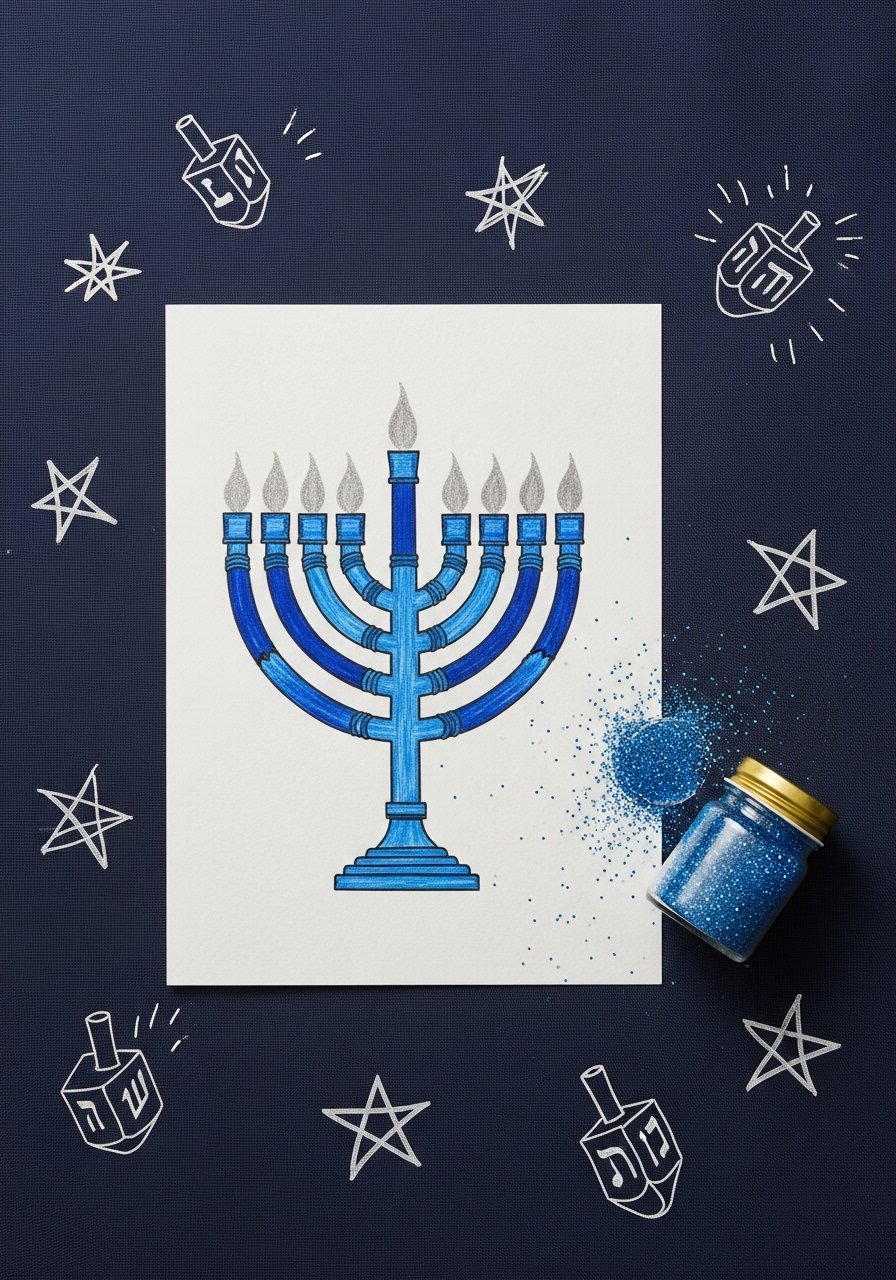
This project uses doodles and repeated motifs to create a celebratory Hanukkah sheet. The finished page is elegant and kid-made, great for classroom displays.
Materials
- 6 sheets 8.5" x **11" white cardstock
- 1 set of blue gel pens (6 shades)
- 1 silver metallic marker
- 1 pencil and eraser
- 1 small jar of blue glitter (optional)
- 1 glue stick
Instructions
- Lightly sketch a central menorah shape.
- Fill candle areas with gradient blues using gel pens.
- Add doodled stars and dreidels around the border.
- Trace with silver marker for highlights.
- Apply a touch of glue and glitter to candle flames; dry 20–30 minutes.
- Let pages rest flat 1 hour.
How to Display or Gift It
- Combine several sheets into a holiday activity pad.
- Hang as a banner across the classroom with mini clothespins.
- Store in a flat craft organizer between seasons.
- Add a set of blue gel pens to the gift bundle.
- Valentine Heart Pattern Prints
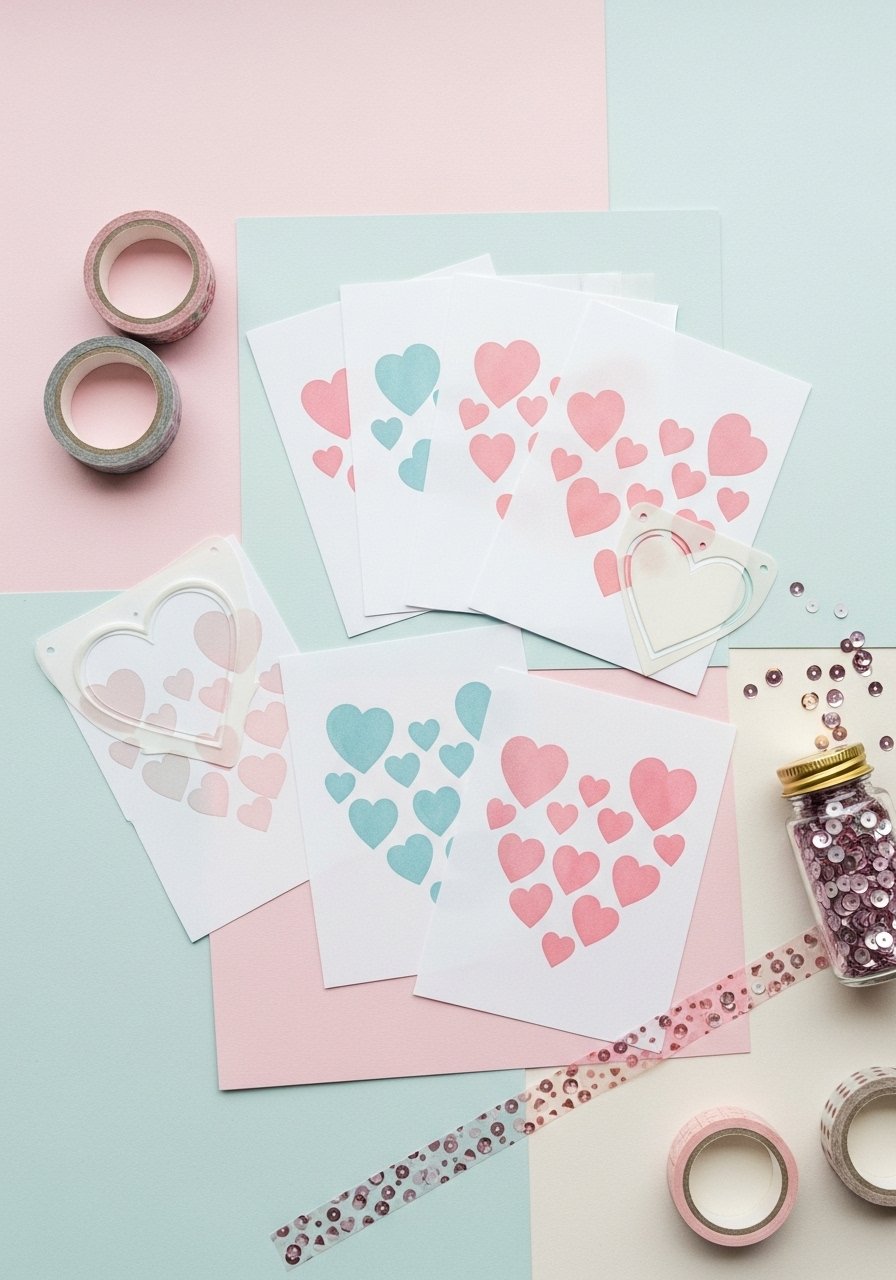
Create repeating heart patterns with stencils and stamps for a sweet Valentine project. The finished pieces look polished and are great for classroom exchanges.
Materials
- 12 sheets 8.5" x **11" pastel paper (mix pink, lavender)
- 1 heart stencil set (3 sizes)
- 1 pack of small foam heart stamps
- 1 metallic pen for outlines
- 1 small container of sequins (optional)
- 1 glue stick
Instructions
- Place stencil and lightly trace a grid of hearts.
- Stamp hearts using foam stamps and varying pressures.
- Outline select hearts with metallic pen for contrast.
- Glue a few sequins for sparkle; dry 15 minutes.
- Allow sheets to rest flat 30 minutes before stacking.
How to Display or Gift It
- Fold into small cards and tuck into envelopes.
- Use as cupcake toppers or bag labels at parties.
- Store unused sheets in a labeled drawer.
- Include a heart stencil set for repeat projects.
- Seasonal Drawing Ideas for Kids: Earth Day Nature Posters
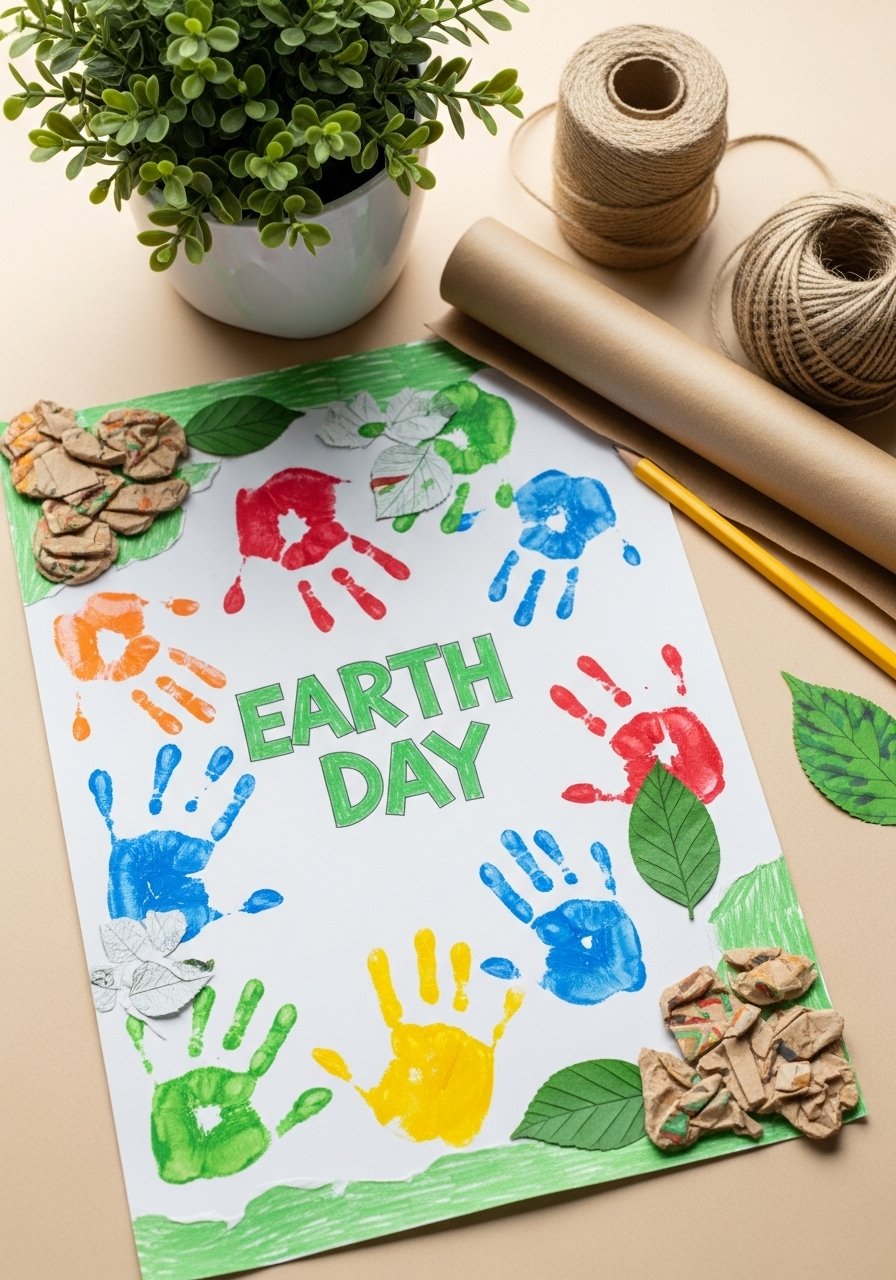
Make a bold nature poster using handprints, recycled scraps, and plant motifs to celebrate Earth Day. The finished poster is textural and meaningful, great for school displays.
Materials
- 1 sheet 18" x **24" recycled kraft paper
- 1 set of washable tempera paints (8 colors)
- 1 pack of recycled paper scraps (20 pieces)
- 1 foam brush and sponge brush
- 1 pencil and black marker for lettering
- 1 spray bottle of water for blending
Instructions
- Paint a basic globe shape with tempera and let dry 20 minutes.
- Press painted handprints around the globe for continents.
- Glue recycled paper scraps to create trees and flowers.
- Add lettering with black marker; let ink dry 10 minutes.
- Mist with a tiny spray of water to soften edges if desired; dry 15–20 minutes.
- Allow full poster to rest flat 1 hour.
How to Display or Gift It
- Hang on a classroom bulletin board with washi tape.
- Roll gently and secure with recycled twine for gifting.
- Store rolled in a poster tube to prevent creases.
- Pair with a set of washable tempera paints.
- Kite-Flying Sky Scenes (Spring/Summer)
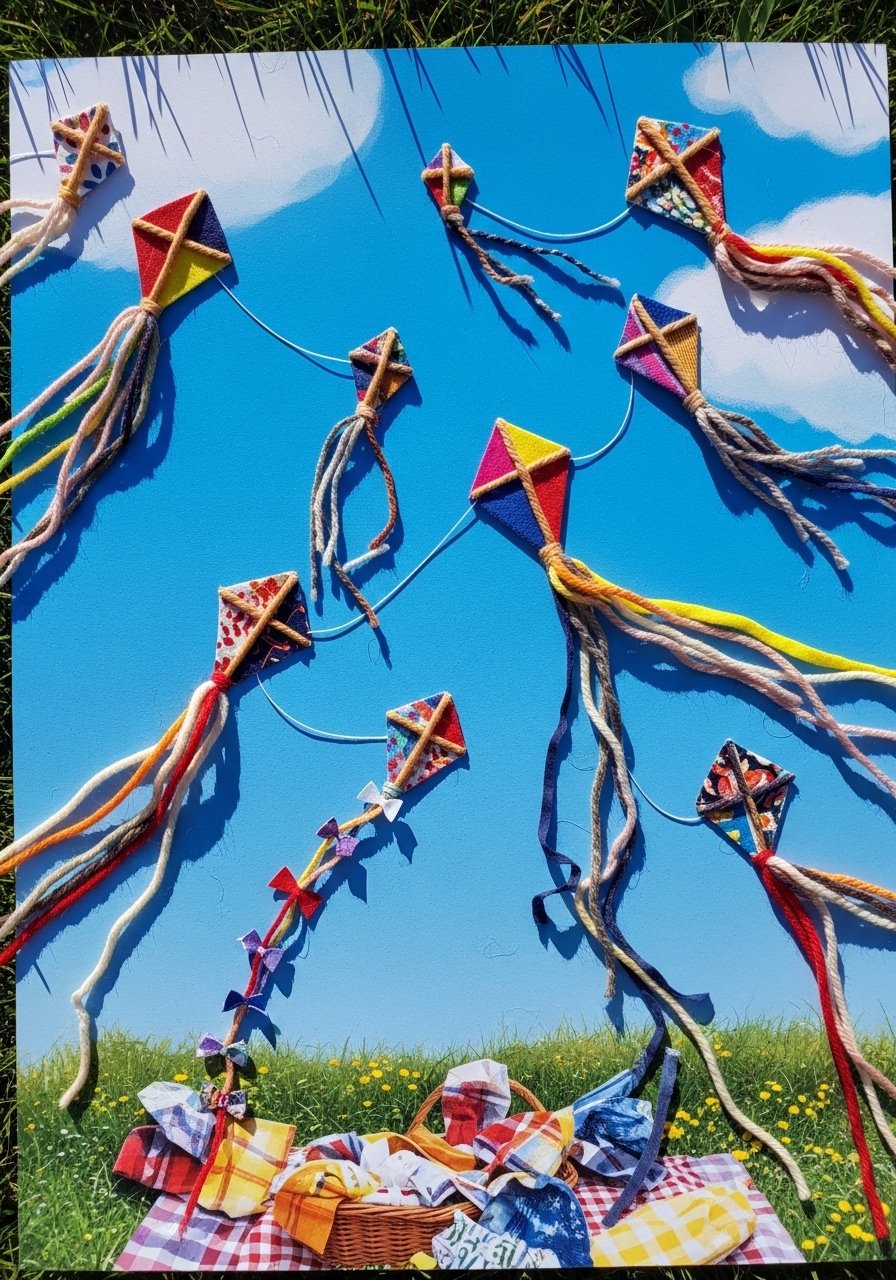
Kites and ribbon tails add movement to sky scenes; kids can use real yarn for tactile tails. The final piece is airy and joyful — great for classroom ceilings.
Materials
- 6 sheets 12" x **18" blue cardstock
- 1 spool of colorful yarn (10 yards)
- 1 set of fabric scrap squares (10)
- 1 glue stick and craft glue for yarn ends
- 1 pencil and white chalk for cloud highlights
- 1 pair of safety scissors
Instructions
- Lightly sketch kite shapes on blue cardstock.
- Cut or tear fabric scraps into kite panels and glue in place.
- Attach yarn tails to kite bottoms with a dab of craft glue; dry 15–20 minutes.
- Add cloud highlights with white chalk; smudge gently.
- Let pieces rest flat 30 minutes before displaying.
How to Display or Gift It
- Hang from the ceiling with clear fishing line for a floating effect.
- Group multiple kites on a long ribbon for a hallway banner.
- Store fabric scraps in a labeled small drawer for future projects.
- Include a spool of colorful yarn when gifting.
- Back-to-School Pencil Portraits
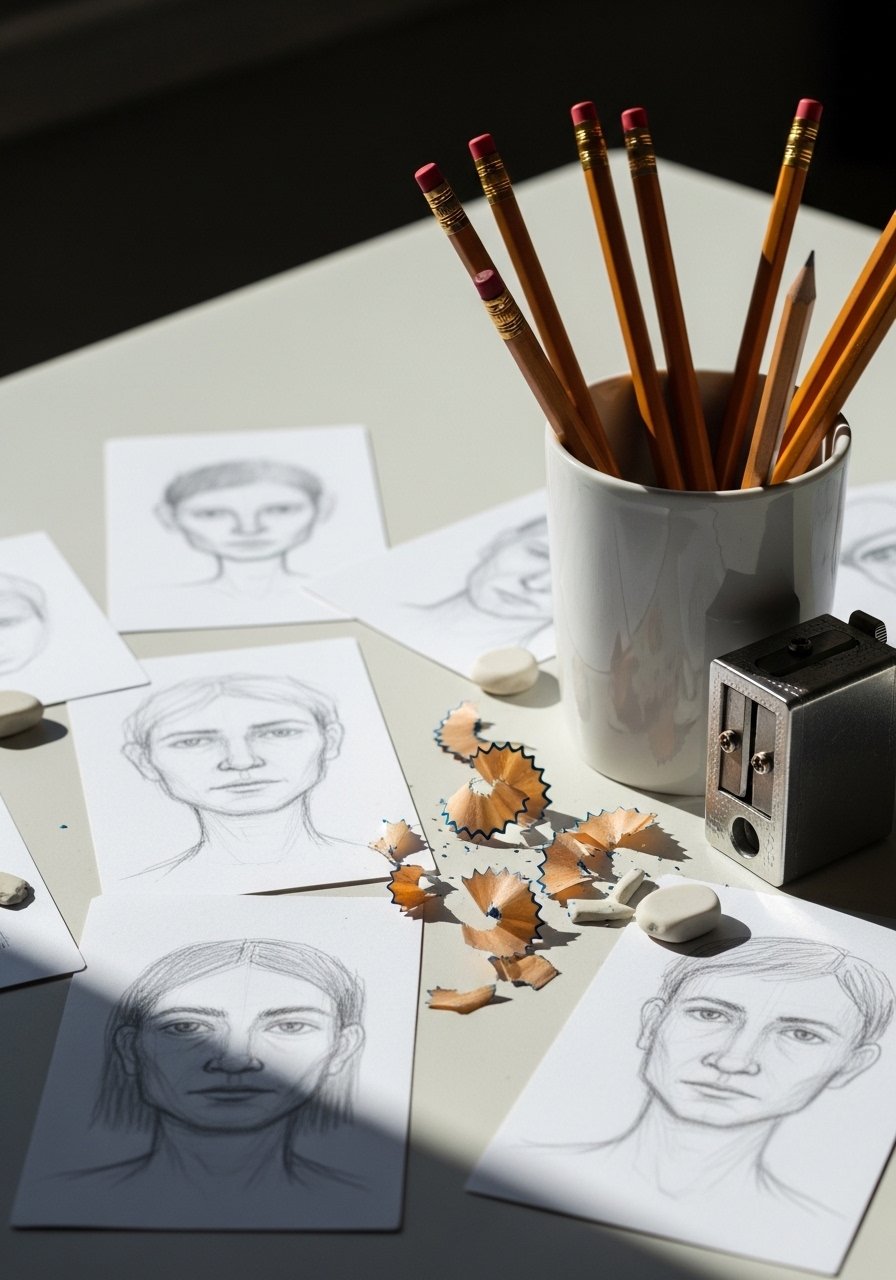
Self-portrait cards teach observation and are a proud back-to-school keepsake. Final portraits are intimate and perfect for corkboards.
Materials
- 24 3" x **5" white index cards
- 1 pack of HB graphite pencils (6)
- 1 pencil sharpener
- 1 kneaded eraser
- 1 set of colored pencils for accents (6)
- 1 small ruler for framing faces
Instructions
- Measure and lightly sketch oval face shapes using the ruler for spacing.
- Block in eyes, nose, and mouth with light pencil strokes.
- Add hair and clothing details; darken key lines.
- Erase guidelines with a kneaded eraser for a soft finish.
- Add small color accents with colored pencils.
- Let cards rest flat 10 minutes before stacking.
How to Display or Gift It
- Pin to a corkboard in a grid for classroom displays.
- Bind into a small keepsake flip book.
- Store cards in a compact index card box for easy access.
- Gift alongside a pack of colored pencils.
- Winter Mitten Pattern Swap
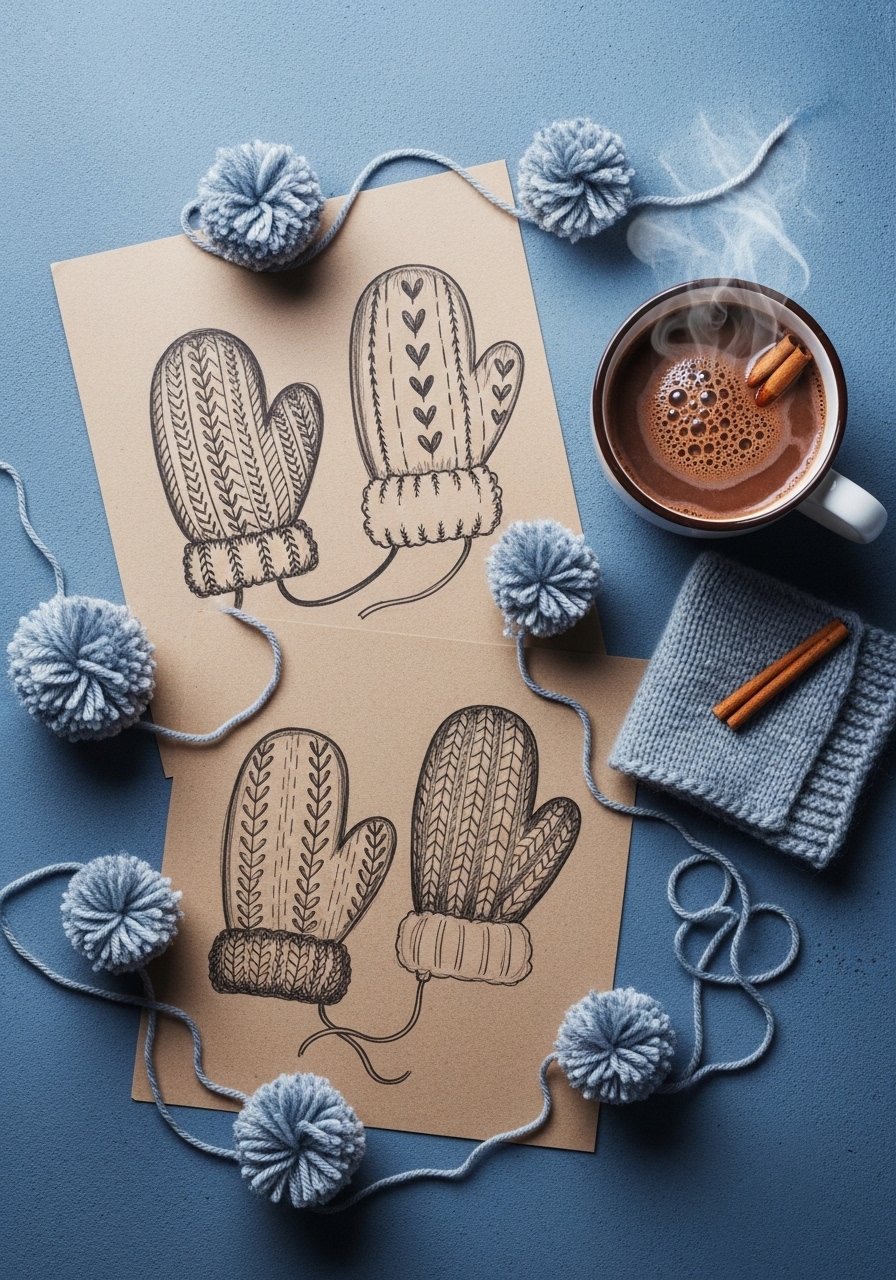
Design patterned mittens in pairs, then swap with a friend for matching sets. Final mittens show playful patterns and textures.
Materials
- 8 sheets 8.5" x **11" kraft paper
- 1 set of colored markers (12)
- 1 pom-pom maker or pre-made pom-poms (8)
- 1 glue dots pack
- 1 pencil and eraser
- 1 small ruler
Instructions
- Draw mitten outlines and divide into pattern sections.
- Fill each section with repeated motifs (stripes, dots, zigzags).
- Add pom-poms glued to cuff areas; dry 10 minutes.
- Swap designs with a friend and redraw for mirrored pairs.
- Allow drawings to sit flat 20 minutes before gifting.
How to Display or Gift It
- Attach to a paper garland across a mantle for seasonal decor.
- Create matching cards and tuck into a gift bag with real mittens.
- Store artwork in a flat folder to protect pom-poms.
- Include a pack of craft pom-poms for tactile fun.
- Lantern Drawing with Tissue Collage (Diwali/General)
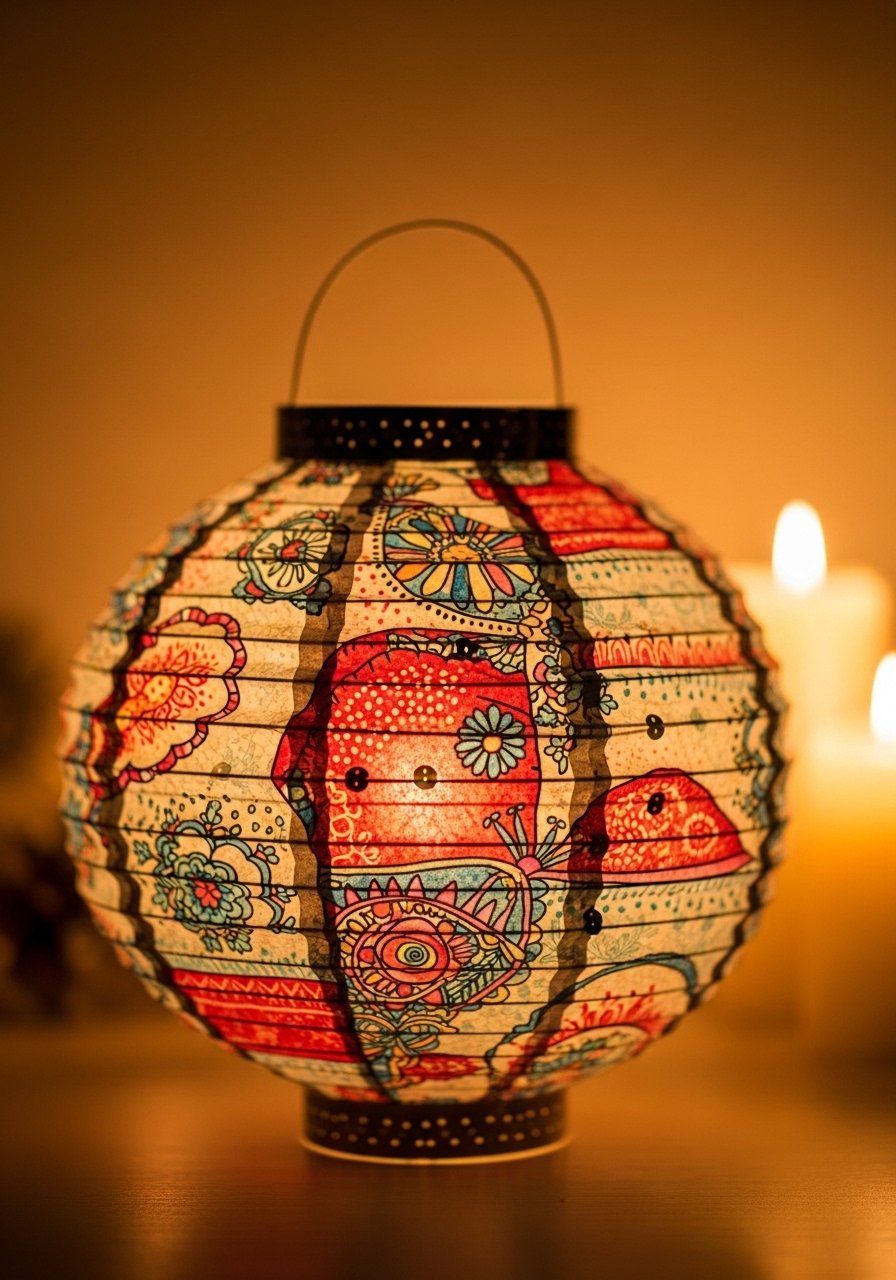
Use tissue-paper collage to add translucent layers to lantern drawings and practice color mixing. The finished art has a lovely stained-glass look.
Materials
- 6 sheets 9" x **12" white mixed-media paper
- 1 pack of tissue paper squares (assorted colors, 50)
- 1 glue stick and thin craft glue
- 1 brown fine-tip pen for outlines
- 1 small sequins pack (optional)
- 1 wax paper underlay to prevent sticking
Instructions
- Sketch a lantern outline lightly with pencil.
- Tear and layer tissue paper pieces inside lantern sections, glue edges down.
- Add small sequin accents with a drop of glue; allow to dry 20 minutes.
- Outline the lantern with brown pen for structure.
- Let the whole sheet rest flat 1 hour to fully set.
How to Display or Gift It
- Mount in a window to catch light and mimic stained glass.
- Group several and hang as a festive mobile.
- Store tissue scraps in a labeled small bin for future collage.
- Gift with a pack of assorted tissue paper squares.
- Spring Bunny Character Sketches
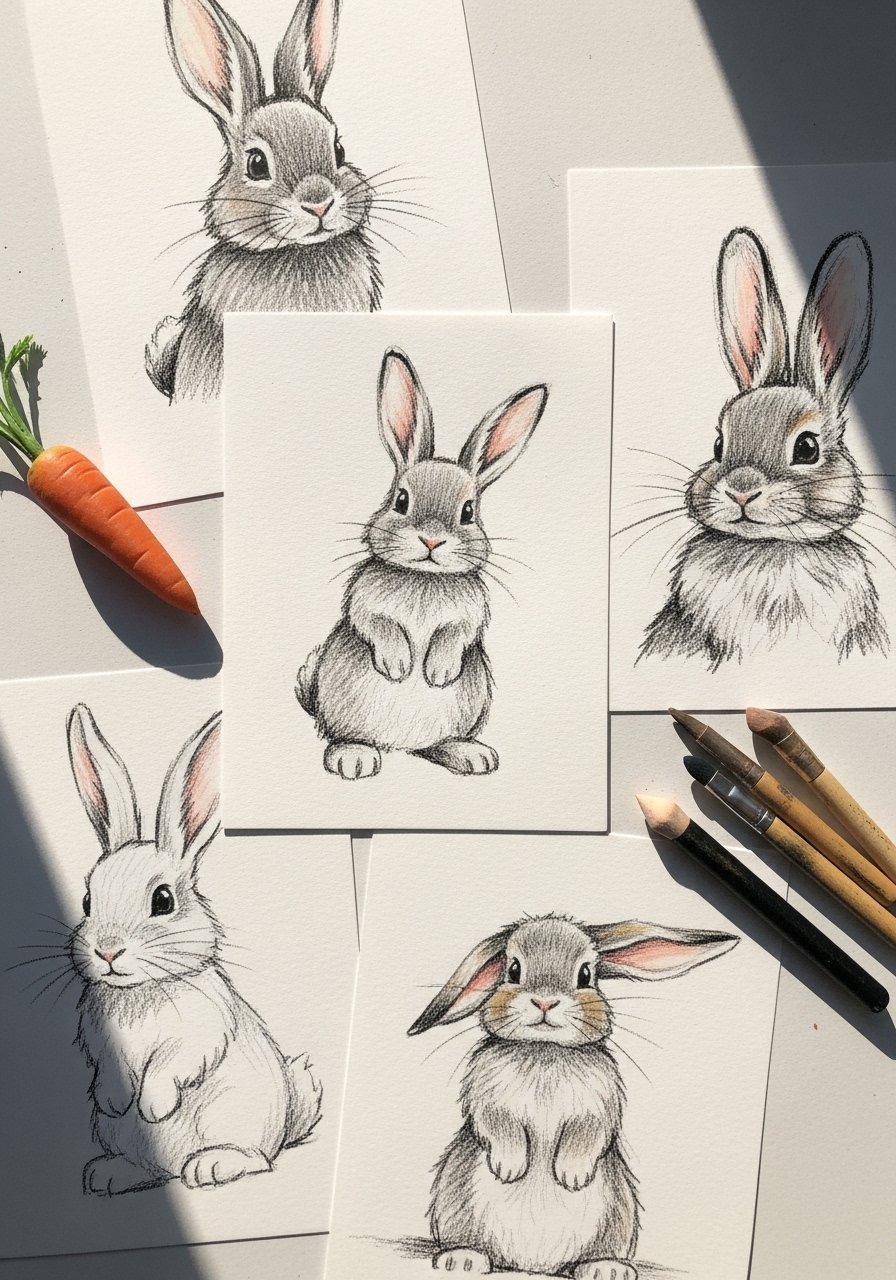
Character sketches let kids invent bunnies with personality — big ears, glasses, bow ties. Finished sketches are sweet and can be turned into cards or plush patterns.
Materials
- 10 sheets 8.5" x **11" pastel sketch paper
- 1 set of graphite pencils (2H, HB, 2B, 4B)
- 1 kneaded eraser
- 1 pack of blending stumps (3)
- 1 colored pencil set for accents (12)
- 1 fine-tip ink pen for outlines
Instructions
- Lightly draw head shapes and experiment with ear styles.
- Sketch facial features and accessories.
- Shade gently with a blending stump for soft fur texture.
- Reinforce important lines with the ink pen for a finished look.
- Add color accents with colored pencils; rest 10 minutes.
- Allow graphite to set 30 minutes before stacking.
How to Display or Gift It
- Bind into a small character sketchbook.
- Turn favorite designs into DIY softie patterns.
- Store sketches in a portfolio folder to keep them crisp.
- Include a blending stump set for more texture.
- Birthday Cake Surprise Card Drawing

Draw and fold a pop-up cake inside a card for a celebratory surprise. The finished piece pops with dimension and makes birthdays feel extra special.
Materials
- 6 pre-folded A4 greeting cards
- 1 set of 12 watercolor brush pens
- 1 small tube of craft glue
- 1 pair of precision scissors
- 1 ruler and pencil
- 1 small packet of paper confetti
Instructions
- Sketch cake layers on a separate sheet and cut out.
- Score the card center with a ruler and fold to create a pop-up tab.
- Glue cake cutout onto tab so it stands when card opens; dry 10–15 minutes.
- Color cake layers with watercolor brush pens; blot and let dry 20 minutes.
- Add confetti inside the card with a dab of glue; press gently.
- Let fully dry 30 minutes before closing.
How to Display or Gift It
- Slip into a colorful envelope and seal with washi tape.
- Make a batch for classroom birthday cards and keep extras in a labeled box.
- Present with a small boxed candle set for parties.
- Pair with a set of watercolor brush pens.
- Cozy Nighttime Story Scene (Winter Bedtime)
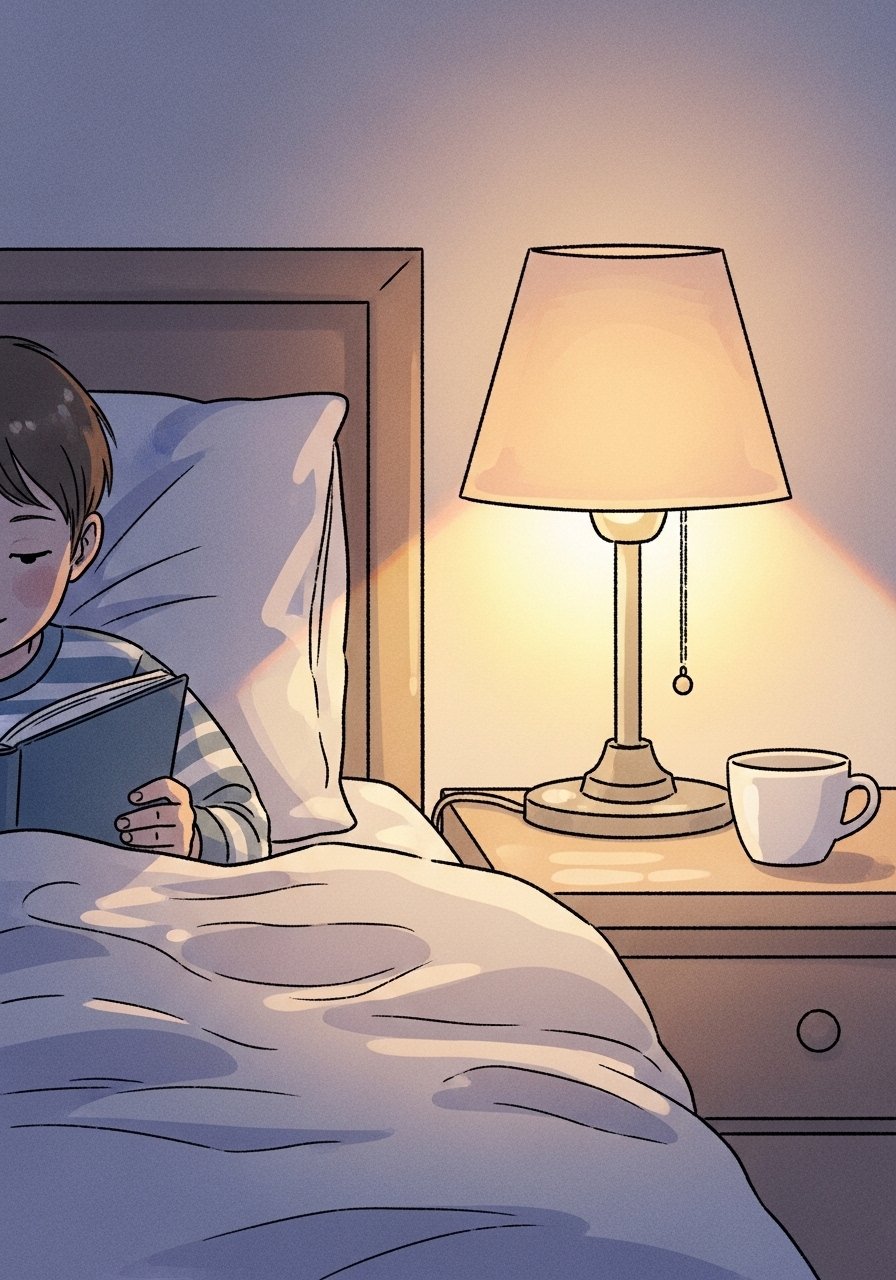
Capture the calm of bedtime with muted colors and soft shading. The finished scene is soothing and perfect for winding down with kids before sleep.
Materials
- 6 sheets 9" x **12" toned sketch paper (warm gray)
- 1 set of soft chalk pastels (12 colors)
- 1 kneaded eraser and soft brush for blending
- 1 white gel pen for lamp glow
- 1 fixative spray (1 light coat)
- 1 small blending sponge
Instructions
- Sketch the basic room layout with light pencil.
- Block in large shadow shapes with chalk pastels.
- Blend edges with a soft brush for a cozy glow.
- Add lamp highlights and book pages with the white gel pen.
- Lightly spray fixative from 12 inches and allow 20 minutes to dry.
- Let pages rest flat 1 hour before handling.
How to Display or Gift It
- Frame and hang above a child’s reading nook.
- Include in a bedtime story craft bundle with a small book.
- Store in a flat archival sleeve to preserve pastels.
- Consider gifting with a set of soft chalk pastels for cozy art nights.
Thanks for exploring these seasonal drawing ideas for kids — from thumbprint suns to charcoal-night scenes, there’s something here for rainy days, holiday prep, classroom crafts, and thoughtful gifts. Try a few projects in one afternoon or plan a seasonal rotation so drawing stays fresh all year. Save or pin this list for later and share your favorites with a friend who loves easy, festive crafts. Which project will your kids try first?
Trust me, picking up a quality low-temp hot glue gun and a small stackable craft organizer tray changed how smoothly my craft days run — less mess, less stress, more time for drawing.


