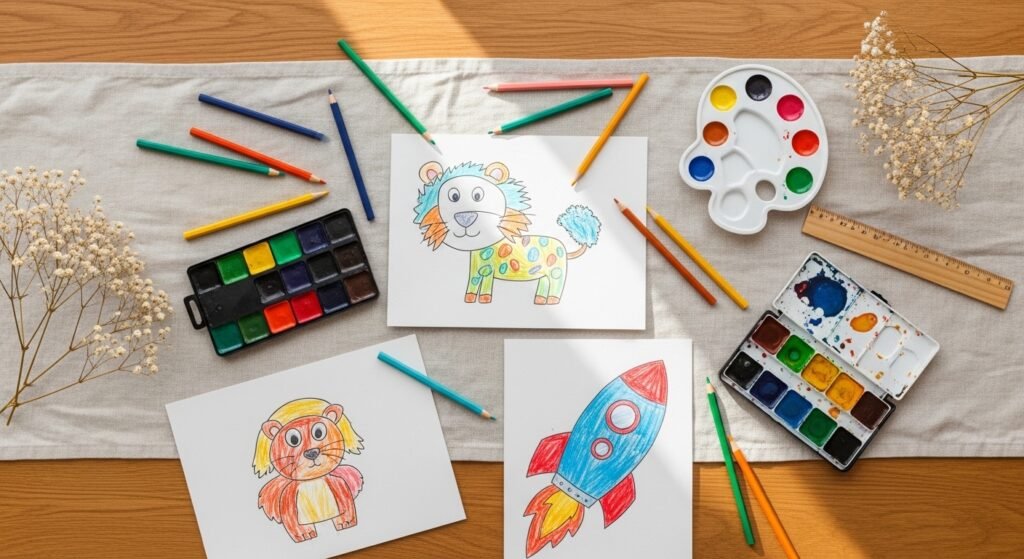
You know that moment when your kid asks for a drawing idea and you wish you had a simple, step-by-step plan ready? These 24 projects are exactly that: clear, joyful drawing ideas for kids step by step that turn blank paper into colorful keepsakes. Each project breaks the process into easy moves so kids build confidence while having fun.
You’ll find projects that use pencils, markers, watercolors, and simple stencils — plus helpful tools like a basic colored pencil set or a kid-safe watercolor set I often keep in my craft drawer. Skip overwhelm and follow the step-by-step instructions; these drawing ideas for kids step by step are perfect for rainy afternoons, classroom projects, or handmade cards.
Keep a cup of pencils handy and let’s get started — thin lines to big swirls, one easy step at a time.
- Friendly Shape Cat
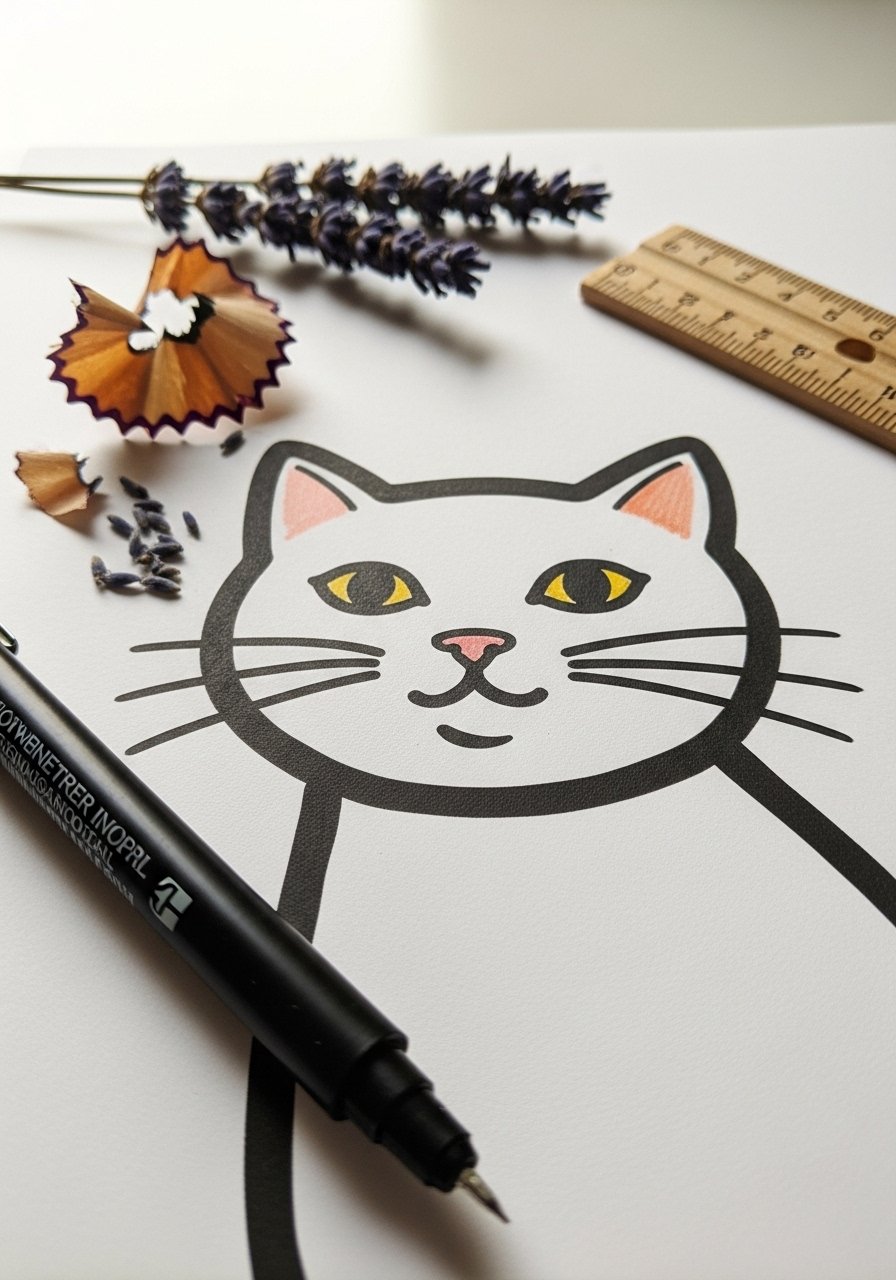
This cute cat turns basic shapes into an adorable character. The project teaches kids how to see circles and triangles as building blocks. Finished drawings look bold and graphic—perfect for framing or stickers. Great for beginners and preschoolers who love animals. The finished piece feels crisp with marker outlines and soft with colored-pencil shading.
Materials
- White drawing paper, 8.5 x 11 in, 1 sheet
- Pencil, HB, 1
- Eraser, 1 small (vinyl recommended)
- Black fineliner pen, 0.5 mm, 1 (fine liner pens)
- Colored pencil set, 12-count, 1 (colored pencil set)
- Ruler, 12 in, 1
- Optional: circle template or small jar for tracing
Instructions
- Lightly draw a large circle for the head (about 4 in diameter) with pencil.
- Add two small triangles on top for ears and a small oval at the bottom for the body (about 2.5 x 1.5 in).
- Sketch two small circles for eyes, a tiny triangle nose, and three whisker lines per side.
- Use the ruler to position symmetrical facial features. Erase stray construction lines.
- Trace over final lines with the black fineliner. Wait 30 seconds to avoid smudging.
- Color with colored pencils. Layer light strokes for fur texture; press firmer for darker shadow—blend softly with a fingertip.
- Add tiny highlight dots with the eraser or leave white paper for shine.
How to Display or Gift It
Frame this drawing on a small wooden easel for a desk display. Slip it into a clear plastic sleeve and pair with a set of colored pencils as a thoughtful homemade gift. Store extra finished pieces flat in a stackable craft organizer until you’re ready to mount them.
- Easy Rainbow Fish
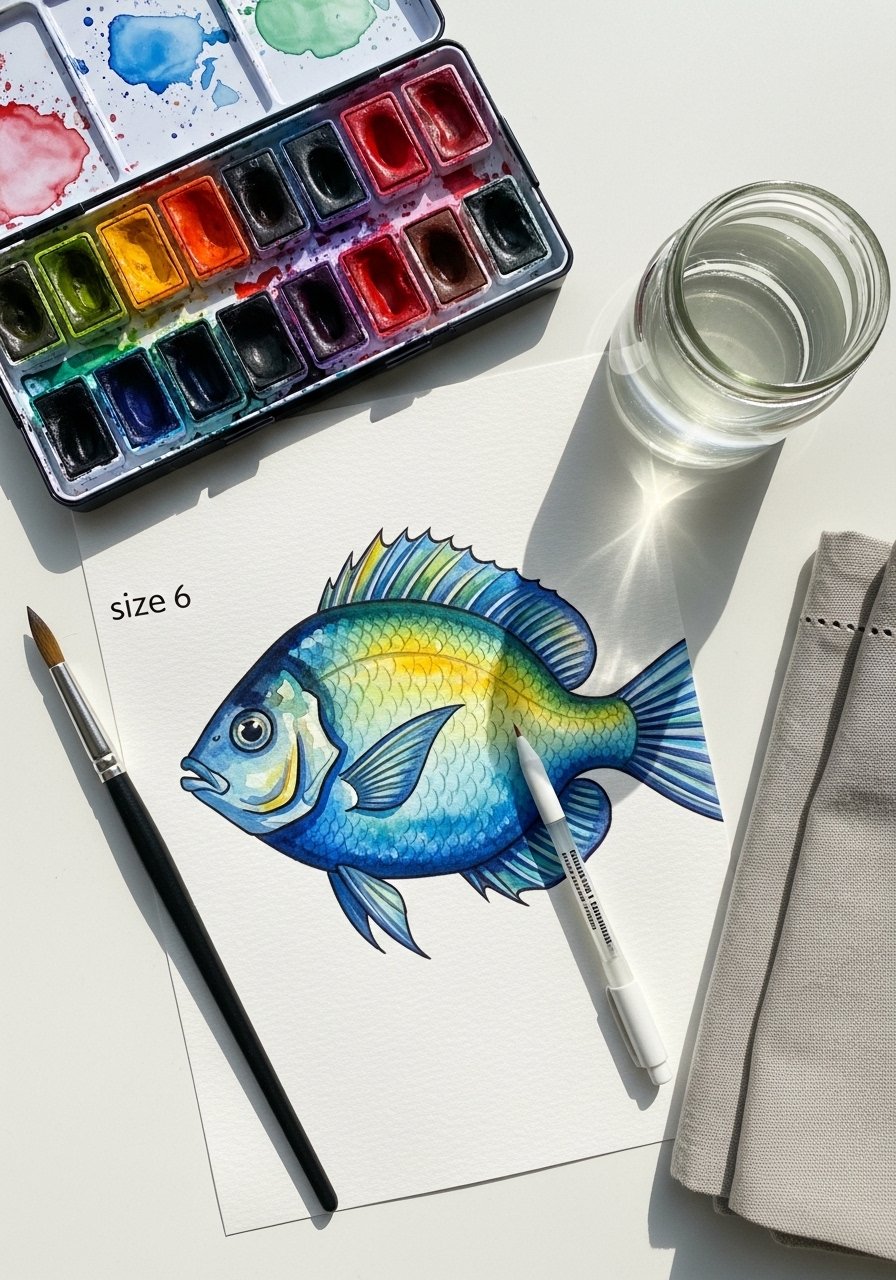
Kids love drawing under-the-sea creatures—this rainbow fish is all about simple curves and color. It teaches basic watercolor washes and patterning. The finished look is glossy and jewel-toned if you use a white gel pen for scales. Best for kids who enjoy playing with color and texture.
Materials
- Watercolor paper, 6 x 9 in, 1 sheet
- Pencil and eraser
- Watercolor set with pans or tubes (watercolor set)
- Round watercolor brush, size 6, 1
- Small jar for water, 1
- White gel pen, 1 (white gel pen)
- Paper towel, 1
Instructions
- Lightly sketch a rounded oval body and a triangular tail.
- Draw a small circle for the eye and a curved smile.
- Wet the body area lightly with clean water using the brush.
- Apply stripes of watercolor—let colors blend slightly. Rinse brush between colors.
- Let the wash dry 20–30 minutes.
- Add scale patterns with the white gel pen—small overlapping half-circles.
- Outline the eye and tail edge with a thin dark color if desired.
How to Display or Gift It
Mount on a small clipboard for kitchen art. Make a set of three in different colors and tie them with twine into a kid-made card pack. Store wet works flat while drying on a baking sheet lined with paper towels.
- Simple Rocket in 6 Steps
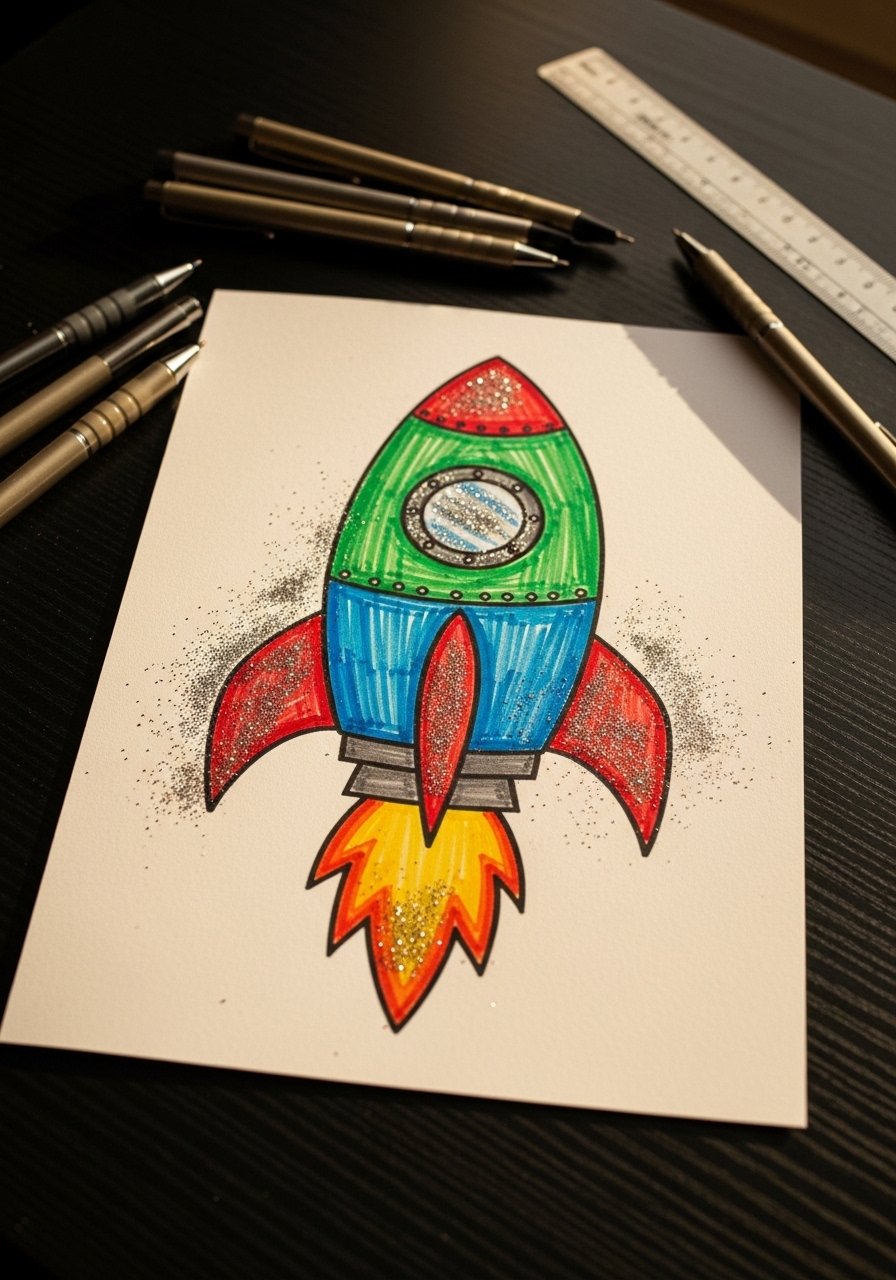
This rocket uses straight lines and gentle curves—great for practicing symmetry. Kids enjoy adding starry backgrounds and metallic highlights for a spacey finish. Works well for classroom space units or birthday party craft stations.
Materials
- White cardstock, 8.5 x 11 in, 1 sheet
- Pencil and eraser
- Ruler, 12 in, 1
- Alcohol-based marker set, 8 colors, 1 (alcohol markers)
- Metallic gel pen, 1 (metallic gel pen)
- Glue stick, 1
Instructions
- Draw a vertical centerline lightly with pencil.
- Sketch a rounded triangle for the rocket body, about 5 in tall.
- Add two small fins and a circular window (about 0.75 in diameter).
- Color the body with broad strokes from the marker set.
- Add metallic highlights around the window and fins. Let marker ink dry 1–2 minutes.
- Glue on small cut-out stars for extra sparkle if desired.
How to Display or Gift It
Cut the rocket out and glue it to a folded card for a space-themed invitation. Display a group of rockets on a bulletin board to create a rocket launch scene.
- Step-by-Step Unicorn Head

Unicorns are whimsical and forgiving—curvy lines create the head and flowing mane. This drawing helps kids practice curves and decorative details like sparkles and braids. A glitter or gold accent gives a magical finish kids adore.
Materials
- Textured drawing paper, 9 x 12 in, 1 sheet
- Pencil, eraser
- Pastel marker set, 6 colors, 1 (pastel markers)
- Gold gel pen or glitter glue, 1 (gold gel pen)
- Small soft brush for smoothing blends
- Black fineliner, 0.3 mm, 1
Instructions
- Sketch a rounded profile for the head and a curved neck.
- Add an almond-shaped eye with lashes, a spiraled horn, and the muzzle.
- Draw flowing mane sections that overlap.
- Outline with the black fineliner and erase pencil marks.
- Fill mane sections with pastel markers and blend gently with the soft brush.
- Add gold accents on the horn and tiny star details. Let any glitter glue dry 30 minutes.
How to Display or Gift It
Turn into a birth announcement by adding name and date in metallic pen. Frame under glass to keep glitter from migrating. Store finished pieces flat in a craft portfolio.
- Friendly Dinosaur from Ovals
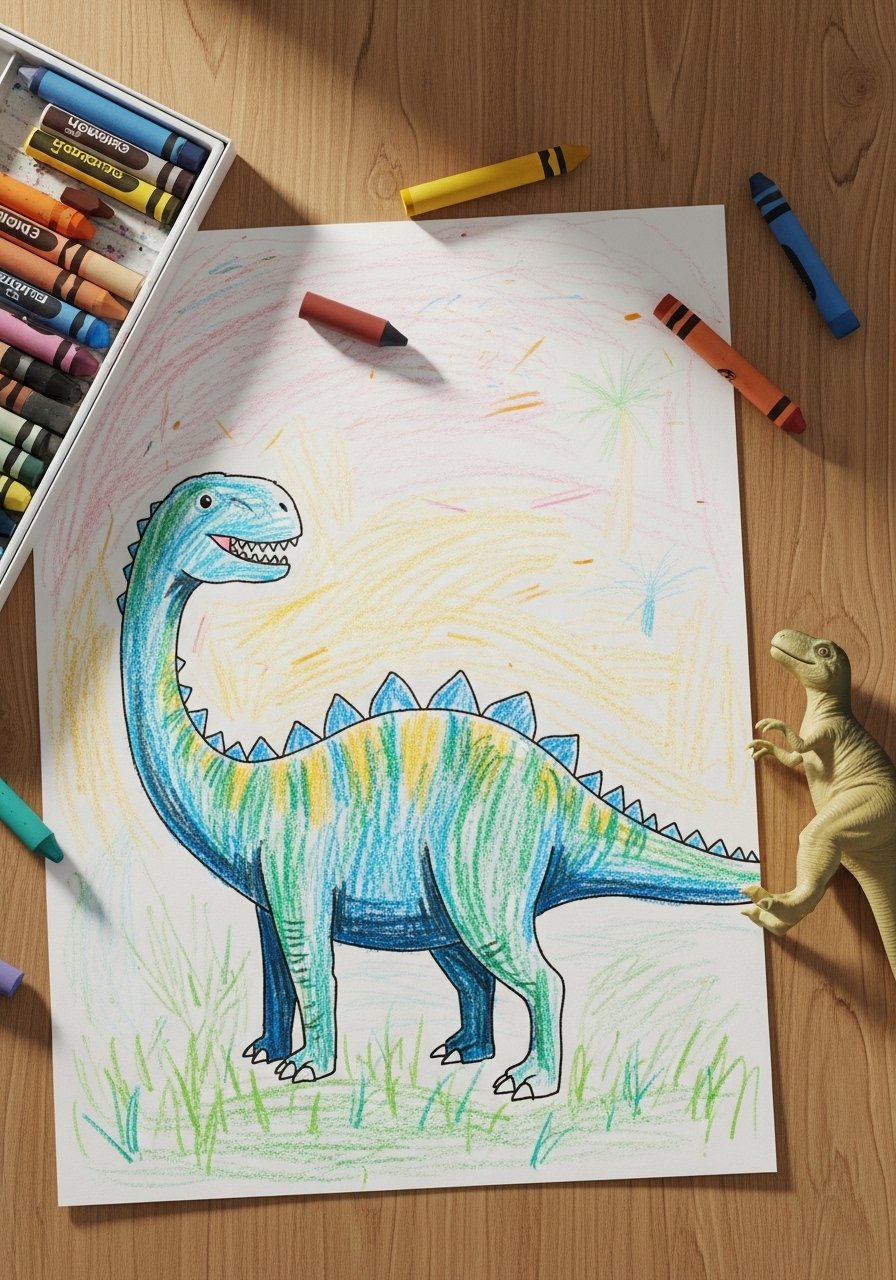
This dinosaur uses overlapping ovals to make an easy, cute body. It’s a great intro to proportion and playful patterns like spots and stripes. The textured crayon finish feels tactile and kid-friendly.
Materials
- White drawing paper, 8.5 x 11 in, 1 sheet
- Pencil, eraser
- Crayon box, 16 colors, 1 (crayons)
- Black crayon or crayon-pepper for outline
- Safety scissors (if making a cutout), 1
Instructions
- Draw a large oval for the body and a small oval for the head.
- Add a curved neck and stubby legs—use short, rounded rectangles.
- Sketch a tail and triangular back plates.
- Outline with a darker crayon to make shapes pop.
- Fill with bright crayon colors and add spots or stripes.
- If making a cutout, carefully cut around the dinosaur and glue it onto colored cardstock.
How to Display or Gift It
Create a mini dinosaur parade on a wall by sticking cutouts with washi tape. Bundle several drawings into a themed coloring book and tie with ribbon for gifting.
- Symmetry Butterfly Drawing (mirror fold)
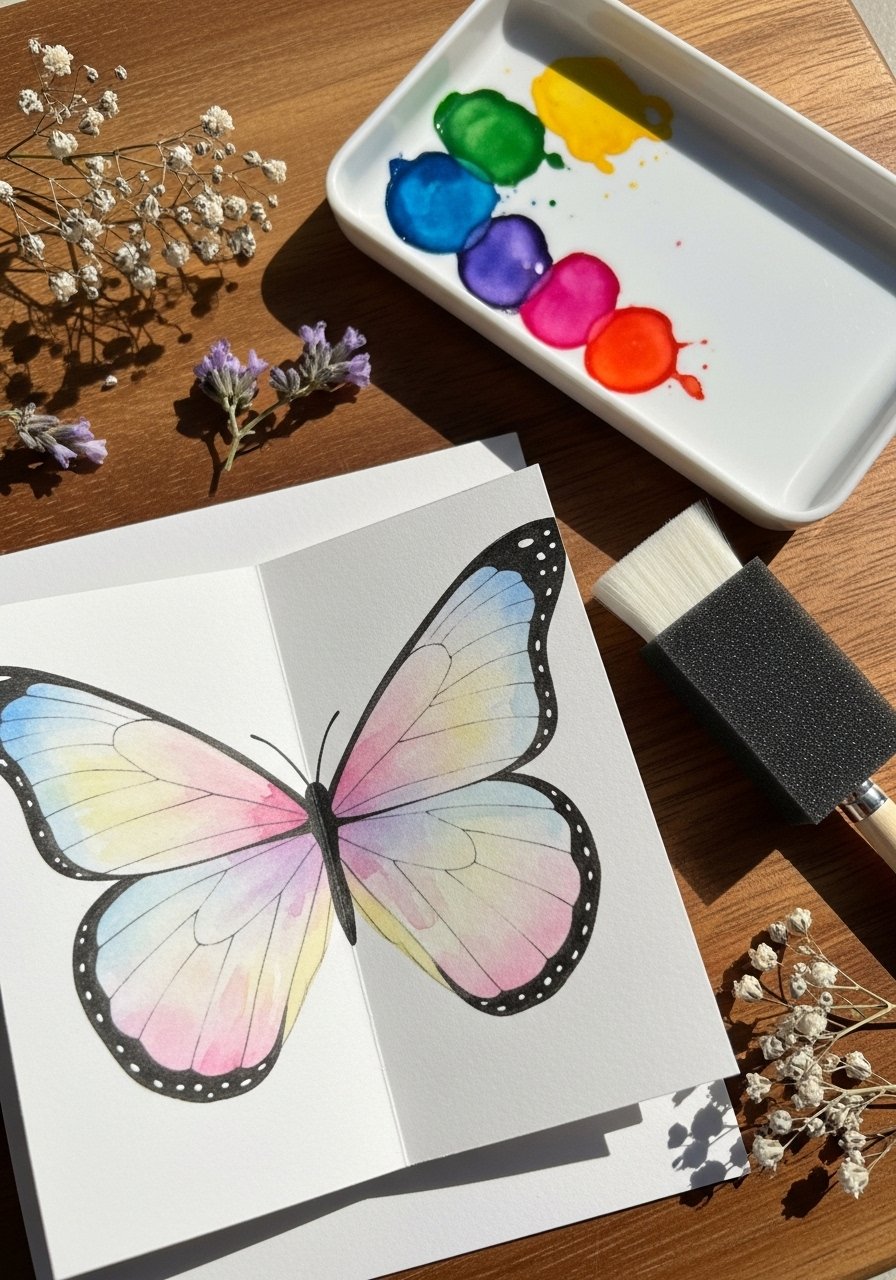
This project teaches symmetry using a fold-and-paint method—the result is perfectly matched wings every time. Kids love the surprise when they open the page. Finished butterflies look painterly and organic.
Materials
- Watercolor paper, folded to 5 x 7 in, 1 sheet
- Watercolor set, 1
- Round brush, size 4, 1
- Pencil and eraser
- Black fineliner, 0.3 mm, 1
- Paper towel
Instructions
- Fold the watercolor paper in half vertically. Lightly sketch half a butterfly on one side.
- Open the paper and paint the half-design with wet-on-wet watercolor in desired colors.
- Before paint dries, fold the paper back to press colors onto the other side.
- Open and let the paint dry 20–30 minutes.
- Once dry, outline the body and antennae with the fineliner.
- Add dots and details to wings for texture.
How to Display or Gift It
Cut out the butterfly and mount it on a thin wooden skewer for a plant topper. Make a garland of butterflies by stringing several together. Store flat while drying on a craft tray.
- Happy Sun with Rays
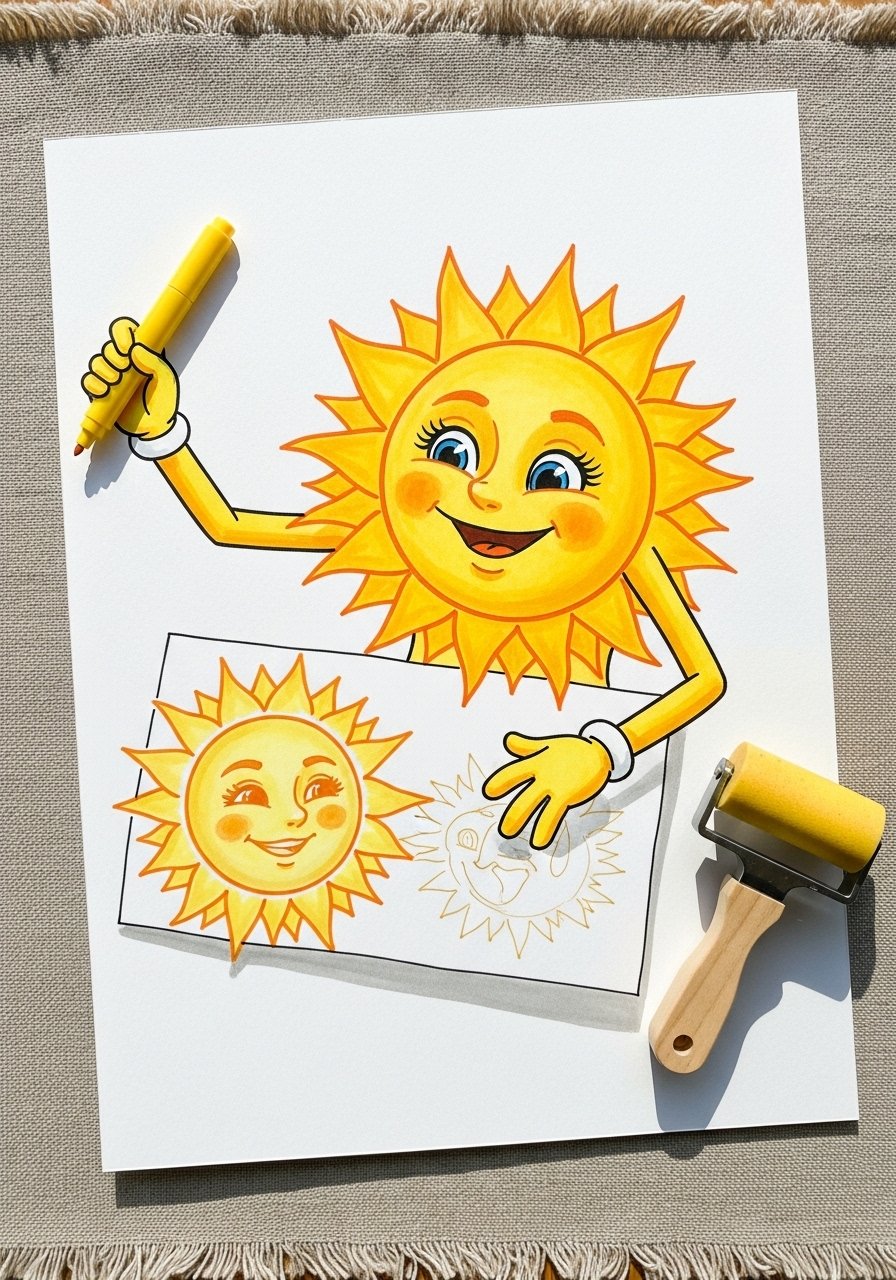
Teach kids about radiating lines and warm colors with this sun drawing. It’s fast, satisfying, and reinforces center-to-edge drawing. The warm wash gives a cozy cottagecore touch that pairs with nature-themed crafts.
Materials
- Heavy white cardstock, 8.5 x 11 in, 1 sheet
- Pencil and eraser
- Yellow and orange marker, 1 each (marker set)
- Watercolor pan (yellow), 1 small pan
- Round brush, size 6
Instructions
- Sketch a central circle roughly 3 in across.
- Draw long and short rays, alternating lengths around the circle.
- Outline with yellow marker and add facial features if desired.
- Lightly wash a thin layer of yellow watercolor across the sun for depth. Let dry 10–15 minutes.
- Add orange accents at ray bases for warmth.
- Erase visible pencil lines after paint dries.
How to Display or Gift It
Group several suns together for a seasonal weather chart. Mount on craft sticks and use as puppets for storytelling. Keep extras in a labeled cardstock folder.
- Monster Doodle with Shapes
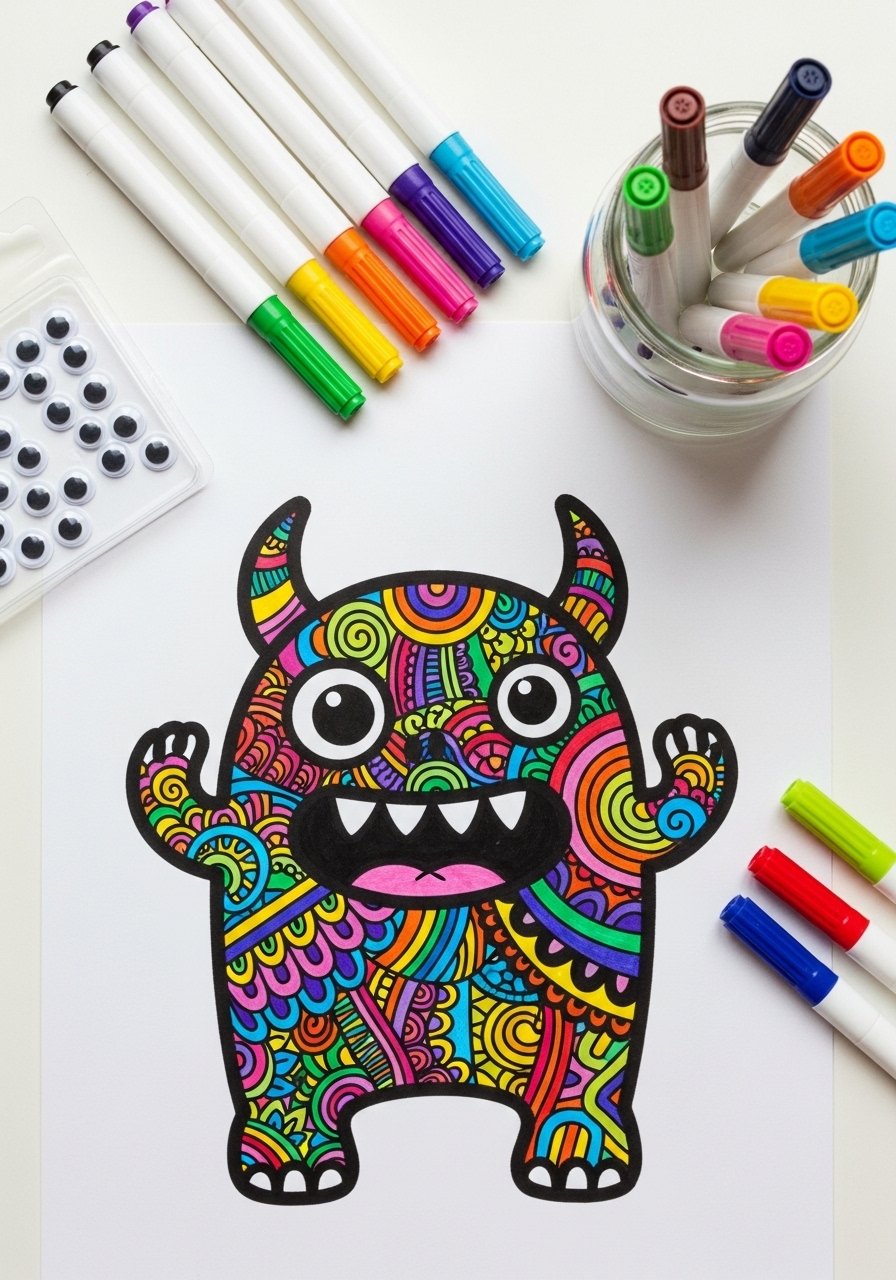
This monster lesson is all about imagination—kids combine circles, rectangles and zigzags to create friendly creatures. Patterning inside shapes teaches fine motor control and color choices.
Materials
- White drawing paper, 8.5 x 11 in, 1 sheet
- Pencil and eraser
- Washable marker set, 12 colors, 1 (washable markers)
- Googly eyes pack, 1 (optional)
- Glue stick, 1
Instructions
- Sketch a basic body from simple shapes—circles, ovals, rectangles.
- Add limbs, teeth, and eyes. Consider one big eye for a cyclops look.
- Outline with thick marker.
- Fill patterns inside the body—stripes, dots, zigzags.
- Glue on googly eyes if using; press firmly and let glue set 10 minutes.
- Add small background details like stars or a speech bubble.
How to Display or Gift It
Make a stack of monster postcards to send to family. Store completed doodles in a plastic sleeve binder to create a mini portfolio.
- Simple Landscape with Horizon
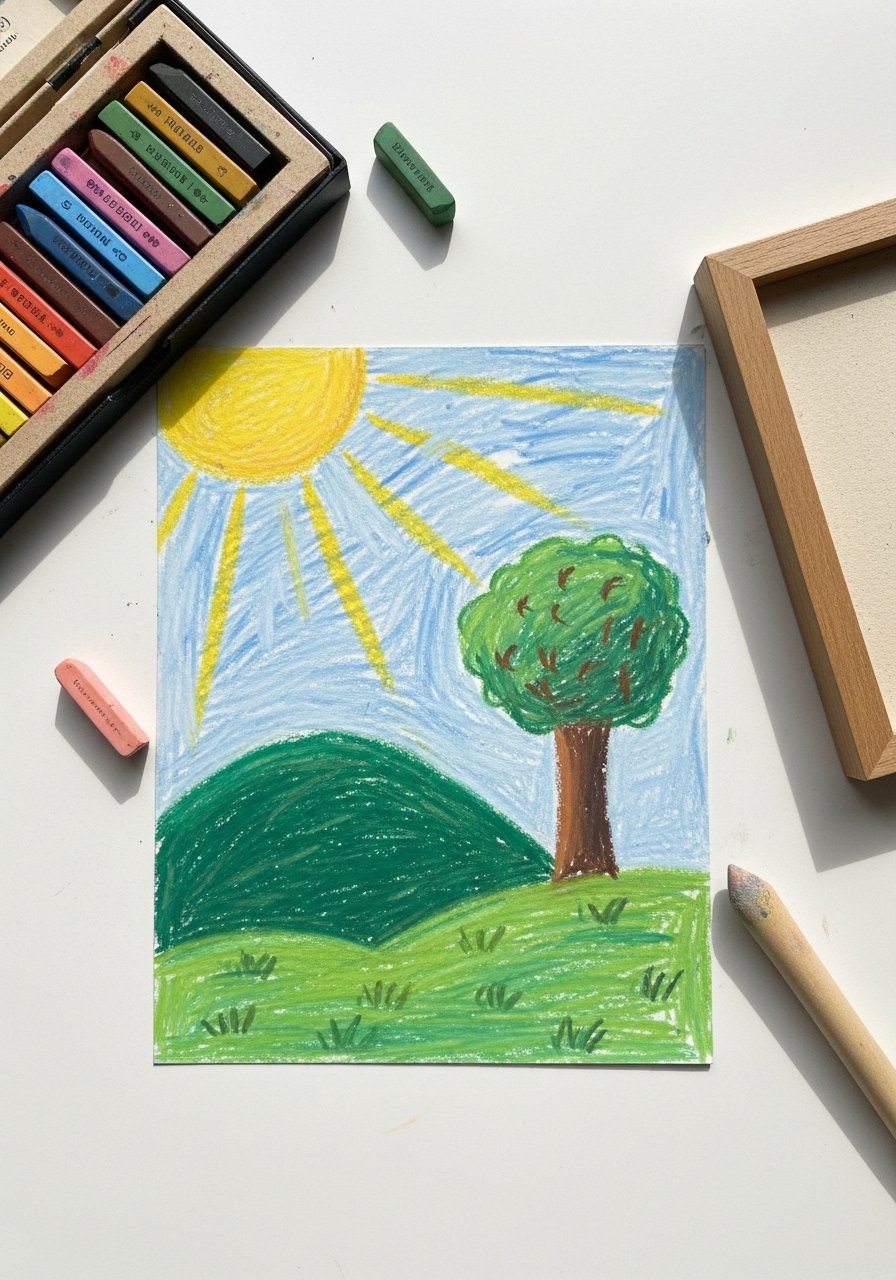
A basic horizon line opens up composition lessons—foreground, middleground, and background. This project is great for teaching scale: bigger objects feel closer. The pastels give a soft, cottagecore vibe.
Materials
- Textured drawing paper, 9 x 12 in, 1 sheet
- Pencil and eraser
- Soft pastel set, 12 colors, 1 (soft pastels)
- Blending stump, 1
- Fixative spray, 1 (adult use; spray outdoors)
Instructions
- Draw a horizon line across the page at about one-third from the bottom.
- Sketch a simple hill and a small tree in the foreground.
- Block in sky color with light pastel strokes.
- Add darker greens for the hill and brown for the trunk. Blend gently with the stump.
- Fix the pastel with a light coat of spray fixative outdoors; let cure 15 minutes.
- Add small details like birds or a pathway.
How to Display or Gift It
Frame under glass to keep pastels from smudging. Include a note about using fixative when gifting. Store flat between sheets of tracing paper in a portfolio.
- Cartoon Face Emotions (happy, sad, surprised)

This project teaches kids to express feelings visually—perfect for emotional learning. Simple shapes and expressive eyebrows make each face read clearly. The set looks great on a classroom feelings chart.
Materials
- Kraft paper or cardstock, 8 x 10 in, 3 small sheets
- Pencil and eraser
- Black marker, fine tip, 1 (fine tip marker)
- Color markers, 6 colors, 1 pack
- Hole punch and string (for a flip chart), 1 each
Instructions
- Draw three equal circles on separate papers for faces.
- Add eyes, mouth shapes, and eyebrows to convey happy, sad, and surprised looks.
- Outline with the black fine-tip marker.
- Color cheeks, hair, and backgrounds with the color markers.
- Punch a hole in the corner and string them into a flip chart.
- Use the faces during circle time to discuss feelings.
How to Display or Gift It
Hang the flip chart by a hook in the classroom or at home. Laminate each face for durability. Store extra blank faces in a binder for quick replacements.
- Cute Owl on a Branch

Owls are forgiving to draw—large eyes and rounded shapes mean quick success. This project uses texture marks for feathers and teaches layering with colored pencils. The finished drawing has a warm, rustic look that suits farmhouse or woodland themes.
Materials
- Cream drawing paper, 8.5 x 11 in, 1 sheet
- Pencil and eraser
- Colored pencil set, 24-count, 1 (colored pencil set)
- Black fineliner, 0.5 mm, 1
- Blending stump, 1
Instructions
- Draw an oval body and a slightly smaller oval for the head.
- Add two big round eyes and a triangle beak.
- Sketch wings and talons gripping a branch.
- Outline with the fineliner and erase stray pencil.
- Layer colored pencil strokes, using short strokes to suggest feathers. Blend gently.
- Add white highlights in the eye with the paper’s white or a gel pen.
How to Display or Gift It
Mount on kraft cardstock and tie with twine for a nature-themed gift card. Store flat in a portfolio or display on a small wooden easel.
- Bubble Letter Name Art
Bubble letters are fun and build lettering confidence. Kids learn letter spacing and pattern filling. The result is a bold, giftable piece—perfect for bedroom door signs or personalized bookmarks.
Materials
- White cardstock, 8.5 x 11 in, 1 sheet
- Pencil and eraser
- Ruler, 1
- Marker set, 12 colors, 1 (marker set)
- Black fineliner, 1
Instructions
- Lightly pencil the child’s name in block letters across the page.
- Thicken each letter into a bubble shape, keeping even spacing.
- Erase inner construction lines.
- Outline with the black fineliner.
- Fill each letter with a different pattern or color using markers.
- Add a shadow along one side to make letters pop.
How to Display or Gift It
Cut into strips to make personalized bookmarks. Laminate for durability and punch a hole to add ribbon. Store laminated bookmarks in a small gift box.
- Simple Tree Through Seasons (4-panel)
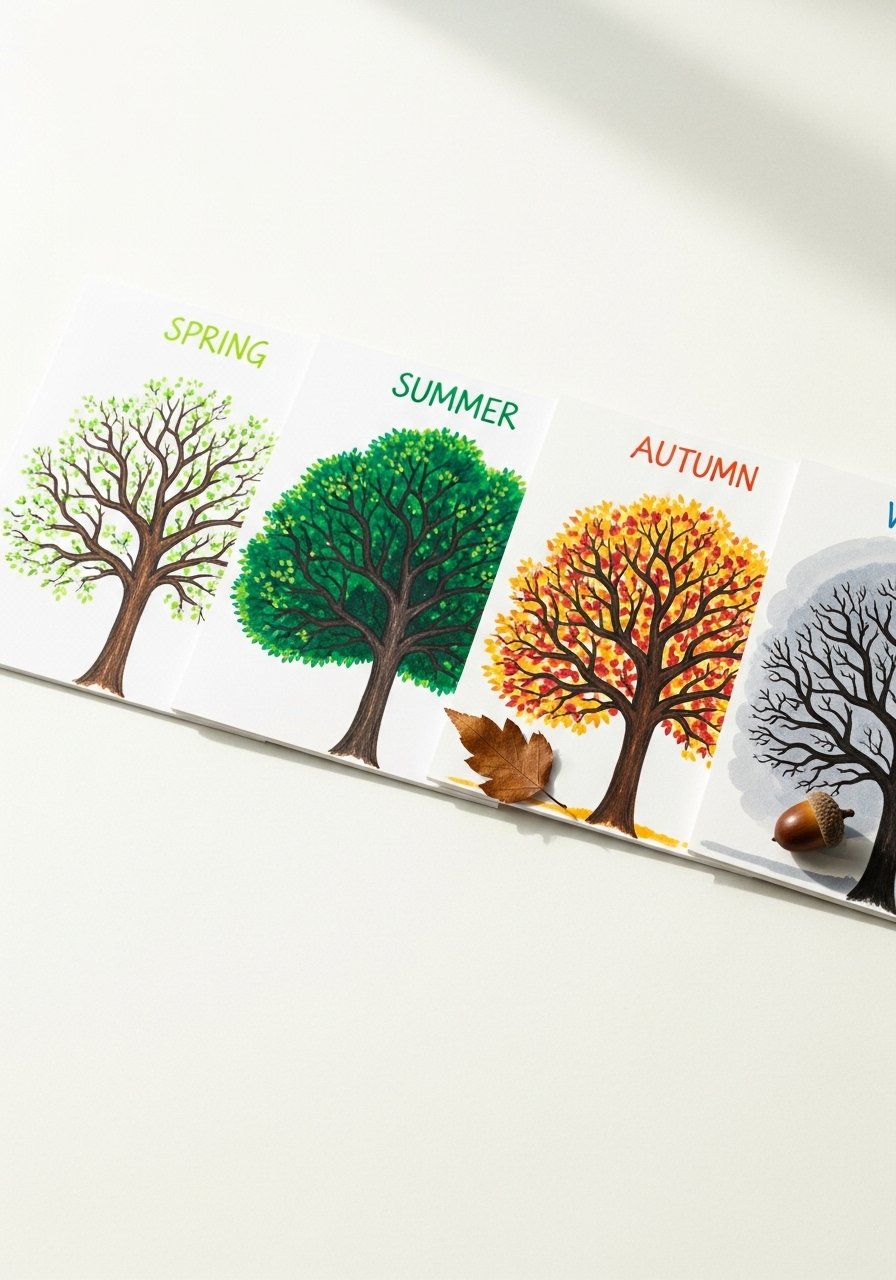
This four-panel project teaches observation: how the same subject changes over time. Kids practice color choices and simple texture techniques for leaves, blossoms, and snow.
Materials
- White sketch paper, cut into four 4 x 6 in panels, 4 panels
- Pencil and eraser
- Marker set or colored pencils, 1 set (colored pencil set)
- White gel pen for snow highlights, 1
Instructions
- Draw the same bare tree silhouette on all four panels.
- Add spring buds and pink blossoms on panel one.
- Fill panel two with lush green leaves for summer.
- Use warm oranges and reds for autumn leaves, letting some fall.
- For winter, add bare branches and soft snow dots with the white gel pen.
- Mount panels in a row on a longer strip of paper.
How to Display or Gift It
Create a seasonal wall strip for a child’s room or classroom. Place panels in a small multi-opening frame. Store loose panels in a plastic sleeve.
- Cartoon Robot with Boxes
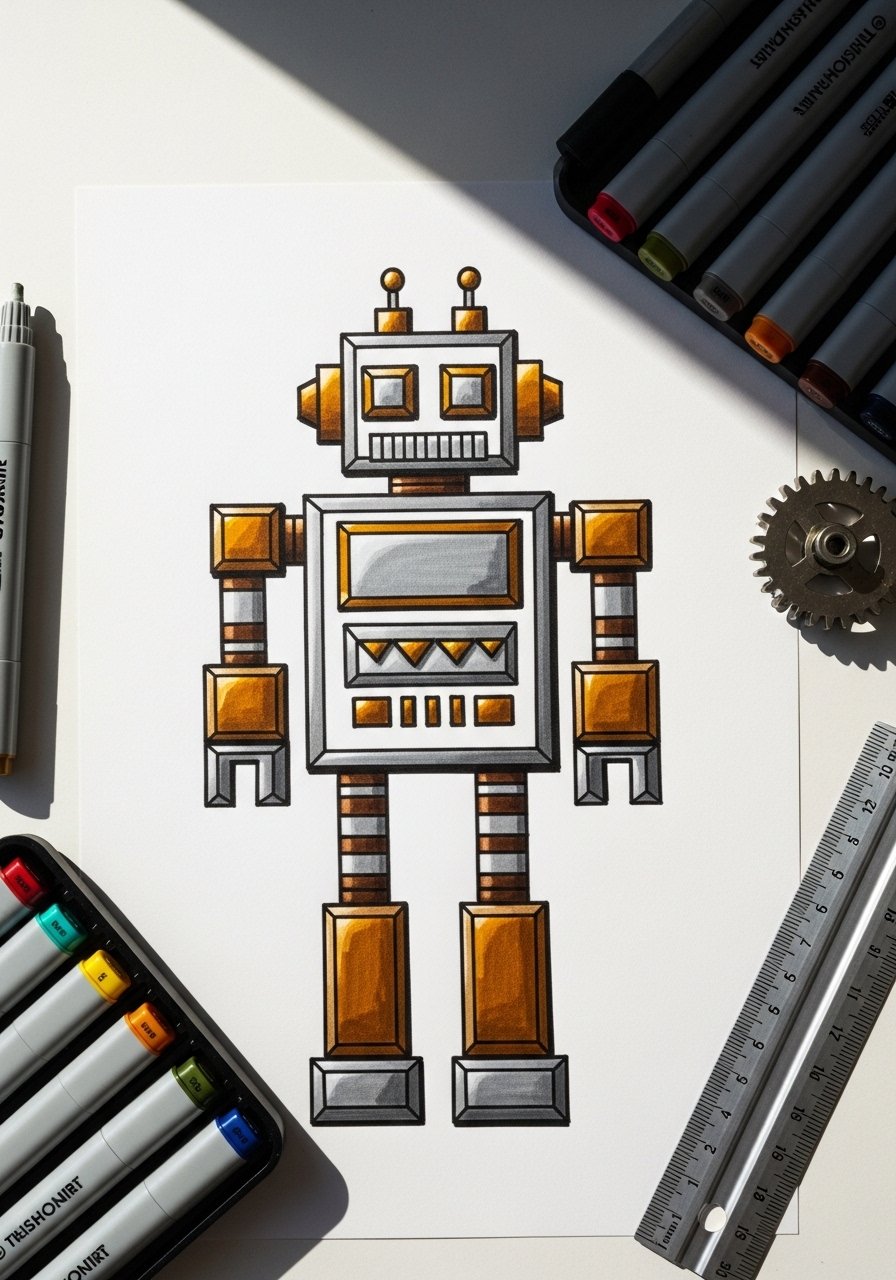
Robots are basically boxes with personality—this project teaches kids to combine rectangles and circles into a friendly machine. Metallic accents add an engineered feel.
Materials
- White cardstock, 8.5 x 11 in, 1 sheet
- Pencil and eraser
- Ruler, 1
- Metallic marker set, 1 (metallic markers)
- Black fineliner, 1
Instructions
- Draw a large rectangle for the body and a smaller one for the head.
- Add circular eyes, small antenna, and rectangular arms and legs.
- Use the ruler to keep edges straight.
- Outline with the black fineliner and erase pencil lines.
- Color with metallic markers for a shiny robot look.
- Add a control panel with buttons and dials.
How to Display or Gift It
Cut out the robot and mount it on a colored background for a framed print. Make a robot sticker sheet by attaching to adhesive paper.
- Starry Night Silhouette
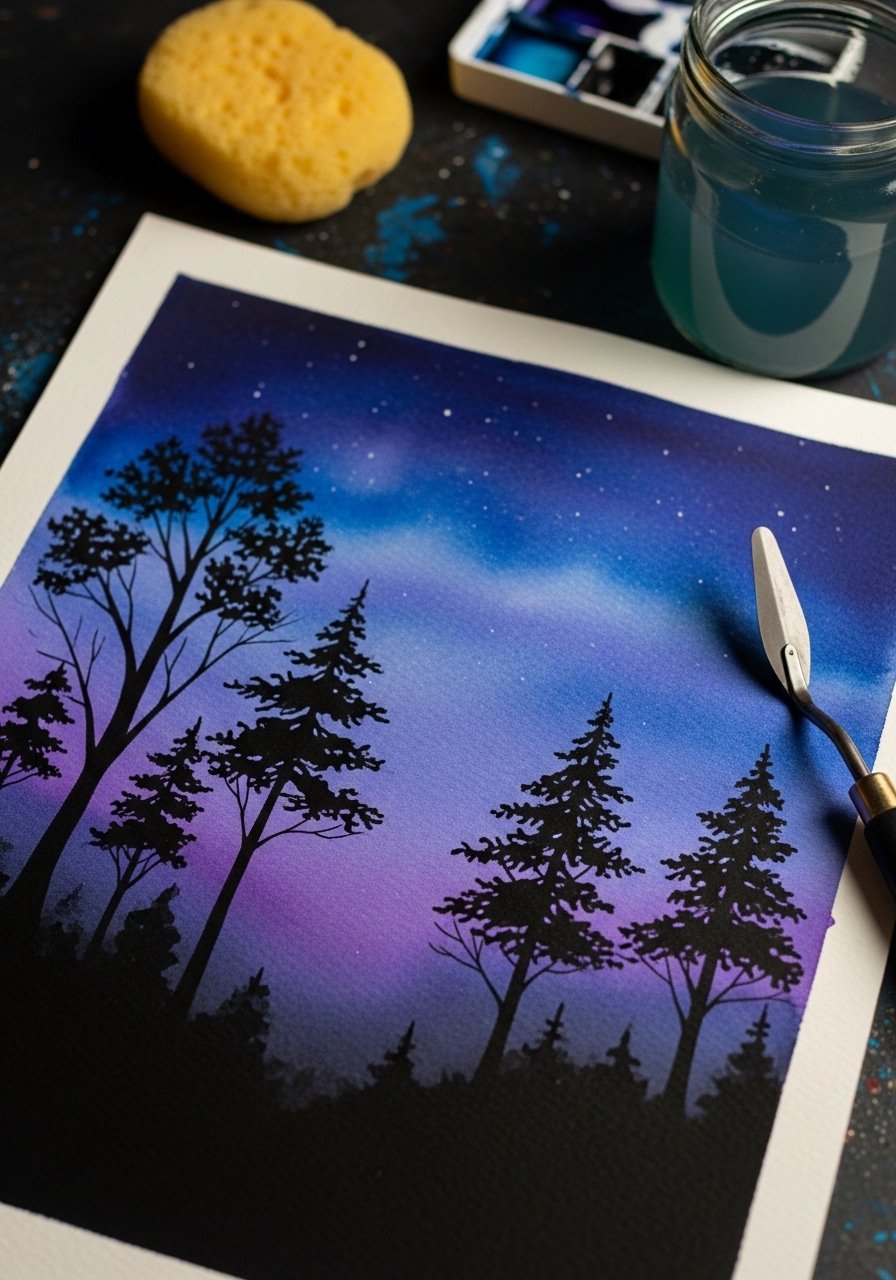
This silhouette project focuses on negative space—painting a blended evening sky then drawing dark silhouettes on top. It’s a nice introduction to mixing colors and contrast.
Materials
- Watercolor paper, 6 x 8 in, 1 sheet
- Watercolor set, 1
- Flat brush, size 8, 1
- Black watercolor or India ink, small amount
- Round brush, size 2 for silhouettes
Instructions
- Paint a wet wash across the paper blending blues, purples, and a hint of yellow near the horizon.
- Let the wash dry 20–30 minutes.
- With diluted black watercolor or ink, paint simple tree silhouettes or rooflines across the bottom.
- Use a small round brush for thin branches.
- Add tiny star dots with a lifted white gel pen once dry.
- Let final piece dry fully 30 minutes before handling.
How to Display or Gift It
Frame under glass for a striking night-sky print. Pair with a tiny LED battery light for a giftable shadowbox effect. Store framed pieces vertically.
- Friendly Penguin in a Scarf
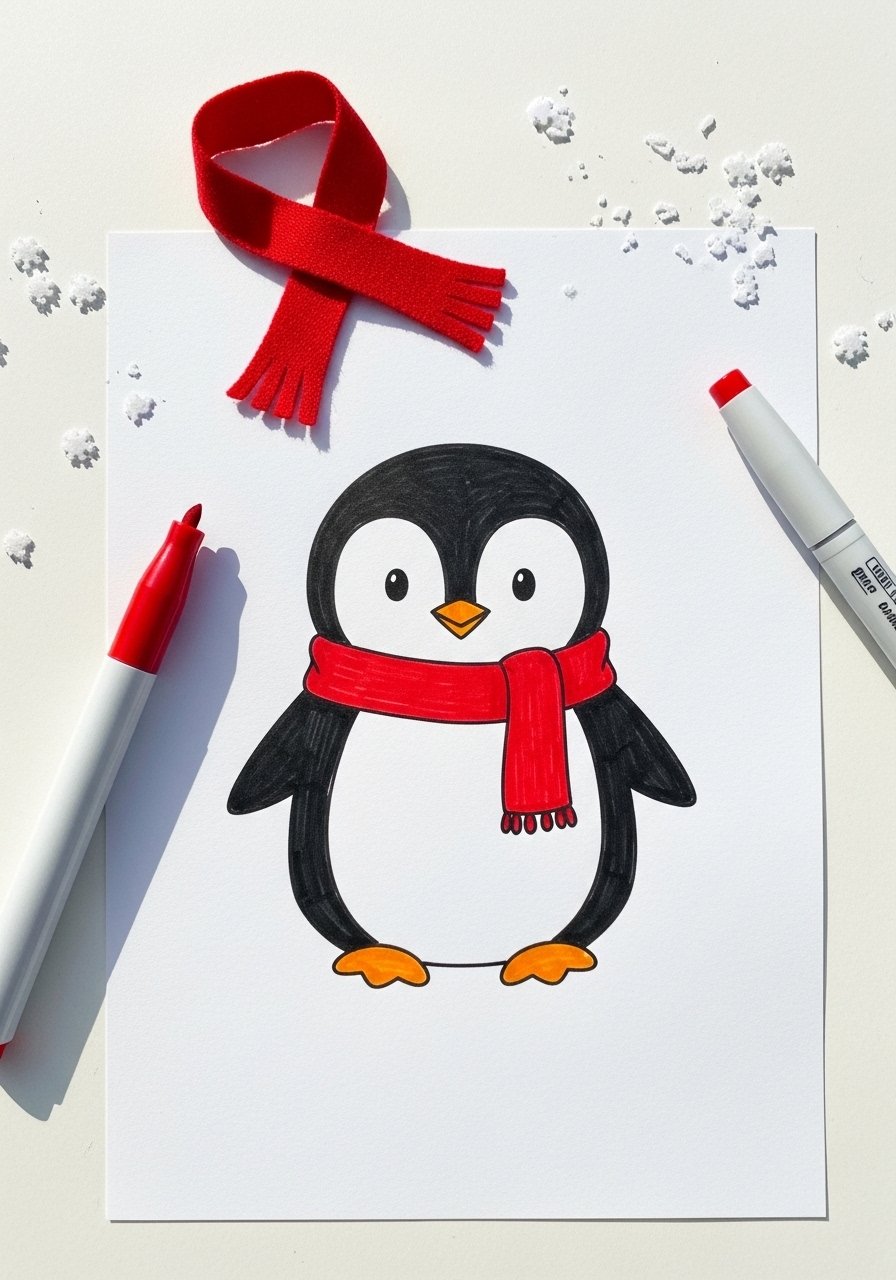
Penguins are simple to shape—rounded bodies and tiny wings make for quick success. Adding a scarf teaches patterning and color contrast. This project has a cozy winter vibe.
Materials
- White drawing paper, 8.5 x 11 in, 1 sheet
- Pencil and eraser
- Black marker, 1
- Red marker or colored pencil, 1
- White gel pen for highlights, 1
Instructions
- Sketch a rounded teardrop for the body and a small oval head.
- Add flipper shapes and short feet.
- Draw a scarf wrapped around the neck with ends hanging.
- Outline in black and erase pencil lines.
- Color the body, leave the belly white, and color the scarf in red with pattern stripes.
- Add white highlights on the eye and scarf tassels.
How to Display or Gift It
Make a set of penguin cards for winter greetings. Slide into a clear cellophane sleeve and tie with ribbon.
- Easy Flower Bouquet in a Vase
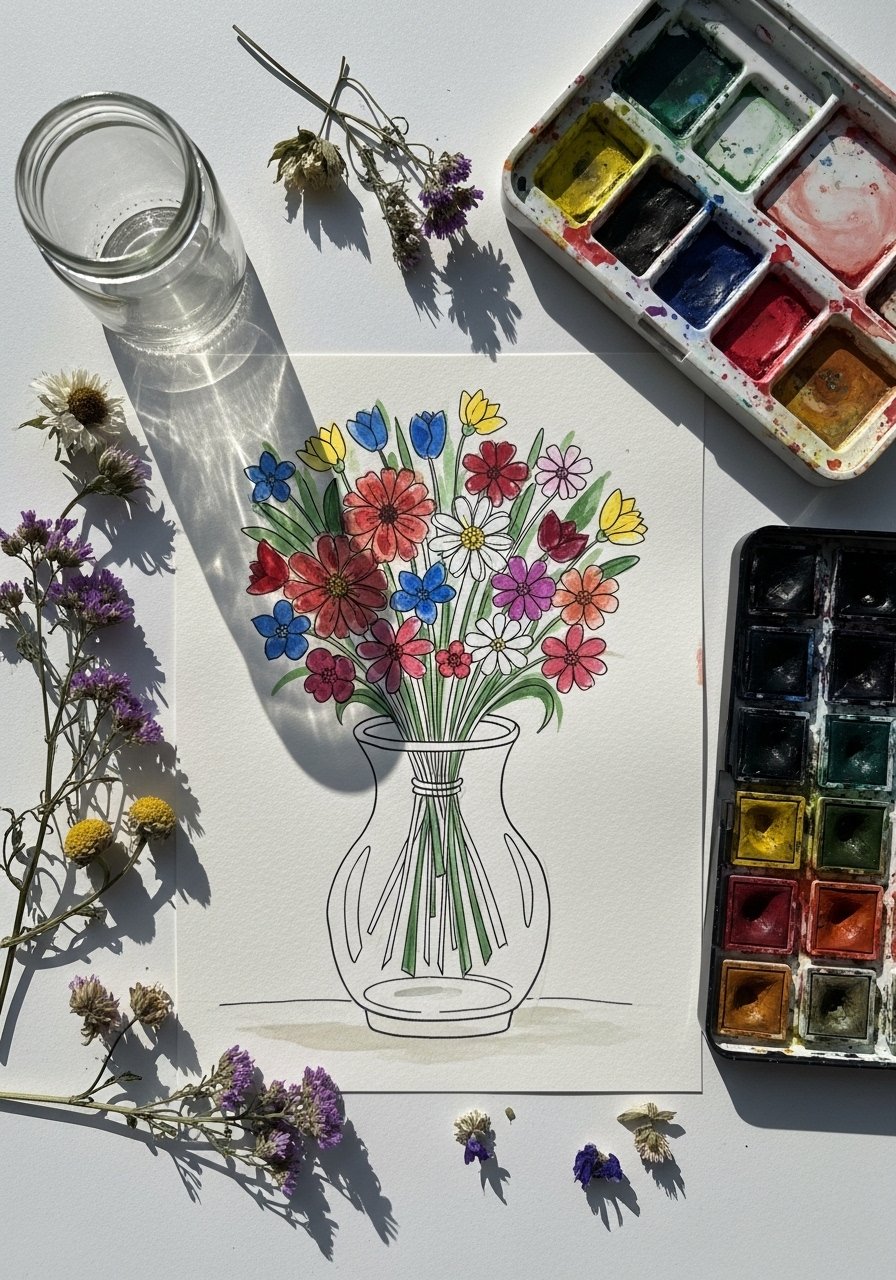
This bouquet lets kids practice shapes for petals and leaves, plus arranging elements in a vase. Watercolor gives a soft, boho finish. It’s great for gift cards or Mother’s Day crafts.
Materials
- Watercolor paper, 6 x 8 in, 1 sheet
- Watercolor set, 1
- Round brush, size 4, 1
- Black fineliner, 0.3 mm, 1
- Pencil and eraser
Instructions
- Lightly sketch a vase and loose flower shapes above it.
- Paint light washes for petals and stems. Let each color dry 10 minutes before layering.
- Once dry, outline stems and petal centers with the fineliner.
- Add small leaf shapes and color them in.
- Add a soft wash inside the vase to suggest glass.
- Let the painting dry completely 30 minutes.
How to Display or Gift It
Frame as a mini wall print or glue into a folded card. Wrap with tissue paper and a ribbon for gifting. Store in a flat portfolio while drying.
- Dino Egg Hatch (surprise reveal)
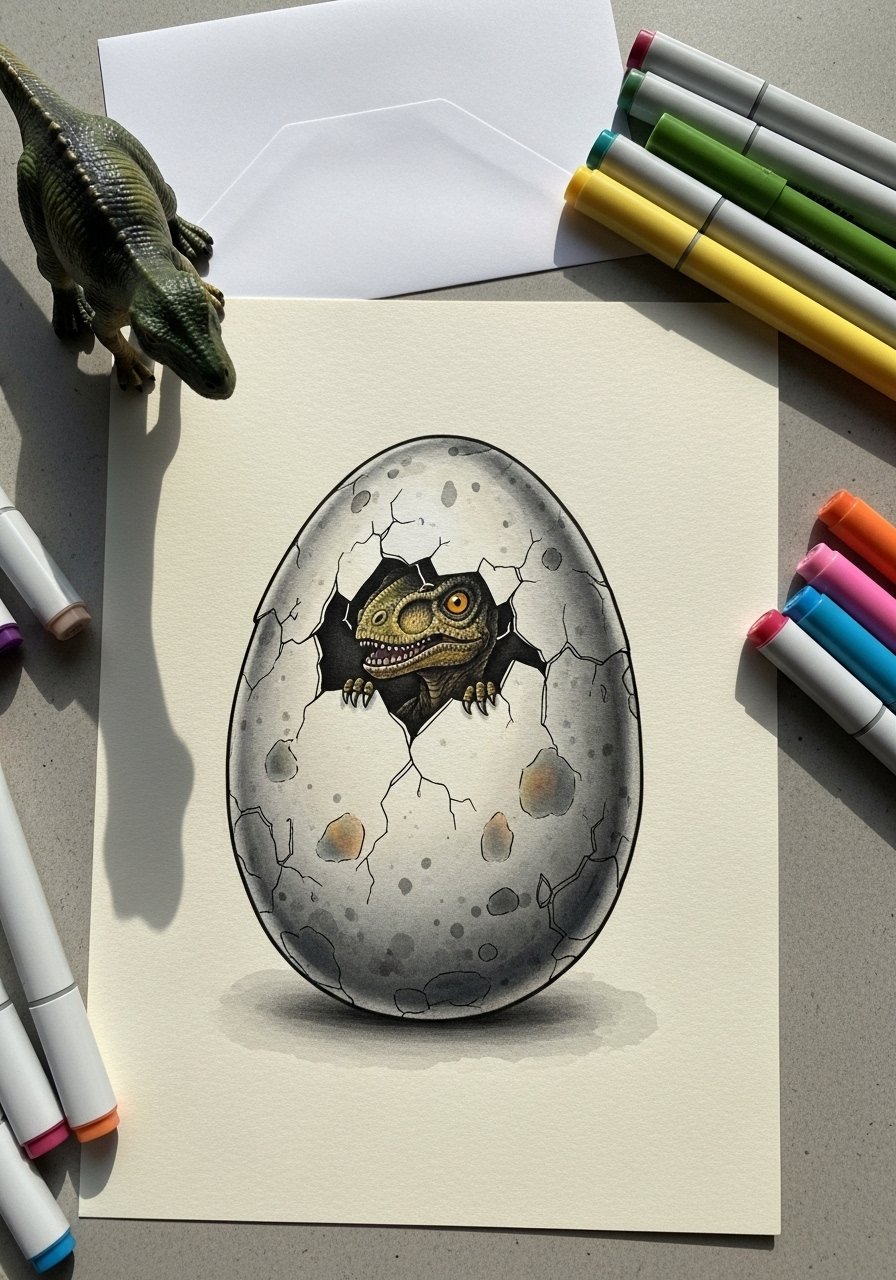
This project adds interactivity: draw an egg and a hidden hatchling. Kids fold the egg to reveal the dino for a theatrical reveal. It’s playful and great for storytelling.
Materials
- White cardstock, 8 x 8 in, 1 sheet (cut square)
- Pencil and eraser
- Marker set, 1
- Scissors, 1
- Glue stick (if making a layered reveal)
Instructions
- Fold the square cardstock in half to create a hinge.
- Sketch half an egg across the fold and a baby dino peeking beneath.
- Cut a zigzag hatch line on the top layer only, leaving the bottom layer intact.
- Color the egg shell and the baby dino.
- Reopen and close the card to practice the surprise reveal.
- Add a small caption like “Peek-a-boo!” if desired.
How to Display or Gift It
Use as a party invitation with space for date details inside. Make several and place in a decorated envelope for a special mailer.
- Leaf Rubbing Drawing
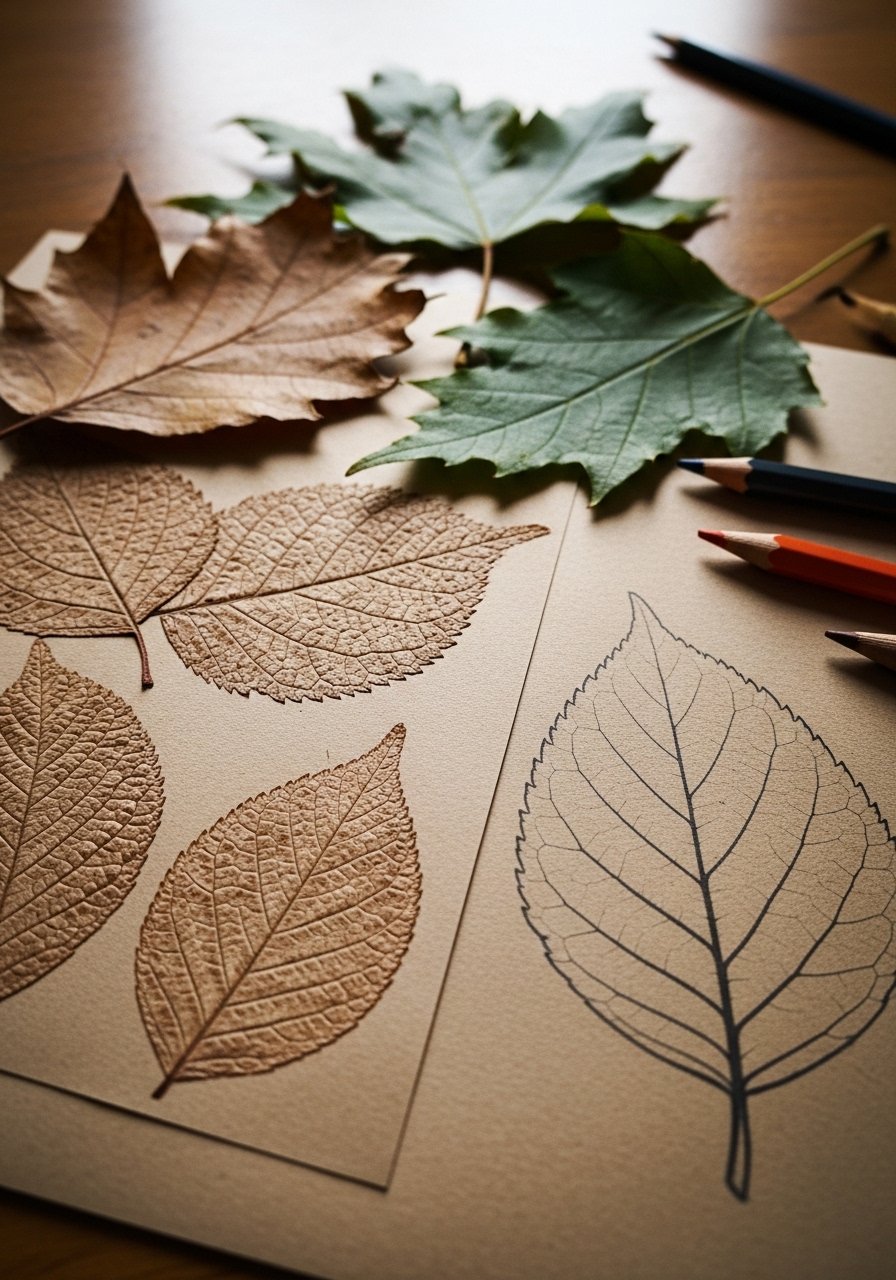
This project pairs nature collecting with drawing—kids make rubbings from real leaves then add details to turn textures into illustrations. It’s tactile and ties to outdoor learning.
Materials
- Kraft paper or thin paper, 9 x 12 in, 1 sheet
- Assorted leaves, 5–10 collected outside
- Crayons or colored pencils, 1 set (crayons)
- Pencil for outlines
Instructions
- Place a leaf vein-side-up under the paper.
- Rub sideways with a crayon or pencil to reveal texture.
- Repeat with different leaves and colors.
- Outline some leaf shapes and add stems.
- Turn one rubbing into a leaf monster or face for extra fun.
- Seal lightly with a fixative spray if using chalky pastels; let cure 15 minutes outdoors.
How to Display or Gift It
Make a nature journal by binding several rubbing pages together. Store collected leaves in a zip bag if you want to keep them.
- Patterned Heart for Cards

This patterned heart is perfect for cards and valentines. Kids fill the heart outline with zentangle-style patterns, working fine motors and creativity. The result is decorative and gift-ready.
Materials
- White cardstock, 8.5 x 11 in, 1 sheet
- Pencil and eraser
- Black fineliner set, assorted tips, 1 (fineliner set)
- Color markers (optional), 1 set
Instructions
- Lightly draw a large heart in the center of the paper.
- Divide the heart into sections with pencil lines.
- Fill each section with a repeating doodle pattern using the fineliner.
- Go over final lines and erase pencil lines.
- Add color with markers if desired.
- Trim and fold into a card or glue onto colored backing.
How to Display or Gift It
Slip into a kraft envelope and add tissue paper for a handmade valentine. Store extra finished cards in a card storage box.
- Simple Sea Turtle
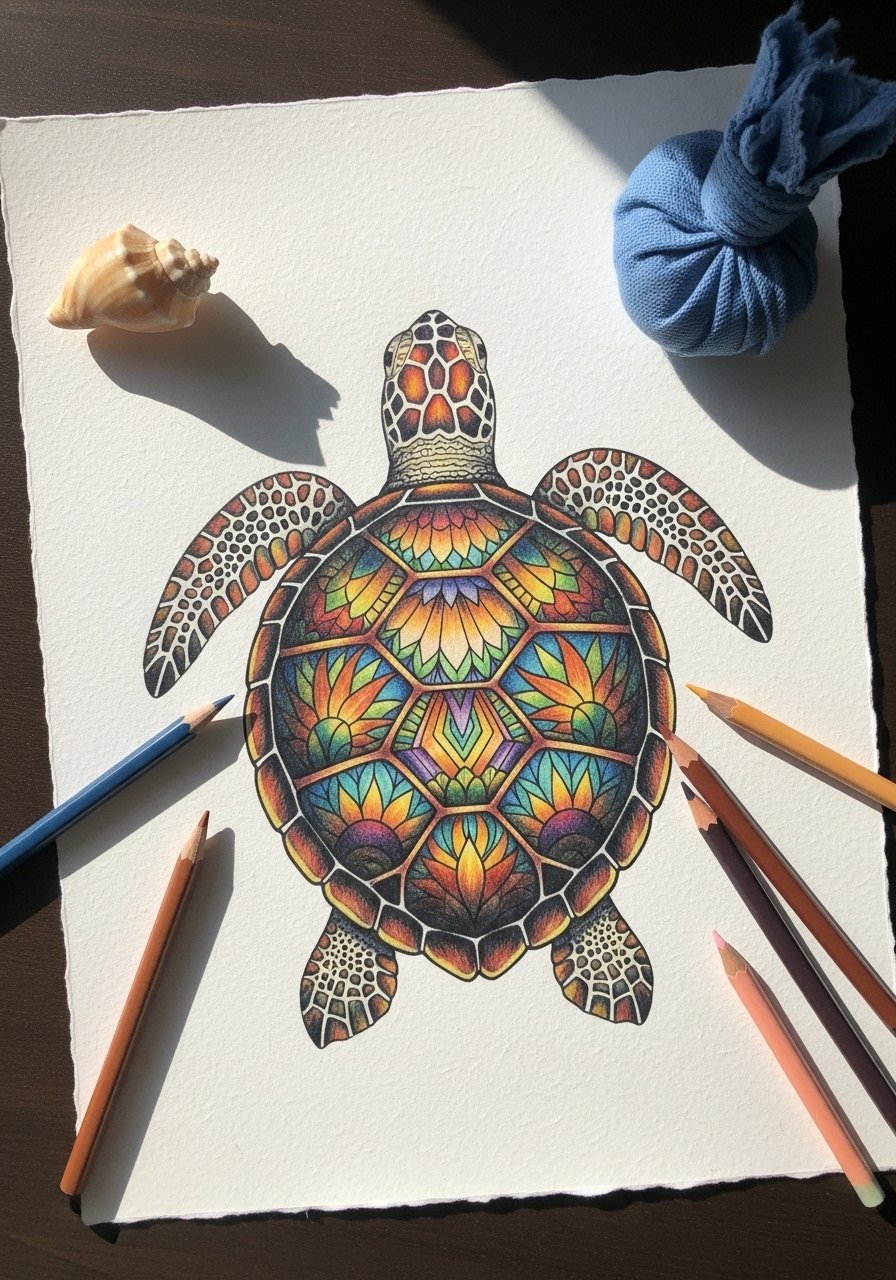
Turtles are built from ovals and circles—this project teaches kids shell patterning and gentle shading for roundness. The finished look feels calm and coastal.
Materials
- Textured drawing paper, 8.5 x 11 in, 1 sheet
- Pencil and eraser
- Colored pencil set, 1
- Black fineliner, 1
Instructions
- Draw a large oval for the shell and a smaller head oval.
- Add four flippers and a tail.
- Divide the shell into hexagonal panels.
- Outline and color each panel with different greens and blues.
- Use gentle circular strokes to shade flippers for depth.
- Add white highlights with the paper or gel pen.
How to Display or Gift It
Mount on blue cardstock and gift as a bookmark. Make a set with other sea creatures for a themed collection.
- Balloon Bouquet (perspective practice)
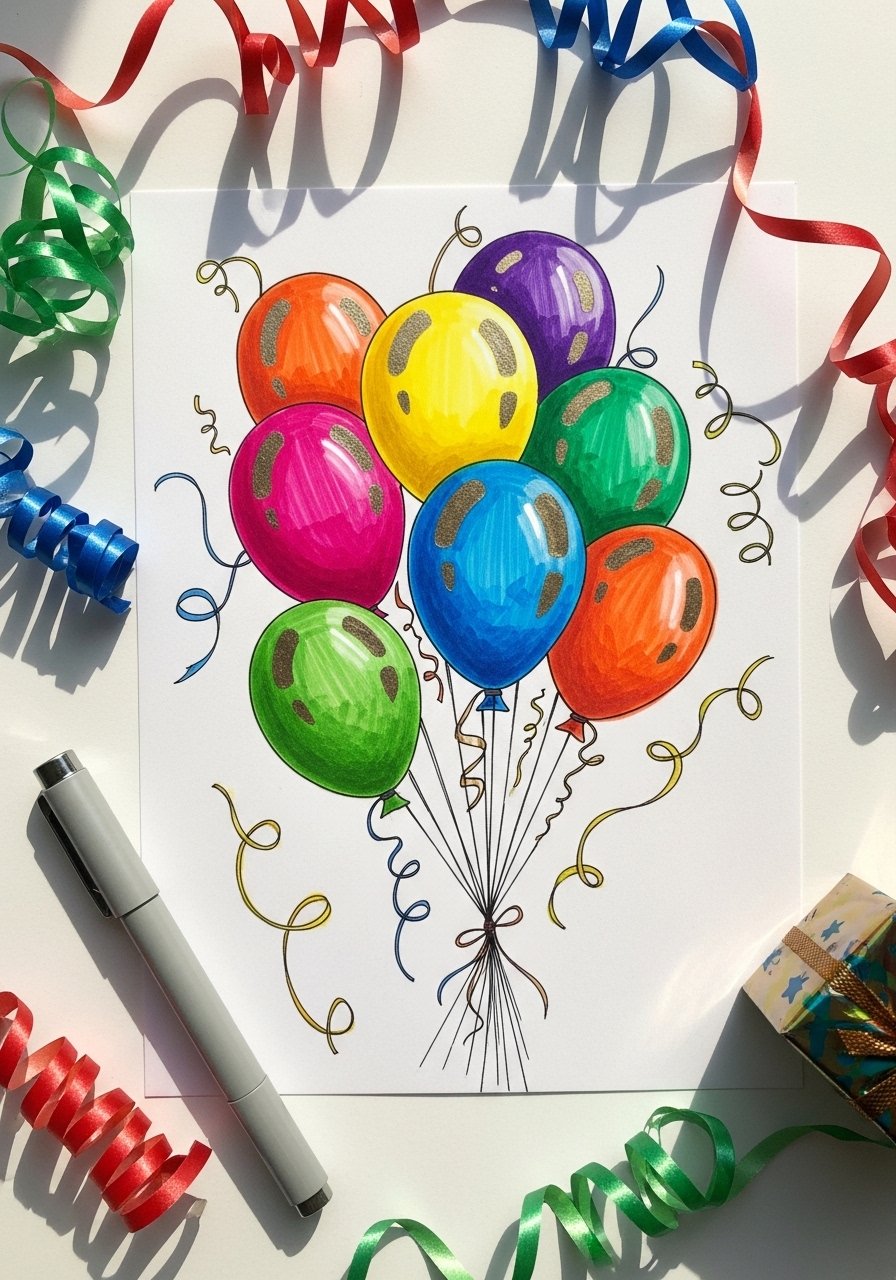
Drawing overlapping balloons helps kids understand simple perspective—front balloons overlap back ones. It’s festive and makes great party decorations.
Materials
- White cardstock, 8.5 x 11 in, 1 sheet
- Pencil and eraser
- Marker set, 1
- Metallic marker for ribbon lines, 1
- Scissors (if cutting out), 1
Instructions
- Draw several balloon shapes that overlap slightly.
- Add small highlight ovals on each balloon.
- Draw tied ends and flowing ribbons.
- Outline with markers and color in bright shades.
- Use a metallic marker for ribbon shine.
- Cut out and attach strings to a paper weight for a table decoration.
How to Display or Gift It
Cluster several cutout balloons into a centerpiece or attach to gift envelopes. Store flat in a craft organizer until ready.
- Fox Face from Triangles
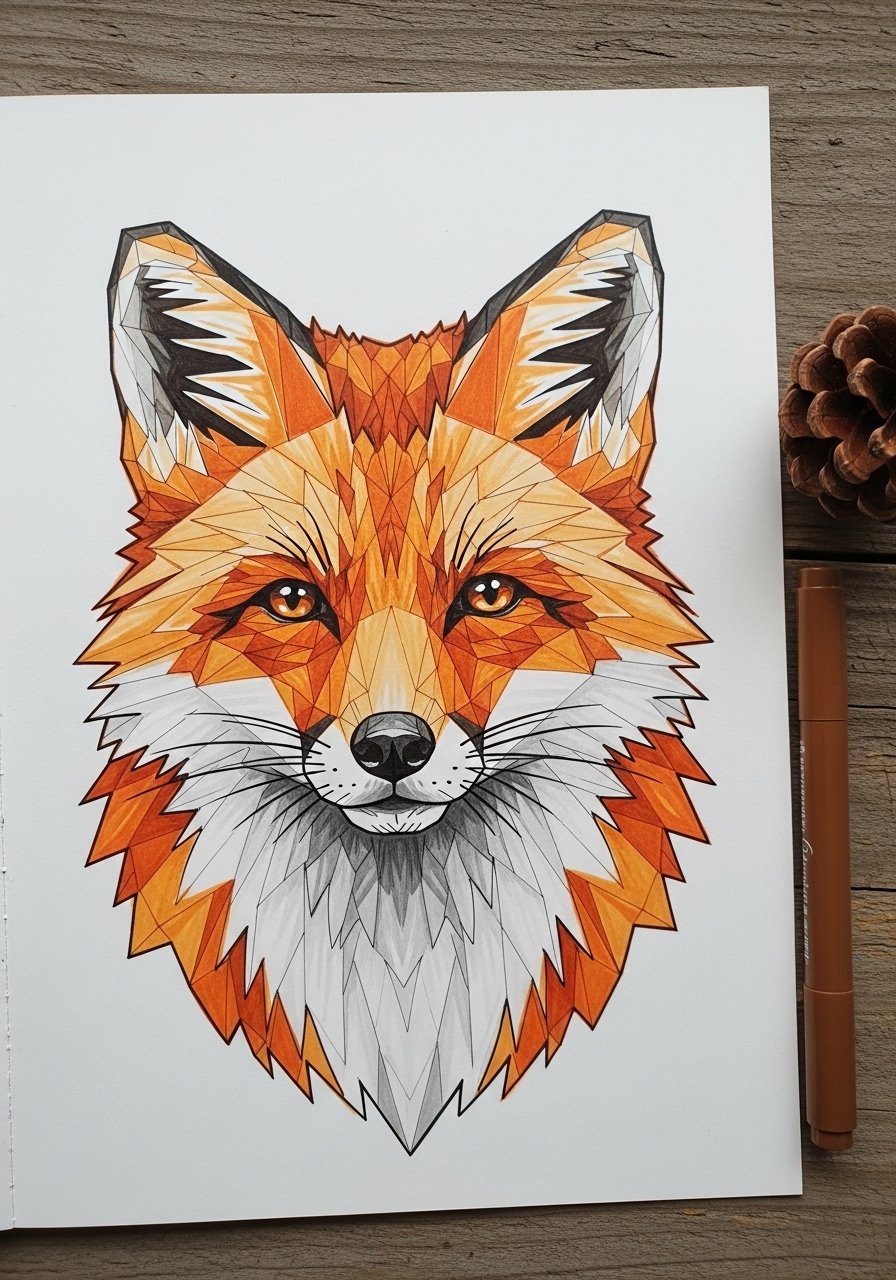
This fox uses triangles and negatives to suggest a pointed snout and ears. The warm orange colors suit autumn or woodland themes and teach shape-based drawing.
Materials
- White drawing paper, 8.5 x 11 in, 1 sheet
- Pencil and eraser
- Orange marker or colored pencil, 1
- Black fineliner, 1
- White gel pen for highlights, 1
Instructions
- Draw a large triangle for the face and smaller triangles for ears.
- Add a diamond-shaped nose and almond eyes.
- Sketch cheek fur lines and an inner ear shape.
- Outline with the fineliner and erase pencil lines.
- Fill with orange hues and add white patches on the cheeks and chest.
- Finish with white highlights in the eyes.
How to Display or Gift It
Turn into bookmarks or gift tags by cutting out the fox shape. Store cutouts in a small envelope for later use.
- Step-by-Step — drawing ideas for kids step by step: Magic Mandala
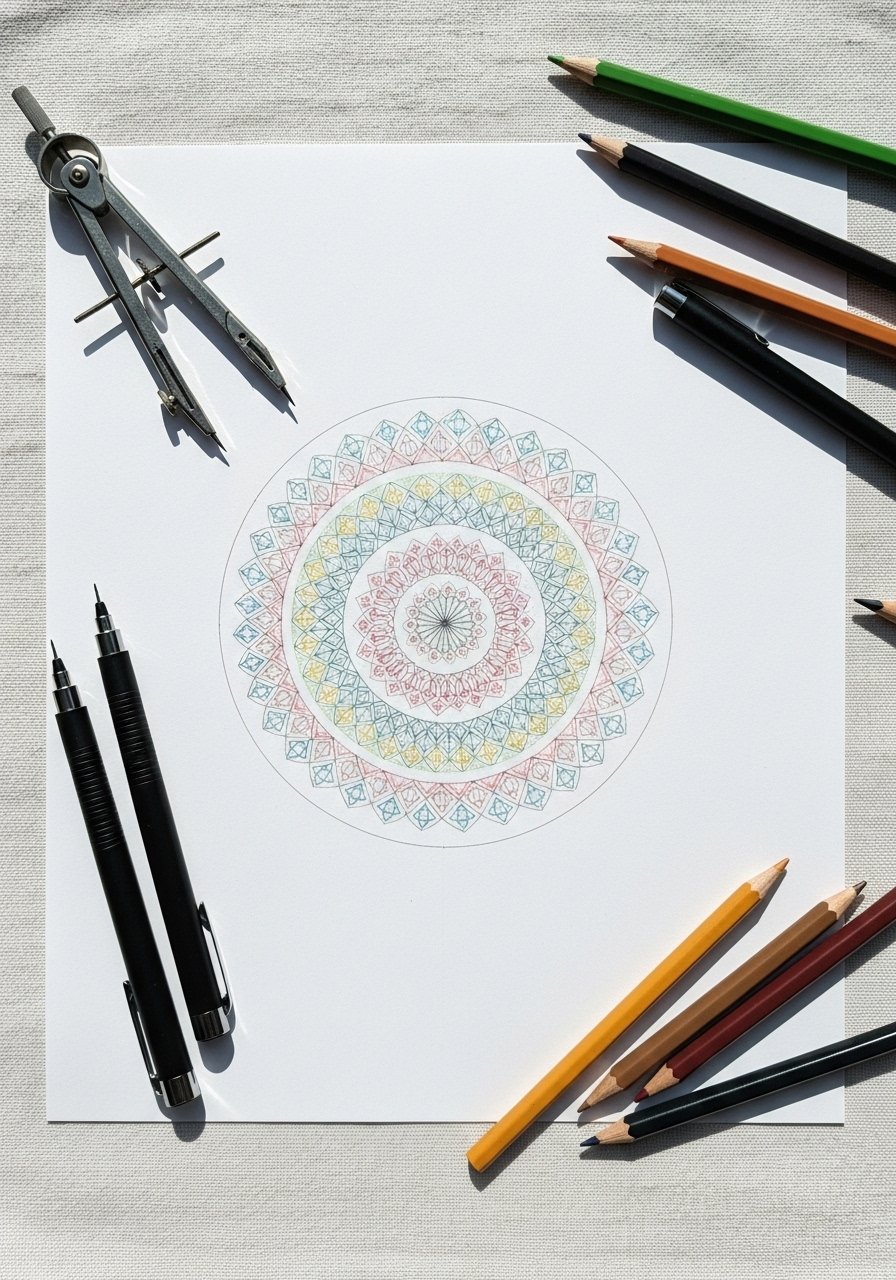
This final project is a calm, pattern-focused mandala that uses repetition and measurement. It’s listed under drawing ideas for kids step by step because the mandala is built ring by ring. The repetitive marks teach focus and rhythm—kids of elementary age will love the meditative process.
Materials
- White drawing paper, 8.5 x 11 in, 1 sheet
- Compass or circular templates, 1 set (compass set)
- Pencil and eraser
- Ruler, 1
- Fineliner pens set, assorted tips, 1 (fineliner set)
- Colored pencil set, 1
Instructions
- Use the compass to draw three to five concentric circles centered on the page.
- Divide the circles into equal wedges with light pencil lines (use the ruler).
- In each ring, draw repeating shapes—petals, dots, tiny hearts—working wedge by wedge.
- Once design is complete, outline with fineliner pens.
- Erase pencil guidelines gently.
- Color each ring with colored pencils, keeping a balanced palette.
How to Display or Gift It
Frame the mandala for a calming bedroom print. Make a set of small mandalas as gift tags. Store unfinished mandalas flat in a portfolio sleeve.
Thank you for sticking with every step—24 ways to turn a blank page into something joyful. These drawing ideas for kids step by step cover simple shapes, patterns, watercolors, and a few surprise techniques that build skills and confidence. Pin this guide so you can pull out a project anytime—rainy day, after-school craft, or party activity.
Which project are you trying first? Share a photo with a friend or tuck a few finished drawings into a handmade card for someone who’d love a personal surprise. And if you pick just one tool to keep on hand, a good set of colored pencils and a pack of fineliner pens will make almost every one of these projects easier and more fun.


