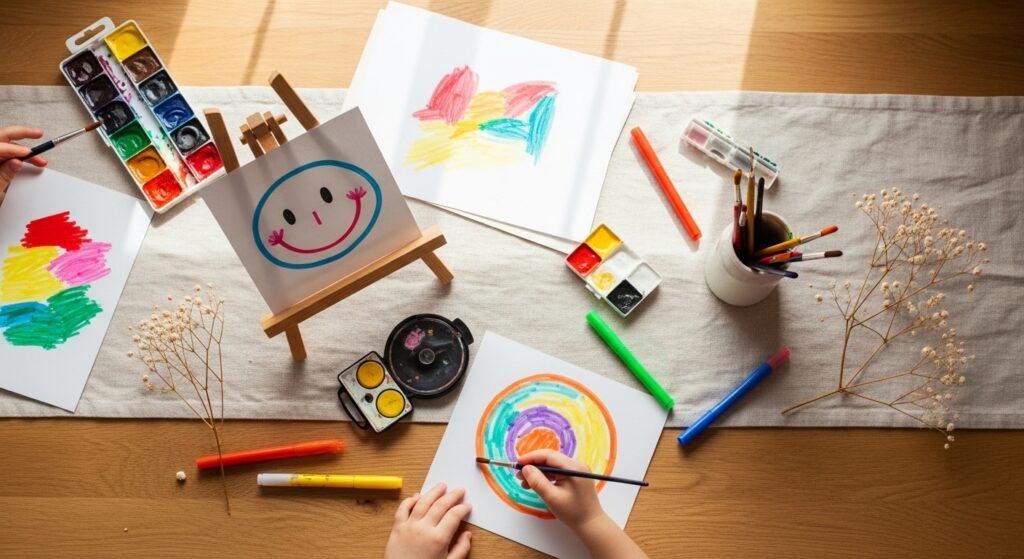
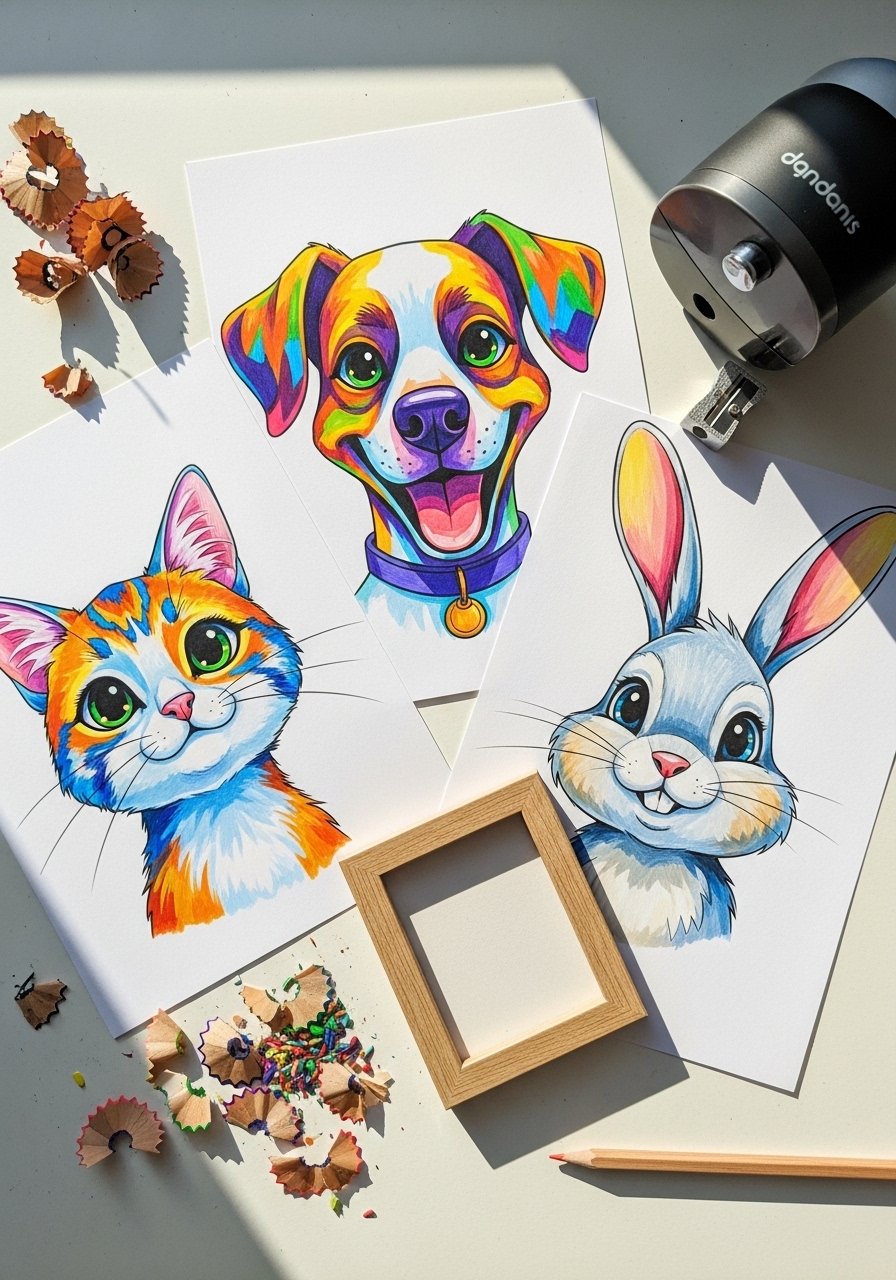
Bring out the crayons and set up a little art station—these 22 cute drawing ideas for kids are perfect when you want something colorful, simple, and delightfully fun. Whether you’re crafting rainy-day activities or quick handmade gifts, each project is designed for small hands, bold imaginations, and satisfying results that look great on the fridge.
You’ll find everything from fingerprint animals and simple kawaii food sketches to easy crayon-resist paintings and mixed-media doodle frames. Each project includes a clear materials list with exact quantities, step-by-step instructions with drying and prep times, and styling or gifting tips. I often prep projects using a Cricut Joy cutting machine for quick paper shapes, and keep a low-temp hot glue gun on hand for mixed-media pieces. These little helpers save time and make things neater—especially when a toddler is ready for round two.
Ready to make some adorable art? Grab markers, paper, and a cup of patience—let’s go through 22 ideas that spark smiles and creative confidence.
- Friendly Fingerprint Forest
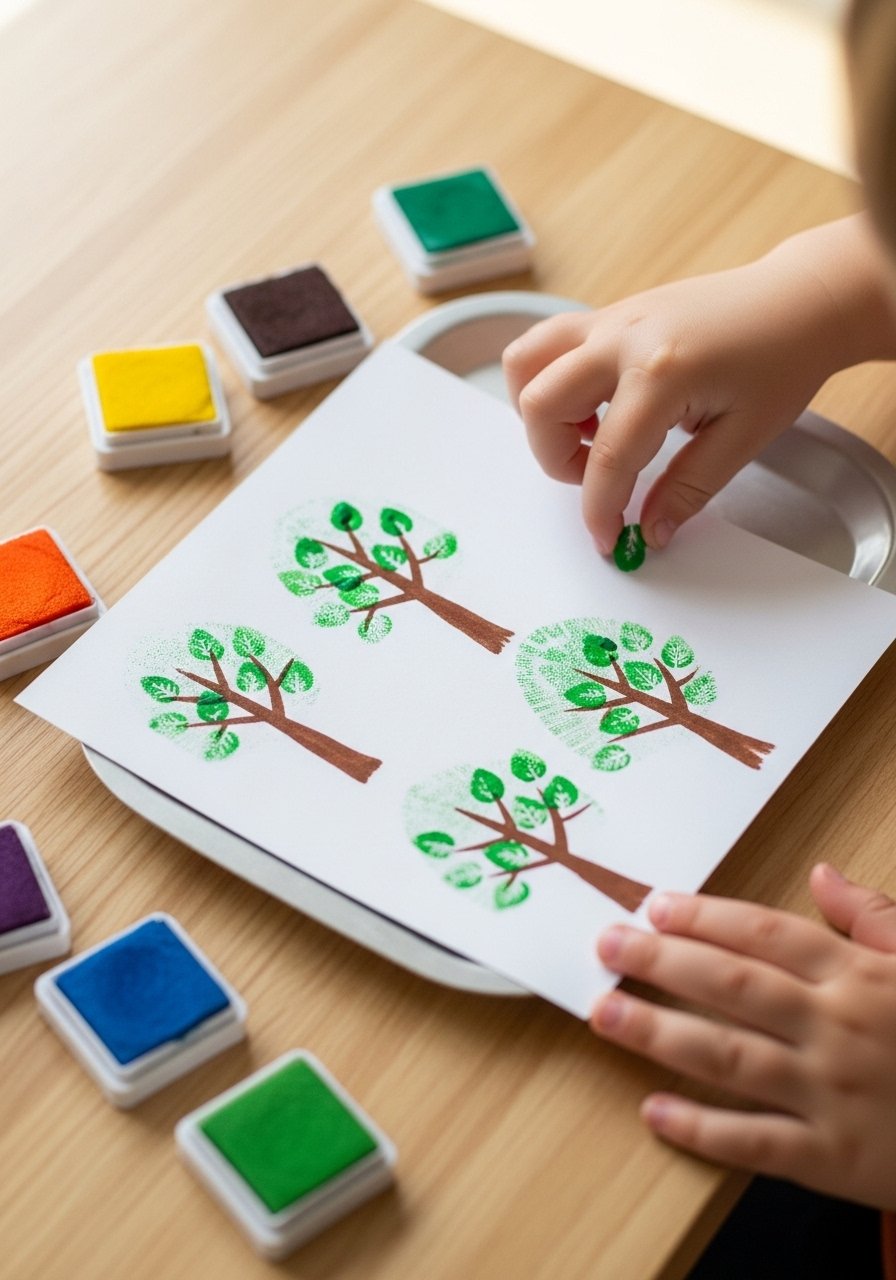
This project turns tiny fingerprints into a cozy forest of trees and critters. It’s tactile, quick to dry, and perfect for toddlers practicing fine motor skills. Finished pieces feel textured and playful, great for creating a set of mini cards.
Materials
- 8 sheets white cardstock, 110 lb (8.5 x 11")
- Washable ink pad set, small size (set of 6 colors)
- Brown fine-tipped marker, 0.3 mm
- Green and yellow washable markers, 2 each
- Pencil and eraser
- Ruler (12")
- Small baby wipes for cleanup
Instructions
- Prep: Cut cardstock into quarters for 4 mini canvases each. Prep ink pads within reach. (Prep time: 5 minutes.)
- Lightly sketch a horizon line and simple trunks with pencil.
- Press child’s finger into green or yellow ink, then gently stamp to form leaf clusters. Repeat to create tree canopies.
- Use the brown marker to draw trunks beneath the fingerprints and add simple roots.
- Add tiny fingerprint animals (bears, owls) with darker ink and use the fine-tipped marker for faces.
- Erase remaining pencil marks after ink dries (10–15 minutes).
- Sign each mini-card with a small name and date.
How to Display or Gift It
Frame a few mini-cards on a small wooden easel for a nursery shelf. Bundle four into a kraft-paper envelope and tie with twine for a sweet gift. Store unused cards flat in a stackable craft organizer tray until you’re ready to assemble.
- Kawaii Food Doodles (cute drawing ideas for kids)
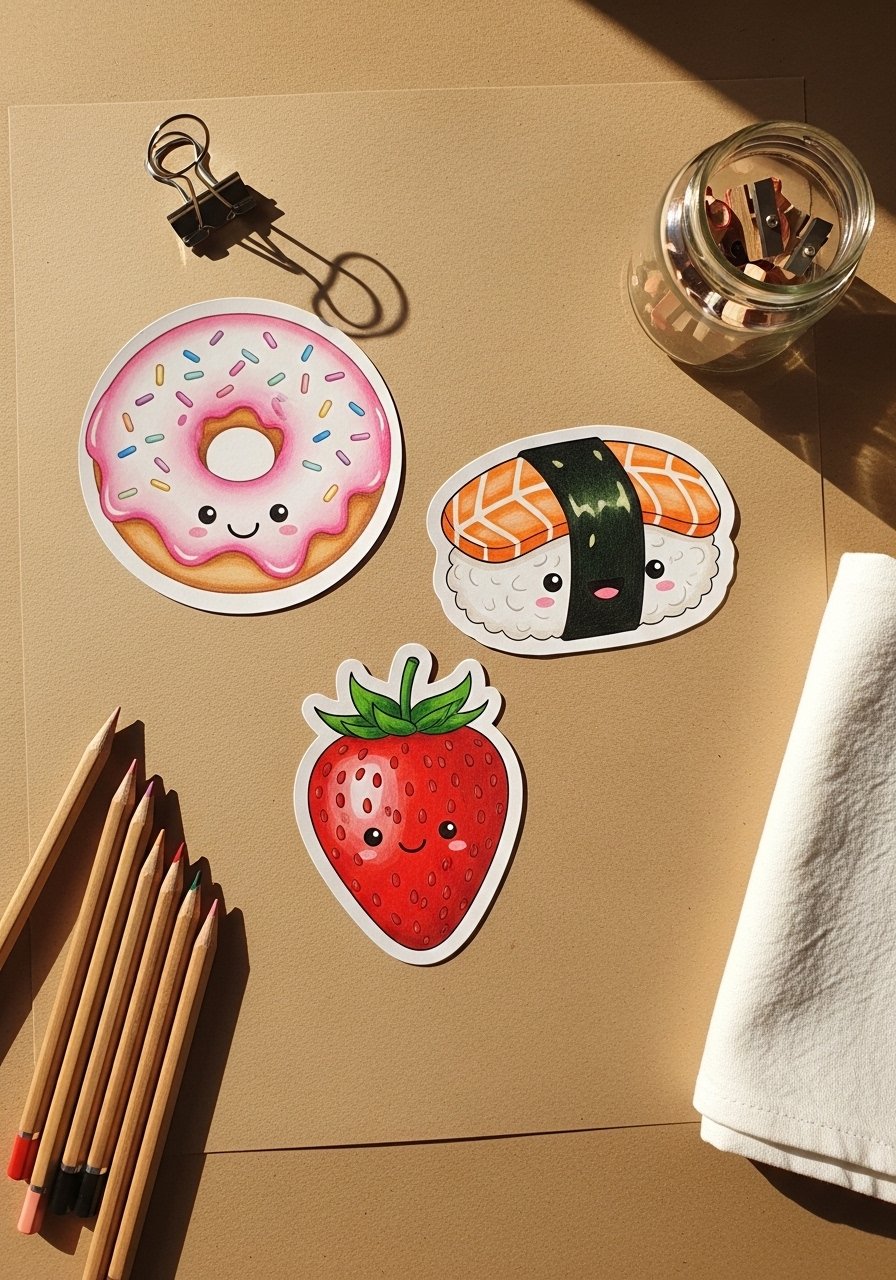
Kawaii food doodles make practice lines addictive. Big shapes, simple faces, and bright colors make these drawings irresistible. Kids love giving each snack a personality, and they’re great for bookmarks or lunchbox notes.
Materials
- Kraft sketchbook, 6 x 8", 30 sheets
- Colored pencil set, 24 colors
- Black gel pen, 0.5 mm
- Pencil and eraser
- White gel pen for highlights
Instructions
- Draw big basic shapes: circle for donut, oval for sushi, heart-like for strawberry.
- Sketch simple faces: two dots and a curved mouth.
- Color each food with flat fills using colored pencils.
- Add shading with a darker pencil along one edge.
- Use white gel pen for glossy highlights on eyes and sprinkles.
- Outline with a light touch using the gel pen for bolder contrast.
How to Display or Gift It
Turn drawings into laminated bookmarks using a home laminator or clear sleeves. For storage, keep finished pages in a portable sketchbook case.
- Sweet Animal Silhouettes with Watercolor Wash

Silhouettes are forgiving and gorgeous when combined with wet-on-wet watercolor washes. The soft bleed creates dreamy backgrounds while the silhouette stays bold. This feels artsy but stays simple for early learners.
Materials
- Cold-press watercolor paper, 9 x 12", 140 lb, 1 sheet per painting
- Pan watercolor set (12 pans)
- Round watercolor brush, #6
- Masking fluid, 20 ml bottle
- Ink pen for silhouette outlines, 0.5 mm
- Cup of water and paper towel
Instructions
- Sketch simple animal silhouette lightly in pencil.
- Apply masking fluid inside the silhouette if you want highlights to remain white. Let dry 15 minutes.
- Wet the background area with clean water using the #6 brush.
- Drop in soft washes of color (one to two colors) and let pigments blend (5–7 minutes).
- Dab edges to soften; allow paper to dry completely (30–45 minutes).
- Remove masking fluid gently with fingers. Outline silhouette with ink pen for crisp edges.
How to Display or Gift It
Mount on a small wooden frame or clip to a clothesline with mini clothespins. Stack finished pieces flat in a portfolio folder to protect them.
- Rainbow Doodle Clouds on Black Cardstock
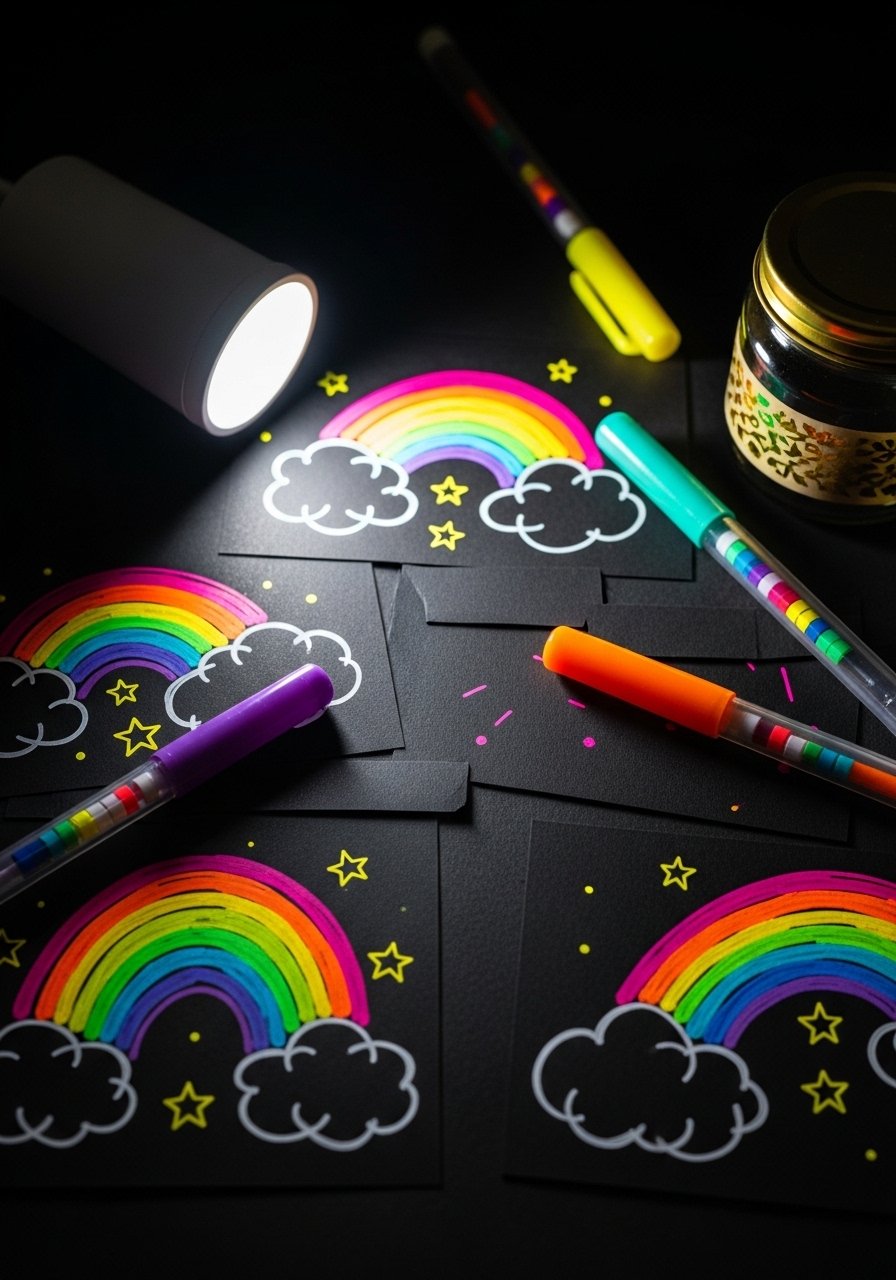
Drawing bright rainbows on black paper makes colors pop. The contrast helps kids see their marks clearly and feel accomplished fast. This activity is ideal for school-age kids practicing pressure control.
Materials
- Black cardstock, 8.5 x 11", 10 sheets
- Neon gel pen set, 10 colors
- Metallic gold pen, 1
- Pencil for planning
- Small ruler (6")
- Eraser
Instructions
- Fold black cardstock in half for symmetry practice or use flat.
- Sketch light cloud shapes with pencil if needed.
- Layer neon arches inside cloud shapes with slow, steady strokes.
- Add tiny stars and dots with metallic gold pen for sparkle.
- Let ink dry 2–5 minutes to avoid smudging.
- Trim edges with a self-healing cutting mat and craft knife if making multiple cards.
How to Display or Gift It
Create a mini constellation set and gift in a clear card sleeve with a kraft backing. Store in a desk organizer drawer to keep inks flat.
- Simple Cartoon Pets with Color Pencils
Cartoon pets are approachable and build confidence. These use bold shapes and color blocking so kids get satisfying results even on their first try. They’re sweet for bedroom walls or pet memorials.
Materials
- Smooth sketch paper, 9 x 12", 20 sheets
- Colored pencil set, 36 colors
- Electric pencil sharpener, compact
- Black fineliner, 0.3 mm
- White eraser
- Reference photos (printed or onscreen)
Instructions
- Lightly sketch the pet’s basic head and body shapes.
- Add oversized eyes and simple features—keep proportions cute (big eyes, small nose).
- Block in base colors with light pressure.
- Layer slightly darker tones for shadow and texture.
- Outline with the black fineliner once color is laid down.
- Sharpen pencils between colors to keep edges clean.
How to Display or Gift It
Frame a favorite portrait on a shelf; use a small wooden easel for rotating displays. Make a set of pet cards to give to family.
- Puffy Paint Puffy Pets (Textured Finger Paint)
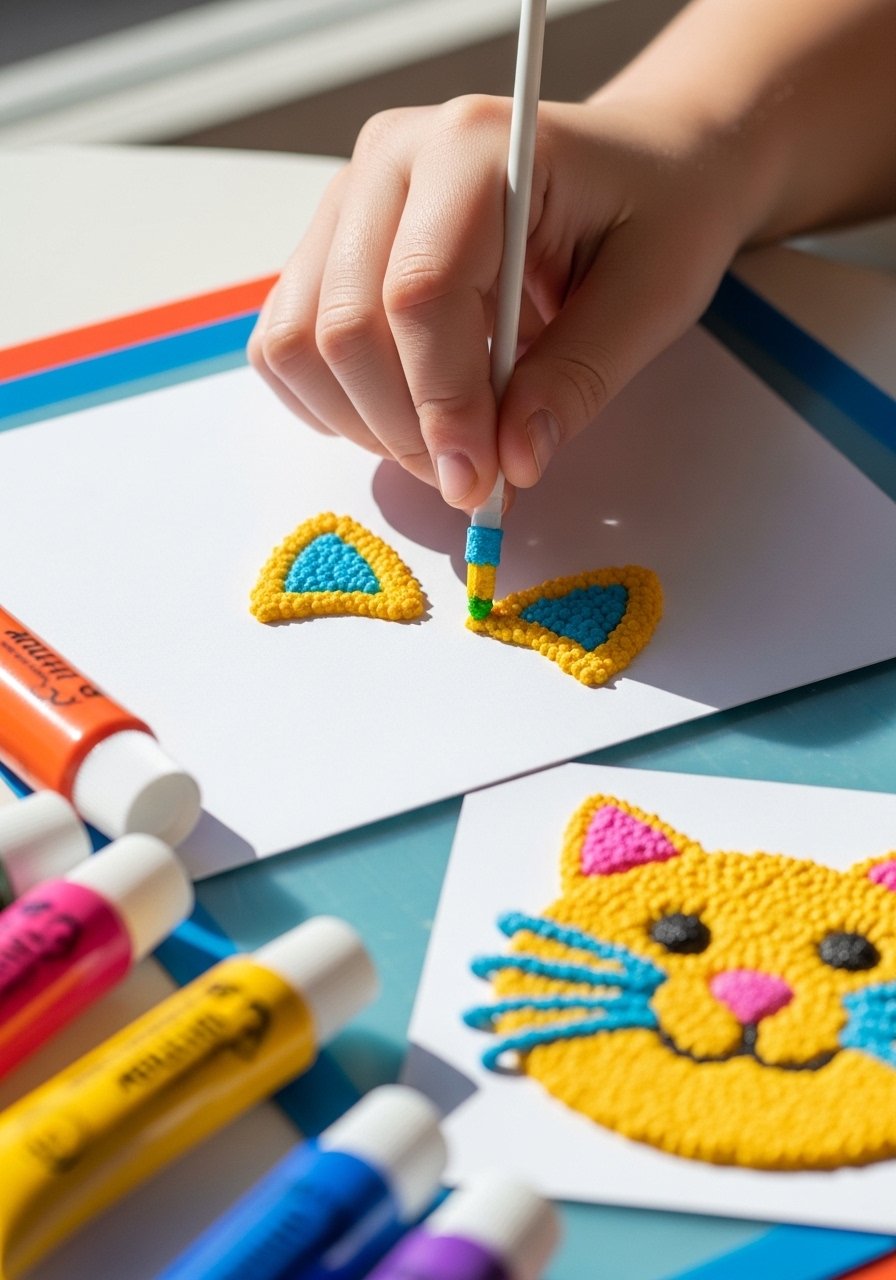
Puffy paint adds delightful texture kids love to touch. Mixing puffy paint with simple drawn faces creates a 3D effect that’s playful and safe for small hands.
Materials
- Puffy paint tubes, assorted colors (6 tubes)
- White cardstock, 110 lb, 8.5 x 11", 4 sheets
- Black marker, 0.5 mm
- Pencil and eraser
- Silicone crafting mat
Instructions
- Lightly sketch pet shapes on cardstock.
- Use puffy paint to fill ears, noses, or fluffy bodies—draw gently from tube.
- Allow each color area to set briefly (5 minutes) before adding adjacent colors to avoid mixing.
- Dry fully for 1–2 hours depending on thickness.
- Add facial details with a black marker once paint is firm to the touch.
- Store puffy paint caps on to prevent drying.
How to Display or Gift It
Mount on a foam-backed mini canvas and tie with baker’s twine for a tactile gift. Keep unfinished pieces flat while drying in a [drying rack] (search link: see tool below) to prevent smudges.
- Easy Sea Creatures in Marker (cute drawing ideas for kids)
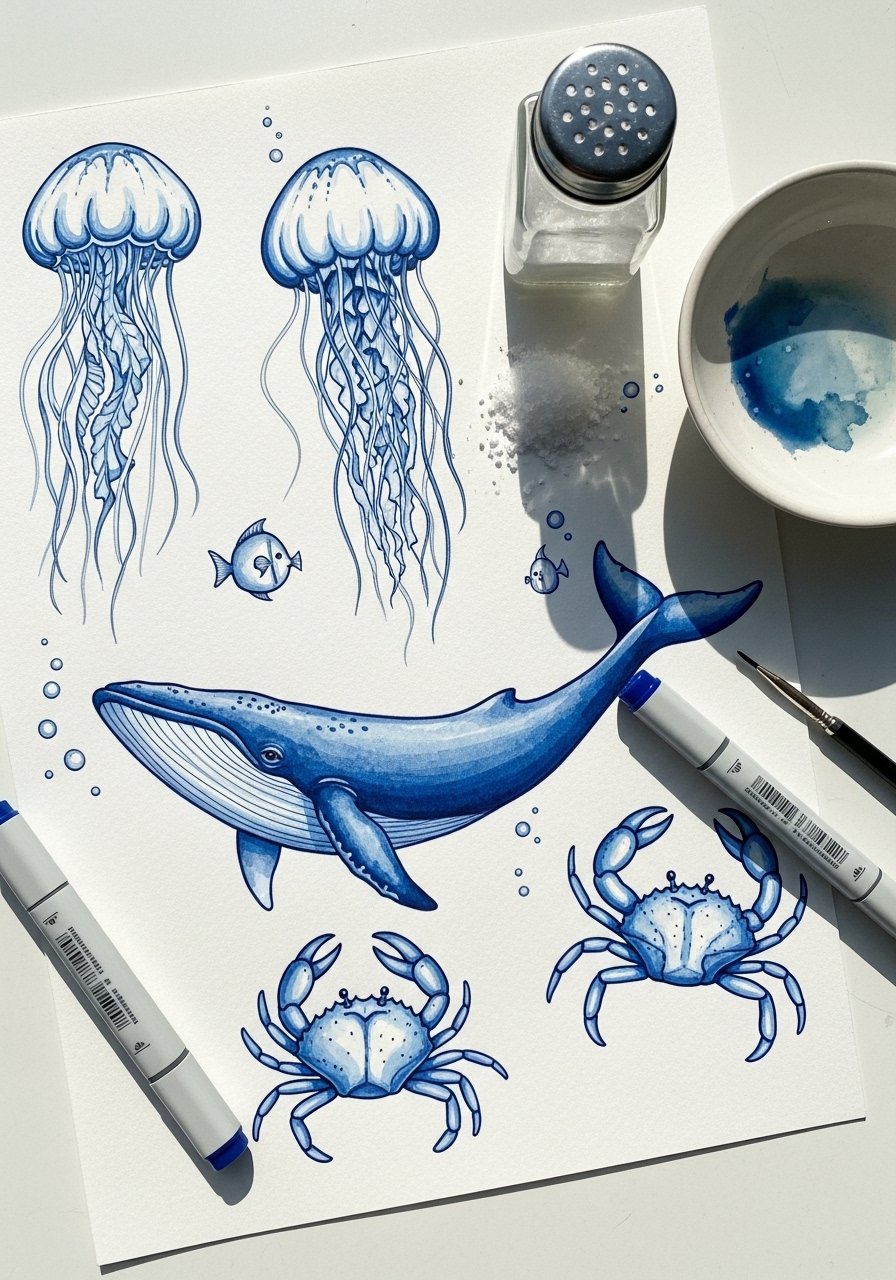
Markers give crisp, saturated color with minimal mess. These sea creature drawings are great for experimenting with blending and simple patterning. They look lively on a bulletin board.
Materials
- Mixed-media paper, 8 x 10", 140 lb, 5 sheets
- Dual-tip marker set, alcohol-based or water-based, 24 colors
- Fine-liner pen, 0.3 mm
- Small brush and water cup for light washes (optional)
- Salt shaker for texture (optional)
Instructions
- Sketch basic sea creature shapes lightly.
- Ink outlines with a fine-liner.
- Fill with marker, layering colors for stripes or spots.
- For watercolor wash effects, add tiny brush washes under inked areas if using water-based markers.
- Sprinkle a little salt on damp wash for texture; remove when dry (10–15 minutes).
- Let fully dry 10 minutes before stacking.
How to Display or Gift It
Create a mini ocean gallery on a bathroom wall or laminate for bath-safe art. For storage, use a flat artist portfolio or plastic sleeves.
- Doodle Monsters with Collage Eyes
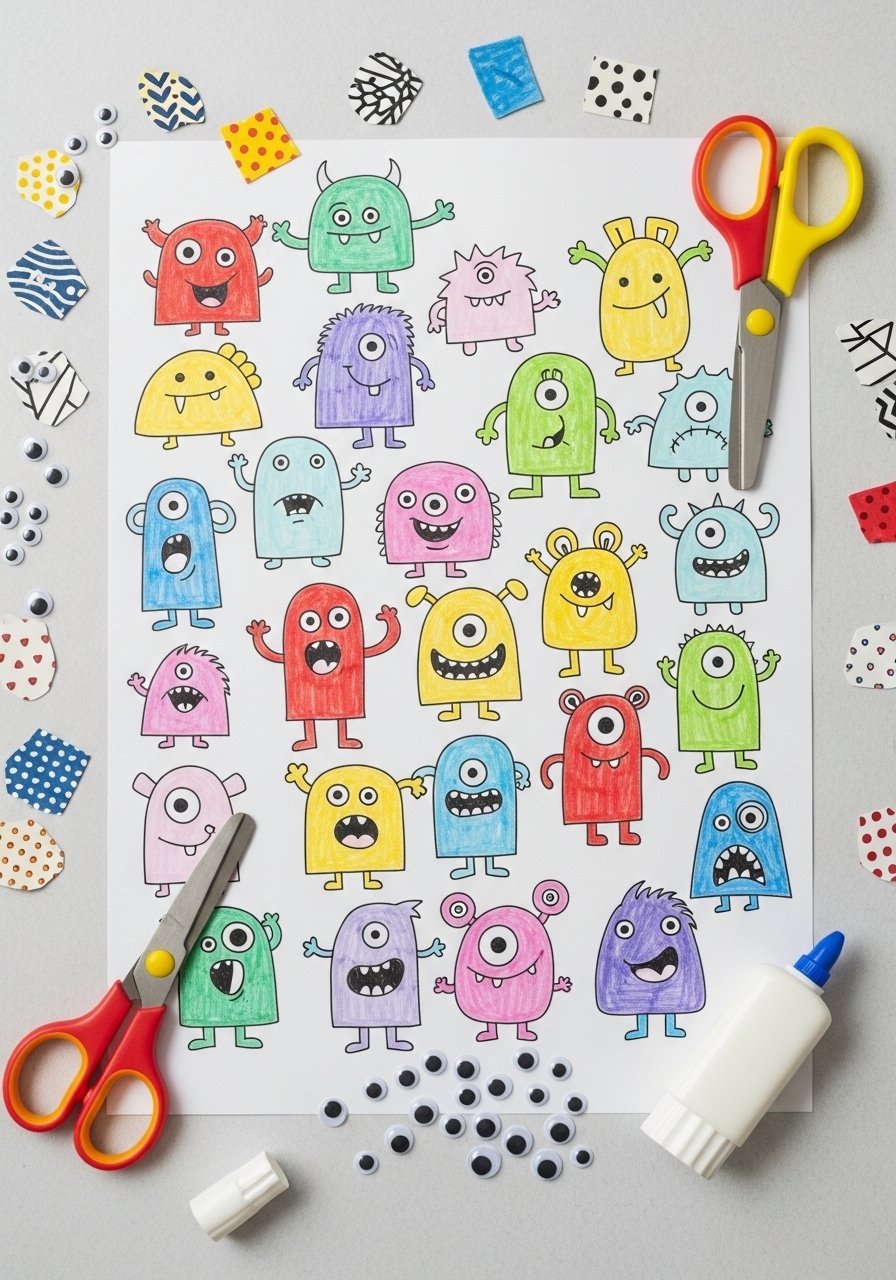
Monsters are forgiving—wild teeth and mismatched eyes make each one unique. Adding collage eyes teaches mixed-media layering and scissors skills.
Materials
- White drawing paper, 9 x 12", 10 sheets
- Patterned scrap paper, assorted, 10 small squares
- Googly eye pack, assorted sizes (12 pieces)
- Glue stick, solid
- Child-safe scissors
Instructions
- Draw monster body shapes with large, simple outlines.
- Cut patterned paper into small shapes for eyes, spikes, or scales.
- Glue paper pieces onto your sketch to create texture.
- Stick on googly eyes with glue.
- Add mouth, teeth, and details with markers.
- Allow glue to set 15 minutes before stacking.
How to Display or Gift It
Hole-punch and string several monsters into a mobile for a bedroom. Store extra collage paper in a small craft bin for future sessions.
- Crayon-Resist Starry Night
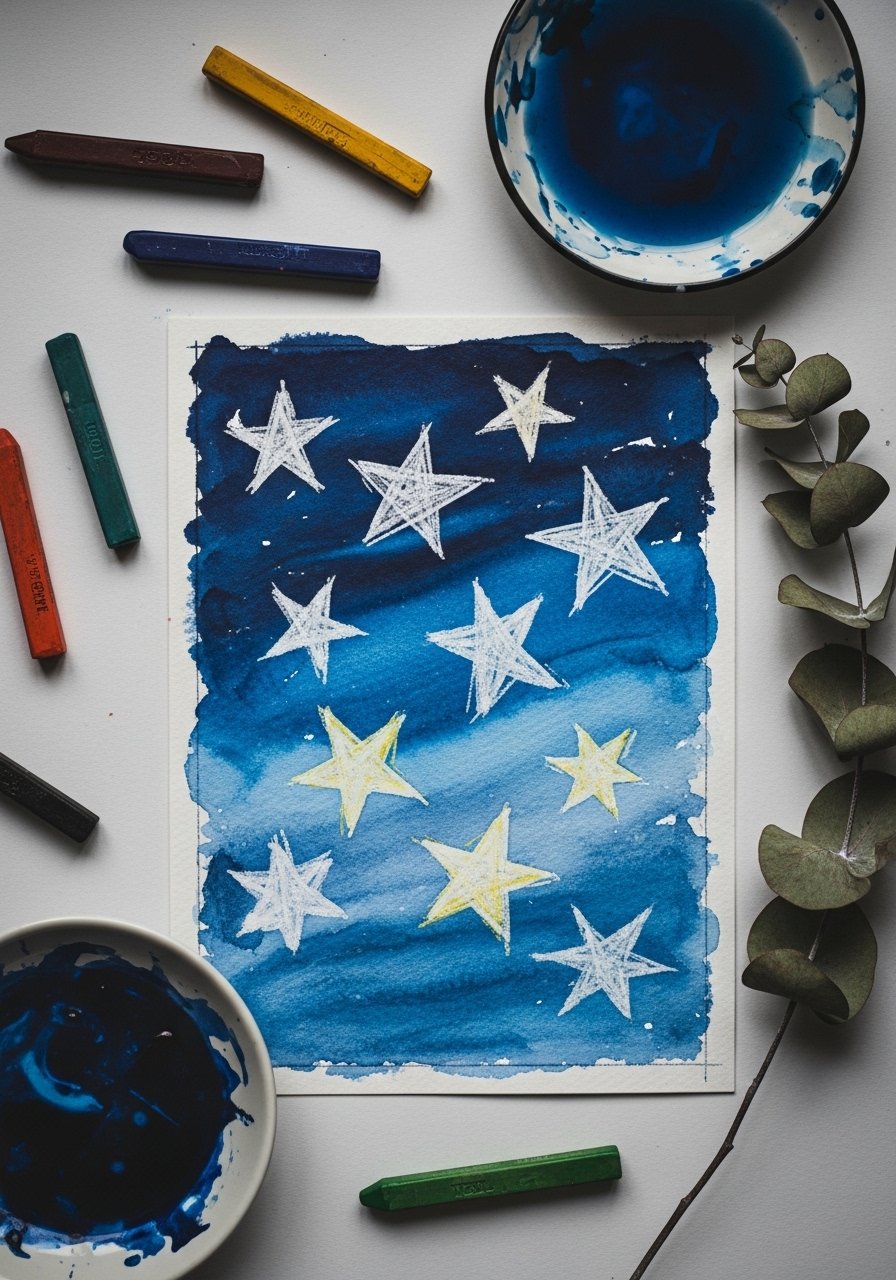
Crayon-resist uses wax’s water-repelling quality to create luminous stars against rich watercolor skies. This teaches layering and patient drying.
Materials
- Watercolor paper, 9 x 12", 140 lb, 1 sheet
- White wax crayon, 1
- Watercolor set with deep blues
- Round brush, #8
- Spray bottle for splatter effect (optional)
Instructions
- Draw stars and simple moon shapes with the white wax crayon lightly.
- Wet the paper and paint a deep blue wash over the surface.
- Let watercolor pool and blend for 5–10 minutes.
- Blot excess water and add darker layers for depth. Dry 30–45 minutes.
- Add white paint splatters for distance stars with an old toothbrush, then dry.
How to Display or Gift It
Frame in a black frame for instant contrast. For storage, keep flat between sheets in a portfolio.
- Alphabet Animals (A–Z Simple Drawings)
Combine learning and drawing by making one animal per letter. The repetition builds confidence and letter recognition through art.
Materials
- Letter workbook or large sketch pad, 11 x 14"
- Washable marker set, fine and broad tips, 24 colors
- Pencil and eraser
- Ruler (for grid)
- Sticker sheet for rewards
Instructions
- Divide paper into a 4×7 grid for 28 squares, 1 per letter.
- Sketch a simple animal that starts with each letter (A-ant, B-bear).
- Trace with marker and color.
- Keep designs simple: single color blocks with a face.
- Let dry 5 minutes between inked sections to avoid smears.
- Add initials or small word labels beneath each animal.
How to Display or Gift It
Bind sheets into a homemade alphabet book and keep inside a bedside storage box. Use a ring binder and plastic covers for durability.
- Sunny Stick Figure Story Scenes
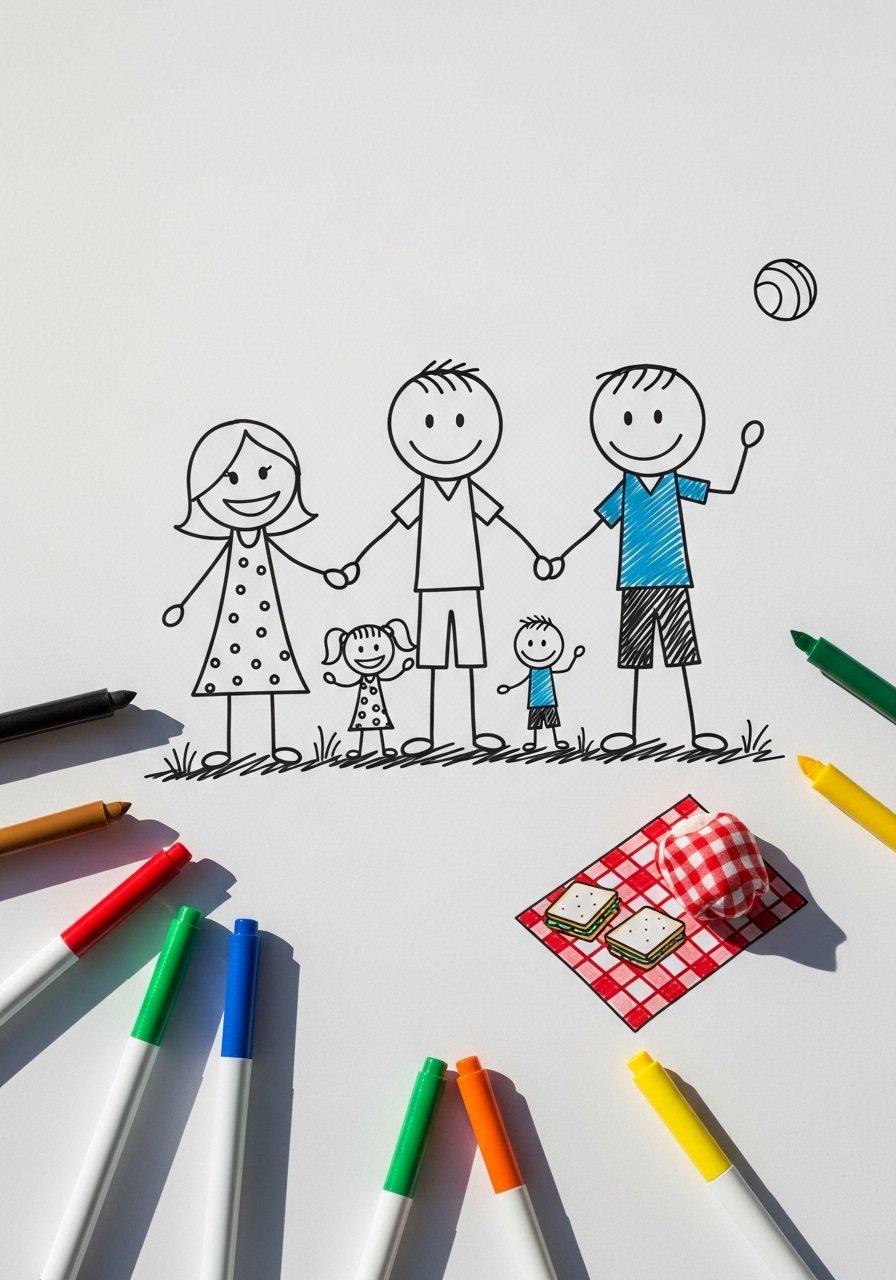
Stick figures are ideal for story-telling. Kids can focus on action, not anatomy, which makes this project great for narrative skills.
Materials
- Poster paper, 22 x 28", 1 sheet
- Jumbo marker pack, 8 colors
- Fine black pen for details
- Pencil for layouts
- Sticky notes for planning scenes
Instructions
- Sketch the scene layout with pencil and sticky-note speech bubbles.
- Draw stick figures in action poses.
- Use marker colors to fill clothing, sun, and props.
- Add captions in sticky-note bubbles and transfer to paper with a fine pen.
- Let dry 5–10 minutes.
- Trim or fold edges to fit display area.
How to Display or Gift It
Hang on a playroom wall or roll into a poster tube for gifting. Roll gently and store in a poster tube.
- Miniature Portrait Magnets
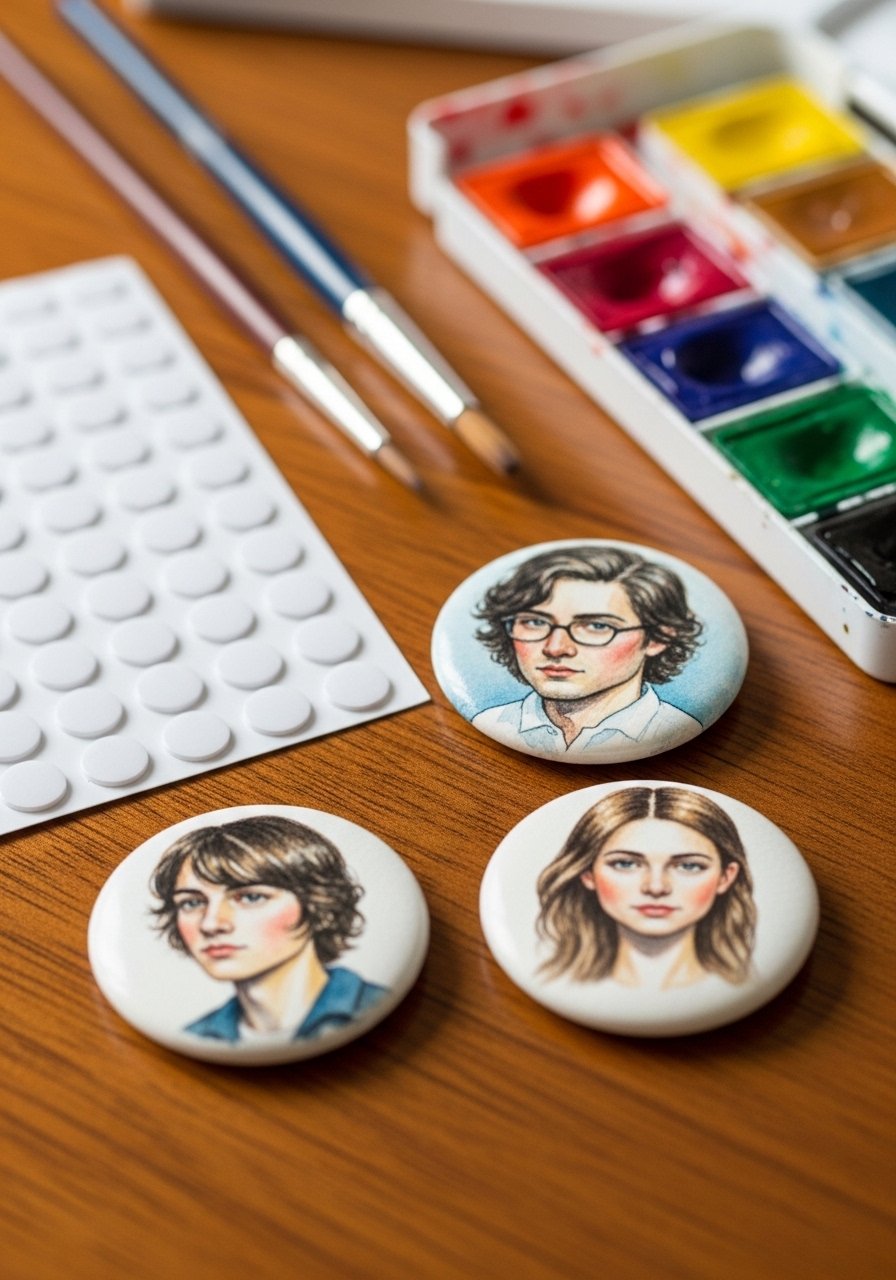
Make fridge art with tiny portraits—these are perfect for quick gift sets and are great for practice with proportions on a small scale.
Materials
- Watercolor paper scraps, 2 x 2", 12 pieces
- Small acrylic paint set, travel size
- Round paintbrush, #2
- Self-adhesive magnet dots, 12
- Fine black pen, 0.3 mm
Instructions
- Sketch tiny head shapes and simple facial features.
- Paint flat skin tones and hair blocks, keeping layers thin.
- Add small dots for eyes and minimal shading.
- Let paint dry 20 minutes between layers.
- Glue magnet dots to the back and press firmly.
How to Display or Gift It
Group in sets of three inside a small kraft box with tissue paper. Keep extras in a small divided organizer.
- Playful Patterned Birds (cute drawing ideas for kids)
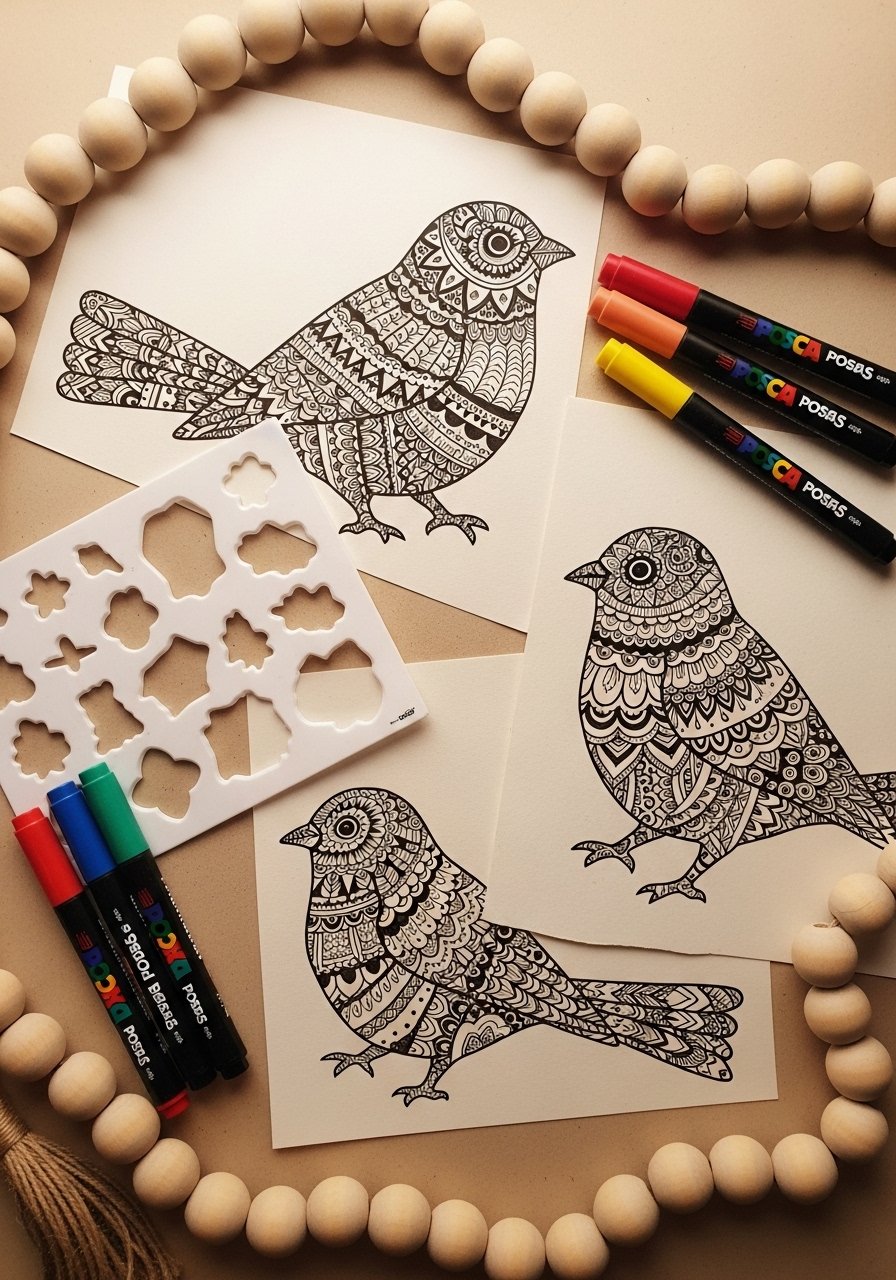
Patterned birds combine simple shapes with repetitive motifs (dots, stripes) for calming, rewarded practice. They’re trendy with cottagecore and boho nursery decor.
Materials
- Mixed-media paper, 8 x 10", 140 lb, 3 sheets
- Posca paint pens or opaque paint markers, set of 8
- Pencil and eraser
- Small circle stencils for dots
- White gel pen for accents
Instructions
- Sketch bird body shapes laid out horizontally.
- Plan patterns: stripes on wings, dots on belly.
- Fill patterns with paint pens, using stencils for perfect circles.
- Outline shapes with a fine black pen.
- Add white highlights and let paint set 10–15 minutes.
- Trim or mat for display.
How to Display or Gift It
Make a trio and frame them in thin floating frames. Store supplies in a marker case.
- Garden Gnomes with Felt Accents
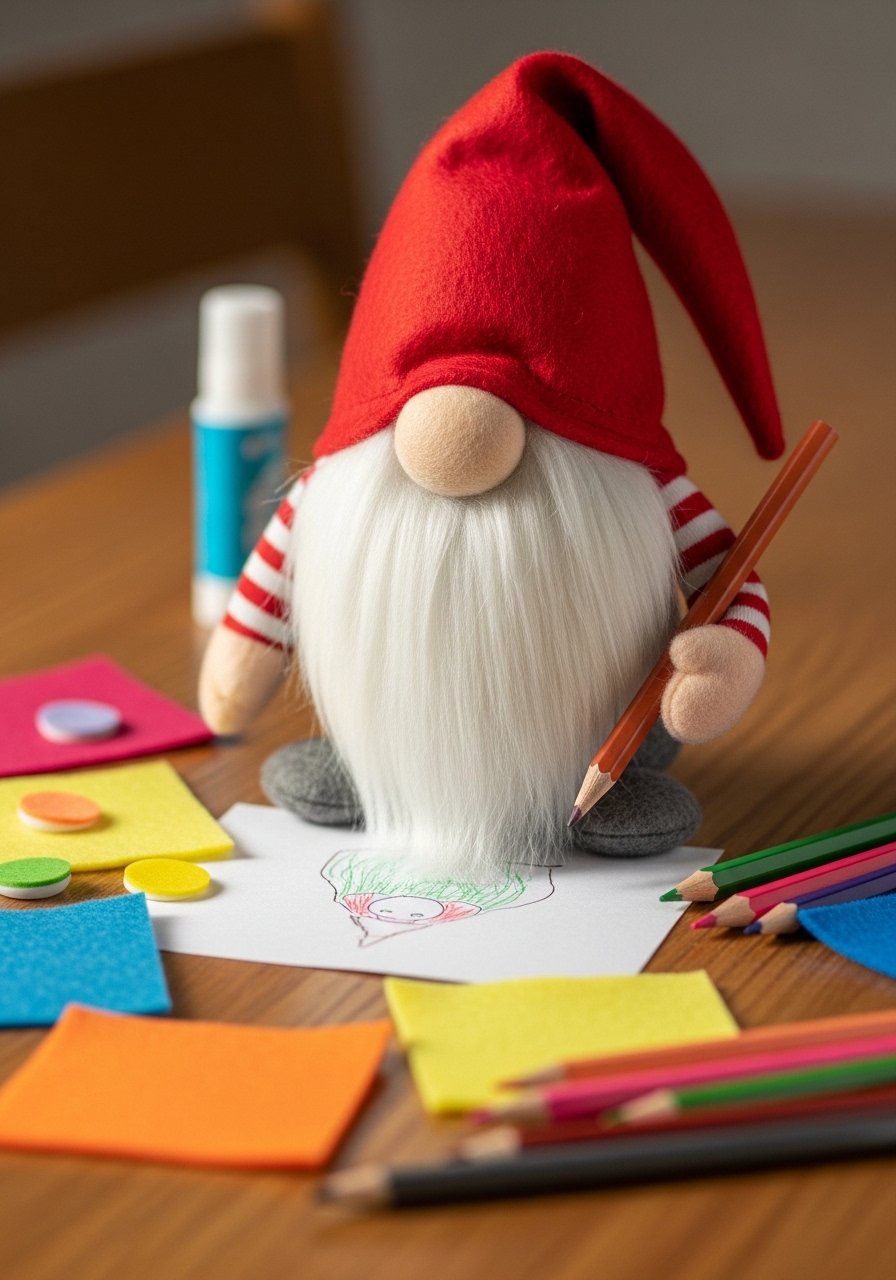
Combining drawing with felt gives tactile interest. Kids can practice drawing simple shapes and then add soft embellishments.
Materials
- White cardstock, 8.5 x 11", 4 sheets
- Small felt sheet pack, assorted colors (8 sheets)
- Glue dots or fabric glue, small pack
- Colored pencils and fine-liner
- Scissors
Instructions
- Draw a large gnome shape—tall hat, round body.
- Cut felt beard and hat trim pieces from felt sheets.
- Color parts of the gnome with pencils.
- Attach felt pieces with glue dots and press 10 seconds.
- Add facial details with a fine-liner.
- Let glue cure 30 minutes if using fabric glue.
How to Display or Gift It
Attach to a magnet for a fridge decoration or tuck into a handmade greeting card. Store extra felt in a sealed craft bag.
- Chalk Pastel Sunset Animals
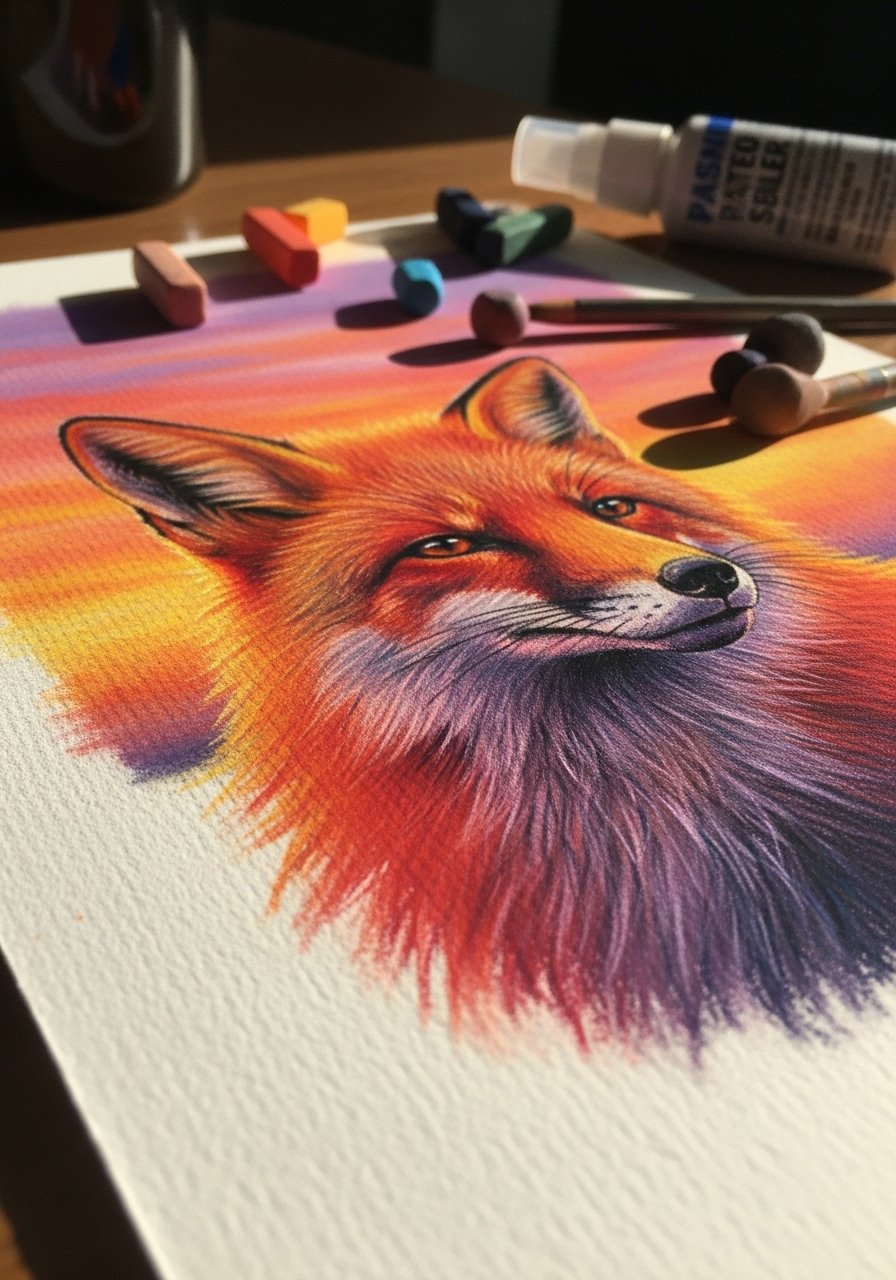
Chalk pastels blend beautifully for soft gradients. Use a pastel sealer for permanence. The tactile blending feels lovely in kids’ hands and teaches layering.
Materials
- Textured pastel paper, 9 x 12", 5 sheets
- Soft chalk pastel set, 24 sticks
- Blending stumps or cotton swabs
- Pastel sealer spray, small can
- Fixative-safe workspace (newspaper)
Instructions
- Sketch the animal silhouette lightly.
- Lay down base color blocks for sky and animal with pastels.
- Blend with stumps for smooth gradients.
- Add darker lines for definition and fur texture.
- Spray lightly with pastel sealer at 12 inches distance; dry 10 minutes.
- Store flat to avoid smudging.
How to Display or Gift It
Frame under glass to protect the pastels. Keep works flat in a portfolio case.
- Happy Houses with Simple Perspective
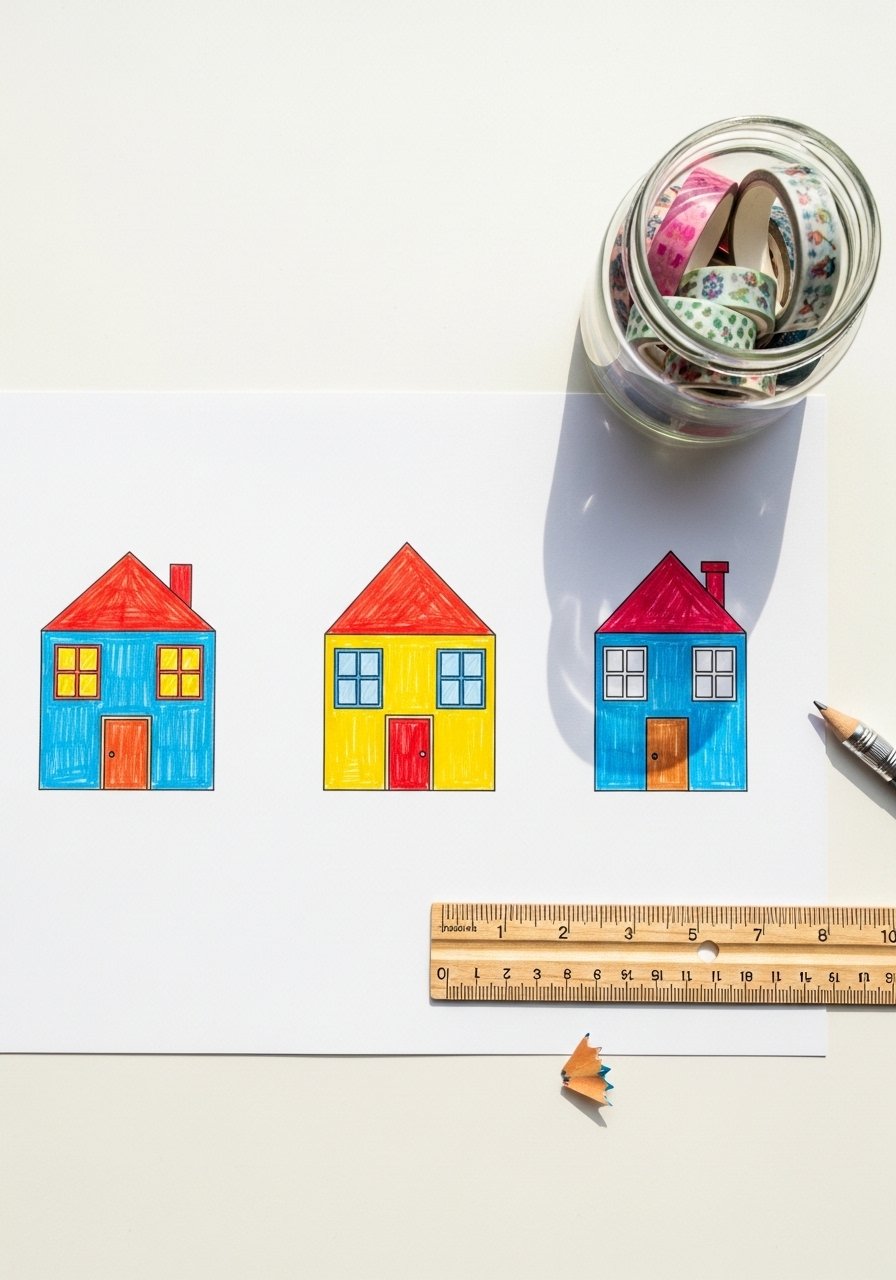
Kids enjoy building little neighborhoods. This project introduces basic perspective—houses in a row, simple rooftops, and doors—while staying cute and colorful.
Materials
- Bristol smooth paper, 11 x 14", 1 sheet
- Mechanical pencil and eraser
- Ruler (12")
- Acrylic paint set (small), 6 colors
- Flat foam brush for painting
Instructions
- Draw a horizon line and place simple house boxes on it.
- Use the ruler to keep roofs and walls angled simply.
- Paint flat color blocks on each house and add patterns.
- Let paint dry 15–20 minutes between coats.
- Outline windows and doors with a black pen.
- Add tiny garden details and let fully dry before stacking.
How to Display or Gift It
Create a neighborhood card set and tie with washi tape. Store extras in a flat file box.
- Magic Mirror Doodles (draw on mirror with markers)

Using washable markers on mirrors is playful and temporary—great for practicing drawing faces and symmetric doodles without wasting paper.
Materials
- Small round tabletop mirror, 6" diameter
- Washable dry-erase marker set, 6 colors
- Microfiber cloth for wiping
- Ruler or tape to mark center line
Instructions
- Clean mirror and mark center lightly with a removable sticker.
- Draw symmetrical doodles or faces using the marker.
- Practice erasing with the microfiber cloth and redraw.
- Encourage mirror tracing for self-portraits.
- Wash the mirror with soapy water after session for deep clean.
- Let markers air dry 1 minute if you want smudge-free display.
How to Display or Gift It
Wrap decorated mirror in kraft paper for gifting. Keep spare markers in a small zipper pouch.
- Puffy Cloud Collage with Cotton and Pastel
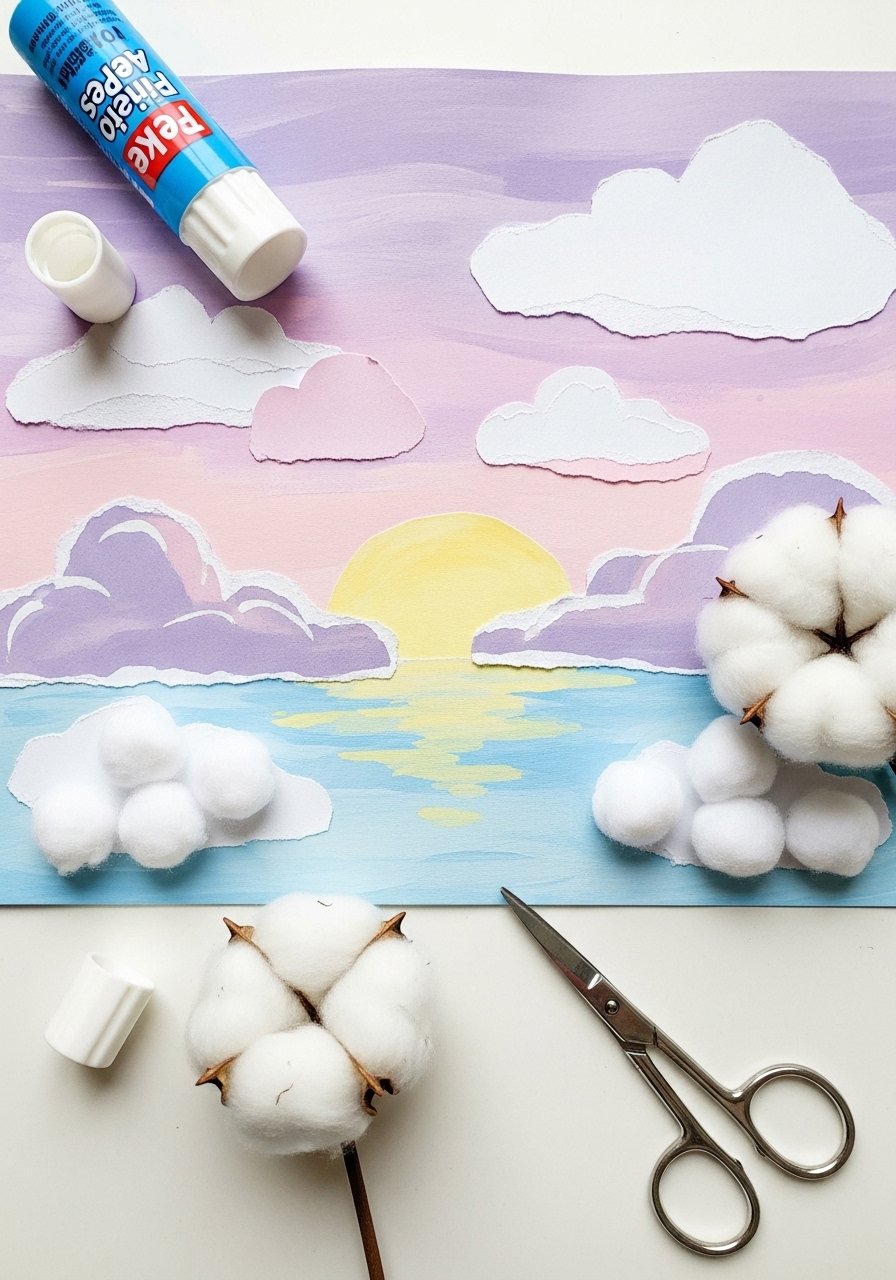
This collage uses mixed textures for sensory play. Torn edges and cotton make the clouds float off the page, teaching layering and composition.
Materials
- Light blue construction paper, 9 x 12", 2 sheets
- Cotton balls, 20
- Glue stick, 1
- Soft pastel stick, 3 colors (blue, pink, lavender)
- Scissors
Instructions
- Lightly sketch cloud placement.
- Tear small paper strips for depth.
- Glue torn paper base for clouds and press cotton balls on top.
- Add pastel shading around clouds and blend with finger.
- Seal cotton lightly with a few glue dots to secure.
- Let glue set 30 minutes before handling.
How to Display or Gift It
Frame under a shallow shadowbox or gift in a flat box packed with tissue. Store extras in a shallow craft tray.
- Monster Handprints Canvas
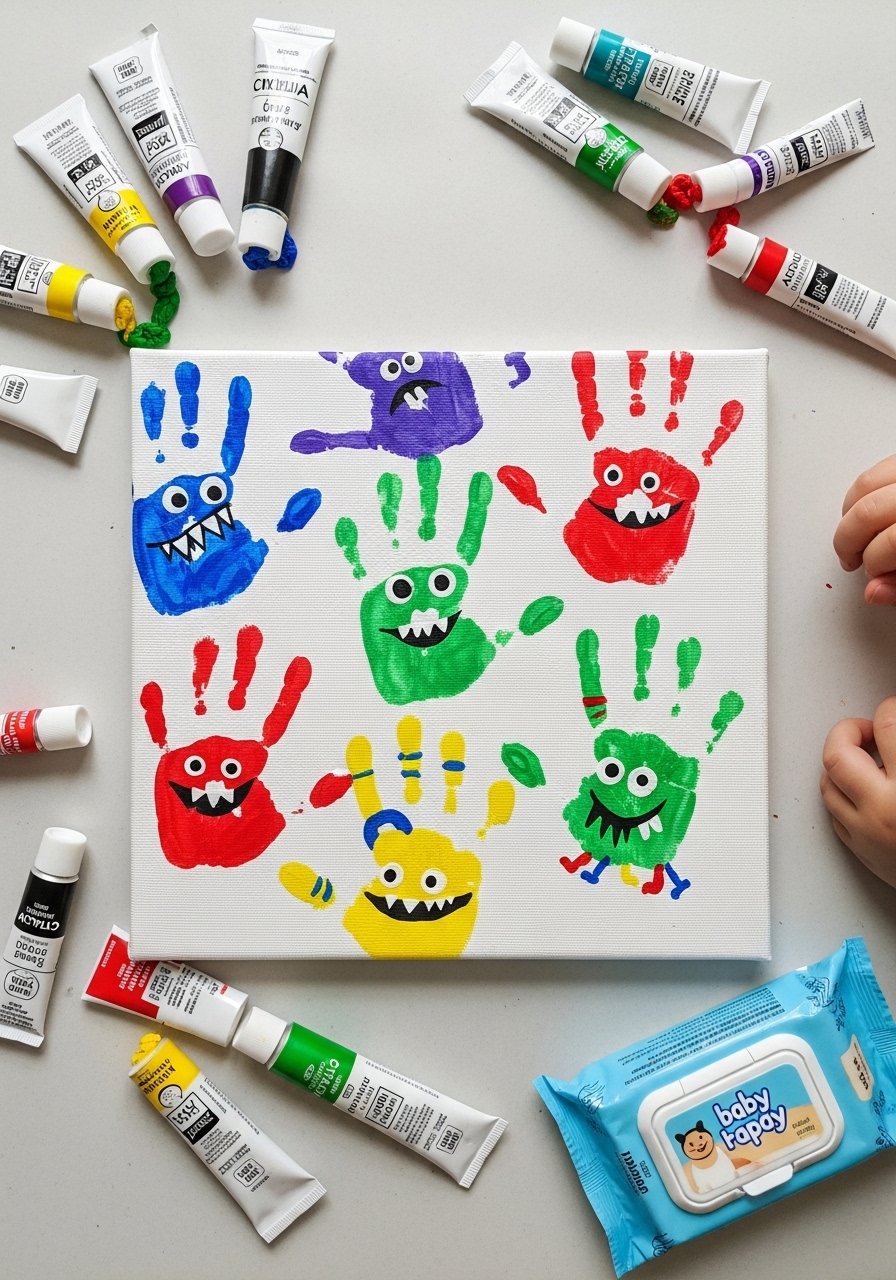
Handprint monsters combine painting and drawing—chaotic, joyful, and great for memory keepsakes. Acrylics dry quickly on canvas panels.
Materials
- Small artist canvas panels, 5 x 7", 4 pieces
- Washable acrylic paint set, 6 colors
- Fine black paint pen
- Disposable plate for paint mixing
- Baby wipes for cleanup
Instructions
- Paint child’s palm with one acrylic color and press firmly onto canvas.
- Let handprint dry 10–15 minutes.
- Use black paint pen to add monster faces, teeth, and limbs.
- Add small embellishments like dots for texture.
- Seal with a thin coat of matte Mod Podge if desired; dry 15–20 minutes.
- Clean hands promptly with baby wipes.
How to Display or Gift It
Arrange canvases in a grid on a hallway wall or gift as a set to grandparents. Store unused panels flat in a canvas storage case.
- Storybook Character Sketches
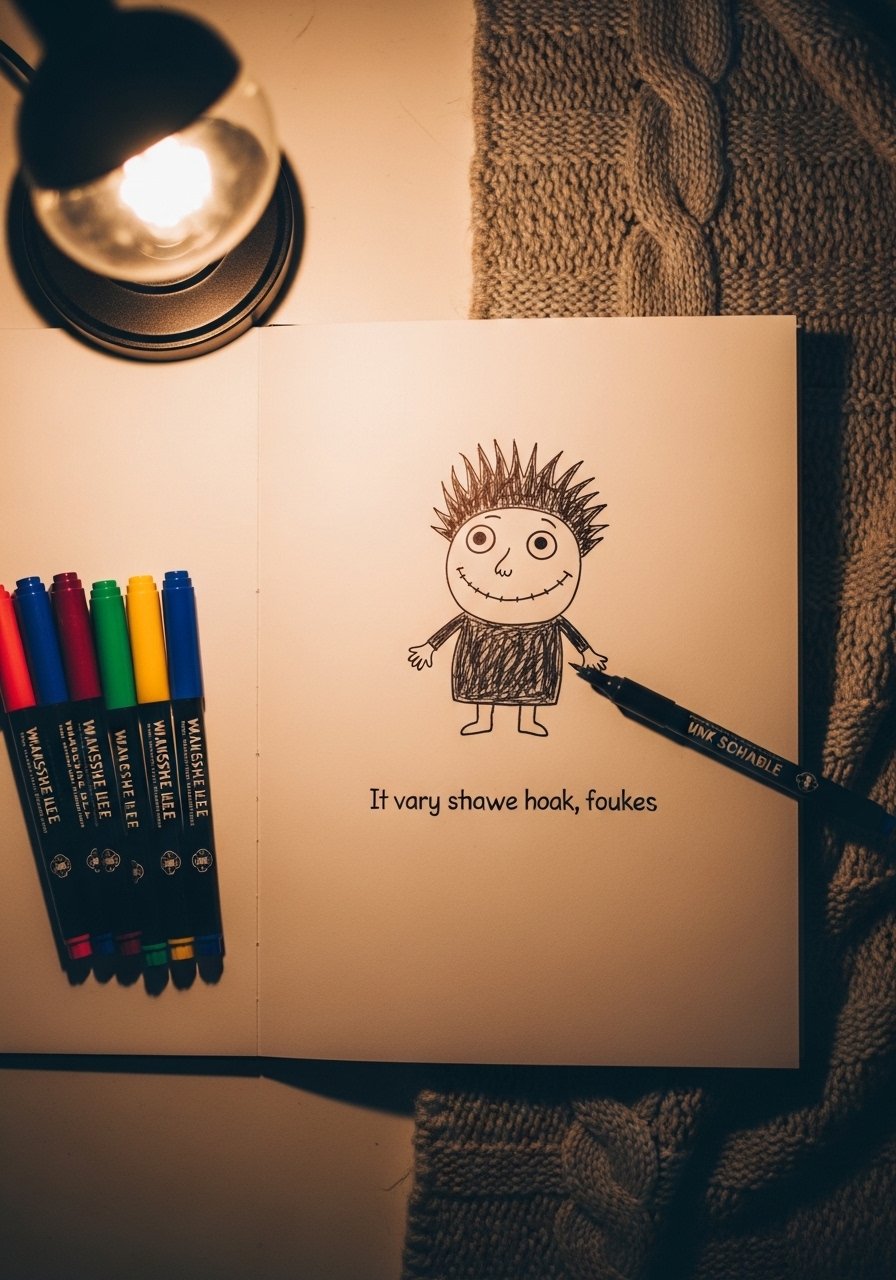
Create characters and write a tiny caption to spark literacy and drawing together. These encourage imagination and basic sequential storytelling.
Materials
- Lined sketch journal, 6 x 8", 50 pages
- Black ink pen set, assorted nibs
- Colored pencils, 12 basic colors
- Pencil and eraser
- Stickers for page decoration
Instructions
- Sketch a character and write a one-sentence story beneath.
- Ink outlines and wait 2–3 minutes for ink to dry.
- Color lightly with pencils, keeping shading minimal.
- Add decorative borders with stickers or small stamps.
- Repeat to build a small book of characters.
- Store the journal in a dry spot.
How to Display or Gift It
Bind several pages into a handmade tiny book and give as a bedtime story. Keep journals in a desk organizer tray.
- Tiny Felt Eyes Doodle Faces on Buttons
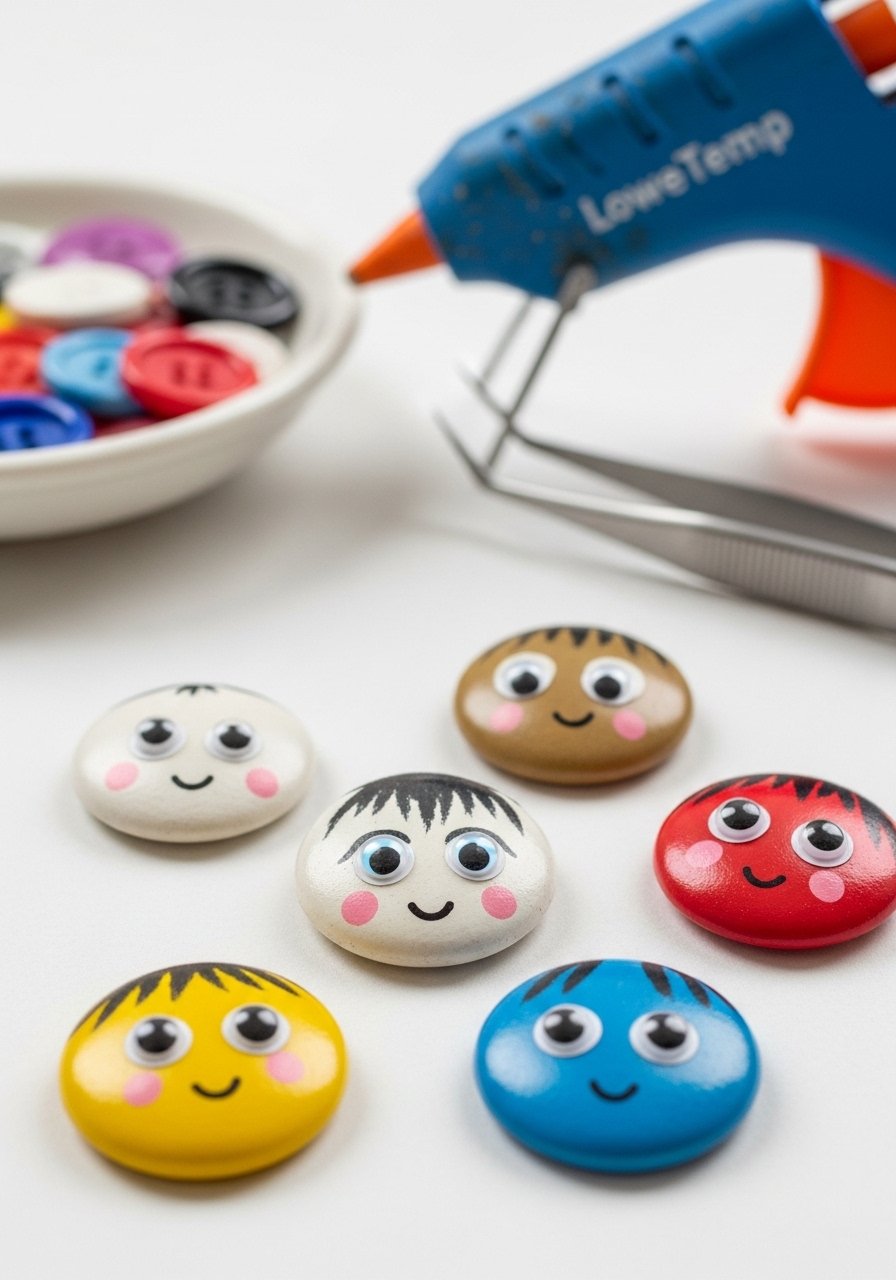
Combine drawing and simple sewing with button faces and felt eyes. Kids practice detail work and get a satisfying tiny finished piece.
Materials
- Large wooden buttons, 20, 1" diameter
- Acrylic paint set (small pots)
- Small felt scraps, assorted
- Low-temp hot glue gun and thin sticks
- Tweezers for placement
Instructions
- Paint button bases with acrylic and let dry 20 minutes.
- Cut small felt eye shapes with scissors.
- Use the low-temp glue gun (adult use) to attach felt and small details.
- Draw mouths and features with a fine paint pen.
- Let glue cool 5 minutes before handling.
- Store in a small divided box.
How to Display or Gift It
Sew onto a fabric pouch or mount on a tiny magnet for a fridge collection. Store buttons in a small parts organizer box.
- Seasonal Window Clings with Sharpie and Laminator
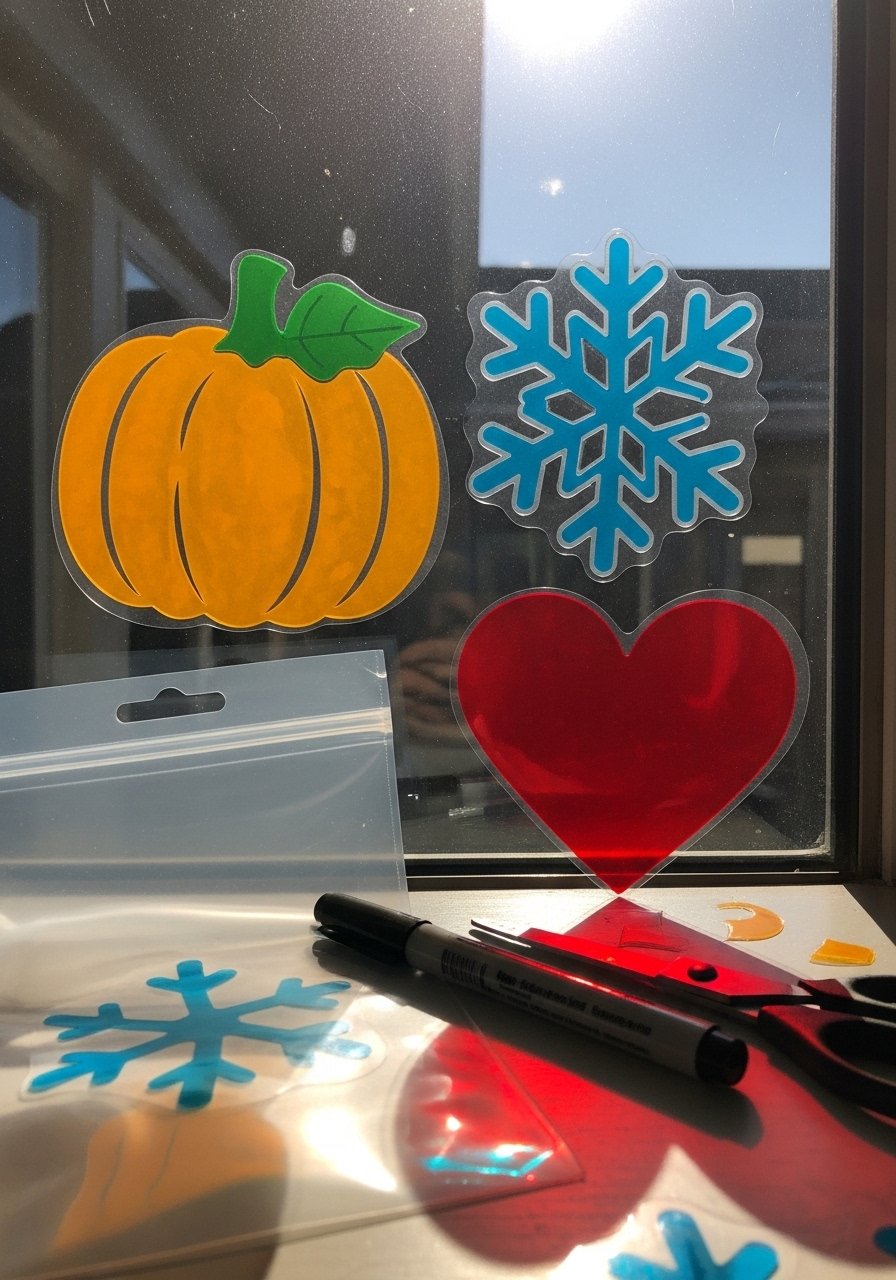
Make temporary window art by drawing on lamination pouches and cutting shapes. Stick to glass surfaces and peel off for new seasons.
Materials
- Laminator pouches, small size, 10 pouches
- Permanent marker set, fine-tip, 8 colors
- Scissors
- Ruler for straight edges
- Optional suction hooks for hanging
Instructions
- Draw designs on the inside of a lamination pouch with permanent markers.
- Place pouch in laminator per machine instructions and run through slowly.
- Trim shapes with scissors, leaving a thin sealed edge.
- Press onto glass; the cling will hold without adhesive.
- To remove, peel gently and store flat between clean paper.
- Store in a cool place away from direct sun to prevent fading.
How to Display or Gift It
Make a seasonal set and package in a clear bag with a ribbon for gifting. Keep unused pouches and finished clings in a plastic sleeve binder.
Thanks for creating through the whole list—what a bundle of charm! These 22 cute drawing ideas for kids cover finger painting, collage, markers, pastels, and even simple mixed media so every child can find a favorite. Try keeping a small stash of versatile supplies like a reliable low-temp hot glue gun and a set of washable markers—they’ll make setup and cleanup smoother across projects. Which project are you pinning first to try with your little maker? Share your photos and pass these along to friends who need easy, colorful activities.


